
For my final project, I have decided to create a dynamic Moon lamp that replicates the phases of the Moon in real time. This Moon lamp has been designed to match the real time phases of the Moon, and fit within the Lunarpunk aesthetic. The Lunarpunk aesthetic was a very important and heavy consideration that I made while designing this project. Before we get into the design of the project, lets first dive into a description of the Lunarpunk aesthetic.
Lunarpunk is described as the nocturnal version of Solarpunk. It usually features dark colors, purples, and blues. It still embraces naturalism and futurism but in a more fantastical way, with flowing curves and fungi instead of trees and grass.
The photo is a great representation of the Lunarpunk aesthetic. It depicts a futuristic city with a dark and fantastical twist. Lunarpunk is a relatively new and unexplored aesthetic, giving me more freedom to interpret it in my project.
Going into this project, I knew that there would be quite a few specifications that I would need to follow in order to achieve the Lunarpunk aesthetic that I am going for, as well as still allow the project to be functional. In order to make sure I achieve these goals, I have listed 5 specifications that this project will need. I ran into these specifications while brainstorming the design of this Moon Diorama. Two of them specific to the aesthetic, and three of them specific to the functionality of the project.
Aesthetic Specifications:
- The wooden base must be painted with dark blue/purple colors. It should also be decorated with Lunarpunk-esque images such as stars, planets, etc.
- The acrylic globe in the center must be painted to match the surface of the Moon with grays and possibly purples/yellows.
Functional Specifications:
- The light bulb needs to be able to rotate at a rate that allows it to match with the Moon’s phases. I have done the calculations on this in a previous post. Here is a quick reminder on what these are:
(360 degrees per cycle)/(29.5 days per cycle) = 12.2 degrees per day
12.2 degrees per day / 1.8 degrees per step = 6.77 steps per day = one step every 3.5 hours
- Next, the globe will need to be large enough to store the light bulb, the bulb fixture, and the stepper motor. There will also need to be a way to feed wires out of it in a way that they don’t interfere with the aesthetic of the project.
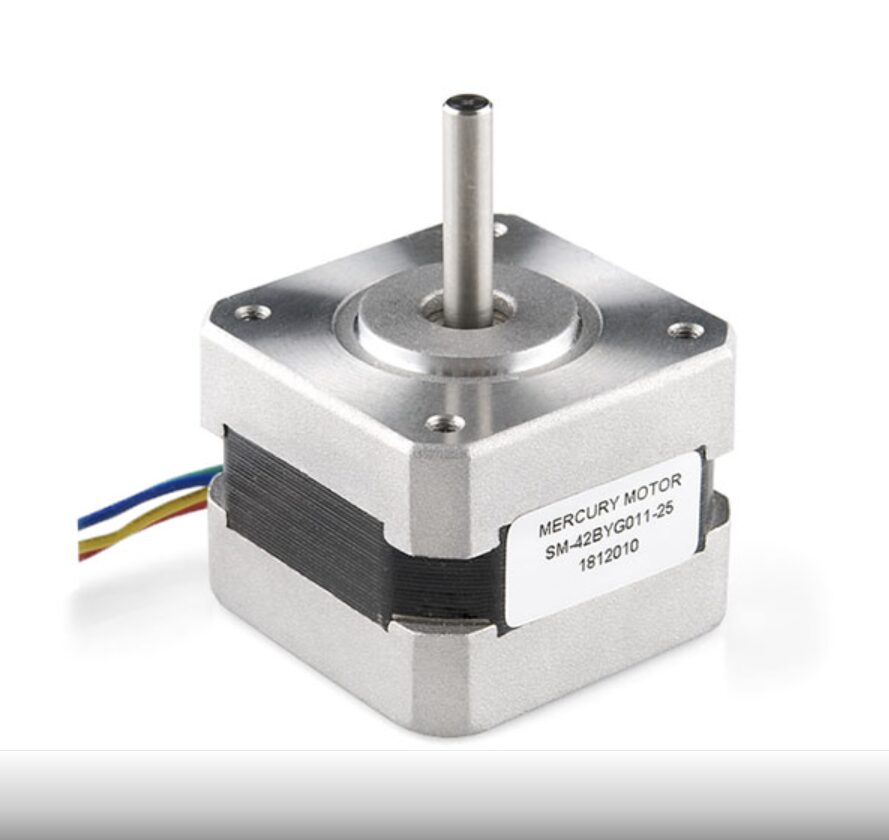 Stepper Motor
 - Finally, the Moon Diorama will need to have an electronics case that will store the Arduino, breadboard, and the motor driver. It is very important that these electronics are away from the board, and are placed in a location where they will not interfere with the aesthetic of the project. The electronics box will be made out of acrylic so that I can see inside to make sure everything is working properly.
 Sparkfun Easy Driver
Due to the nature of this project, there are quite a few constraints that I will run into.
- Power consumption of the stepper motor:
- The stepper motor consumes a large amount of power, and even if I only run one step every 3.5, it will be consuming the same amount of power this entire time. One way to avoid this could be through the software, creating some kind of timed shut off, but this is likely something I won’t be able to implement before expo.
- Size of the electronics box:
- All of the electronics combined are very bulky, and interfere with the aesthetic of the project. I will need to find a way to hide the electronics box so that this doesn’t happen.
- Size of the acrylic globe
- The globe will need to fit a stepper motor, and a lightbulb inside of it, while sitting at the center of the globe.
- Moon diorama phases falling behind whenever it’s turned off
- In order to keep up with the Moon’s actual phases, the stepper motor will need to run on a very specific schedule. Every time it’s turned off, it will fall behind. I can fix this by adding a way to speed up the stepper motor to match with the.
- Performance capabilities of the stepper motor.
- Unfortunately, the stepper motors that are within my budget can not turn as slow as I need them to. The smallest stepper angle that I can achieve with the motor I have purchased is 1.8 degrees.
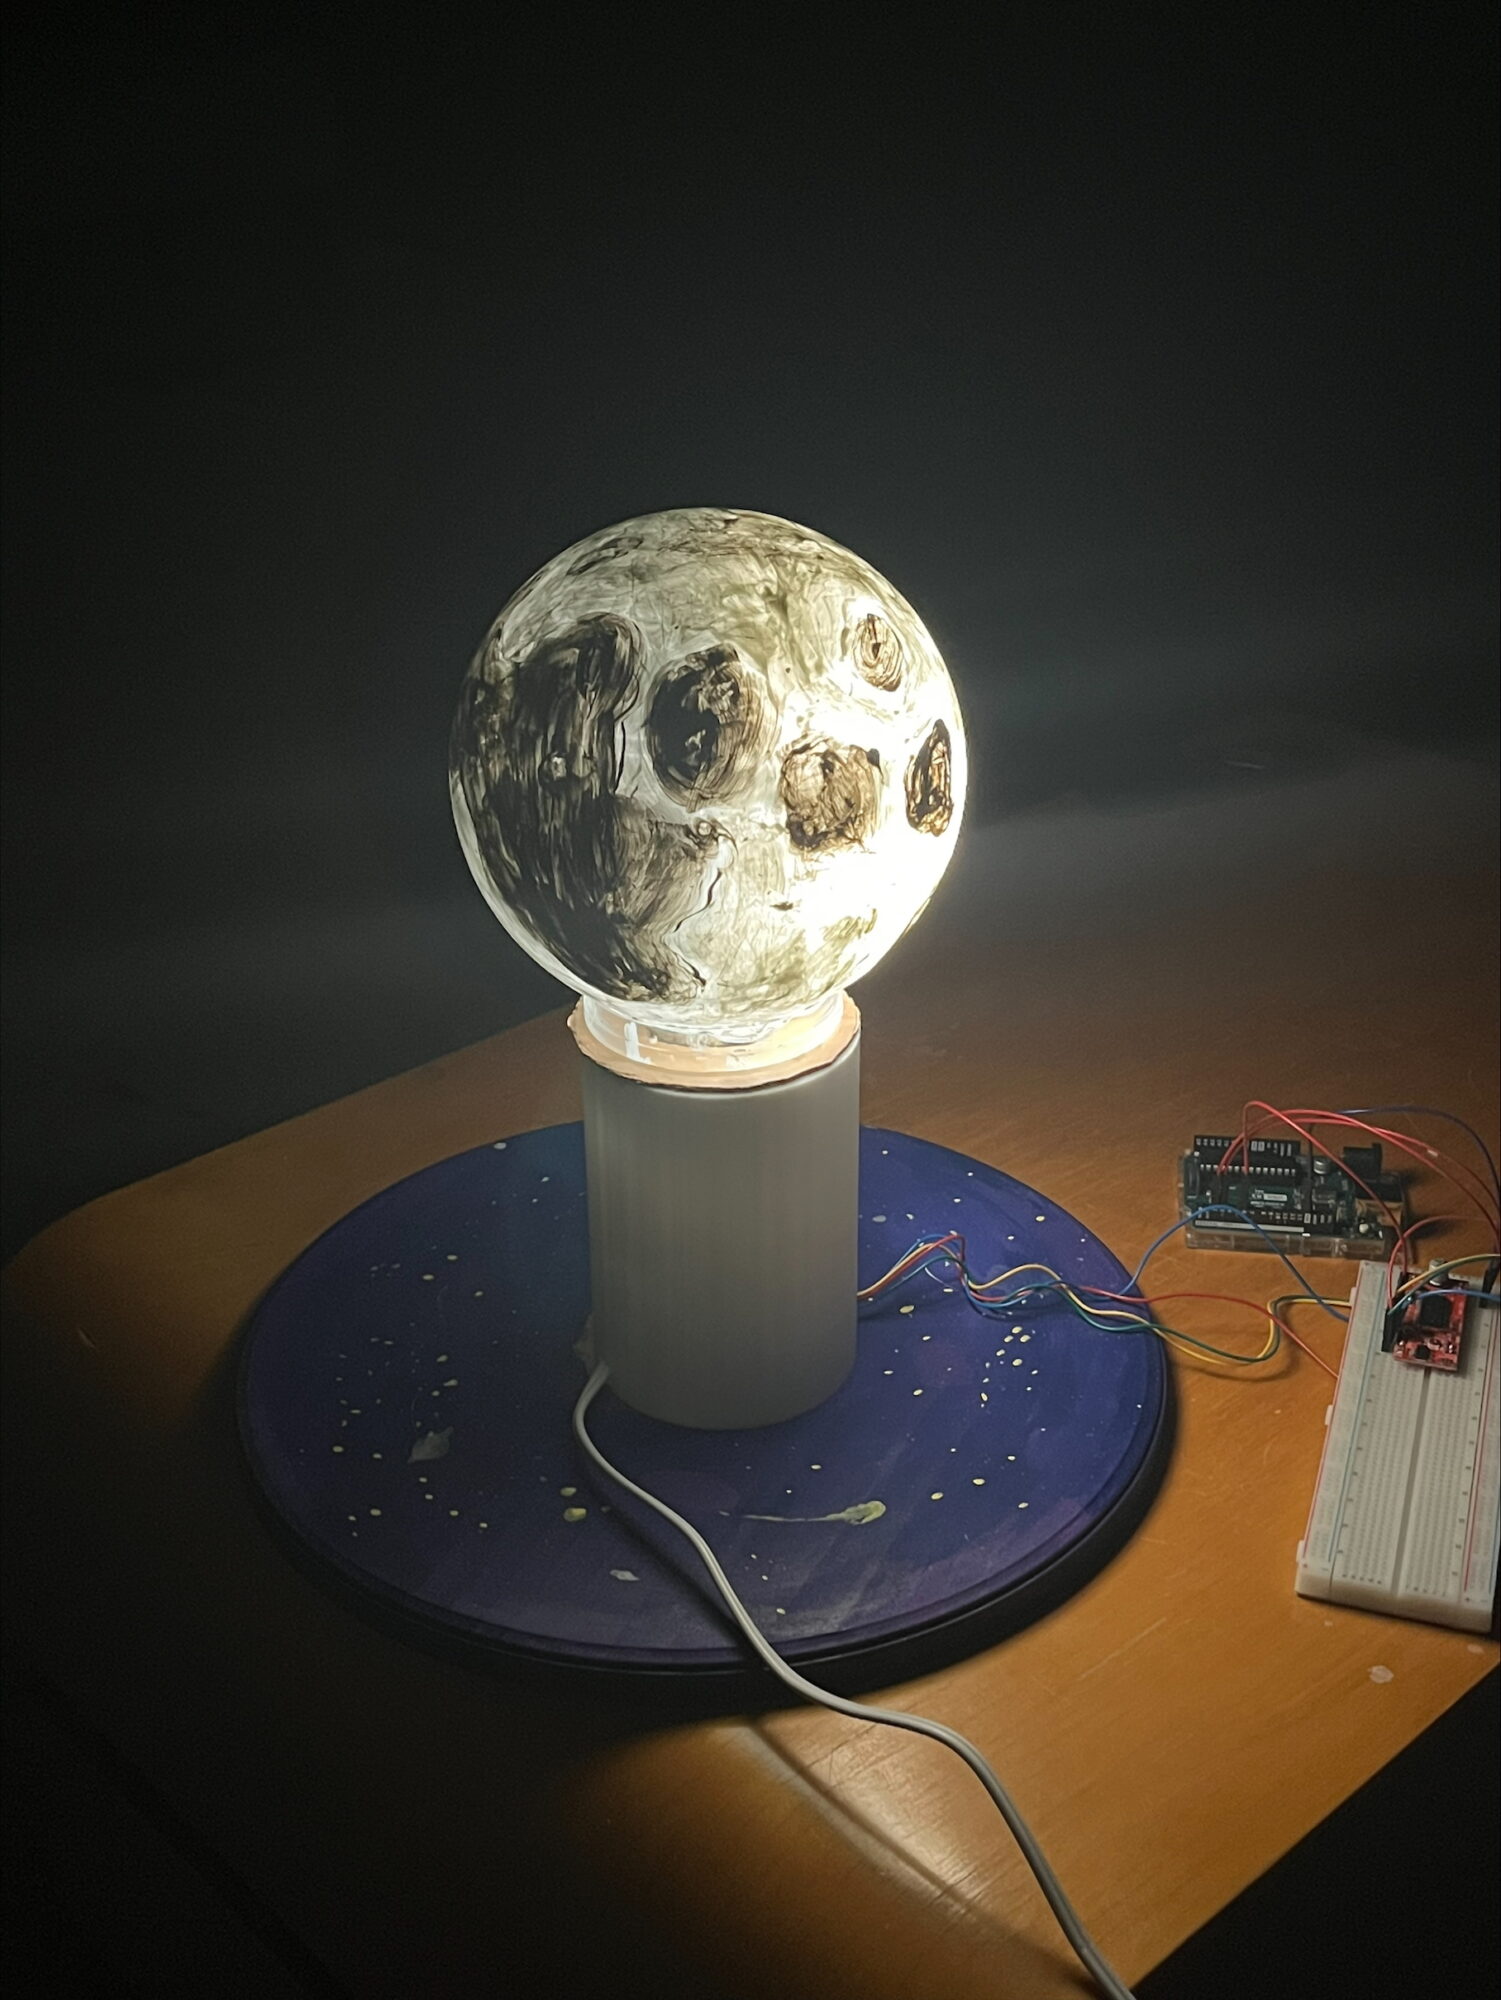
The actual Moon lamp replicates this aesthetic by combining multiple different characteristics. The first one being a Moon of course, right in the center of the base board. This Moon has been painted to replicate the surface of the actual Moon. I have included an image of it below.
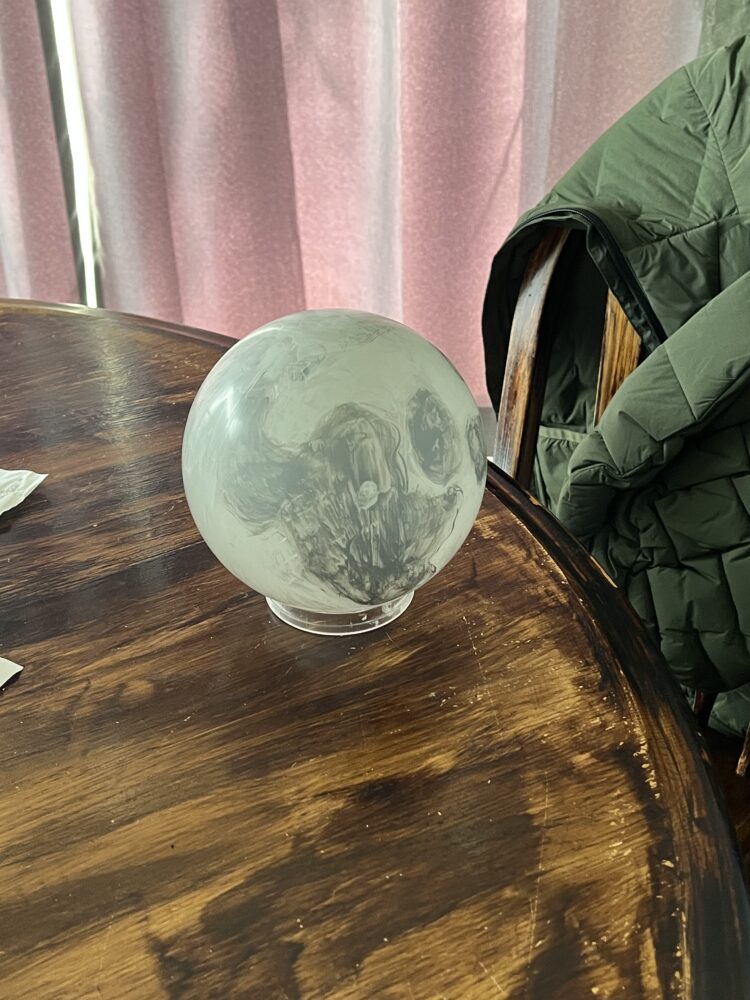
Unfortunately, I am not a very talented artist, and the Moon wasn’t quite up to par with what I wanted it to look like after painting it. In order to paint this surface, I looked up an image of the Moon’s surface, and tried to replicated on the acrylic ball. Another problem with this Moon is that the paint is not thick enough to cover up a lot of the light shining through it. I have had to paint multiple layers over it, and many brush marks are still visible when the light is shining through it. I had considered printing out the surface of the Moon onto a piece of paper, and gluing it directly to the acrylic globe that I had purchased, but I felt that painting it would not only be a more fun experience, but it would add to the Lunarpunk aesthetic.
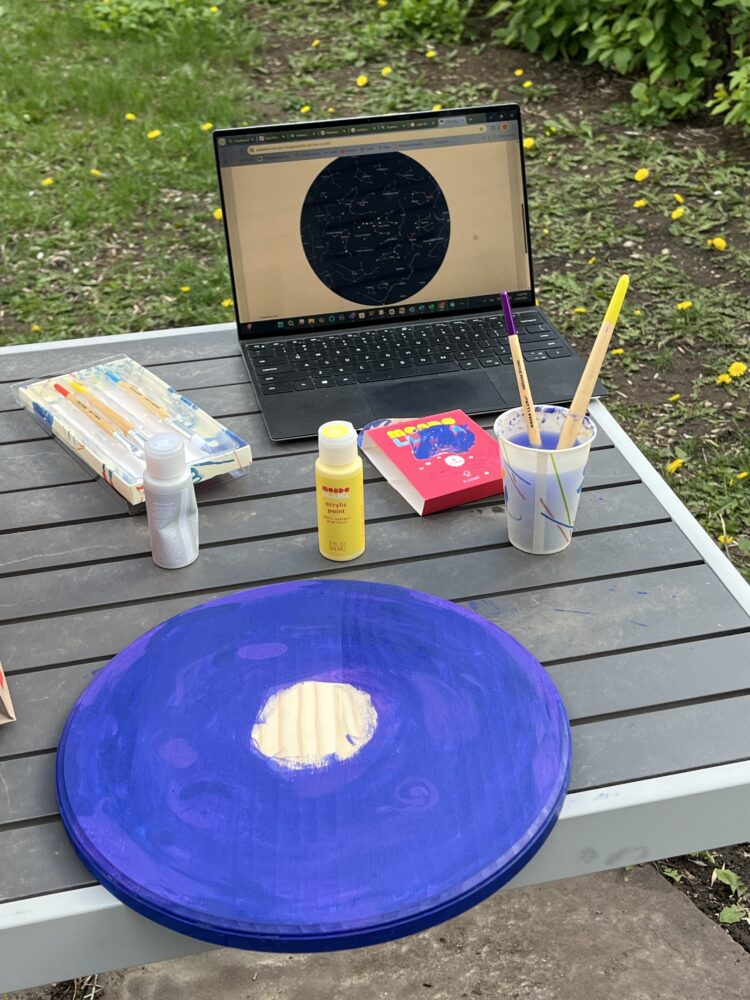
For the baseboard, I decided to buy a circular piece of wood from target, and paint it to look like the night sky. I used dark blue and purple paint colors to help match with the Lunarpunk aesthetic, and I am very happy with how it came out. I added little swirls of purple randomly throughout the board to make it look like a cloudy night sky, and add detail to the design.
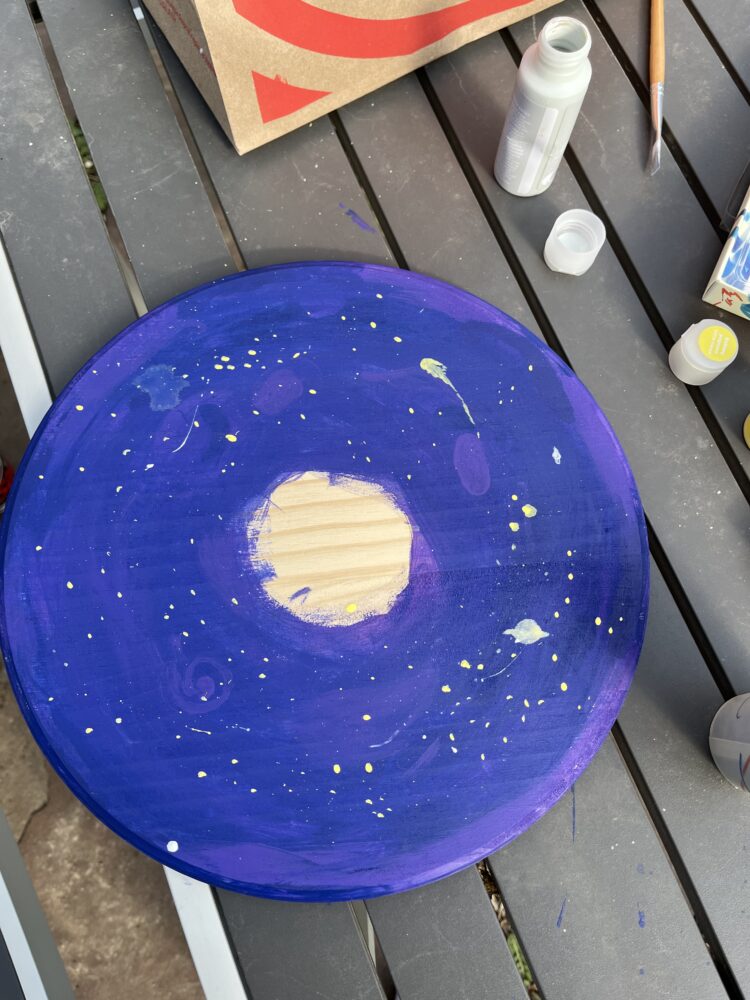
I tried to also incorporate small details when painting the stars. Every star on the board is painted to represent real constellations. To achieve this, I research what constellations are viewable in the night sky during the month of April, as this changes frequently. Other small details I added include, Saturn, a shooting star, and a small galaxy swirl near the bottom left of the board.
Earlier in this blog post, I discussed that I will be using a stepper motor, an Arduino Uno, and a Sparkfun Easy driver. The actual light bulb itself is attached to a lightbulb fixture kit that I purchased from home depot. As for the light blocker, I was originally just going to tape half of the bulb, but I did not consider that light would bounce around the inside of the acrylic globe, and cause the entire globe to light up anyway. I then decided to make a quick light blocker out of carboard to insert into the acrylic globe as shown below.
While the carboard light blocker is not the most highly engineered material, it get’s the job done, and blocks half of the light, simulating the phases of the Moon.
There were only two pieces that I had to design in CAD and 3D print for this project. The first one being the Moon Raiser, a hollow cylinder that elevates the Moon to create space to house the stepper motor and lightbulb fixture.
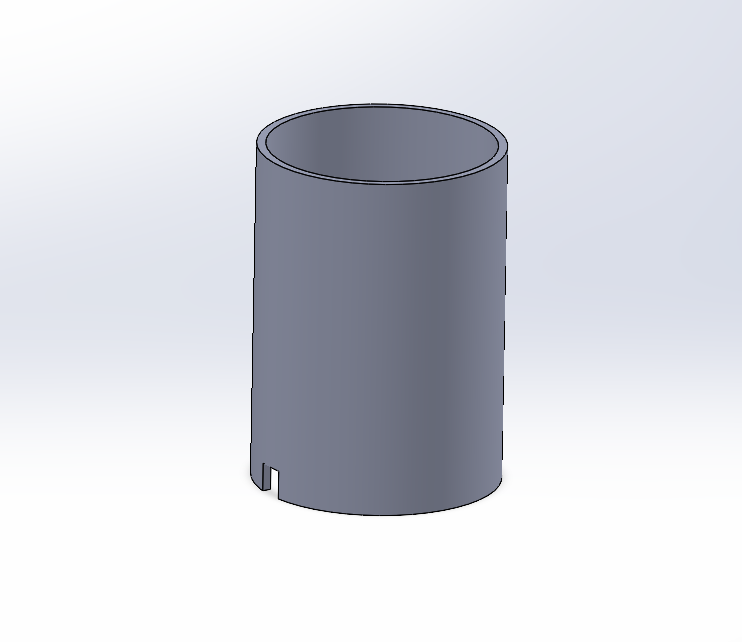
This design also includes small holes on either side of the raiser to allow the wires from the stepper motor and the lightbulb fixture to exit the raiser.
The second part that I designed in CAD was a stepper adapter. This is simply a hollow cylinder with an inner radius the size of the stepper motor shaft. This piece interfaces with a small rubber gear that connects to another gear at the base of the light bulb fixture, but more on how this process works during Part 2, another 1500 word report on exactly how I got this project to come to life.
Next, lets review the final product and see how it matched up to my previously set aesthetic and functionality specifications.

Overall, I am pretty happy about how this project turned out, but there are a lot of things I will modify in the future so that I can make it function and fit the Lunarpunk aesthetic better. At first, I really didn’t like how the Moon turned out until my friend mentioned that it fit the same aesthetic as Starry Night by Van Gogh. Starry night is an example of famous artwork that fits somewhat within the Lunarpunk aesthetic. I prefer this outlook to blaming the visible brush strokes on my lack of artistic ability.
In the future, I will be modifying a few things. First, I will paint the Moon raiser to match with the starry night sky on the base board. The white PLA looks very out of place here. I will also create a housing for the electronics, as right now they just appear to be hanging around and hurt the aesthetic quite a bit.
Sources:
Here are the MLA citations for the two iStock images:
- iStock. Moon Surface Crater Illustrations and Clip Art. www.istockphoto.com/illustrations/moon-surface-crater. Accessed 23 Apr. 2025.
- iStock. Vector Illustration of the Constellations, the Night Sky in April. www.istockphoto.com/vector/vector-illustration-of-the-constellations-the-night-sky-in-april-gm539028428-96017519. Accessed 23 Apr. 2025.
Let me know if you need them formatted for a Works Cited page or annotated!
4 Comments. Leave new
Hi Delos, I really like all the thought you put into your project. Not only is a rotating Moon lamp cool in itself, but you went the extra mile by calculating and simulating the Moon’s actual angular rate, as well as the other small details in your project like adding realistic constellations to the base plate. The Lunarpunk aesthetic is really cool! I didn’t know that was a thing, but I really like the artwork you chose to depict this aesthetic. Also, I personally really like your rendition of the Moon. I know you were going for accuracy with many aspects of your design, but I think the shading and slightly blurred details are intriguing. It reminds me of illustrations from famous old space exploration books like Jules Verne’s “From the Earth to the Moon”. Congratulations on reaching/nearing the end of your project! I look forward to seeing it at expo!
Hi Eric. I haven’t heard of “From the Earth to the Moon” by Jules Verne, but I will definitely do some research on it now. Thanks!
Hi Delos! I love how your project turned out and agree with you friend that it resembles Starry Night, especially when the light’s on. The brushstrokes give the moon a textured and shaded look, making it feel more realistic. If you ever plan on touching up or repainting the moon, you could add more swirls within the dark patches to lean more into the style.
Thanks Annie! I really like the idea of adding some swirls into the dark spots of the Moon, I will definitely consider adding that before Expo!