
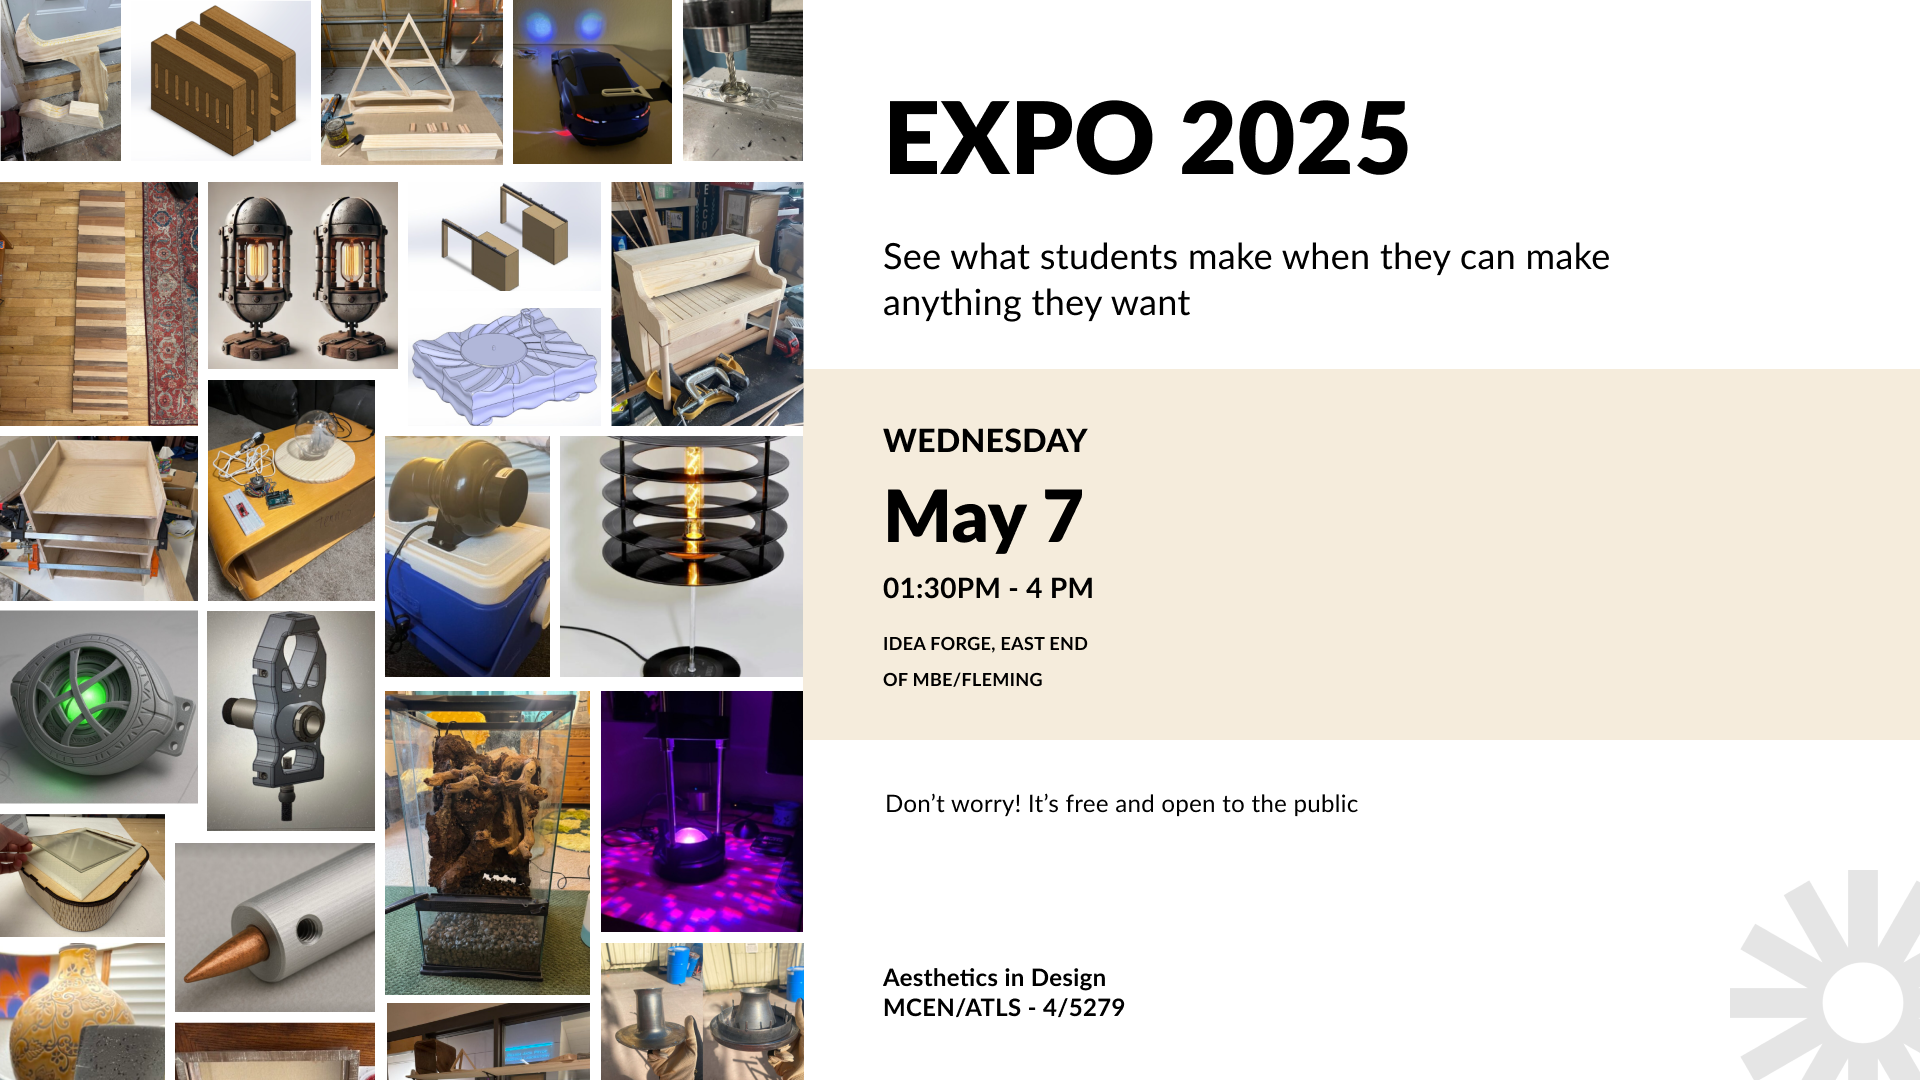
Welcome to the Aesthetics of Design Website. This site displays student work in the Aesthetics of Design class at CU Boulder. This site serves as an archive for current and past student projects, and for current students to develop their portfolio and documenting skills. It is also an Open Educational Resource, for anybody interested in how to make these projects, and for educators who might like to teach a course like this: all lecture notes and videos are available, as well as syllabus, schedule assignments etc..
This year’s12th post, where students present Part 2 of their final report, the How
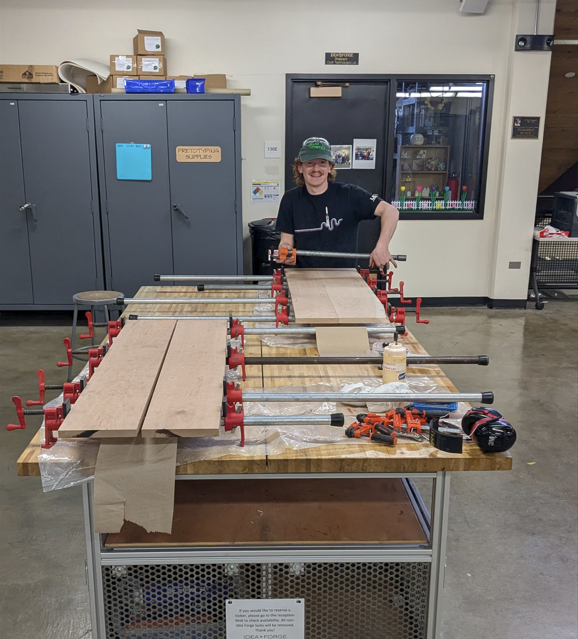
Mid Century Modern Nightstand Final Report Part 2 – Fabrication
Schedule First I would like to go over the schedule of creation, shown below in Figure 1 is my post creation Gantt chart. This is the actual schedule that ended up occurring, and while I would have liked to have been completely done a week earlier to properly present my oiled project to my pod,…
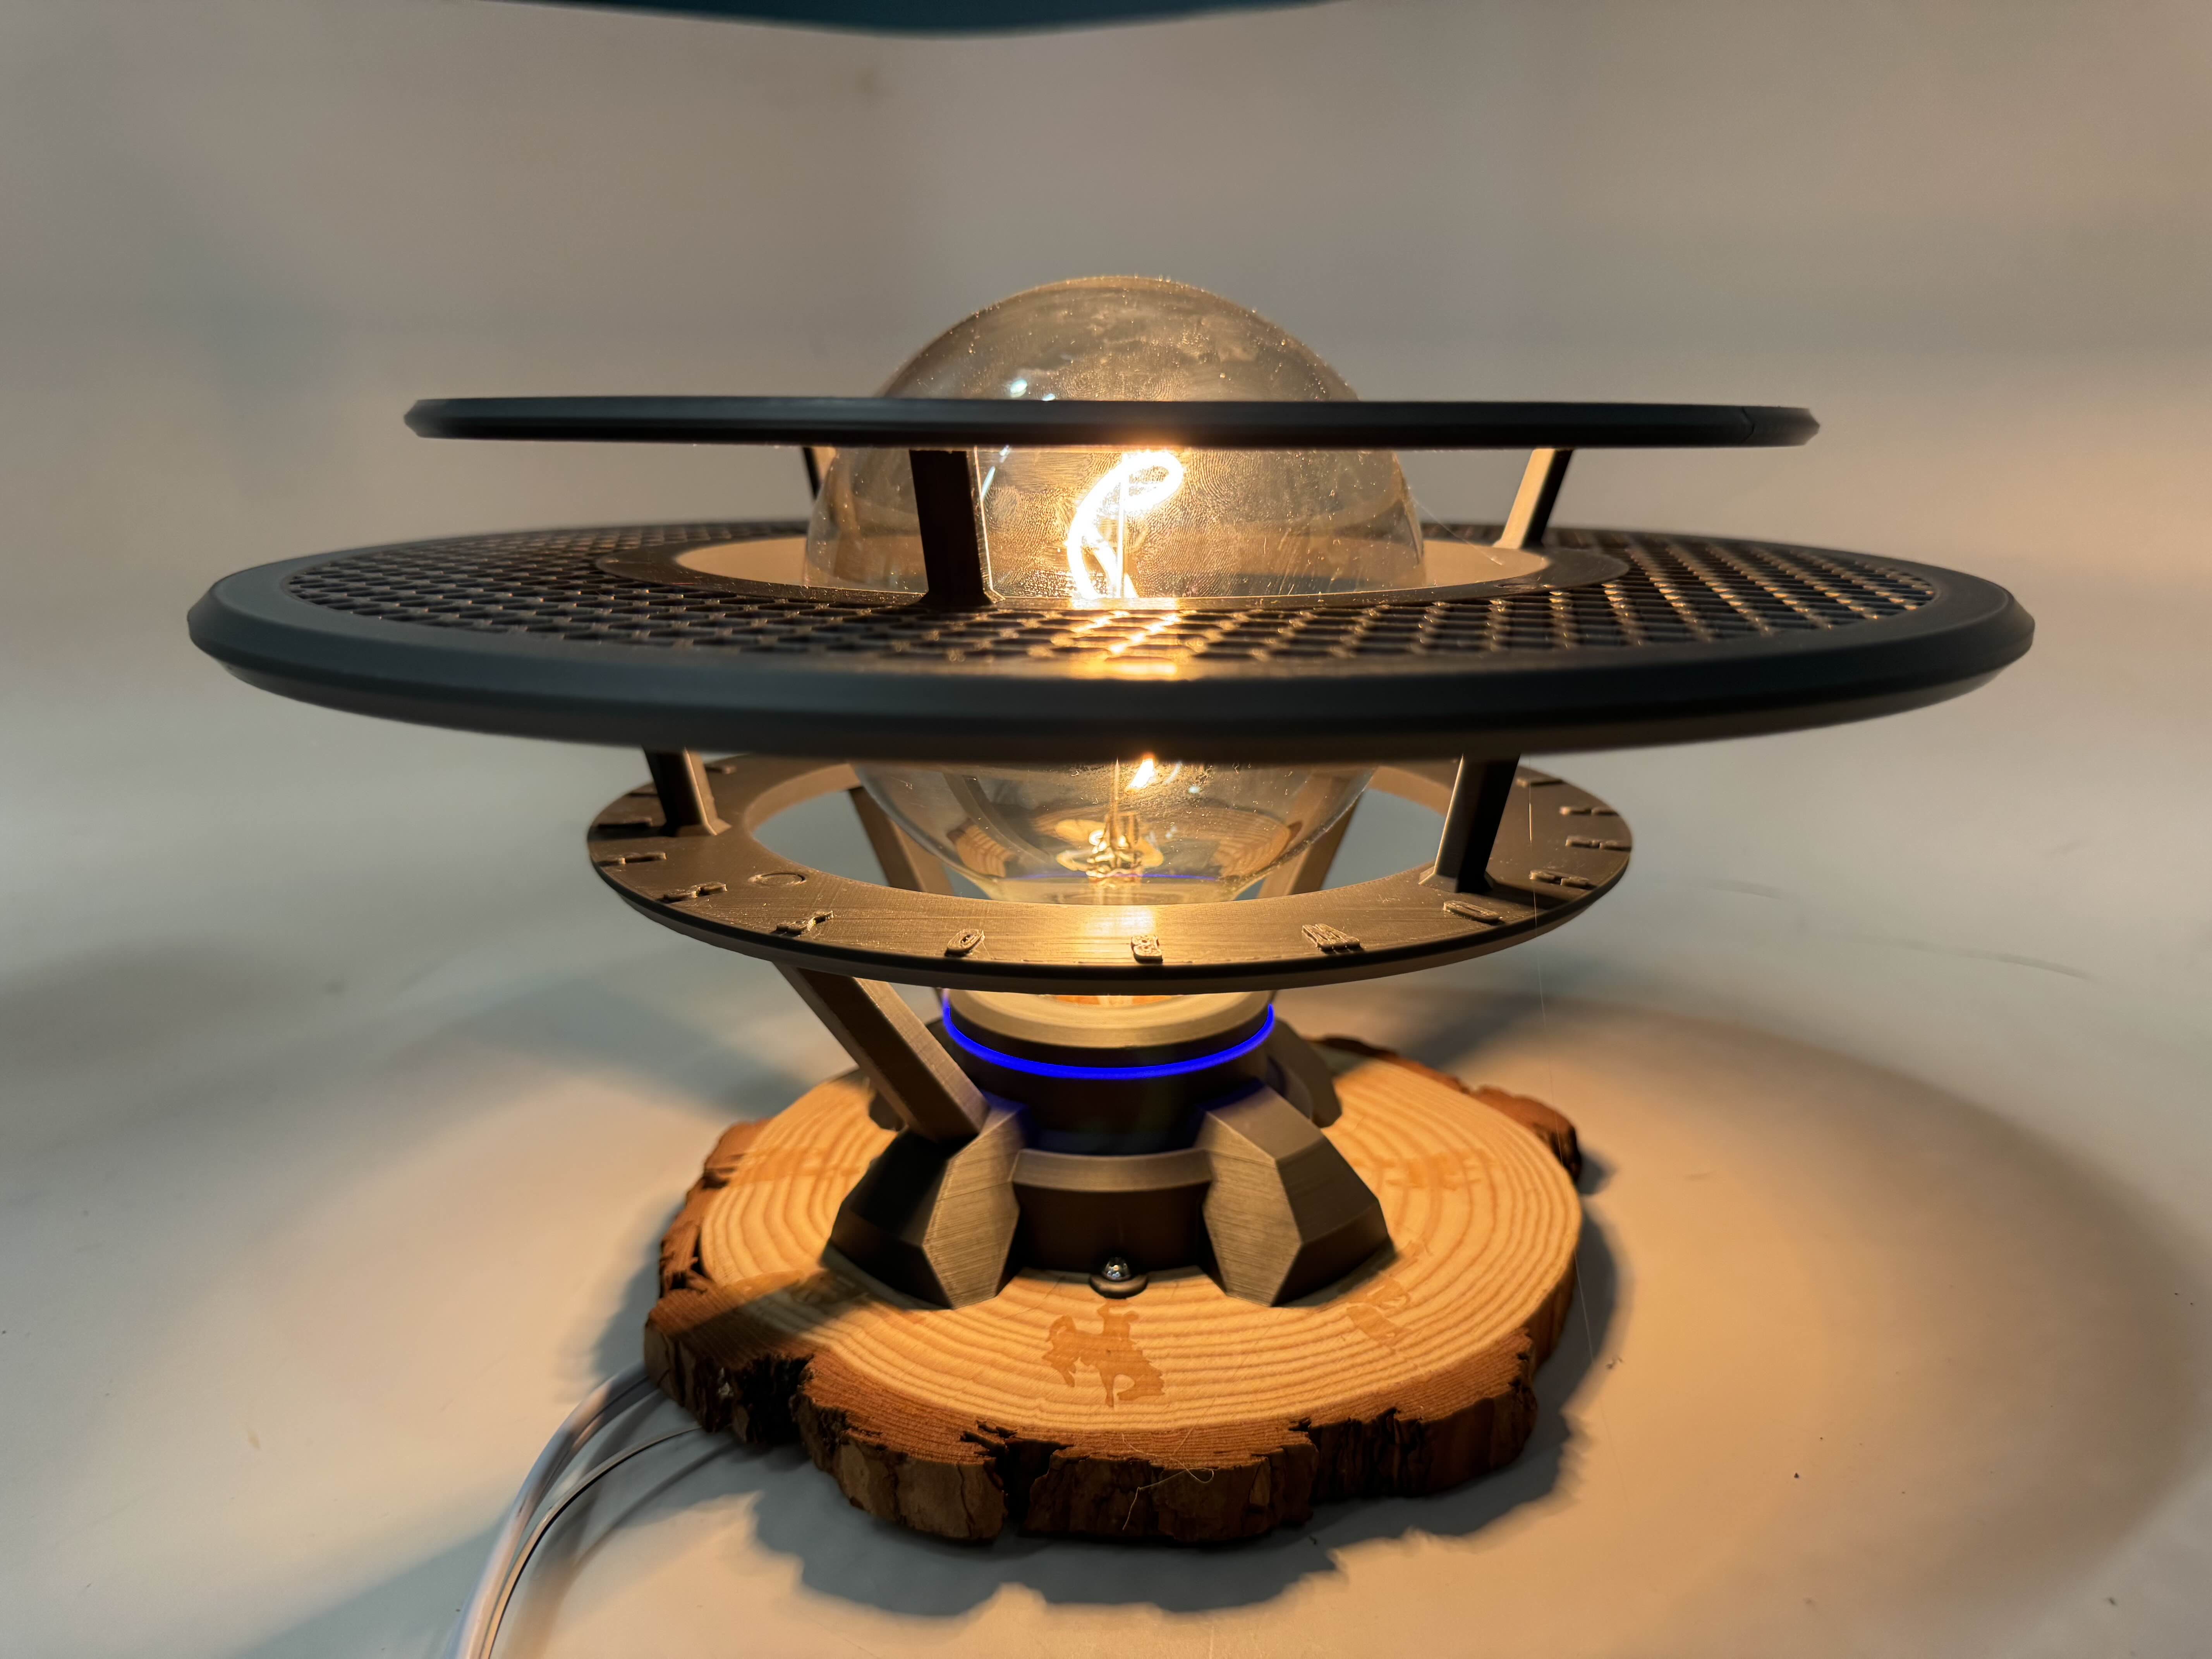
Post 12: How the Space Cowboy Lamp was made
Process documentation: The Space Cowboy Lamp is the result of a semester of work, including CAD designing, 3D printing, woodworking, and electronics. The overall timeline for this project can be seen below: Final timeline The design process, as described by the timeline above, relied heavily on about a month of CAD design and sourcing materials.…
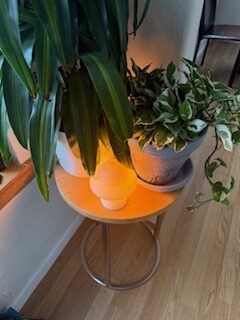
How: Mushroom Lamp
The construction of this project began with reaching out to Erik Gustafson, a Chicago based artist that specialized in wood working. I asked about his advice on incorporating a moving element into a lighting element crafted from wood. Being an engineer, we are constantly told that Wood is not an engineering material and should not…
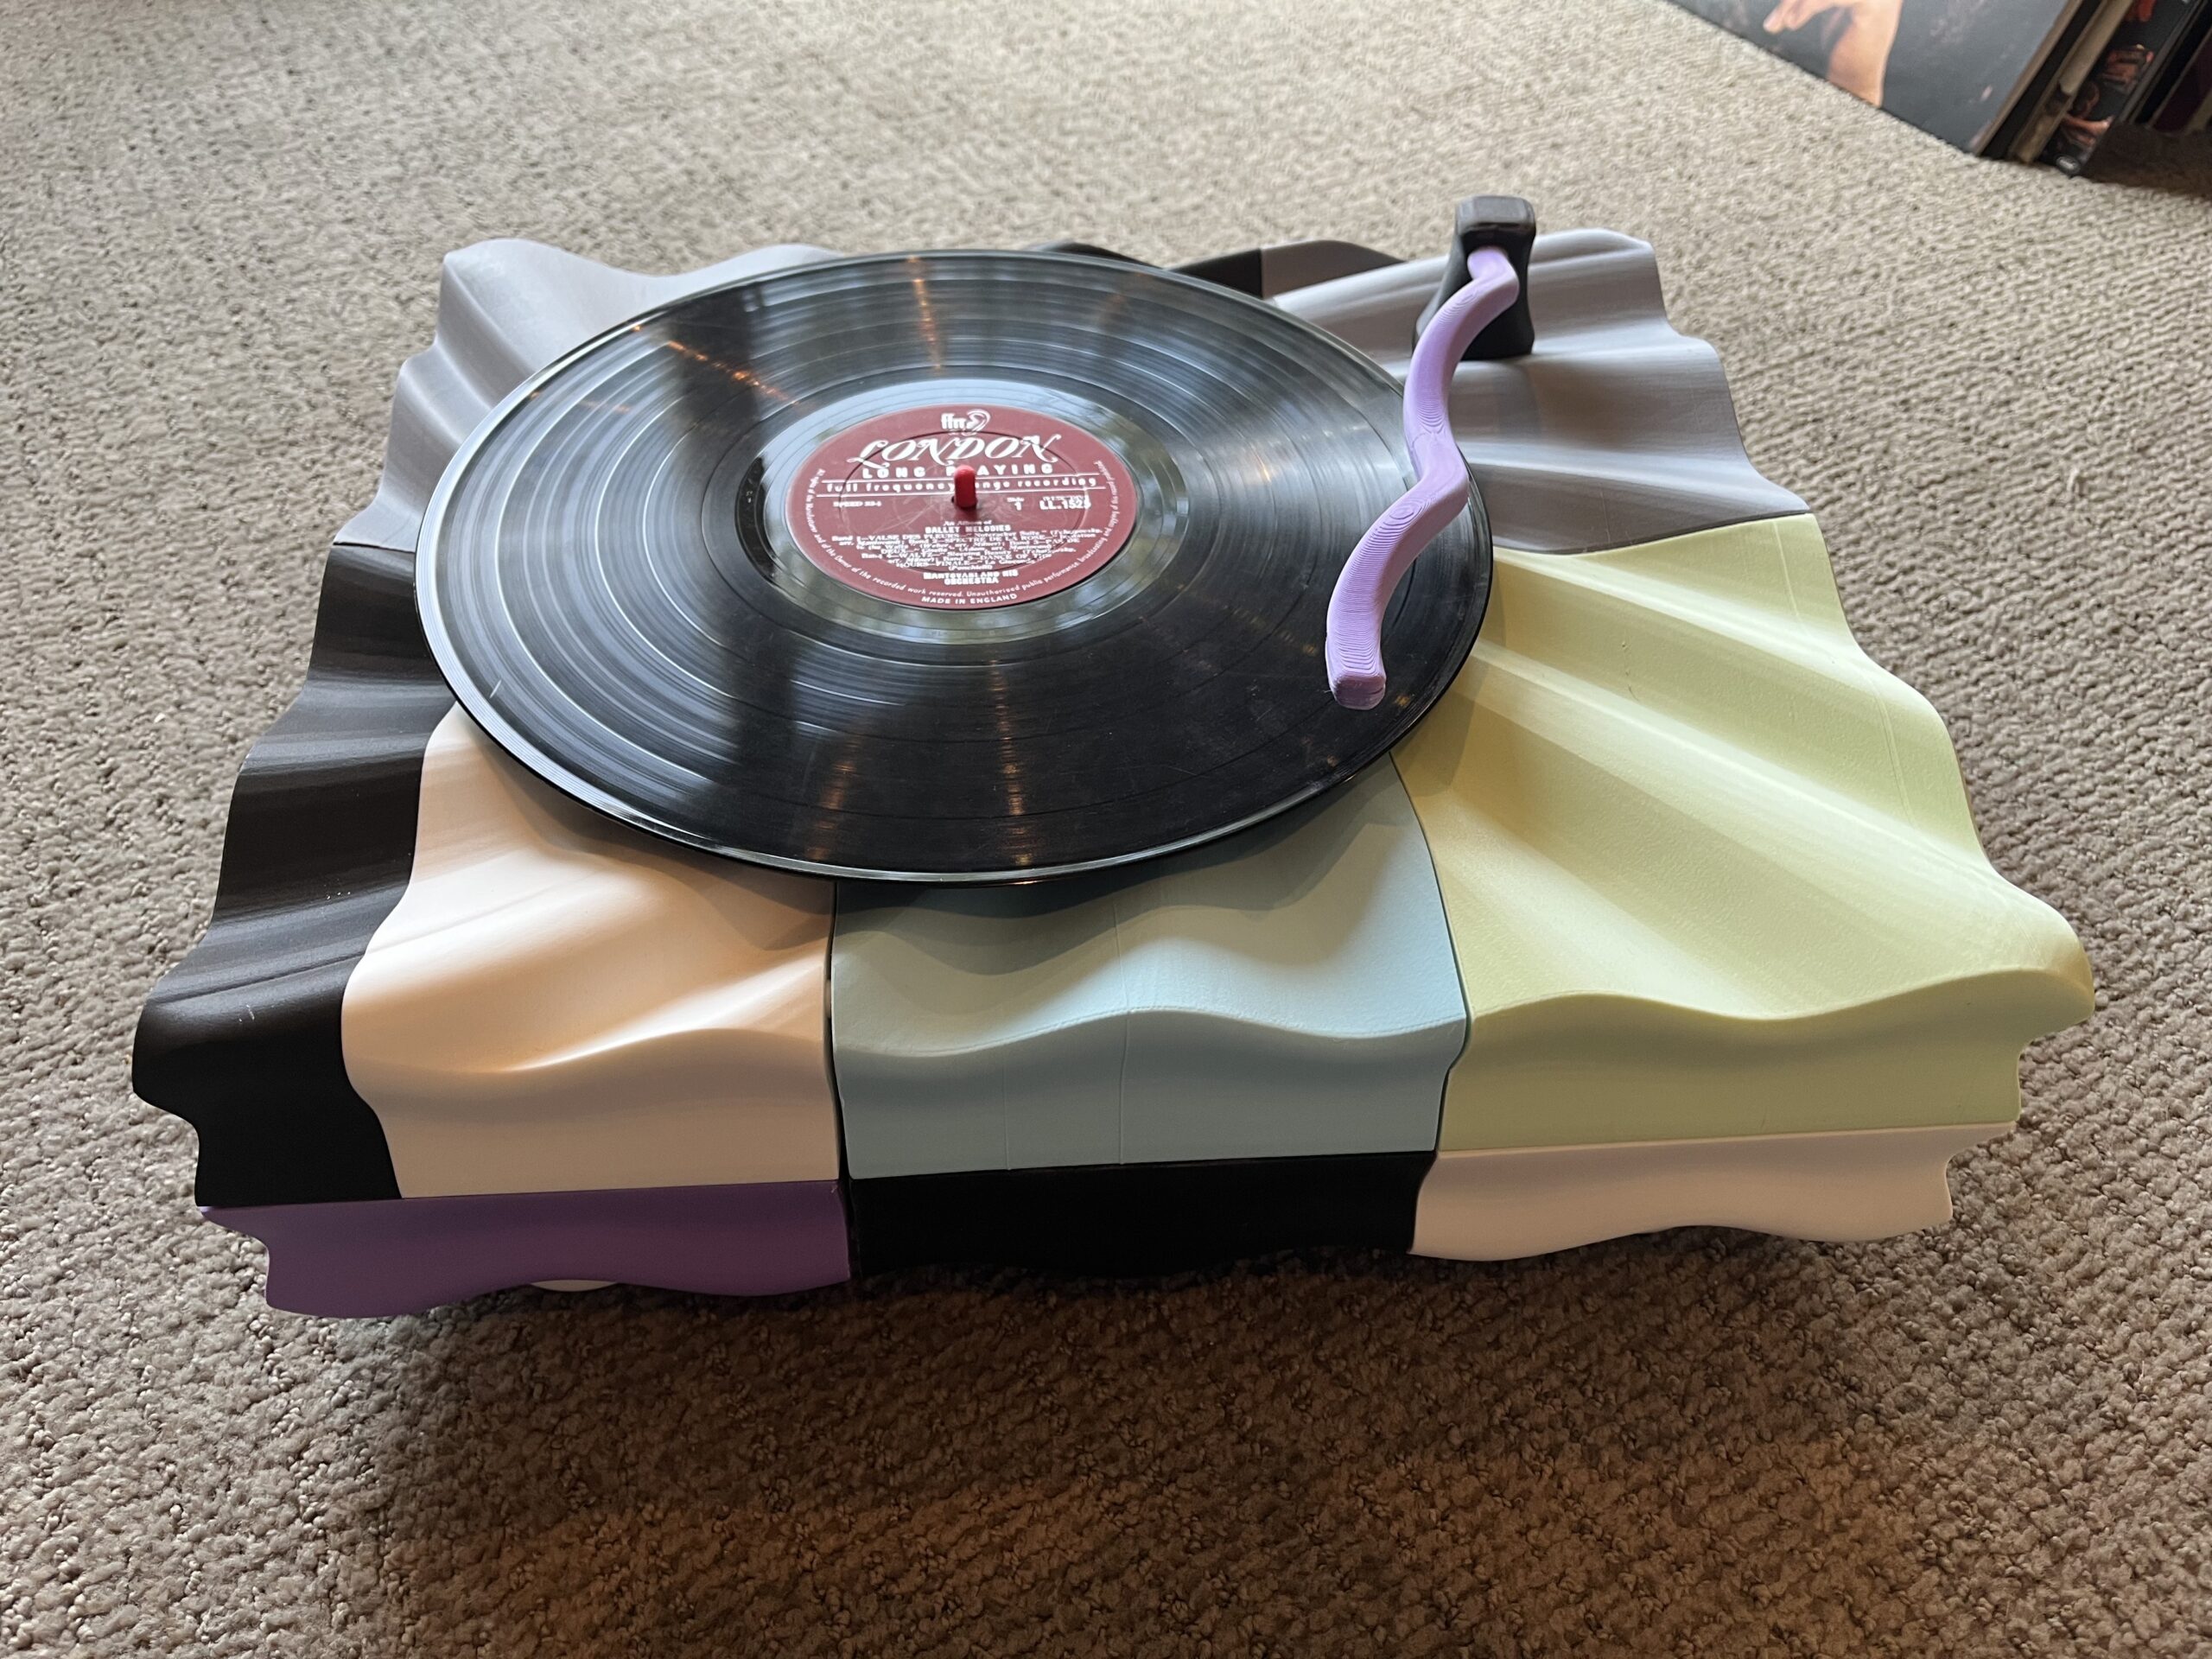
Artistic Vinyl Speaker: Part 2
For my main project, I created an artistic vinyl record display that plays music from an internal Bluetooth speaker (see the featured image [1]). Through this project, I wanted to replicate the feeling of listening to a record player, while having the freedom to choose whatever songs you’d like through a Bluetooth device. Aesthetically, I…
Almost the Look
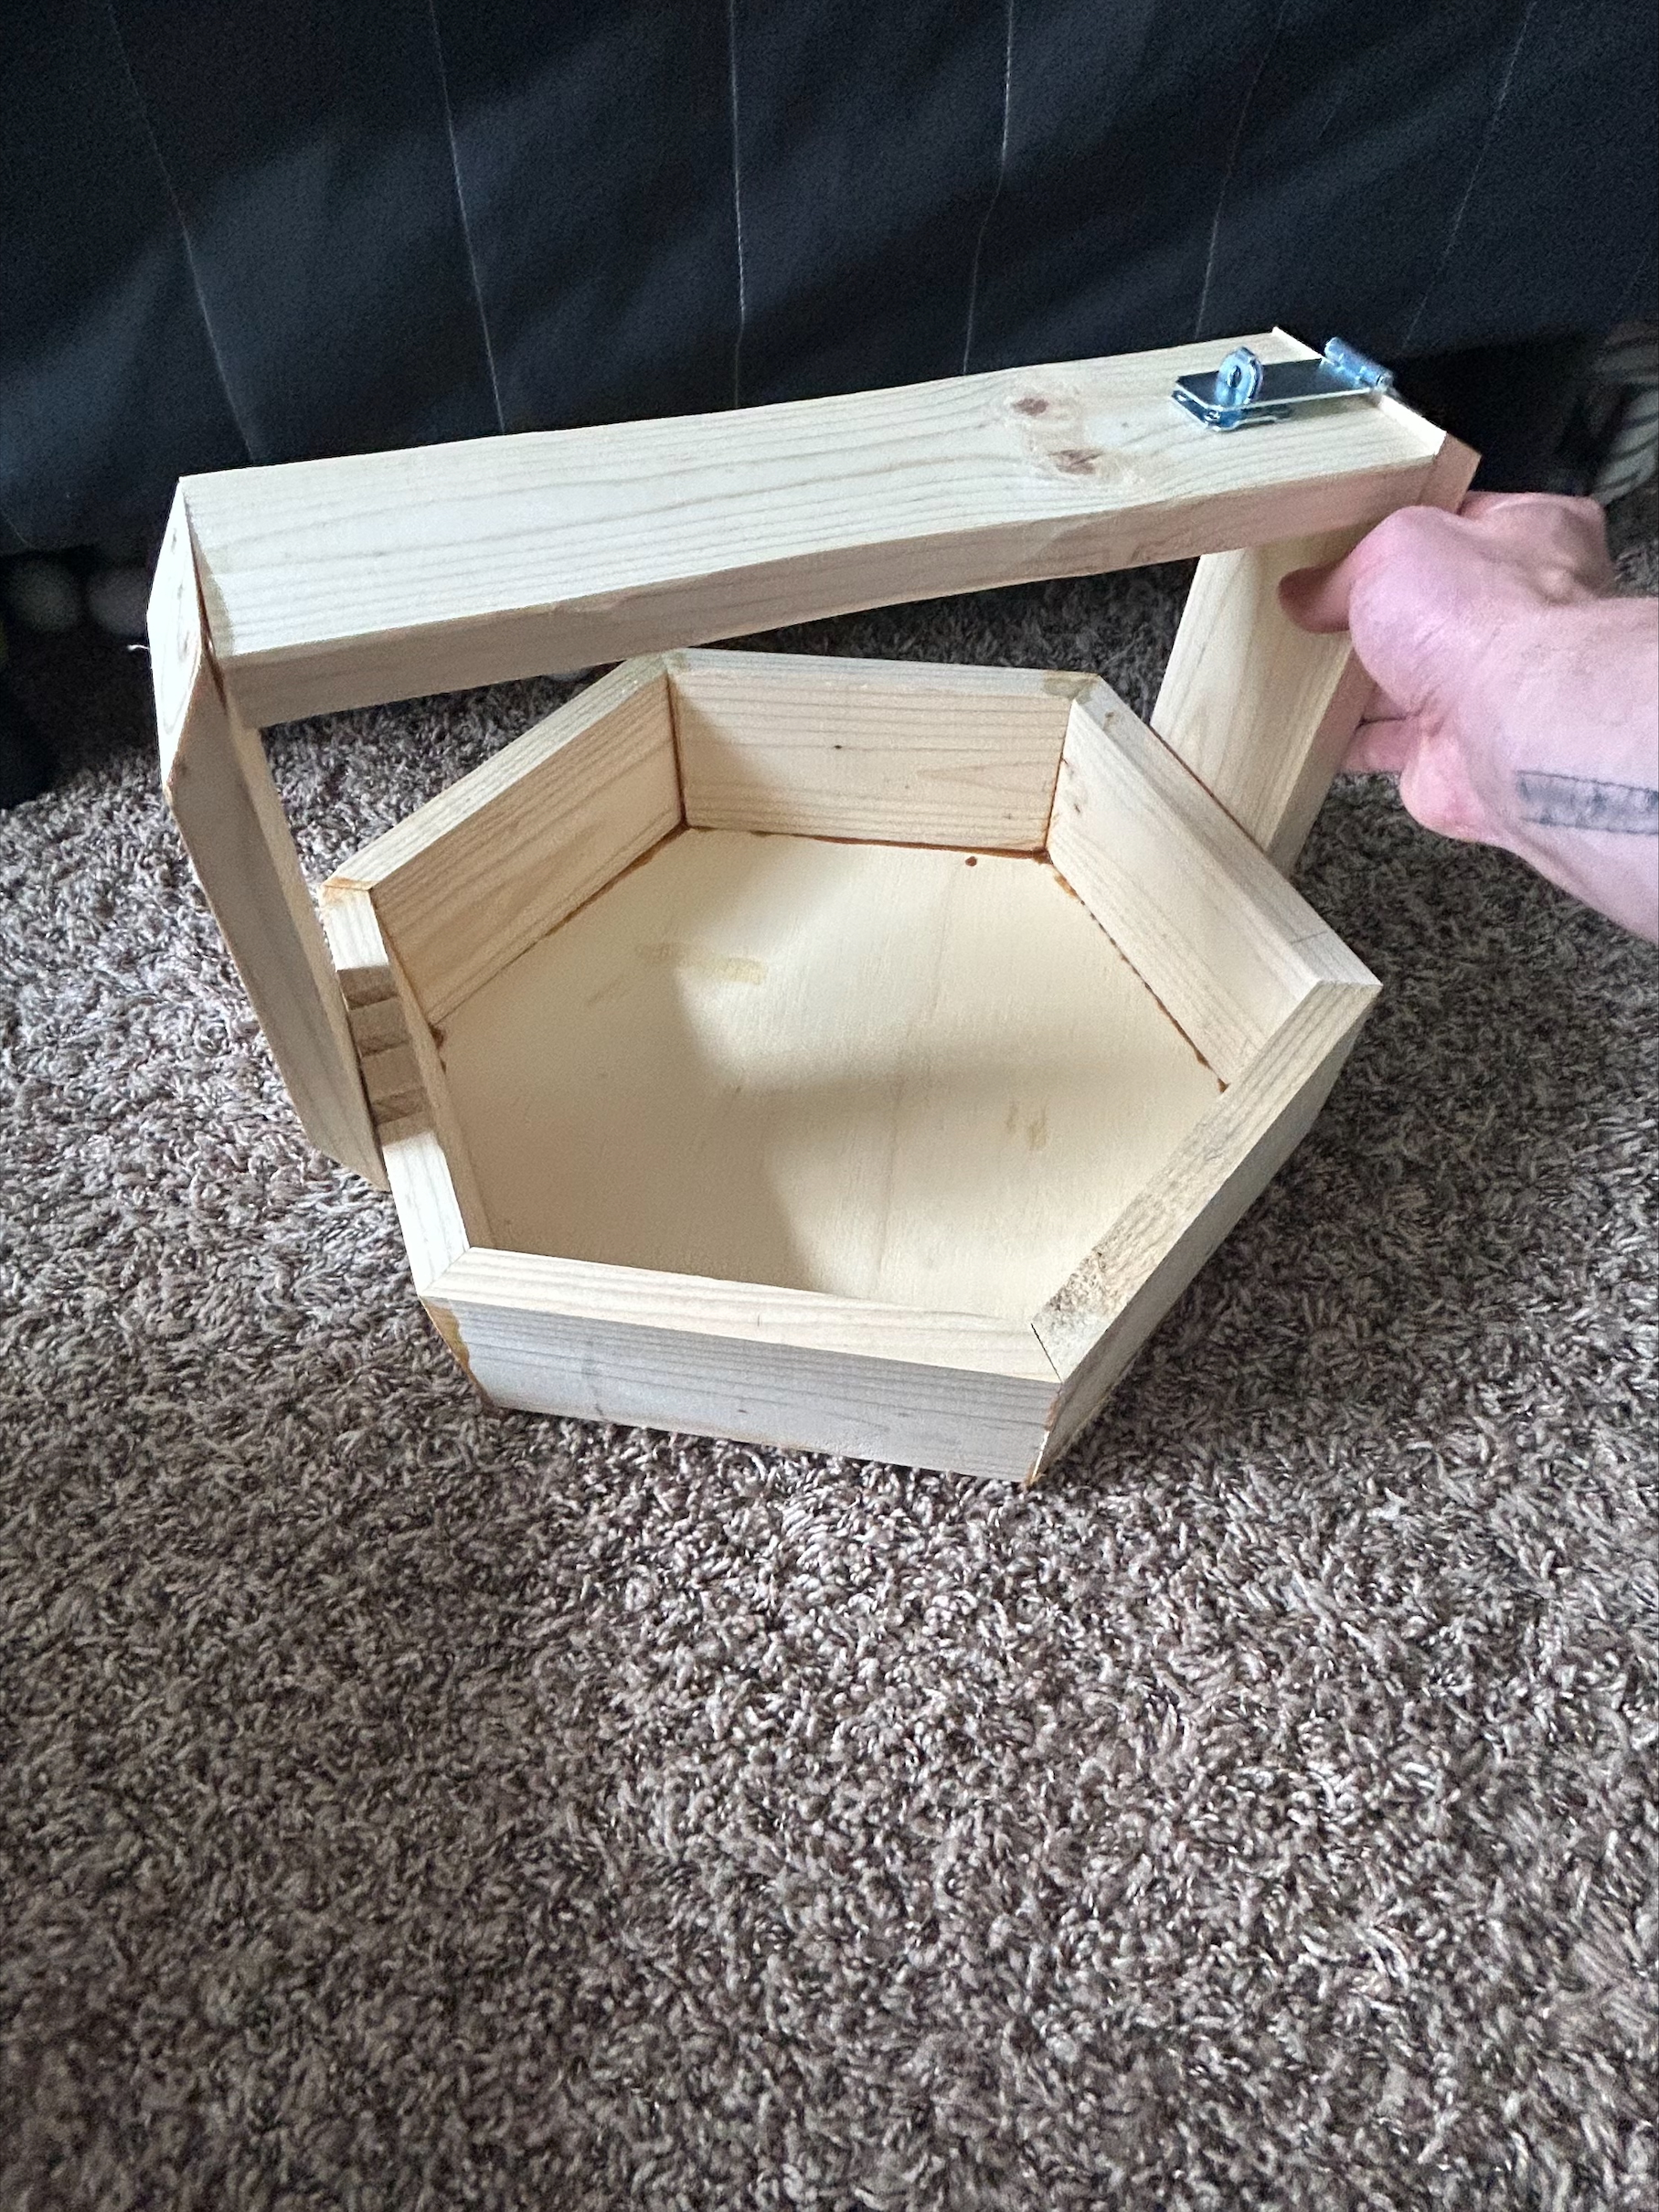
1. Timeline: The Making of the Hexagonal Bookshelf Below is a visual timeline representing my build process, highlighting the cyclical and non-linear nature of design: Week 1–2: Exploration & Planning Brainstorming 1970s-inspired aesthetics Sketching geometries Defining functional requirements (book storage, compact corner fit, modular potential) Week 3: CAD Design & Dimensioning Modeled in SolidWorks Solved…

Eclipse Lamp – Final Post Part 2
I began this project by sketching out some ideas on what I wanted the lamp to look like as well as its scale and functionality. I chose to create a lamp for this project. I have always found beauty in simple shapes. My first project was in the space age aesthetic, a spherical lamp with…
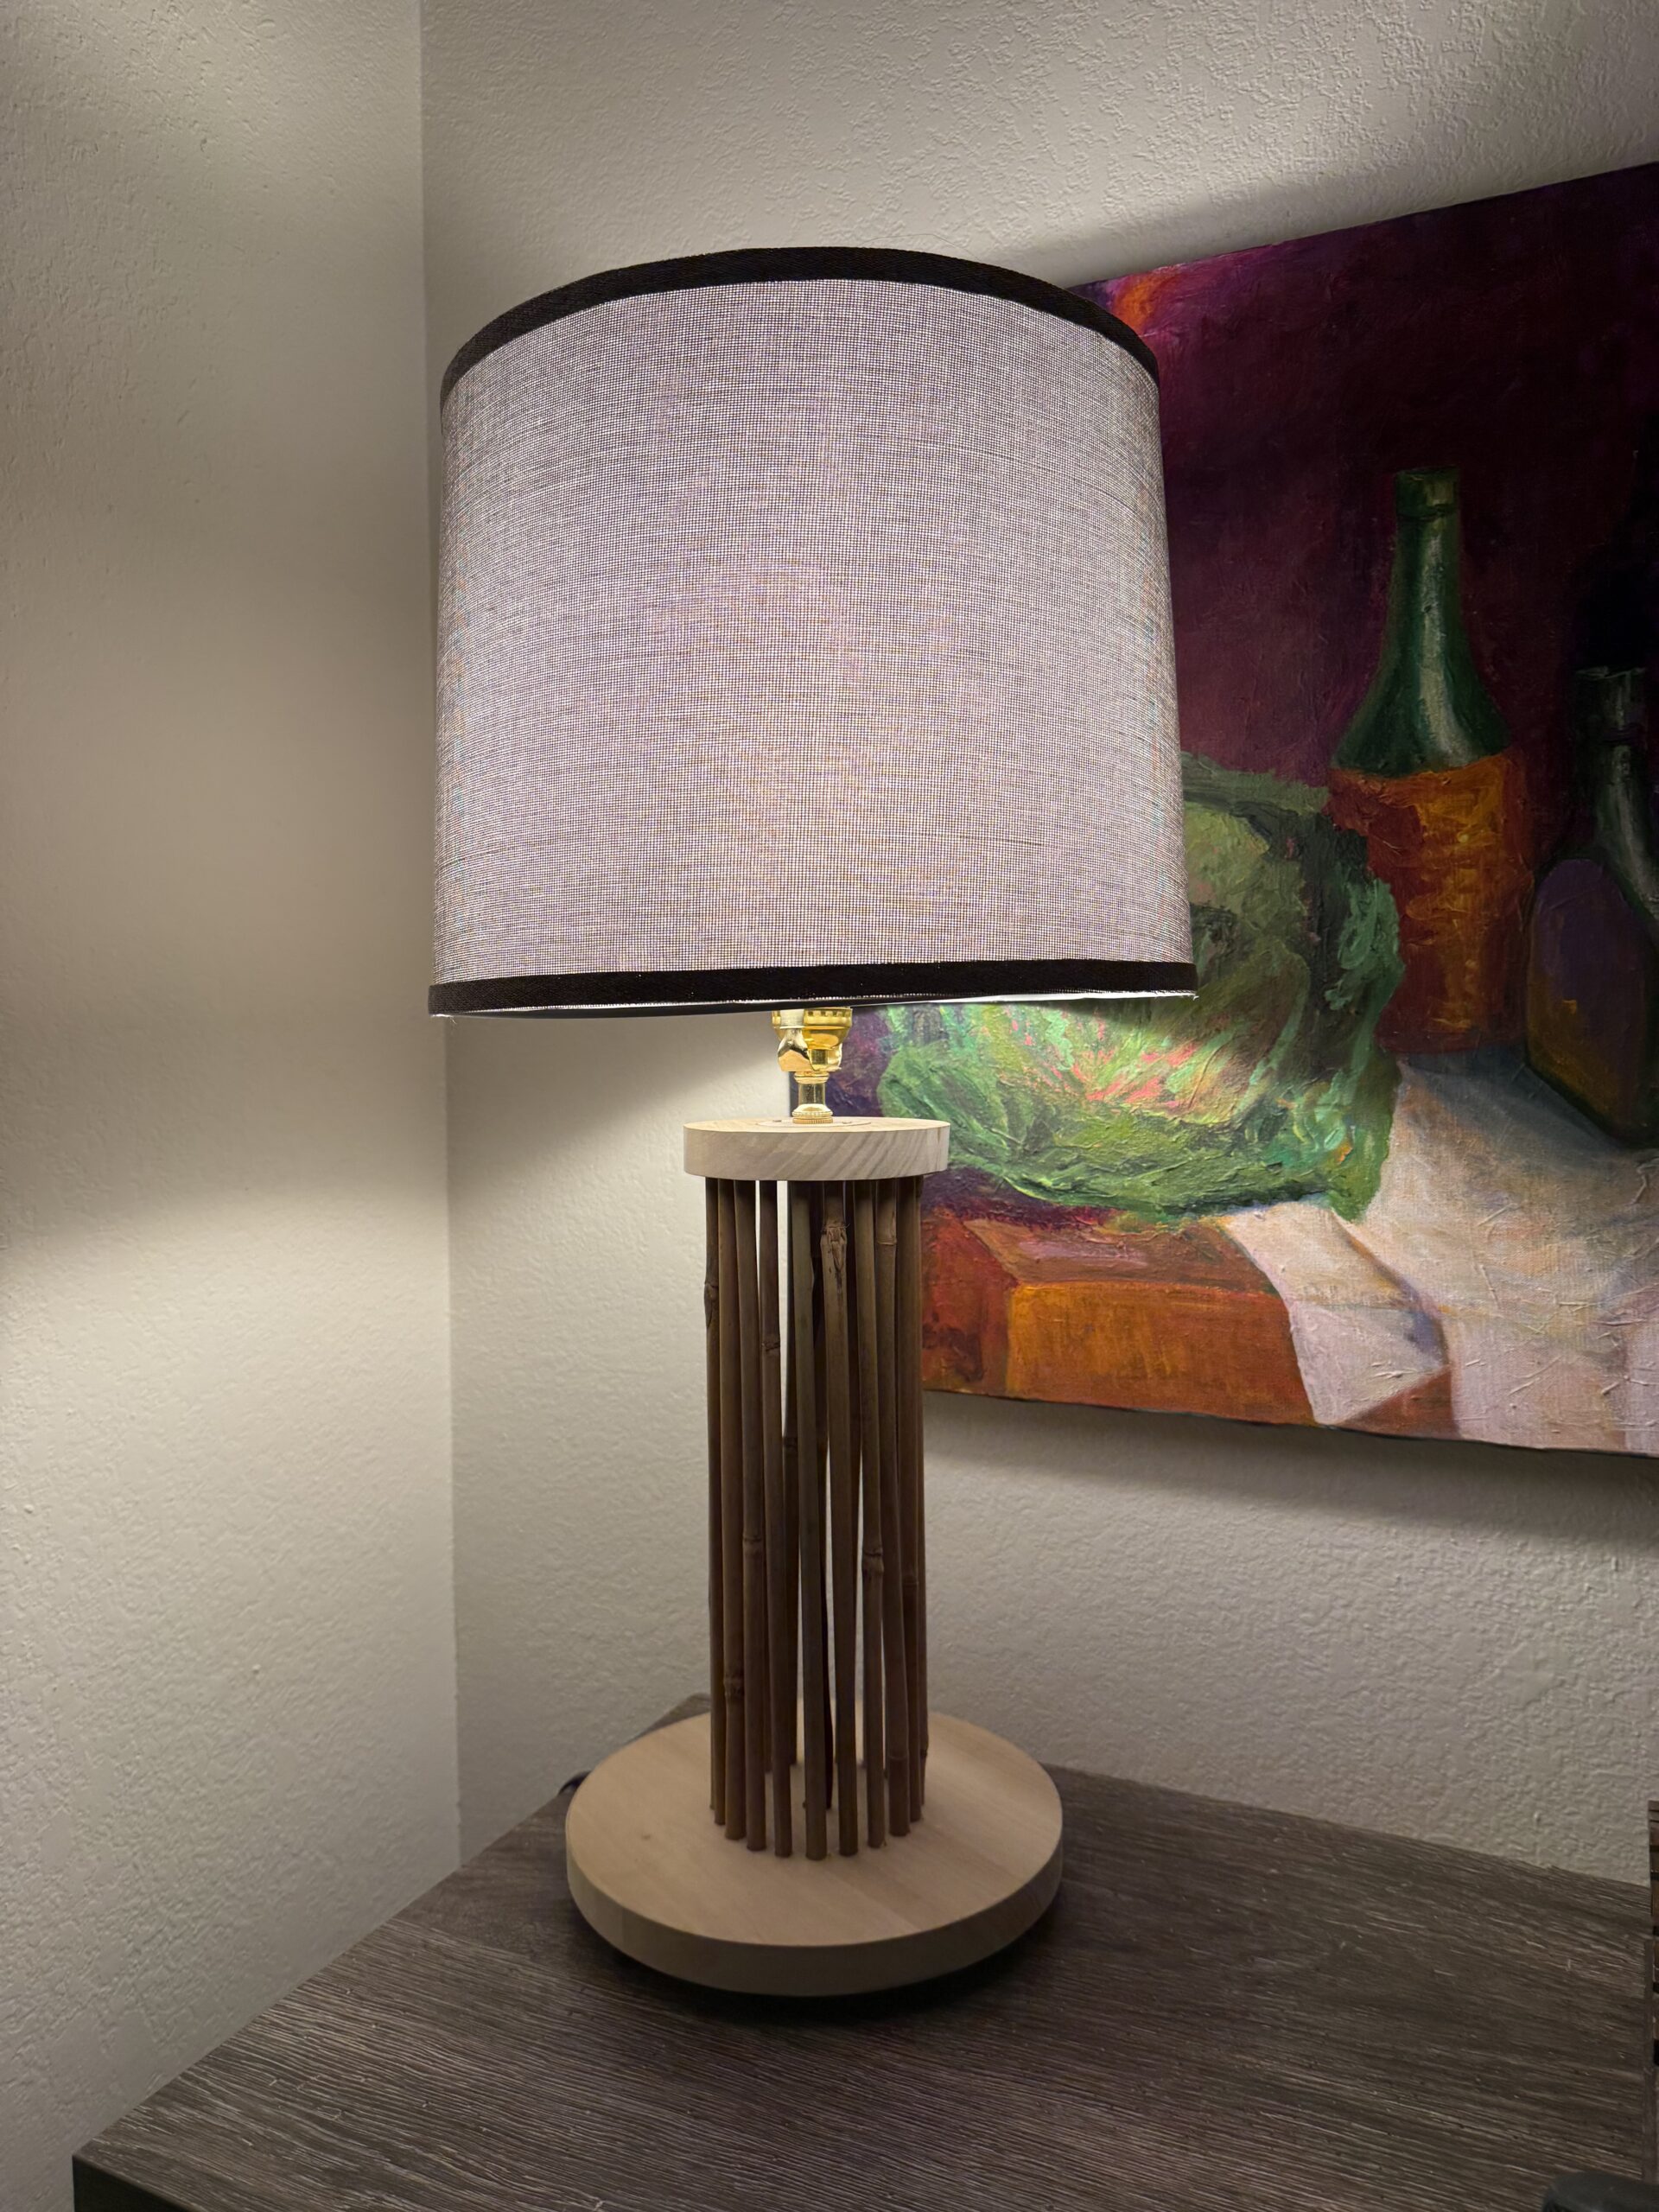
Final Project Part 2: Bamboo Lamp Creation
For my final project I created a lamp using bamboo poles to create the structural body. To actually create this, it took meticulous planning and accounting to ensure that the lamp was standing straight. Below is a timeline of the major components of my project. Preparation There were two rounds of preparation that I had…

Functional Yard Art: The “What”
Summary: In short, the goal of my project was to produce an artifact inspired by yard art and a jagged, rusted aesthetic like the “Diesel Punk” that can be found in the Mad Max movies. Counterintuitively, I planned to cast this aesthetic on the thriving ecosystem in my yard in the form of a jagged,…
The Journey from Concept to Creation: Origami Inspired Floor Chair
Fabrication Process: Bringing the Origami Chair to Life Research & Inspiration My journey began with immersing myself in the world of origami and furniture design. I spent considerable time exploring the intersection of these disciplines, studying how folding techniques could translate into functional, weight-bearing structures. I was particularly inspired by designers who had successfully merged…

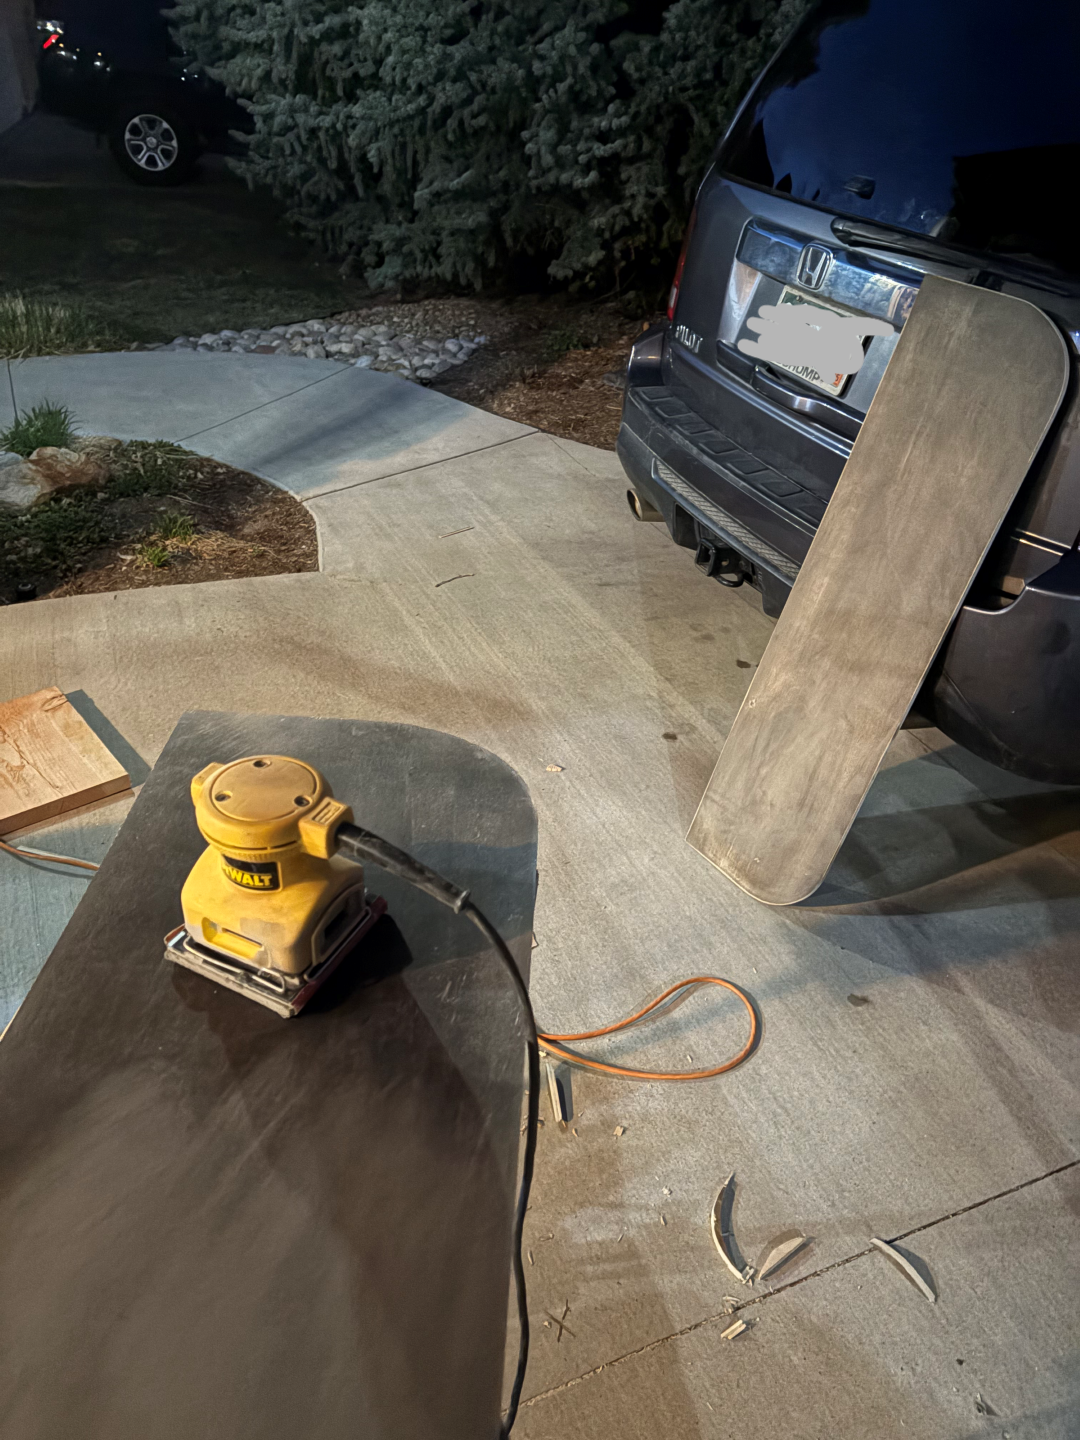
Skateboard Deck Project | The How (Photos Coming Soon, Issues Uploading)
Building My Custom Cruiser: The Hands-On Process Behind the Design I want to walk through the technical process of building my custom skateboard deck from raw veneers to a fully finished cruiser. This project wasn’t just about making something that rides well; it was about learning new tools, trying new workflows, and combining both digital…
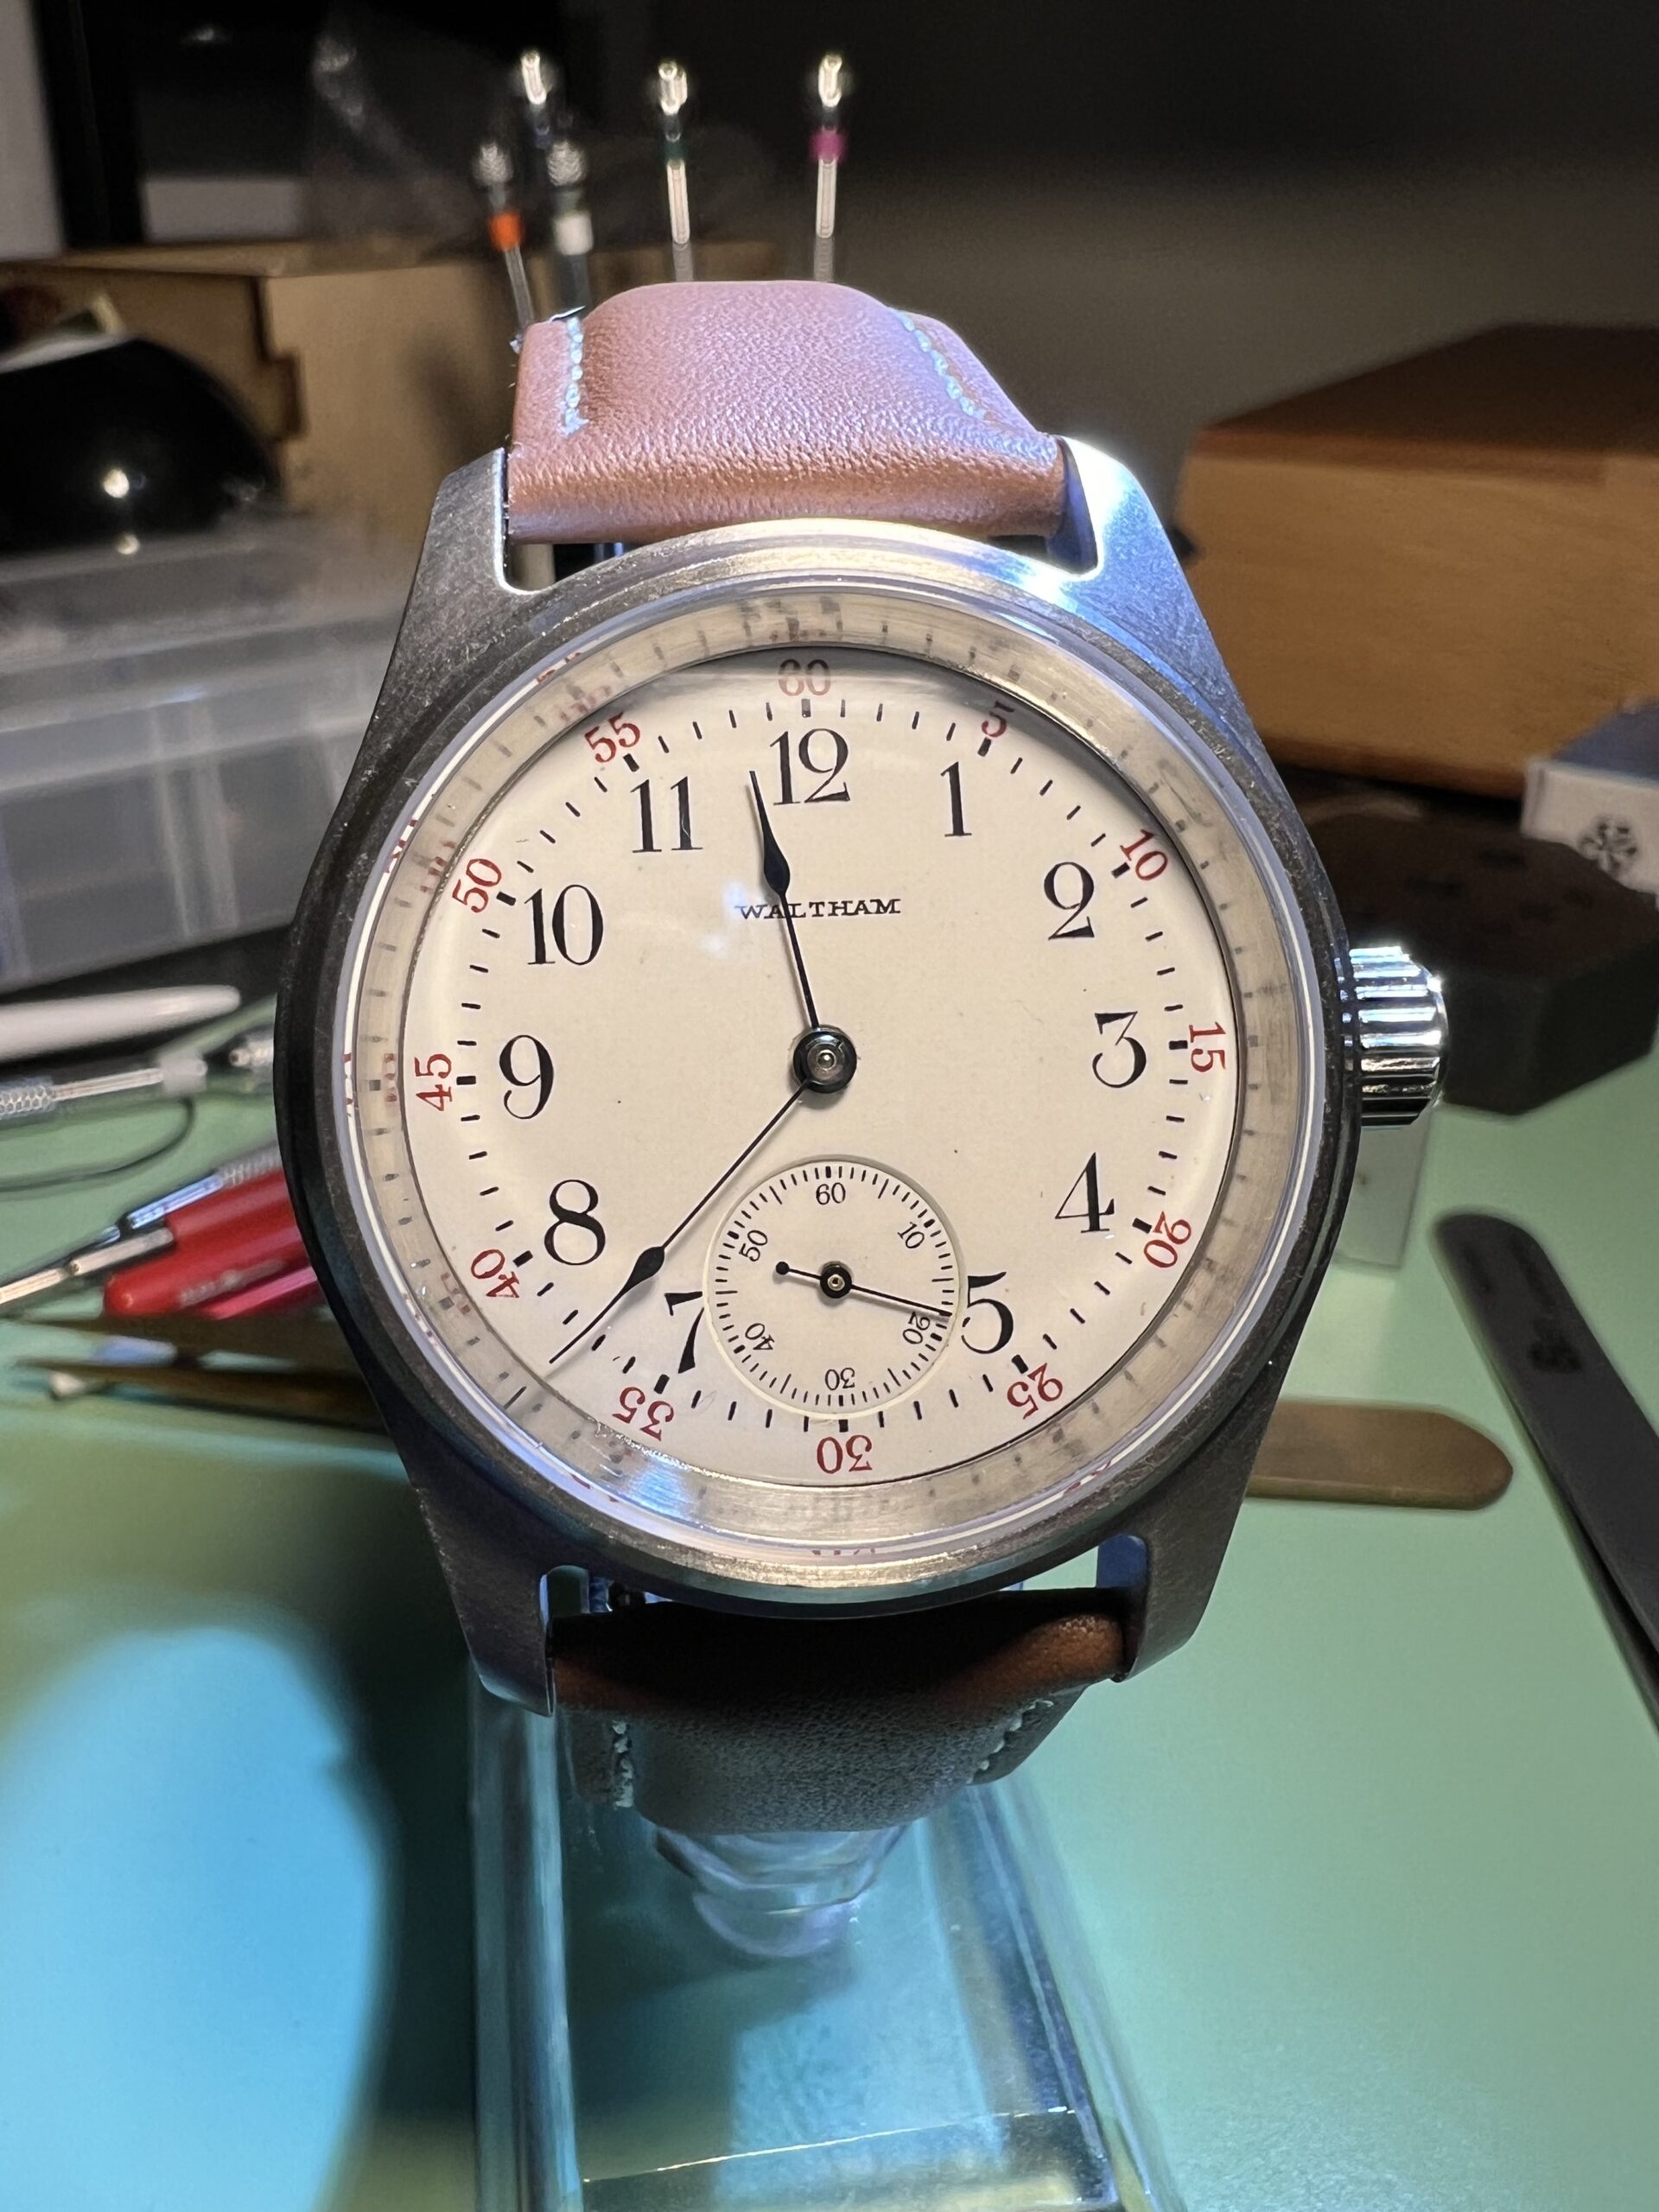
Part 2: A Watchmakers Story
The finished product: A 118 year old pocket watch is given a new life in the post-modern era Timeline and Process Overview The idea for this project was sparked several months ago when I visited a craft fair on Boulder’s Pearl Street and spoke with the team from Vortic Watch Company, who specialize in…
Final Report Part 2
The creation of art is often a protracted dance between vision and execution, a meticulous process of translating abstract concepts into tangible realities. The brutalist fountain that took shape over several days was no exception, its construction a testament to both the initial design aspirations and the pragmatic adjustments necessitated by material constraints and technical…
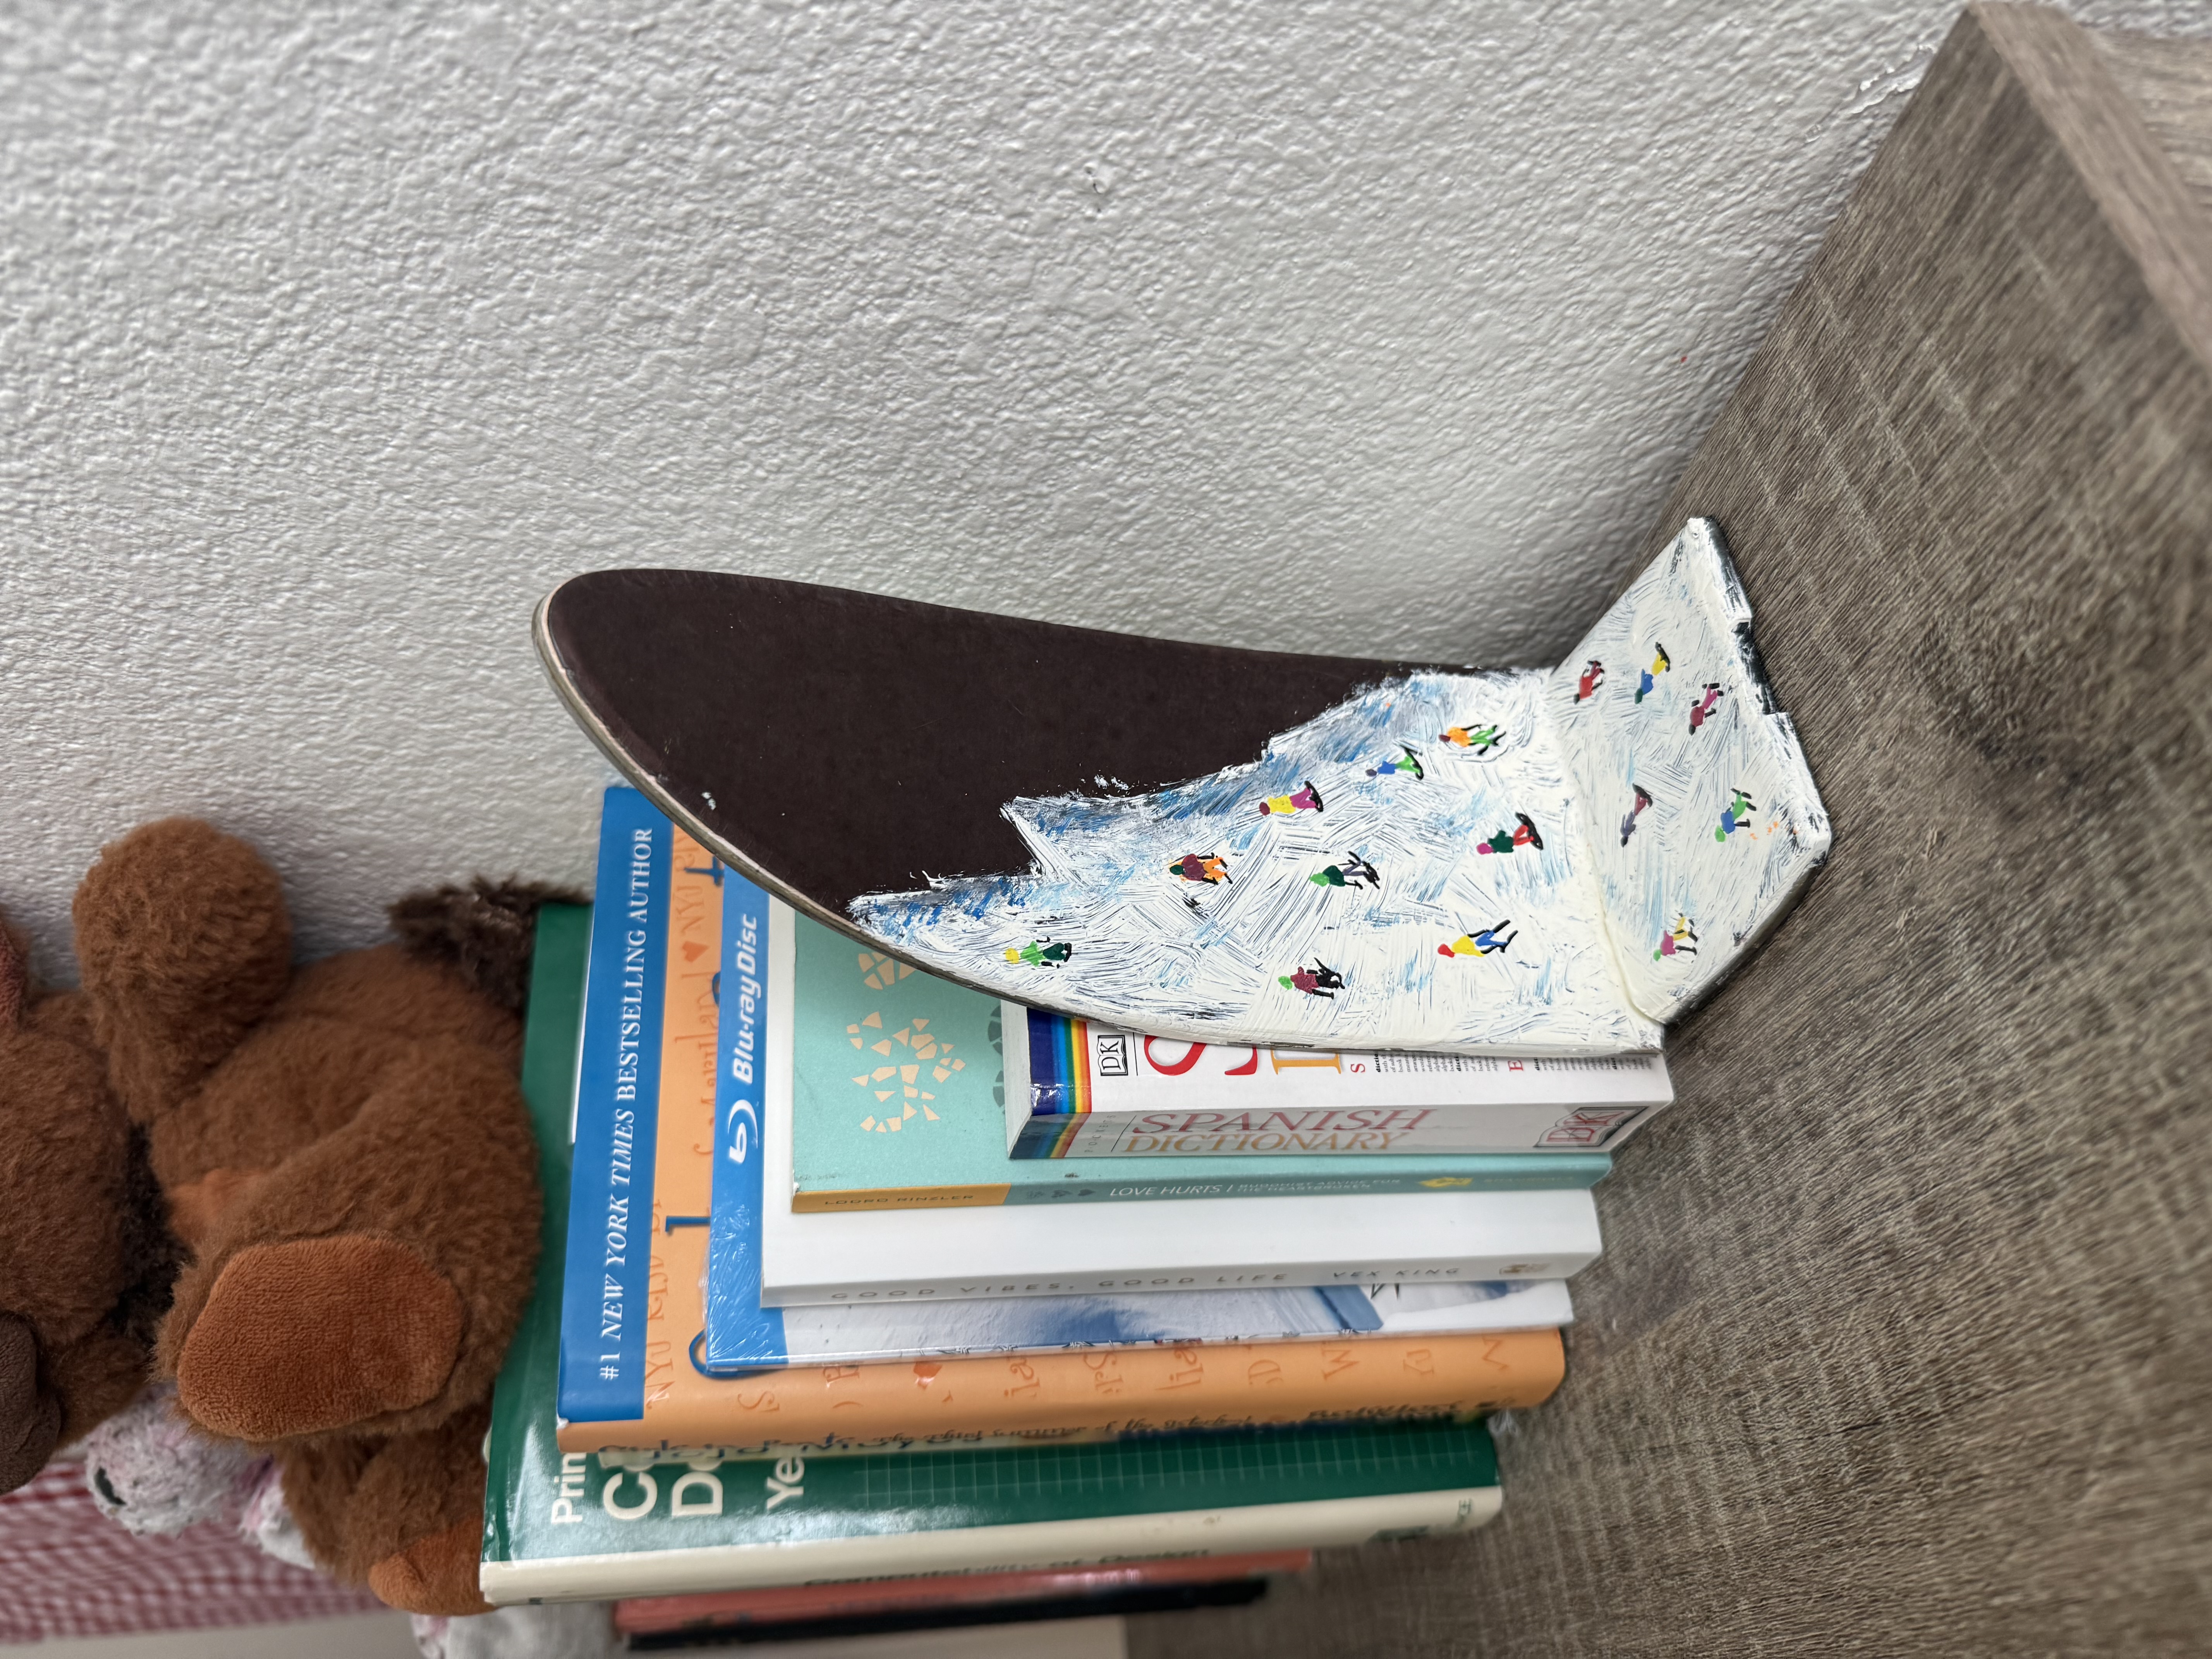
Ski Bookends – Part 2
Once I decided on my idea for the project, it was time to begin the design and fabrication. The first step was to find a pair of skis. This was almost more important than the overall design because the type of ski I found would drive how I supported the bookends and how I painted…
Final Report Part 2 – Retro 80s Ski Boot Warmer
Timeline: The timeline above outlines the five-week process behind designing and building my retro ski boot warmer. In Week 1, I purchased all necessary materials—including a 12V PTC heater/fan, plywood, PVC, and a power converter—and began preliminary sketches to size the enclosure for portability and proper boot fit. Week 2 focused on fabrication, where I…
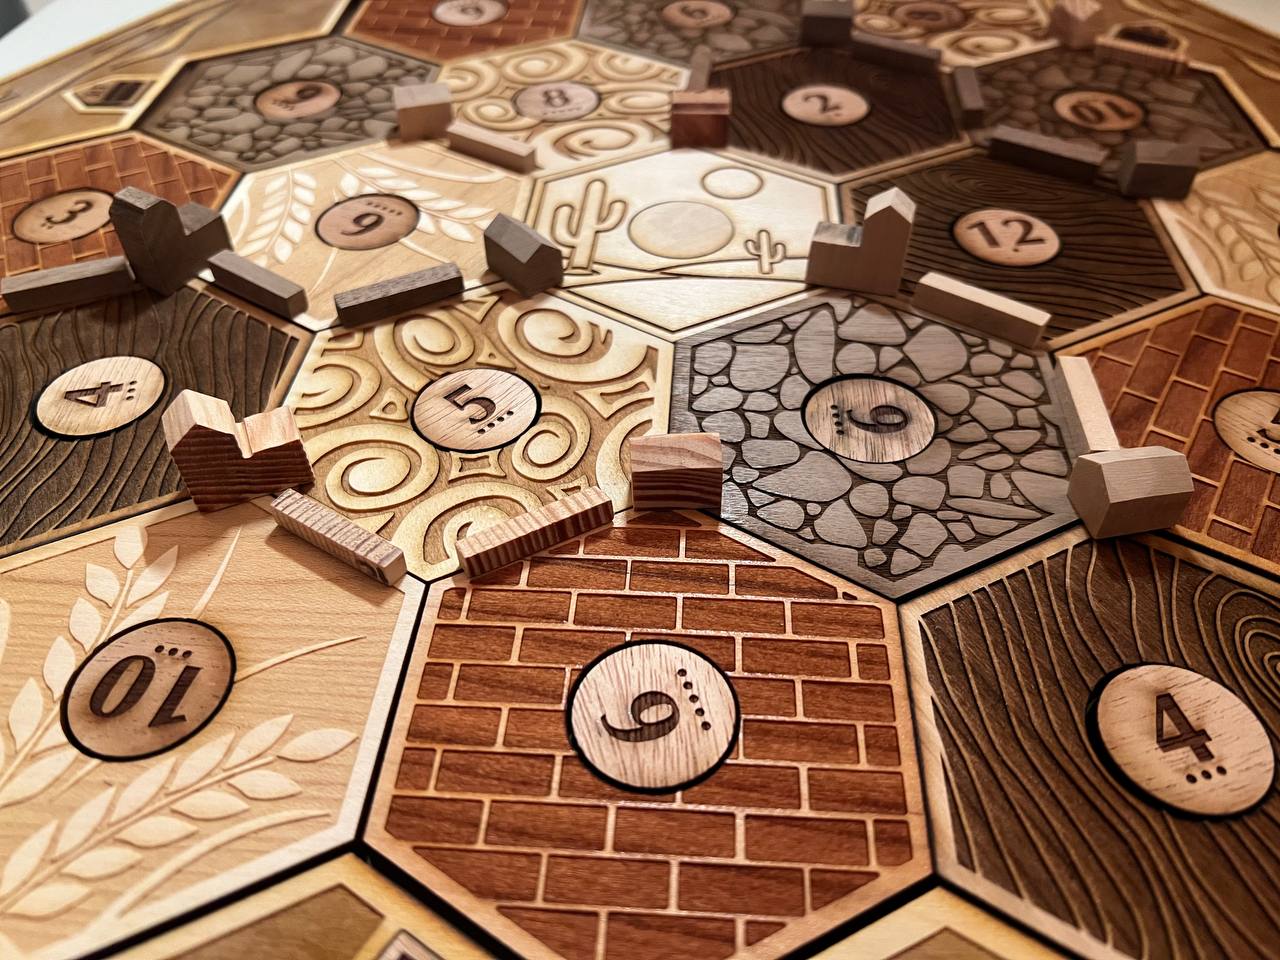
Rustic Catan – Final Report Part 2
For my project, I decided to create my own version of the board game Catan with a rustic and naturalistic aesthetic. Catan is a strategic and interactive board game (with tons of individual pieces) where players act as settlers that build settlements, cities, and roads while gathering and trading resources (wool, brick, rock, wheat and…
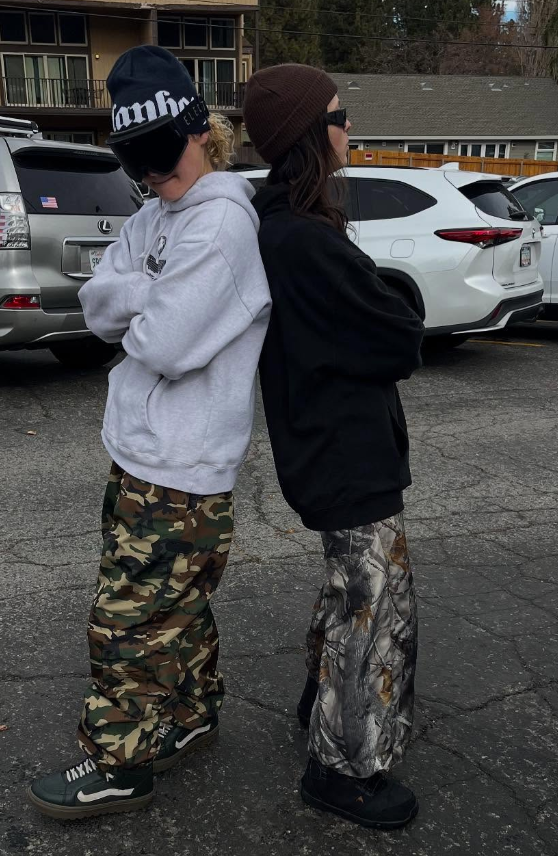
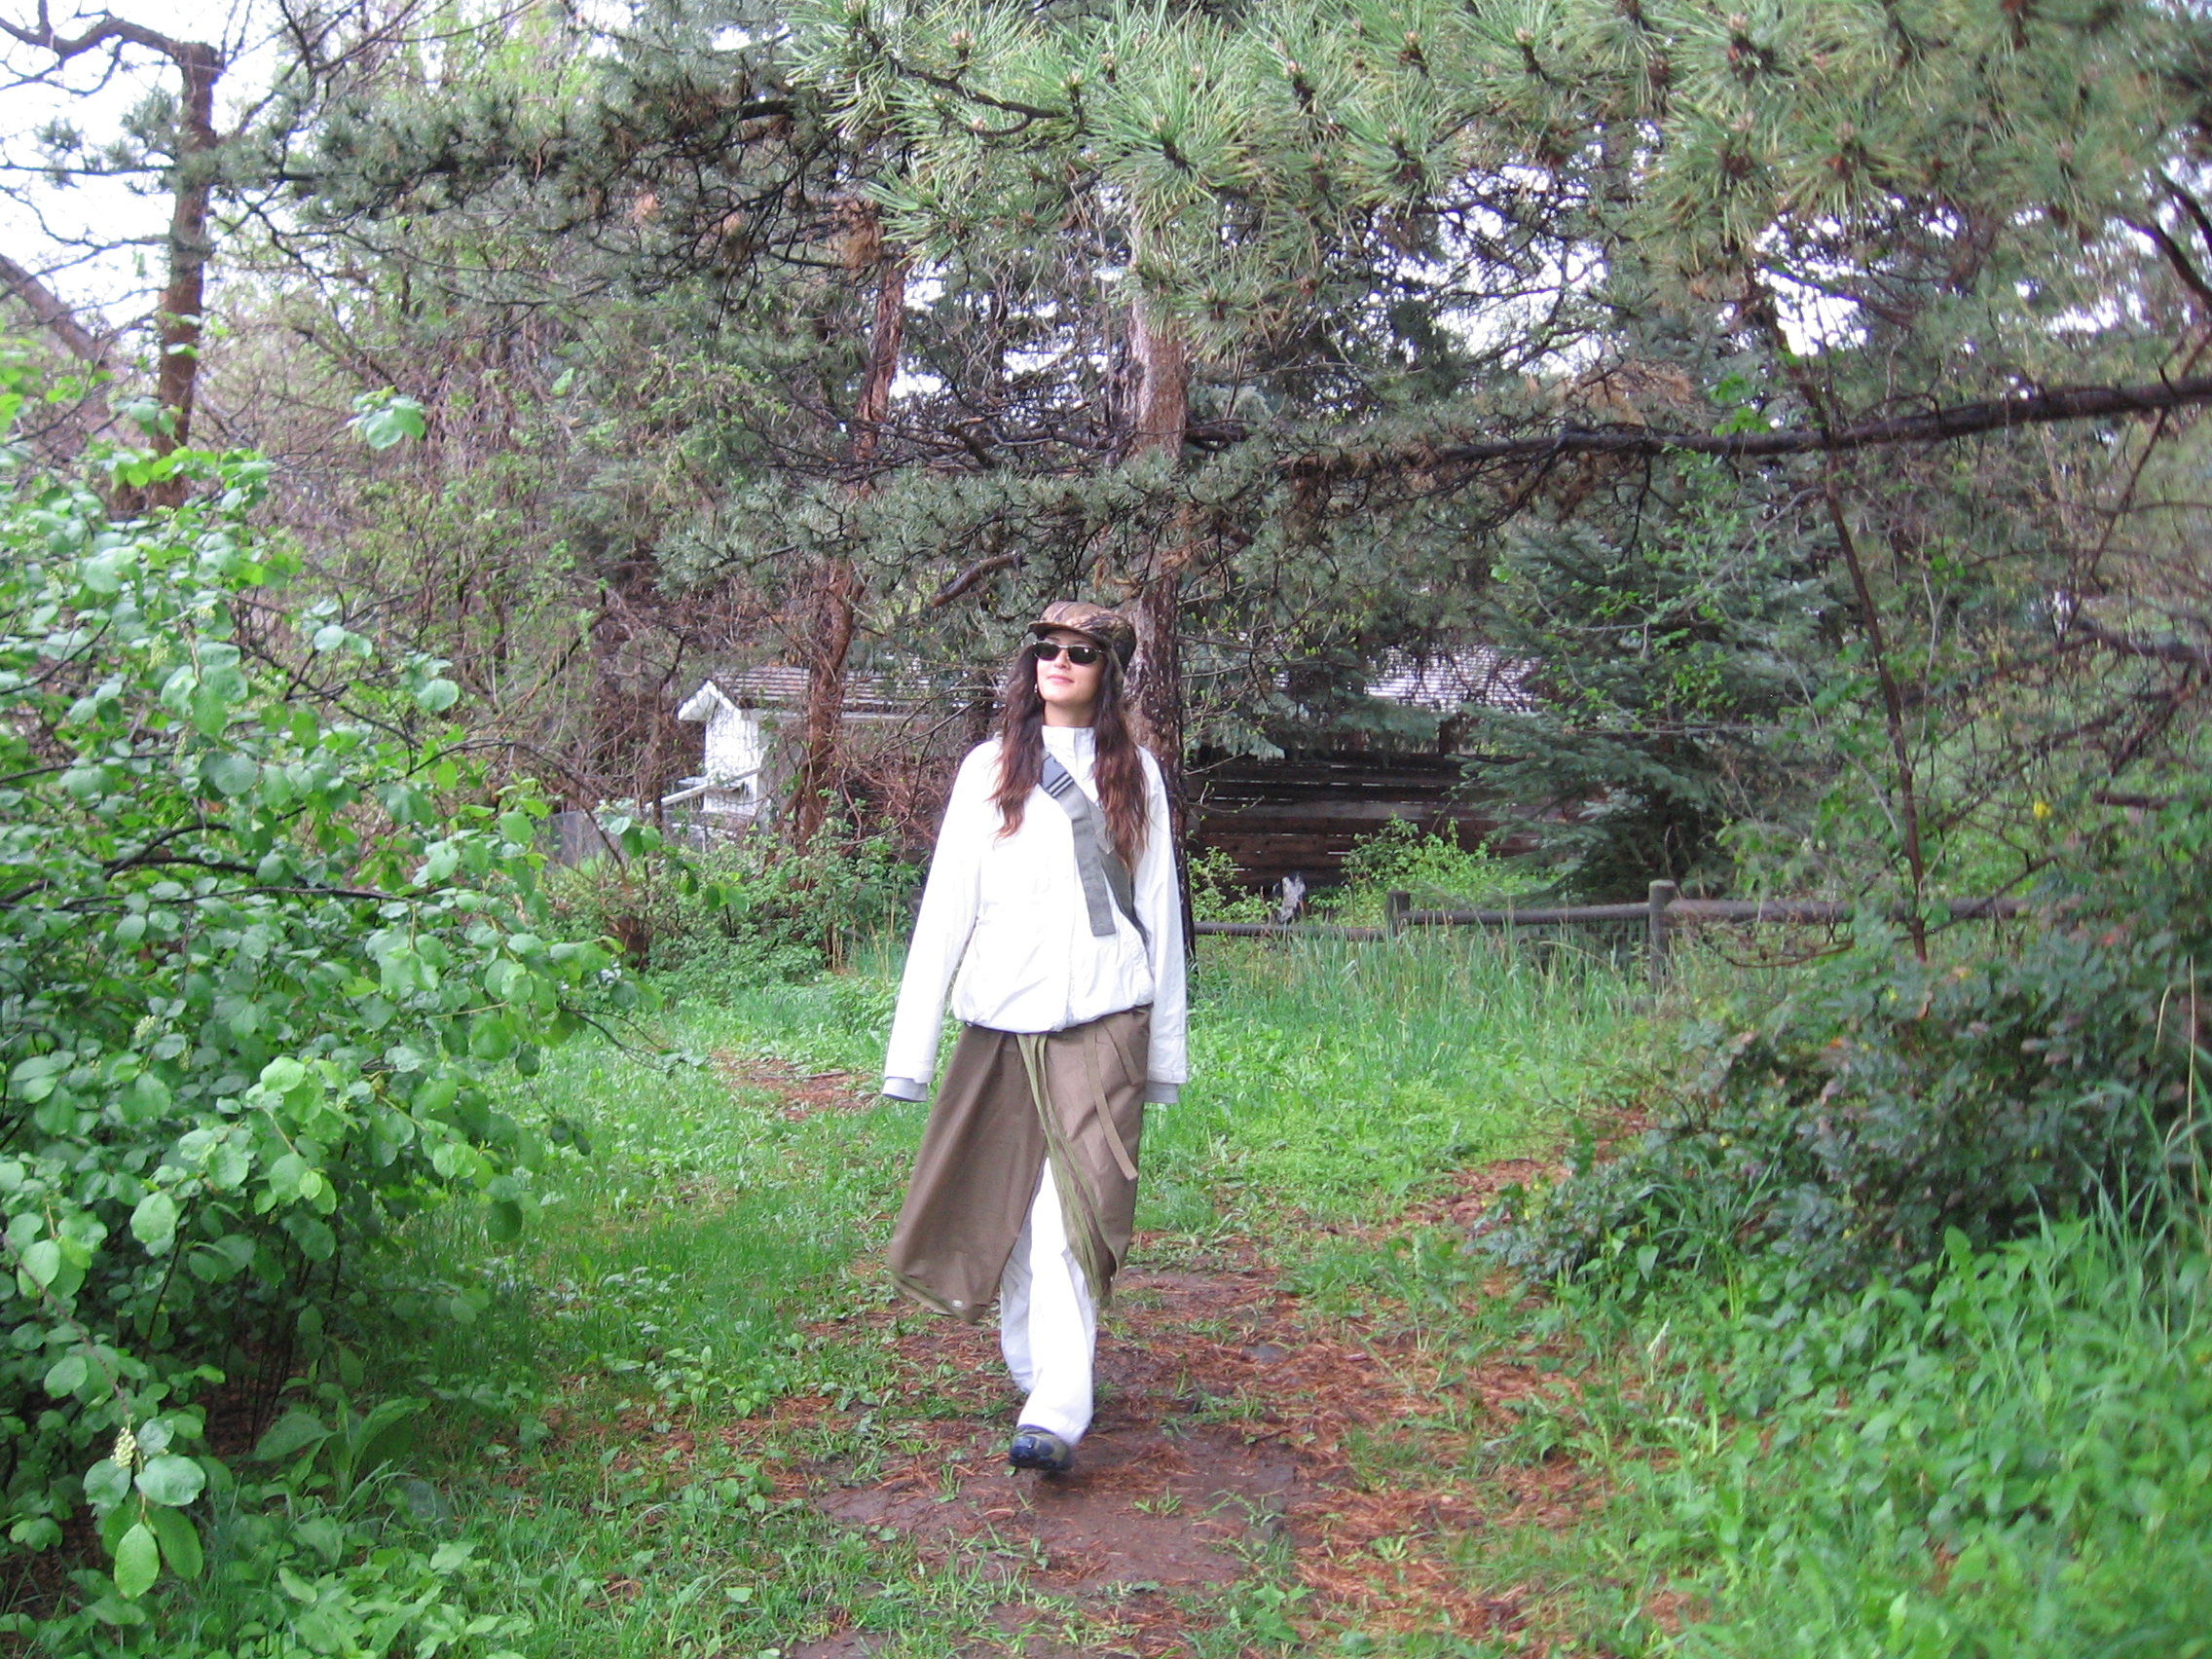
90’s Streetstyle Snowboarding Pants – The “How”
Now that my initial sketches, pieces of fabric to cut, and dimensions are completed, I can finally start making my own snowboarding pants. As a quick refresher: I wanted to design pants that are both stylish and functional, inspired by my love for snowboarding and my passion for making clothes (thanks, Mom and Nani!).…
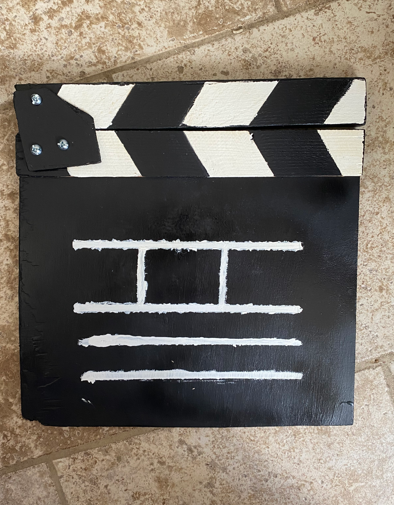
Final Project: Classic Hollywood Clapperboard
Timeline of the Design Process Creating my final artifact—a handmade clapperboard inspired by Classic Hollywood—wasn’t a strictly linear process. It involved a lot of back-and-forth between exploration, trial, and hands-on learning. Here’s a breakdown of my design timeline: Phase Dates Key Activities Exploration Feb 20 – Mar 3 Researched vintage film equipment, gathered inspiration…
CyberCrystal Vest: Final Report Part 2 – The How
Timeline of the CyberCrystal Vest Project Week Phase Developments 1 Ideation & Aesthetic Definition Brainstormed cyberpunk-inspired designs, sketched early vest concepts, defined goal for movement-reactive wearable tech 2 Component Exploration & Research Researched Neopixel LED chains, vibration sensors, microcontrollers, and 3D-printed wearable components 3 CAD Modeling & Prototyping Designed three sizes of crystal spikes in…
Foldable Car Camping Bed – The How
For my final project for Aesthetics of Design, I built a cabincore car bed suitable for camping that can also fold to fit behind the back row of seats in my car. Through several design iterations better covered in my last post, I came up with a design that uses hinges to allow five different…
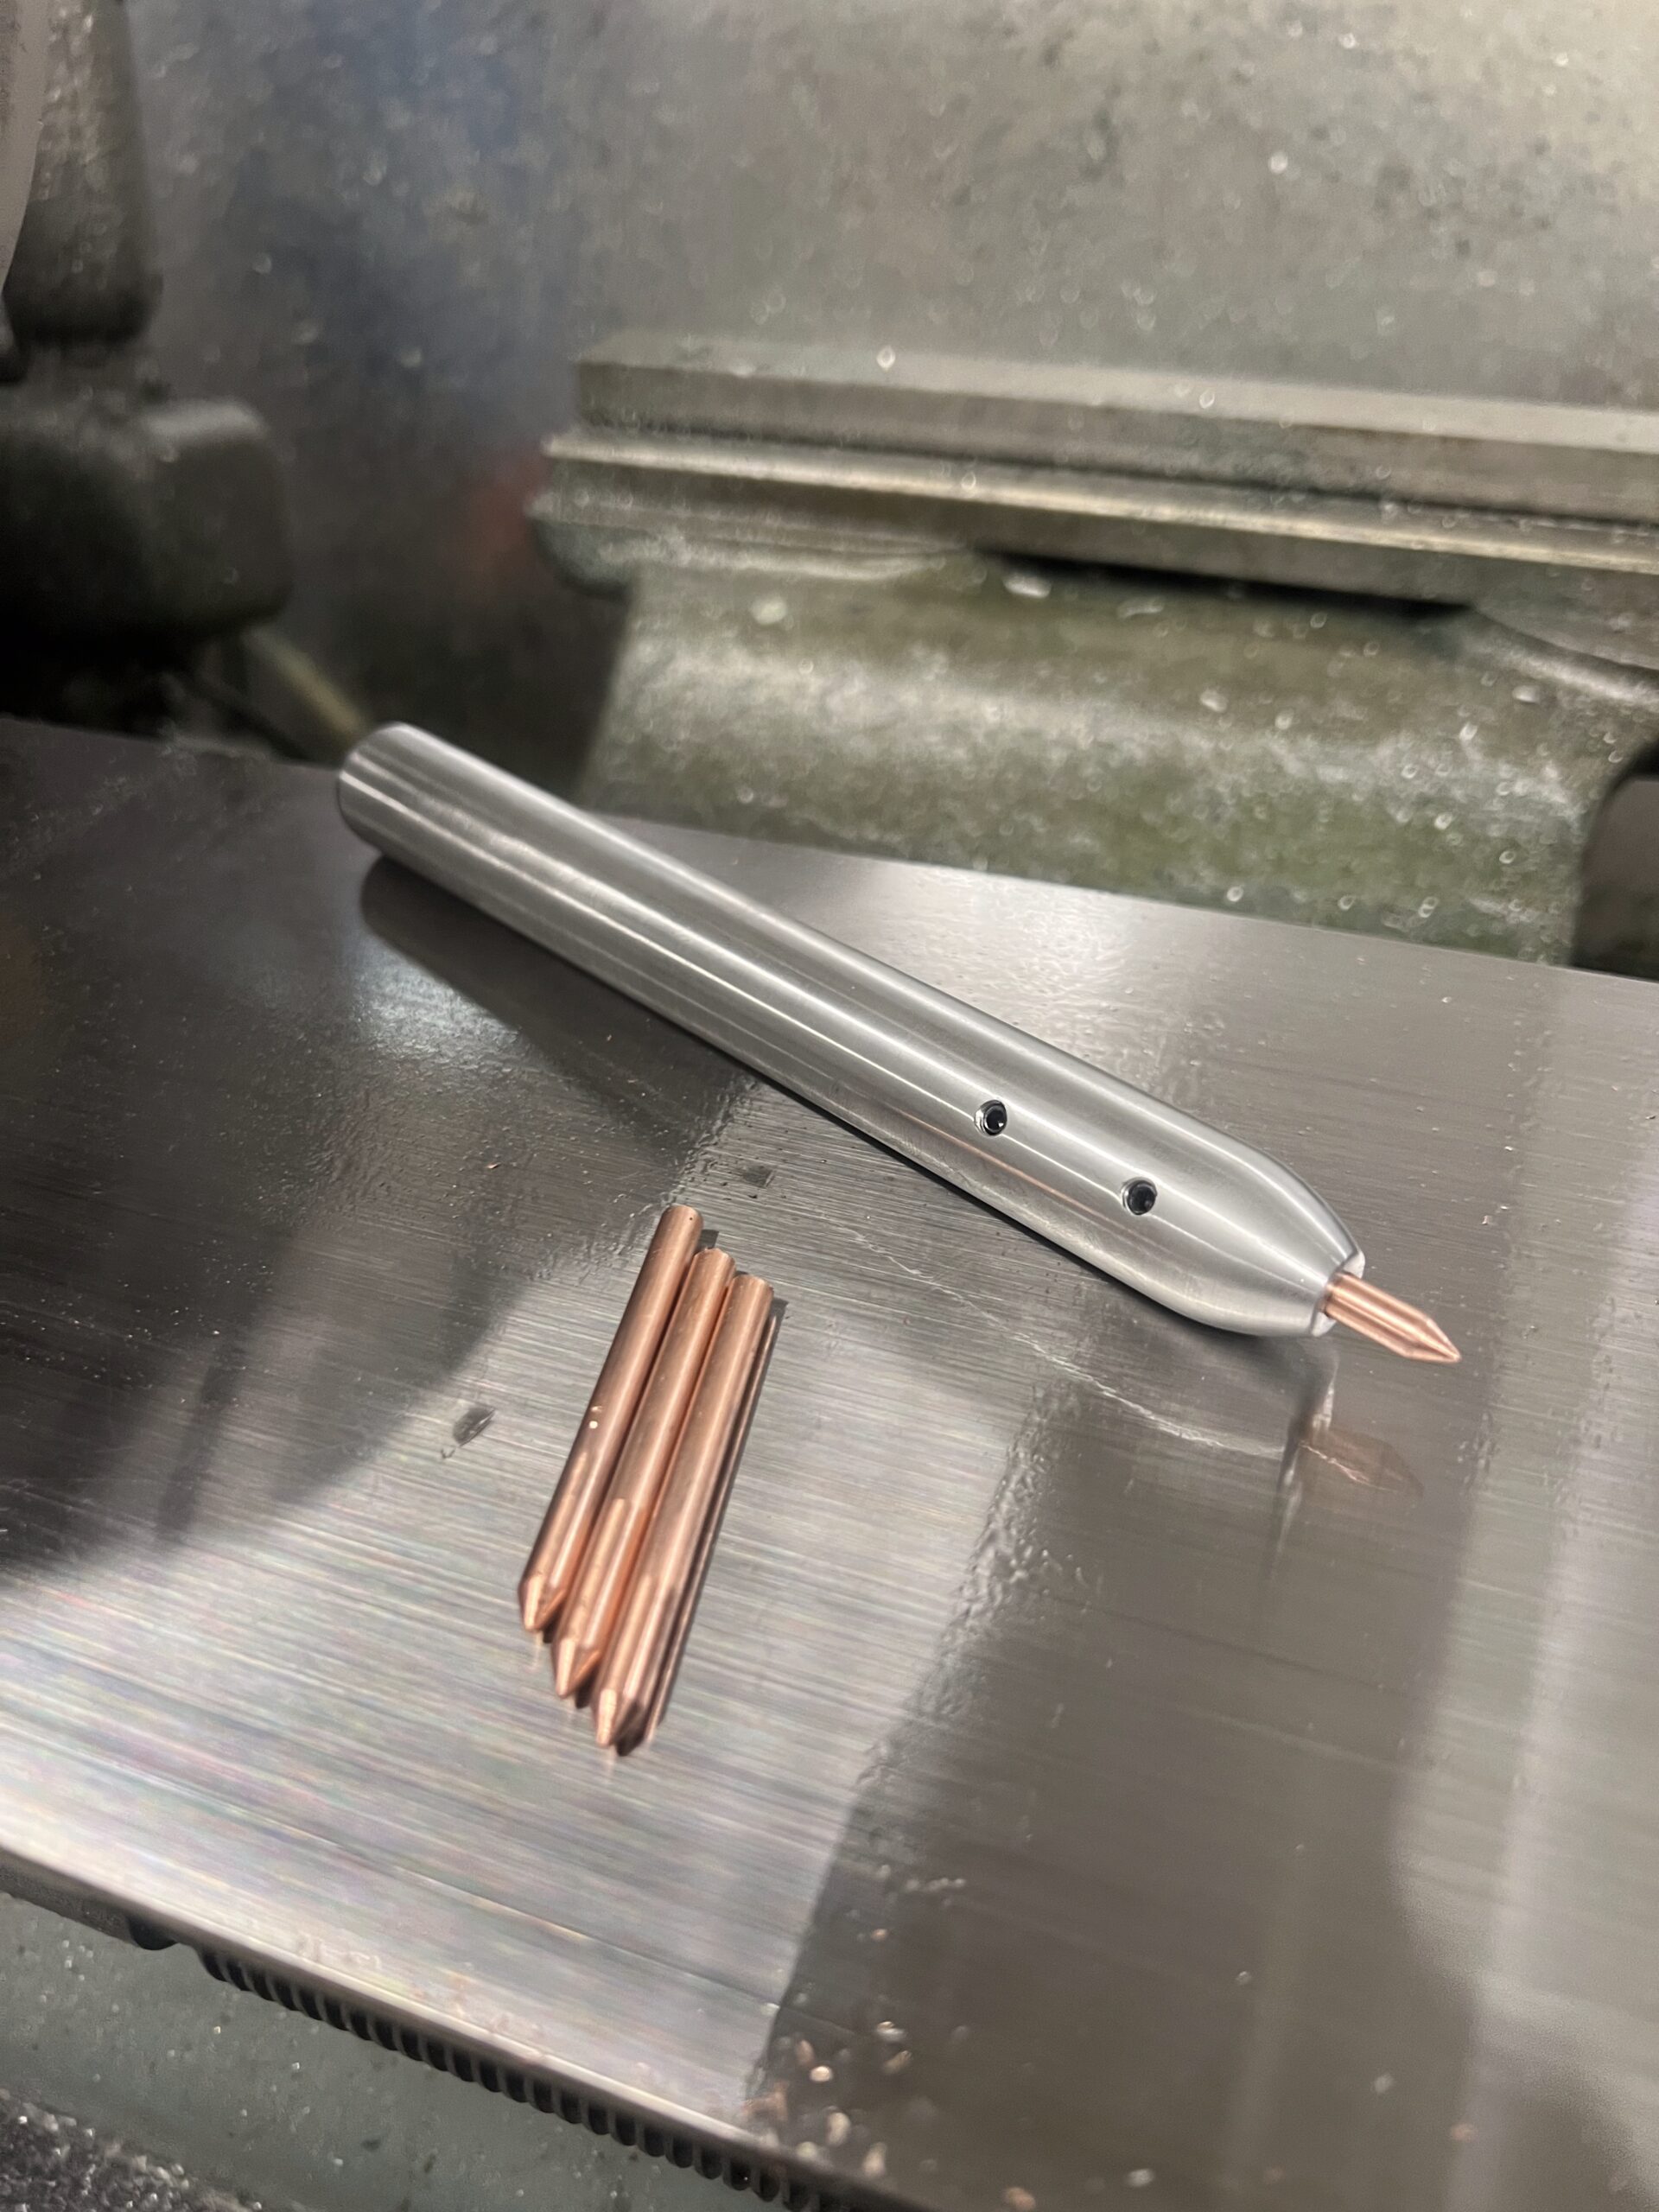
Final Report Part 2 – Art Nouveau Mobile Fabrication
To create my artifact I primarily used 2 methods of construction, a tube bender and jewelry pliers. The first and most used tool to create the Art Nouveau Mobile was a tube bender, shown below. This tool allowed for me to set up series of dies and stops to create precise bends in the wire…
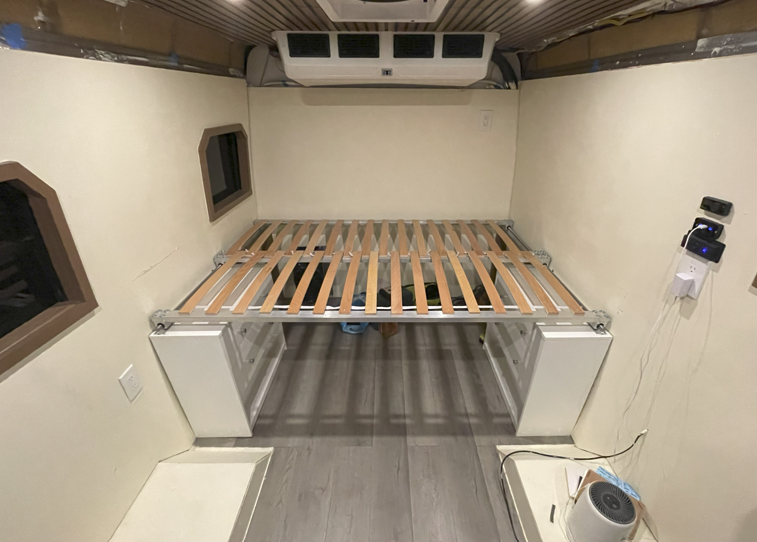
Final Sliding Bedframe – Part 2
After some shipping delays, I finally completed the assembly of my project. I was able to get the aluminum tubing I needed just in time to manufacture in slots, and my project came together just how I envisioned it. With that, this post will describe my entire process of building out my bedframe. The goal…
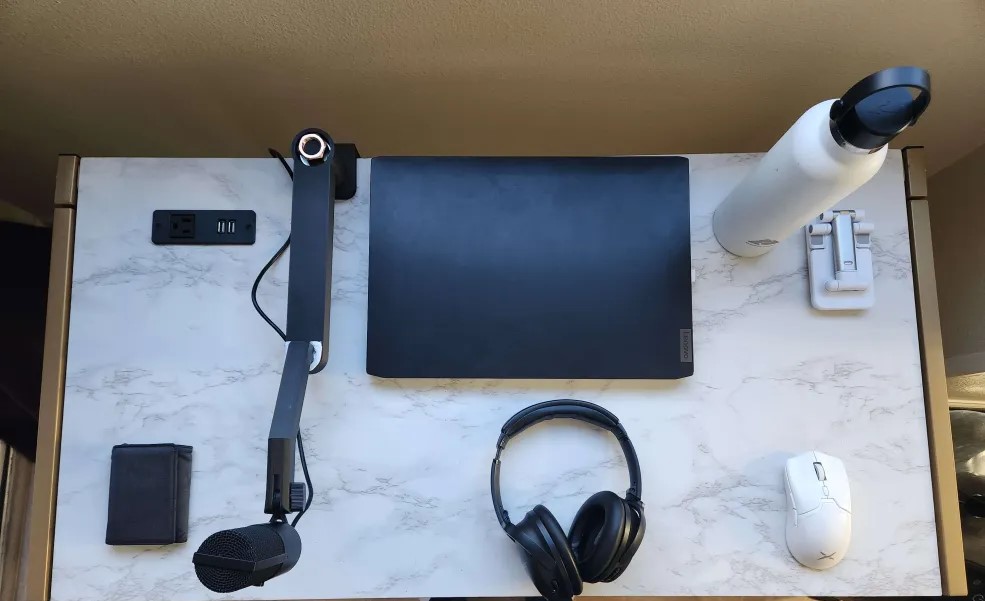
Low Profile Microphone Boom Arm: The “How”
For my final project, I created a minimalist, sleek, low-profile boom arm inspired by those currently available on the market. I scaled my boom arm to match the length of my table, as I happen to have a table with a shorter depth than most (I do not have the exact measurement). I used a…
Dual-Perspective 3D Sculpture: Final Report – Part 2
Project Timeline This section documents the full journey from idea to final artifact. It outlines the actual design process through a week-by-week timeline, describes how the sculptures were modeled, fabricated, and assembled, and ends with a reflection comparing the original vision with the final outcome. While function played a role, the focus remained on aesthetics,…
Magnetic Shoe Display – Fabrication and Construction
After developing the aesthetic direction and functional goals for my magnetic shoe display, the next phase of the project focused on physically building the piece. This stage was where ideas on paper were translated into tangible form through sketching, cutting, gluing, carving, wiring, and assembly. My goal was to bring together all aspects of the…
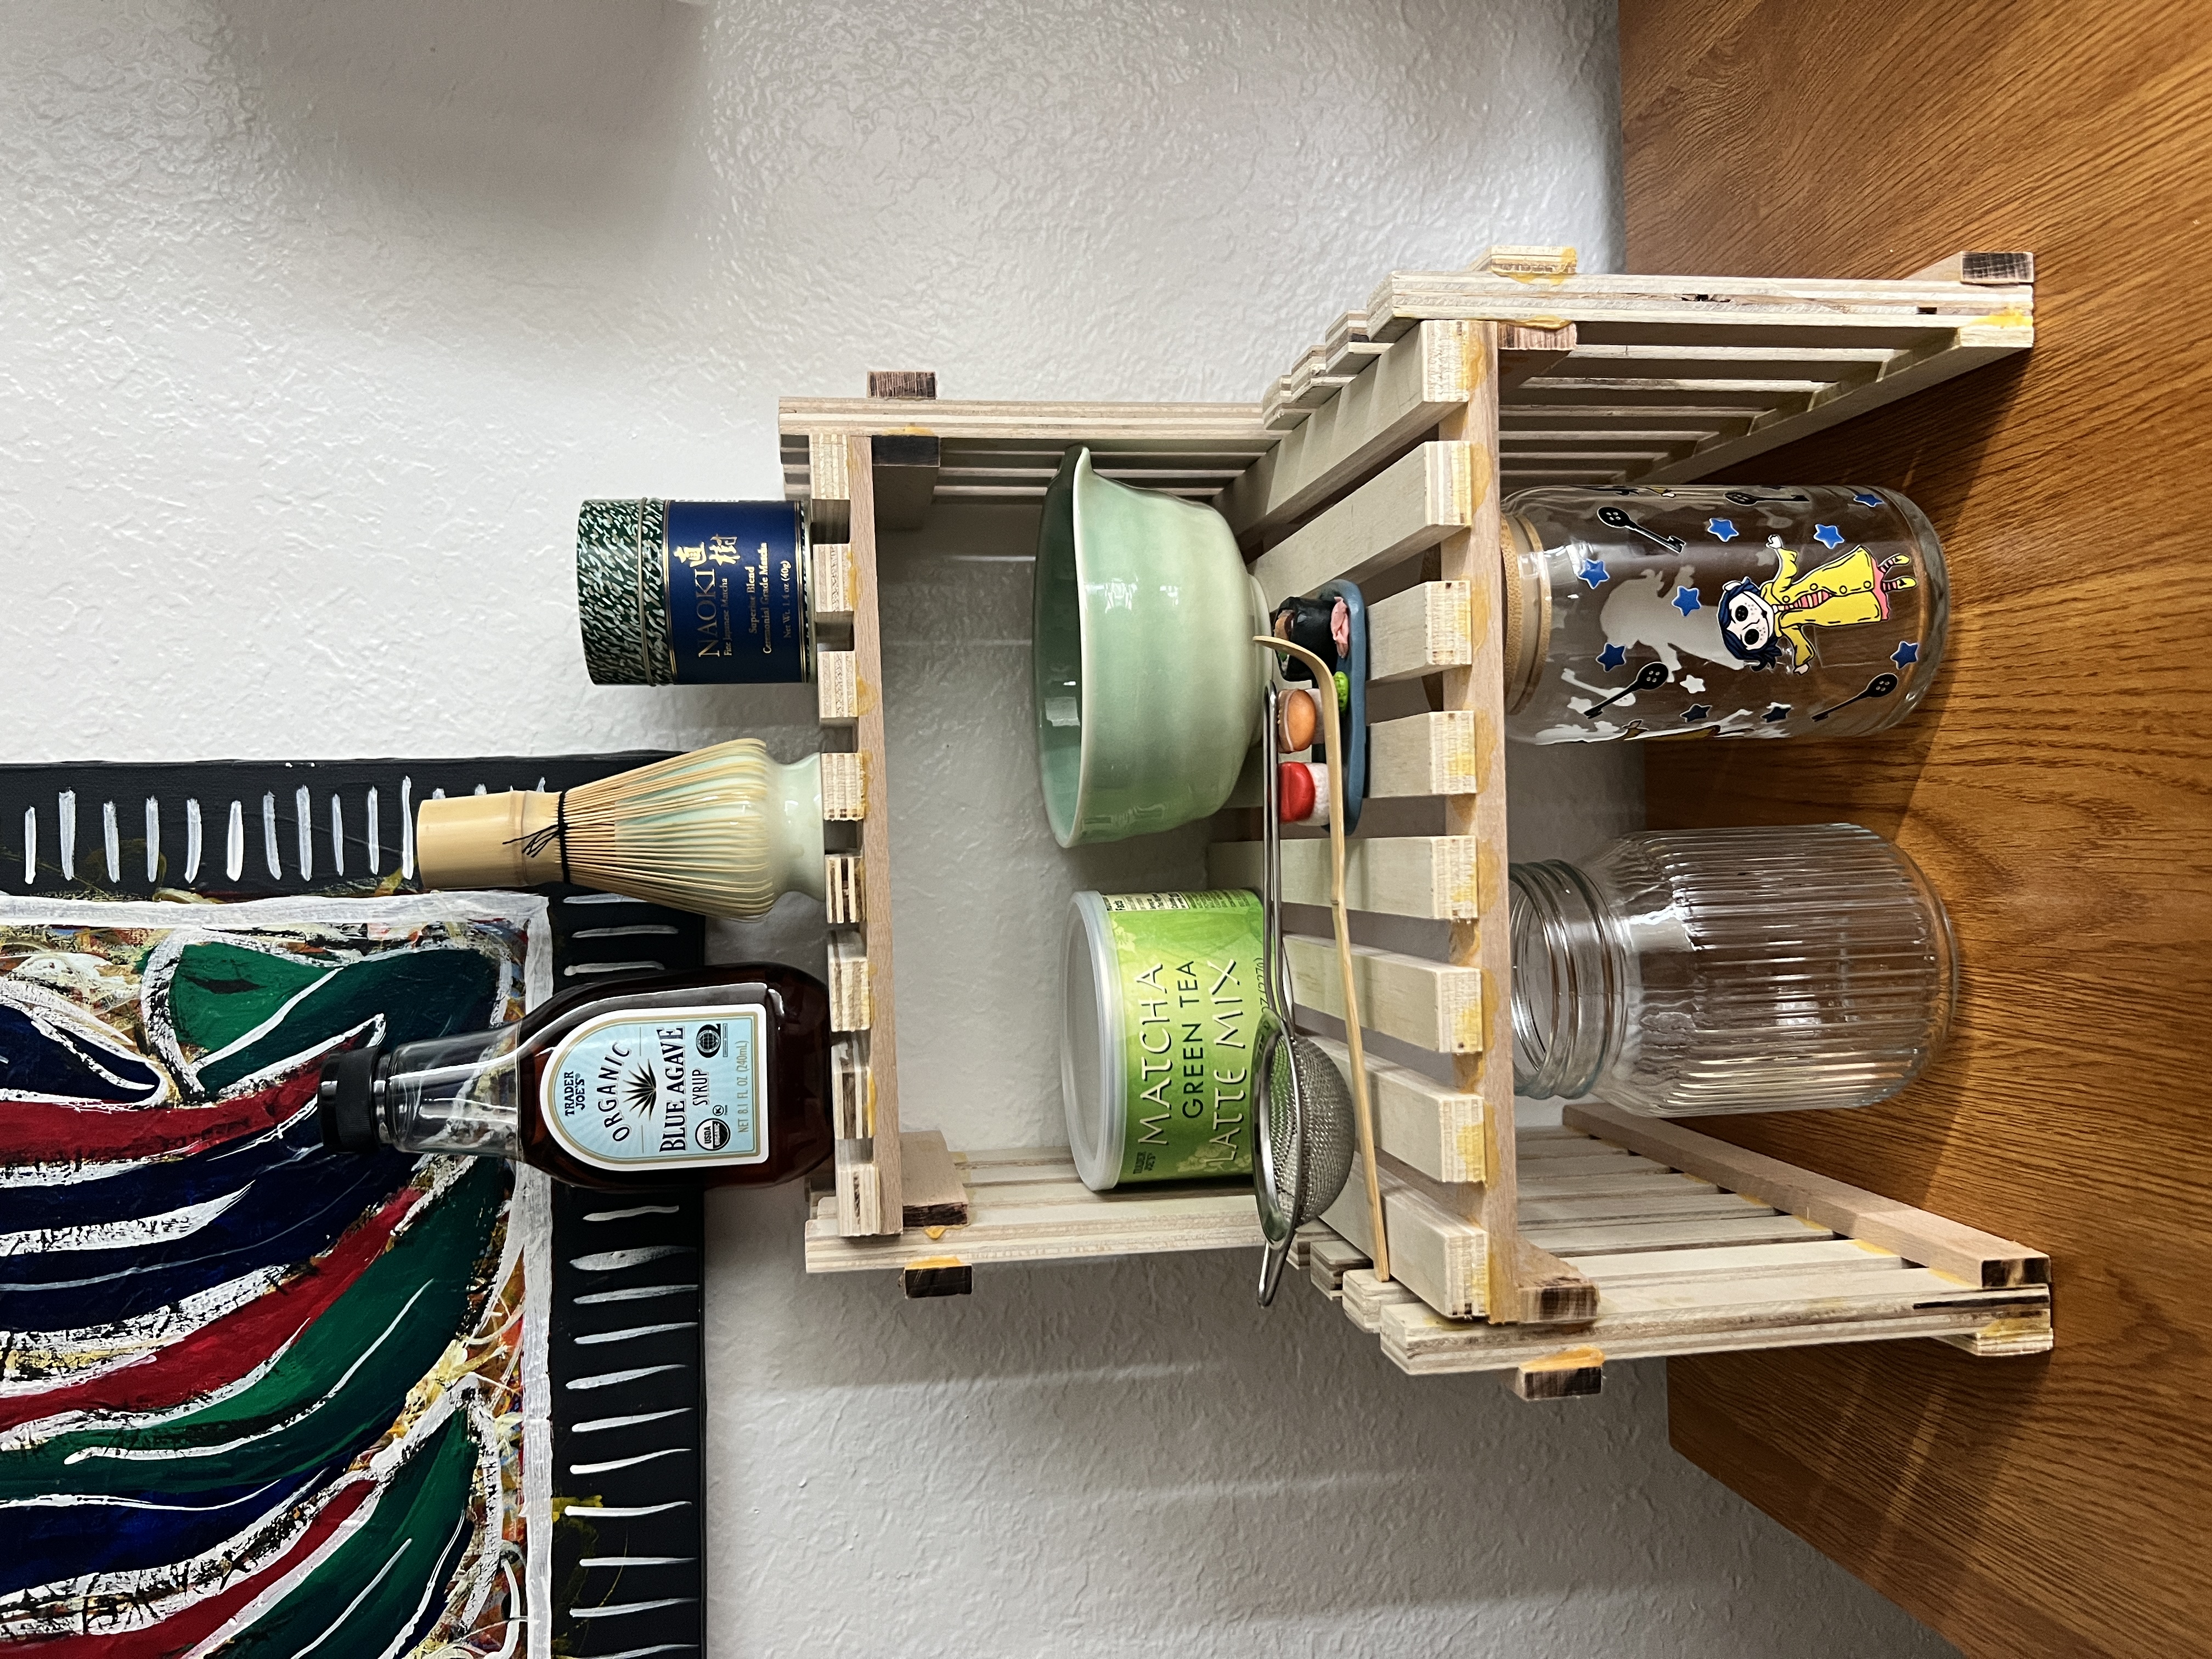
Zen Matcha Stand
The How Bringing my matcha stand to life from my CAD Model was a journey of learning, problem solving, and a whole lot of glue. In this post, I’ll walk through how I actually built it from skill acquisition and material prep to finishing details and reflect on what I learned and where I ended…
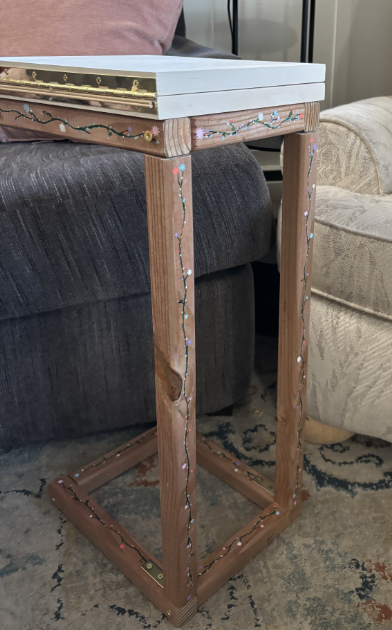
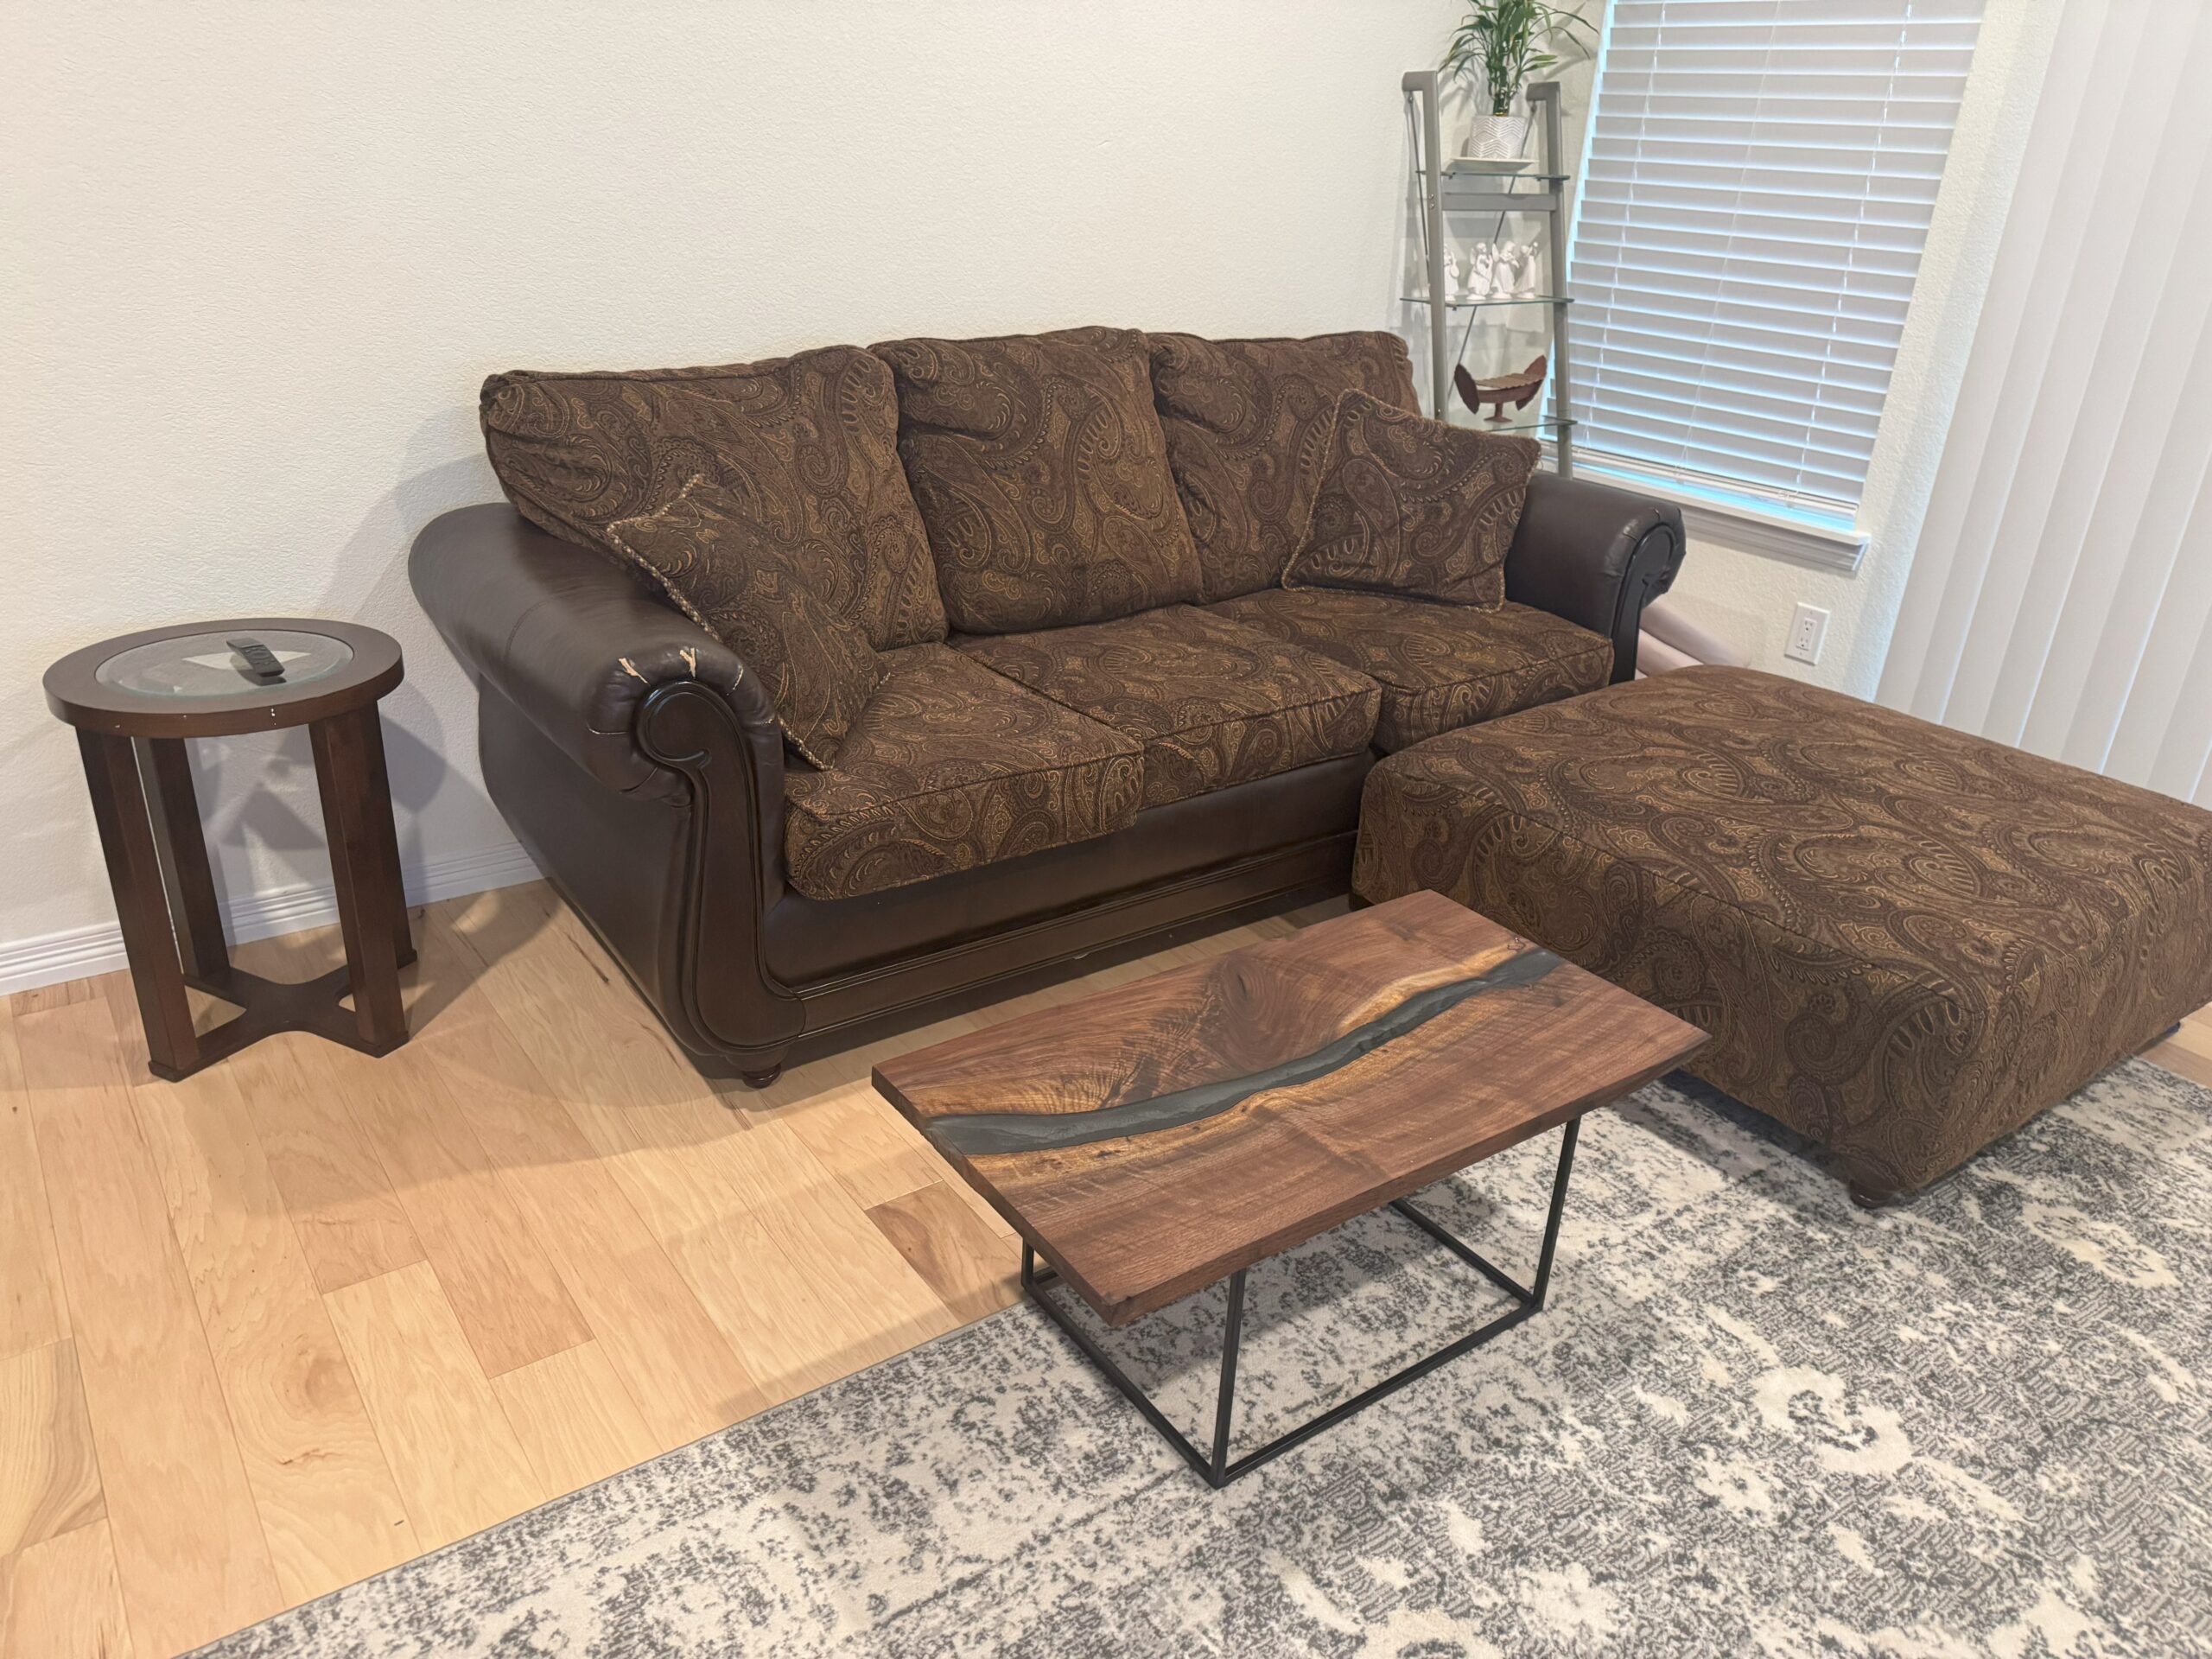
Rustic Cottage End table Final Report Part 2
For my main project I made an end table for my couch with a folding leaf extension in the rustic cottage core aesthetic. I chose this aesthetic because I really enjoy it and it matches my current living room decor. I also knew I wanted to use wood to create this end table due to…

The Disqualifier – Pneumatic Gauntlet 2
In my sophomore year of college, I was unmistakably disqualified from a taekwondo tournament—no confusion, no gray area, just cleanly and thoroughly booted from the mat. I left the team not long after. At the time, it felt like failure. Over the years, though, that moment took on a new shape. What began as frustration…
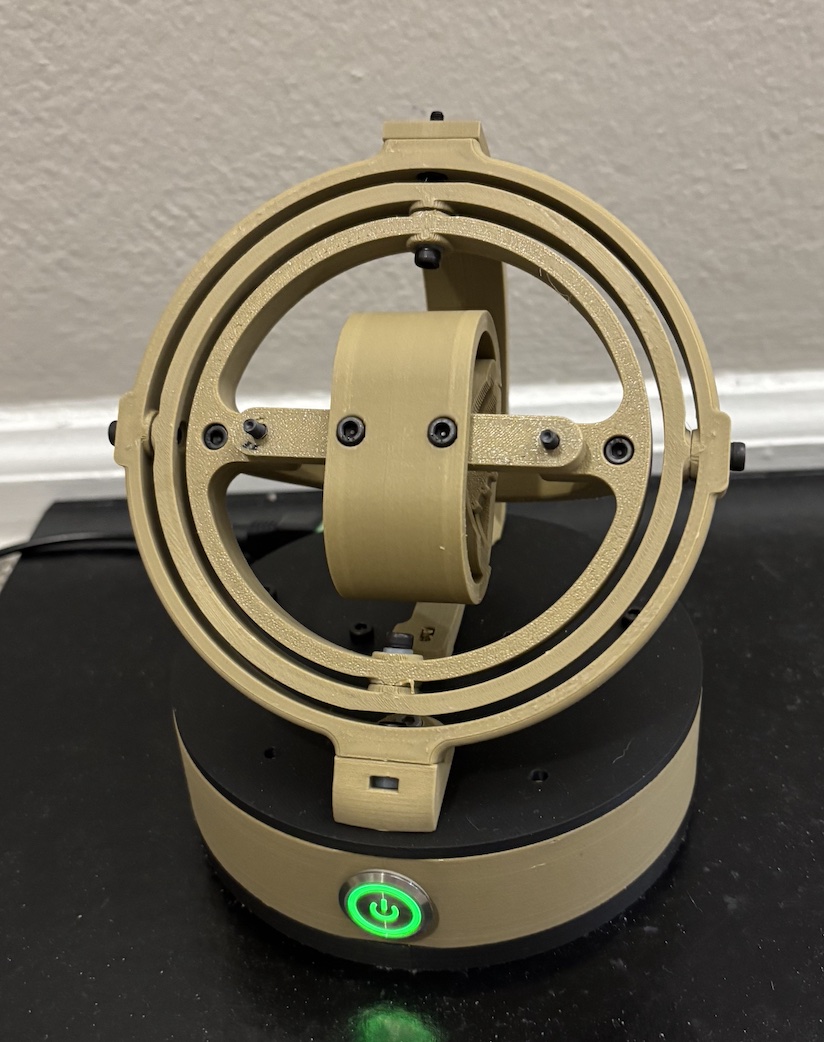
Final Project Post 2: Gyroscopic Watch Winder
Here is the timeline for the project: Exploration: I performed most of my exploration at the beginning of my project. As mentioned in my previous post, I was inspired to do this project by my friend Justin and my need for a watch winder. I have been looking consistently for a watch winder that would…
Post 12 – Hidden Compartment Fantasy Aesthetic
Creating my fantasy-inspired hidden compartment was a journey of creative exploration, technical challenge, and aesthetic evolution. What started as a Lord of the Rings-inspired art piece became a compact minimalist artifact, and built through trial, error, and eventual refinement. Fabrication Process Unfortunately, I did not take nearly enough photos of my fabrication process, however, you…
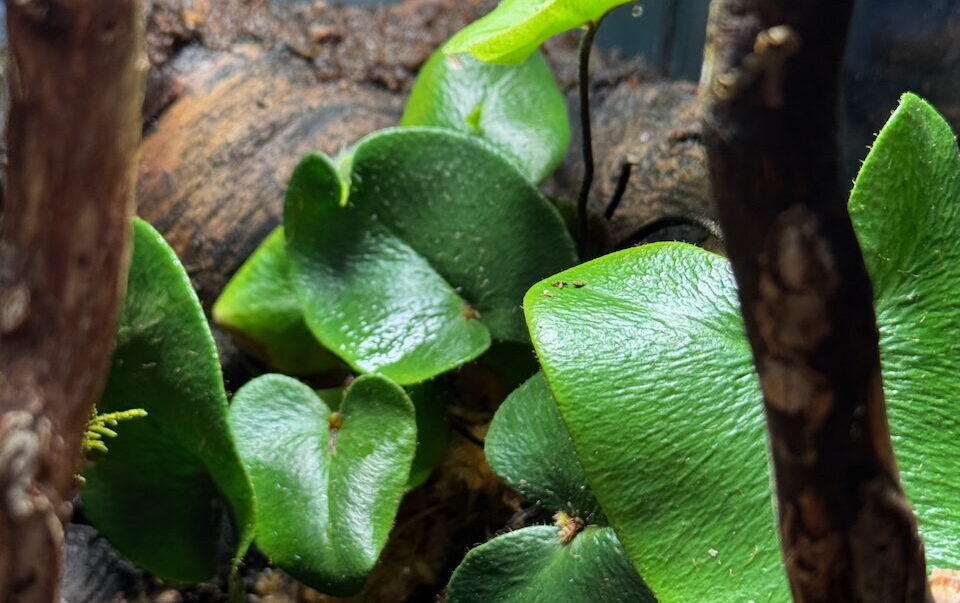
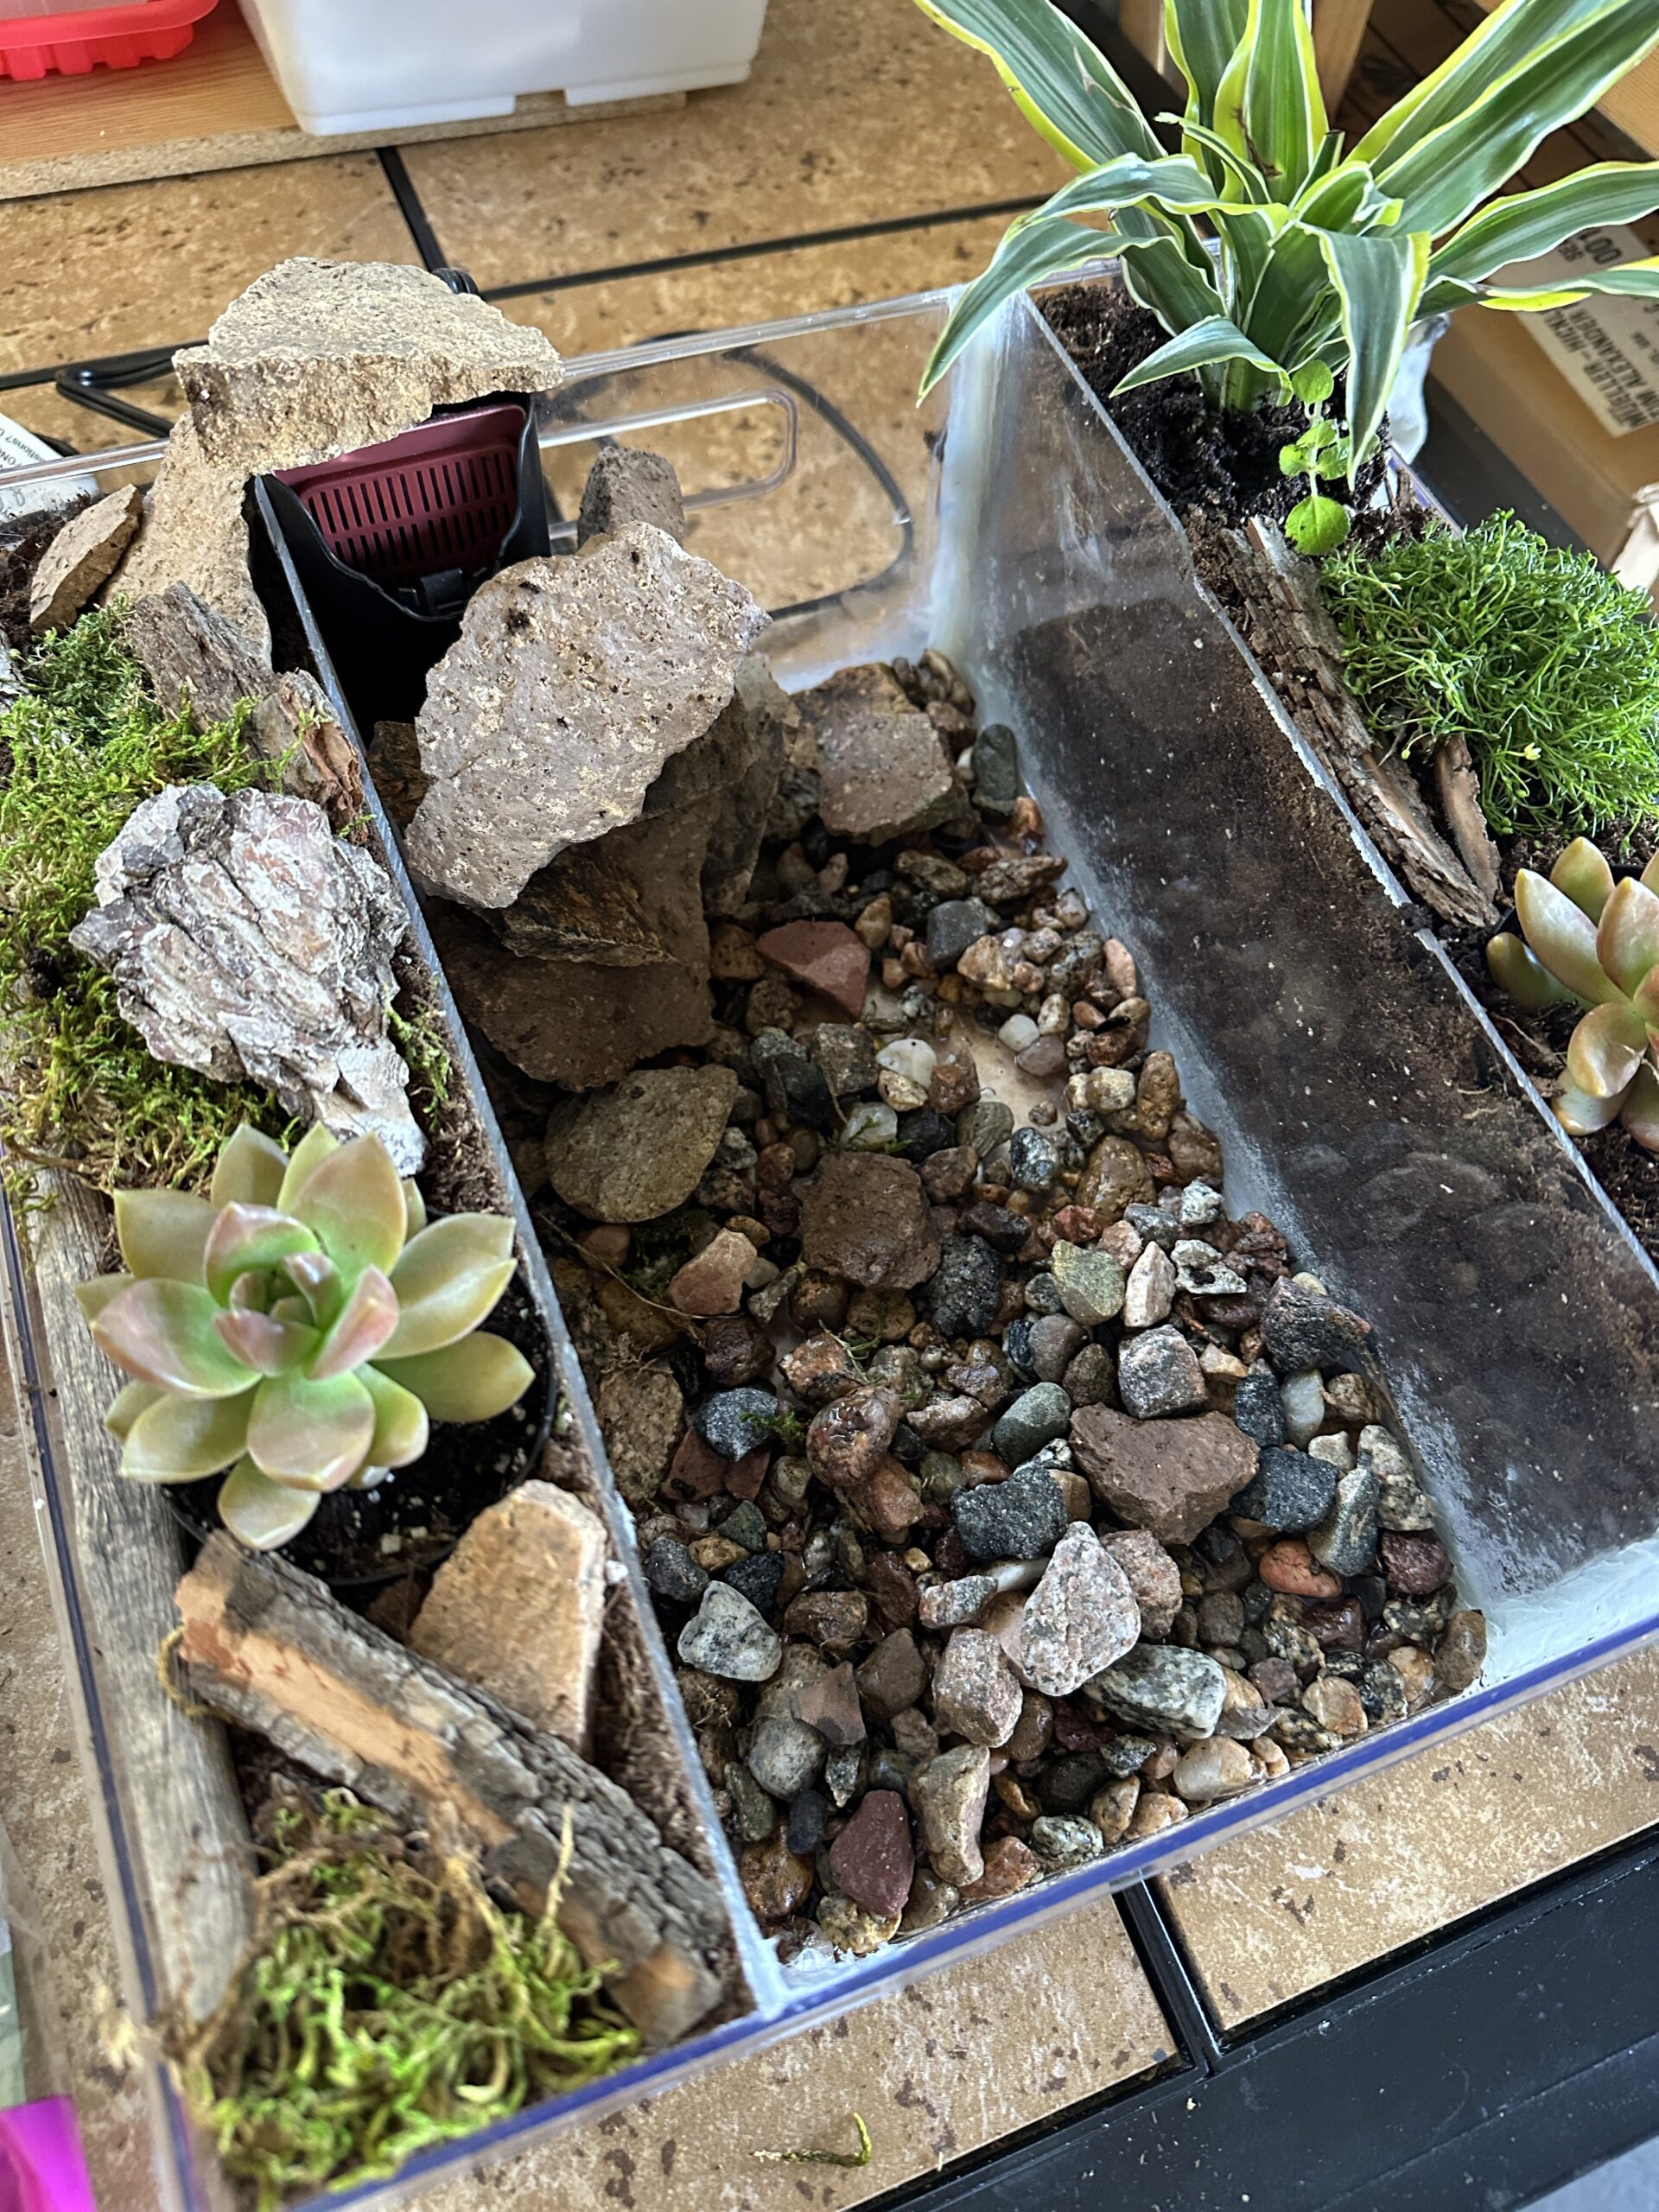
Final Report 2: Bioactive Terrarium Process
Timeline: Process: Step 1: Clean glass Step 2: Wash Leca and fill in drainage layer Step 3: Substrate barrier and substrate mix Step 4: Hardscape and plant! Step 5: Practice patience Day one: freshly planted. Day 3: Not much change. Day 11: Little (and a few big) signs of growth. Day 22: Growth! And…
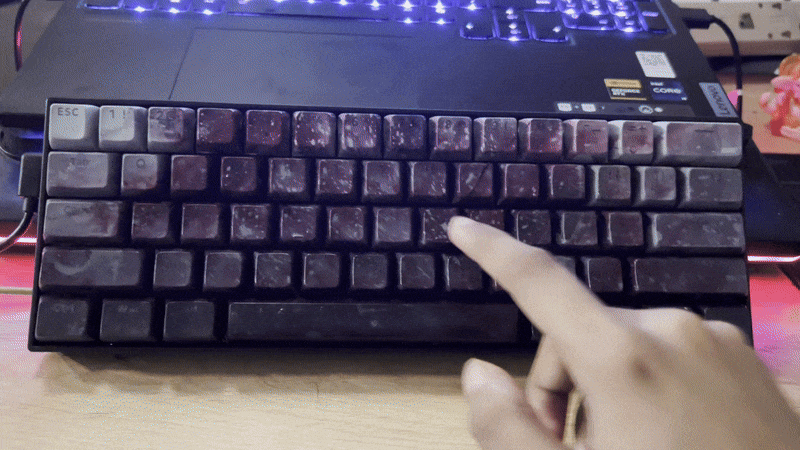
Space Theme Keyboard – Final Report Part 2
Introduction This post is the complete fabrication and process behind the project. In my last post, I walked through the journey of creating a custom space-themed keyboard for my Aesthetics of Design final project. I explored the inspiration behind the aesthetic—drawing from cosmic elements like stars, nebulae, and spacecraft—and discussed the iterative design process. Timeline…
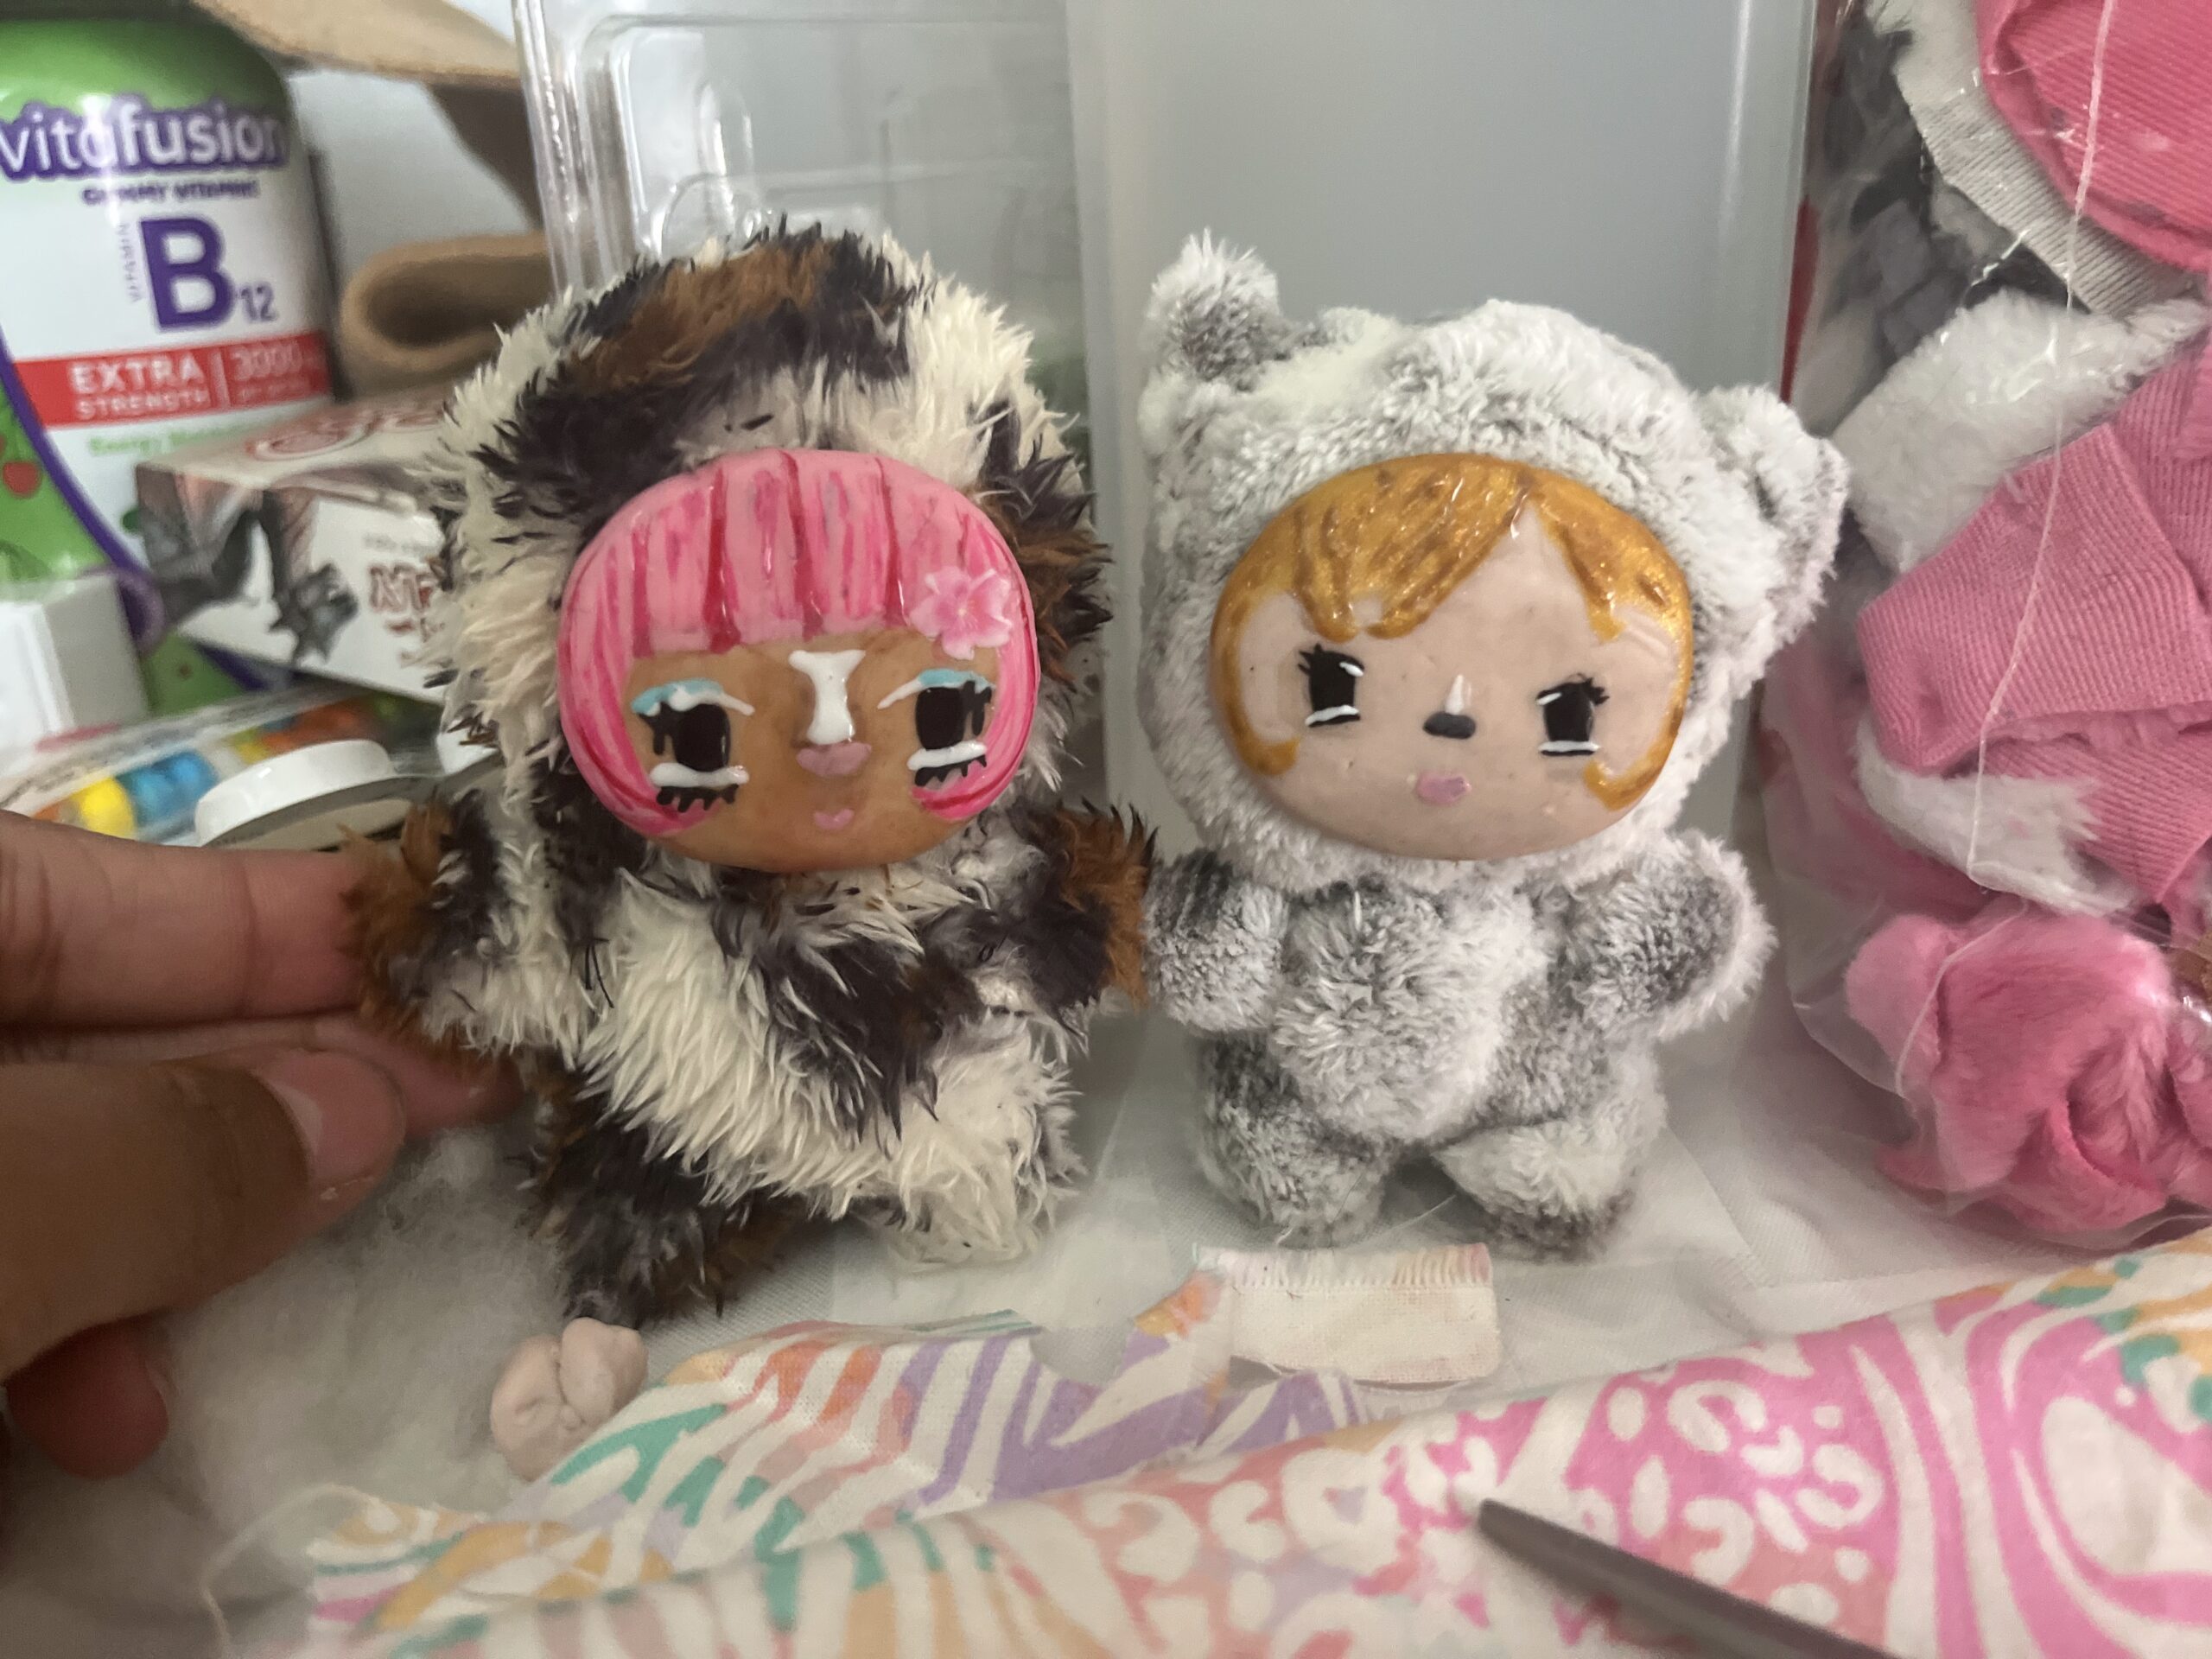
Gyaru Dolls pt 2
The overall way that the dolls came out made me really happy. I am glad I was able to make so many different face plates for the two that are completely finished with outfits, and that I managed to create the other two despite there being some things that I may need to add. The…

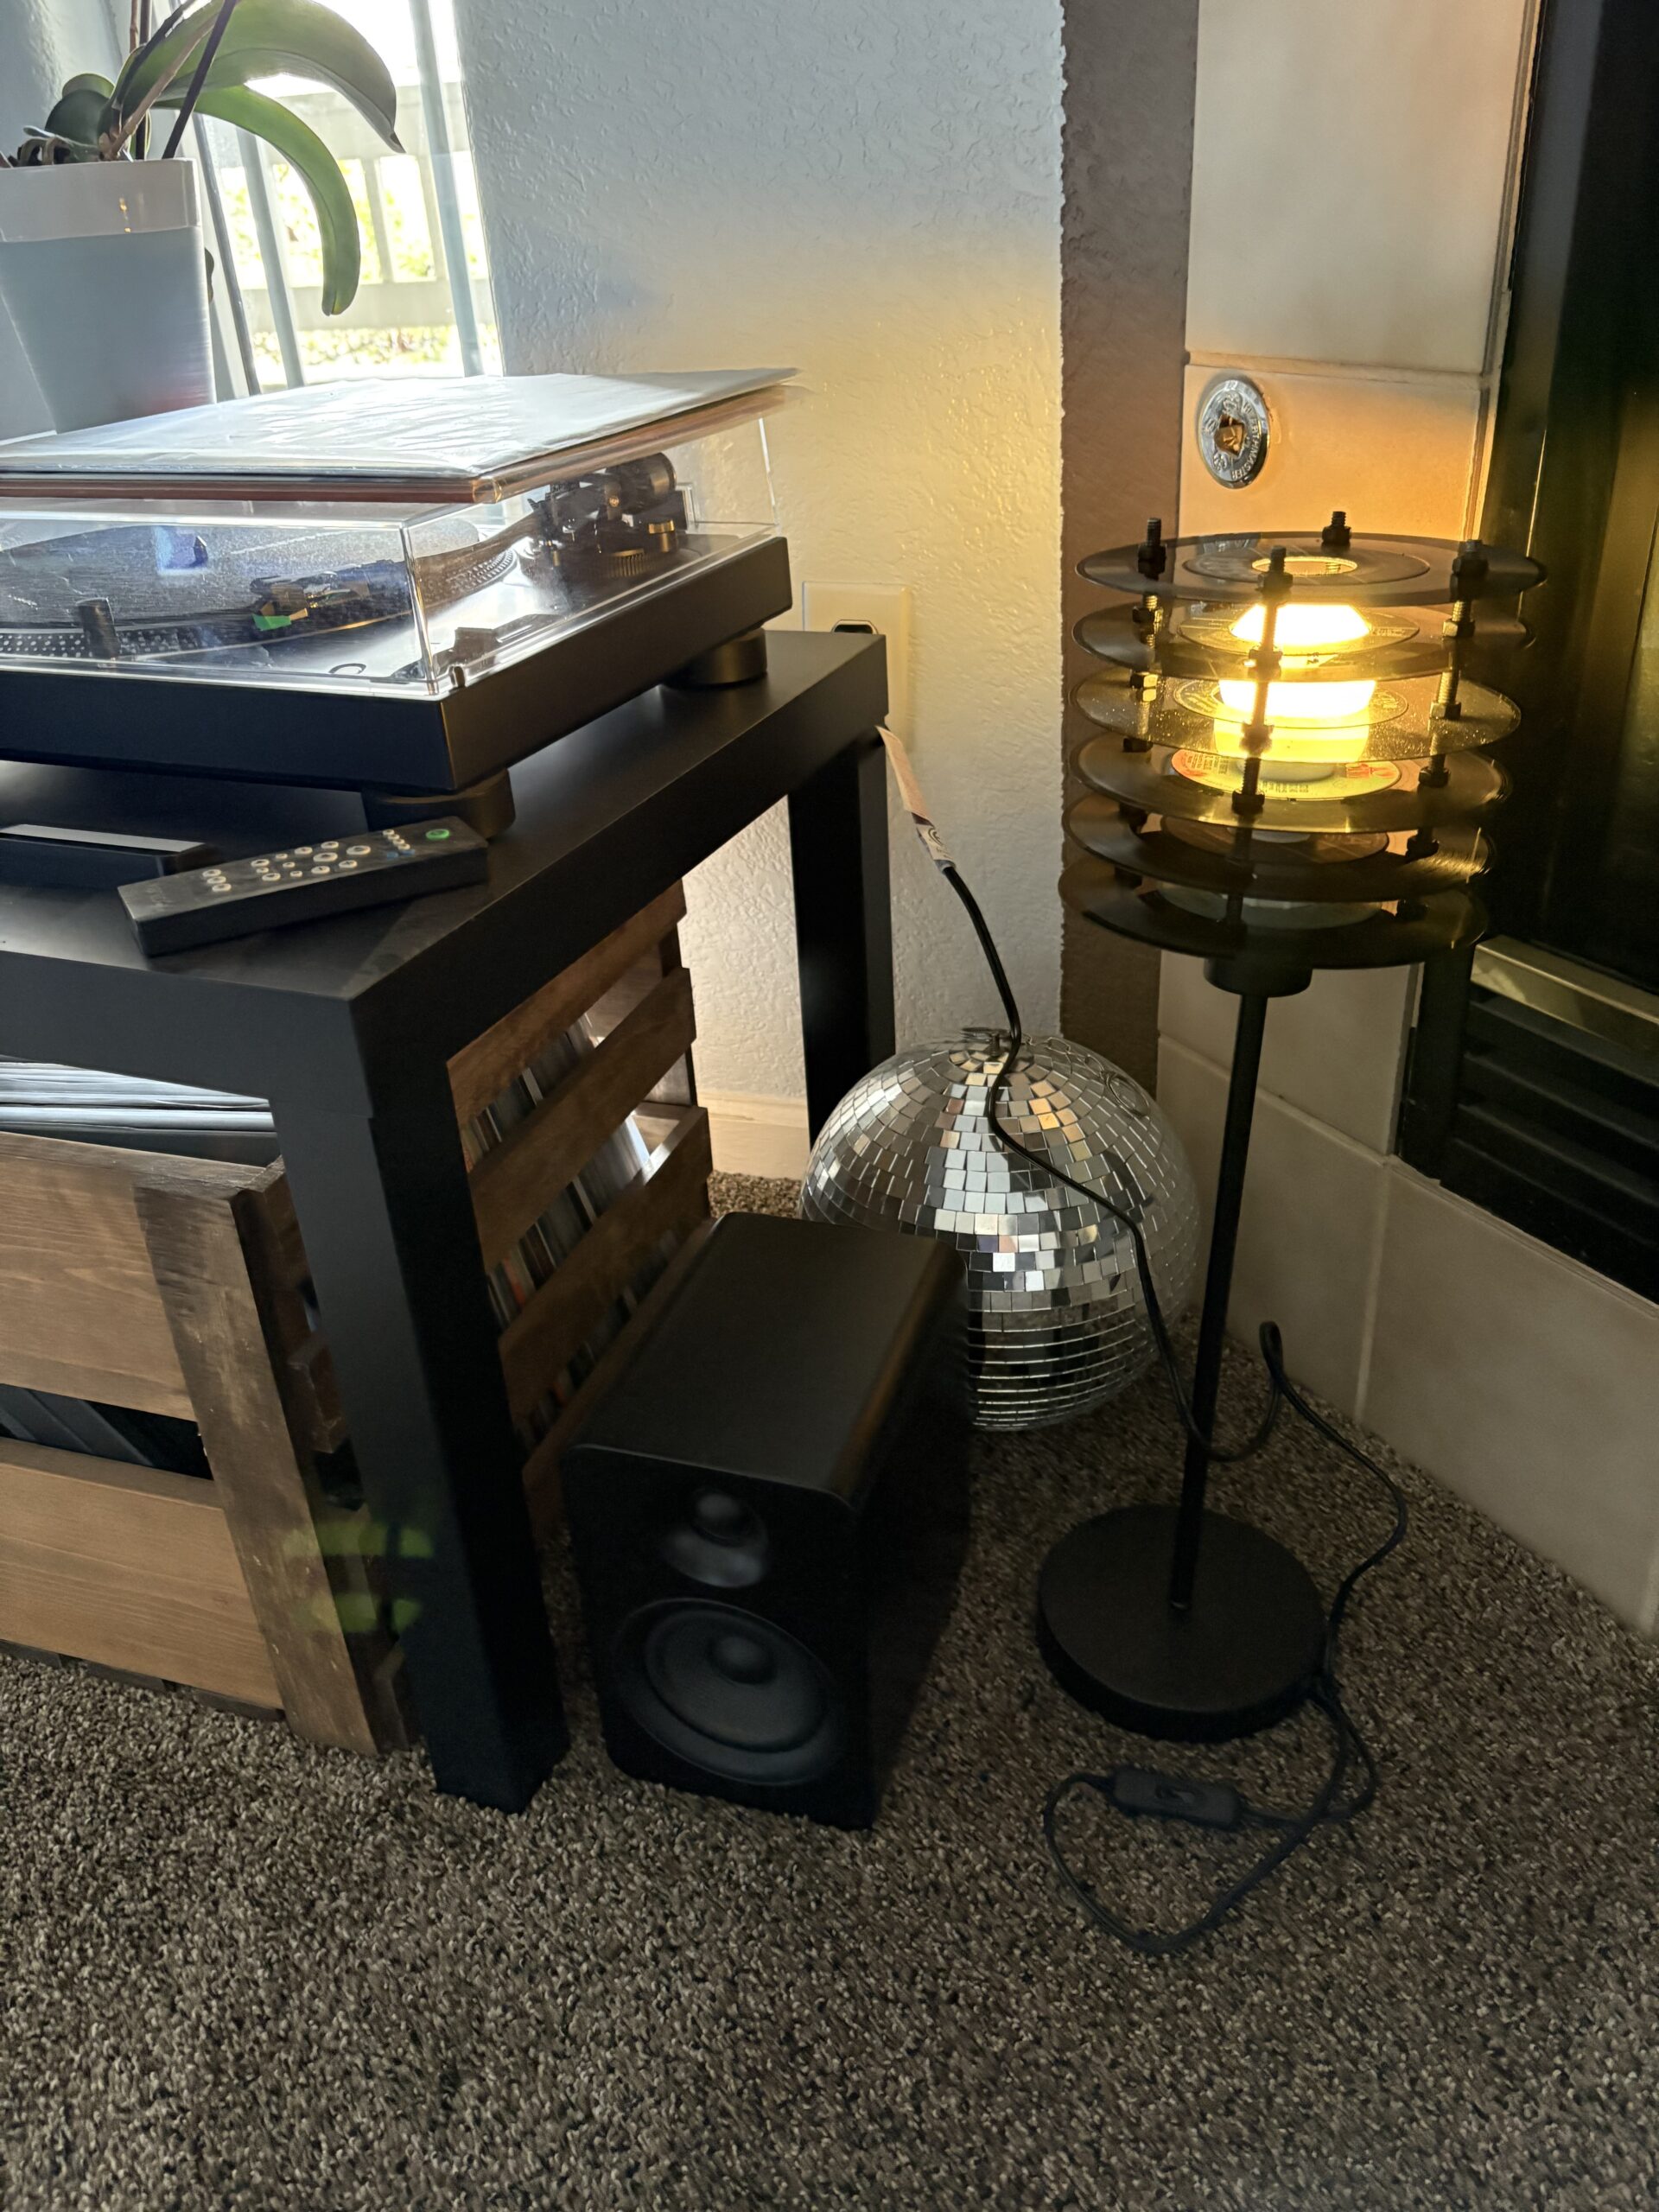
Record Player Stand and Vinyl Storage – Final Report Part 2
Project Timeline During my design preview, I presented the following steps with “done by” dates that would give ample time for troubleshooting and experimentation. When starting the actual process, I decided to skip redesigning the CAD model, as I figured it’d be near impossible for me to match the dimensions exactly when using hand tools.…
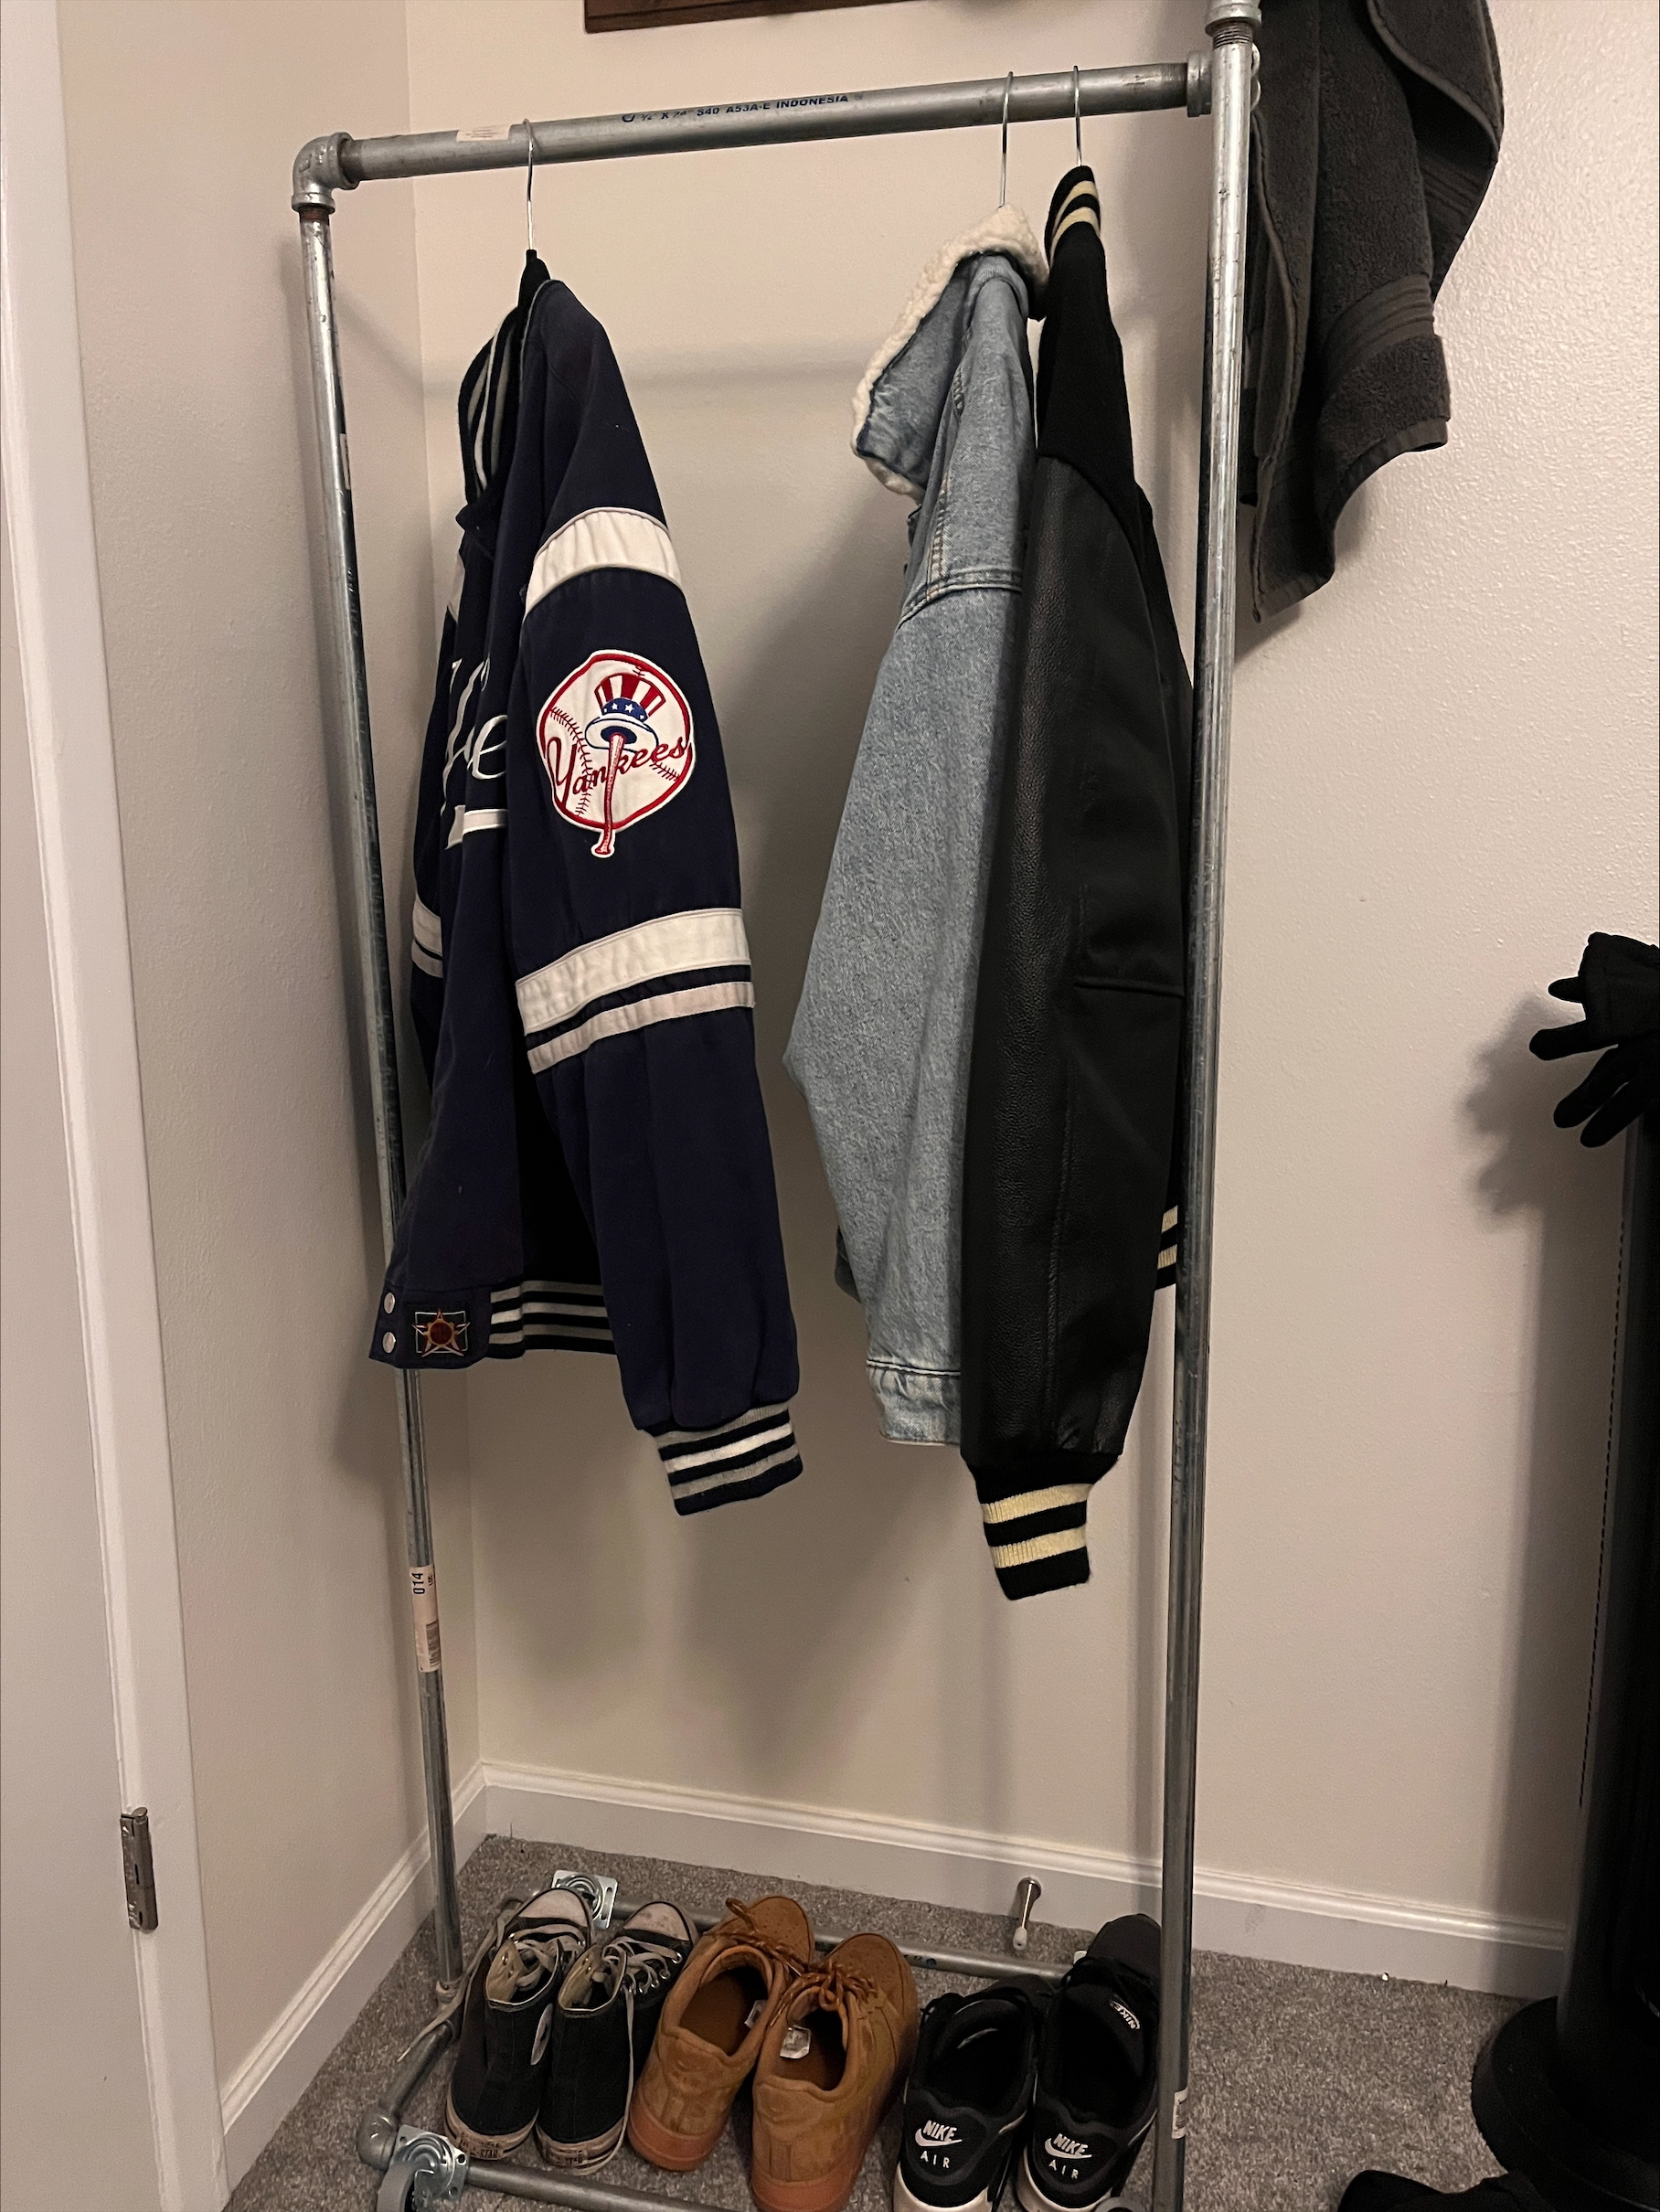
New York Loft Style Clothing Rack – Final Report Part 1
Introduction Every project begins with an idea, but turning that idea into a physical object is a journey filled with decisions, pivots, trial and error, and a lot of improvisation. This clothing rack began as a vision: a rugged yet refined piece of furniture that could bring together industrial and vintage aesthetics in a way…
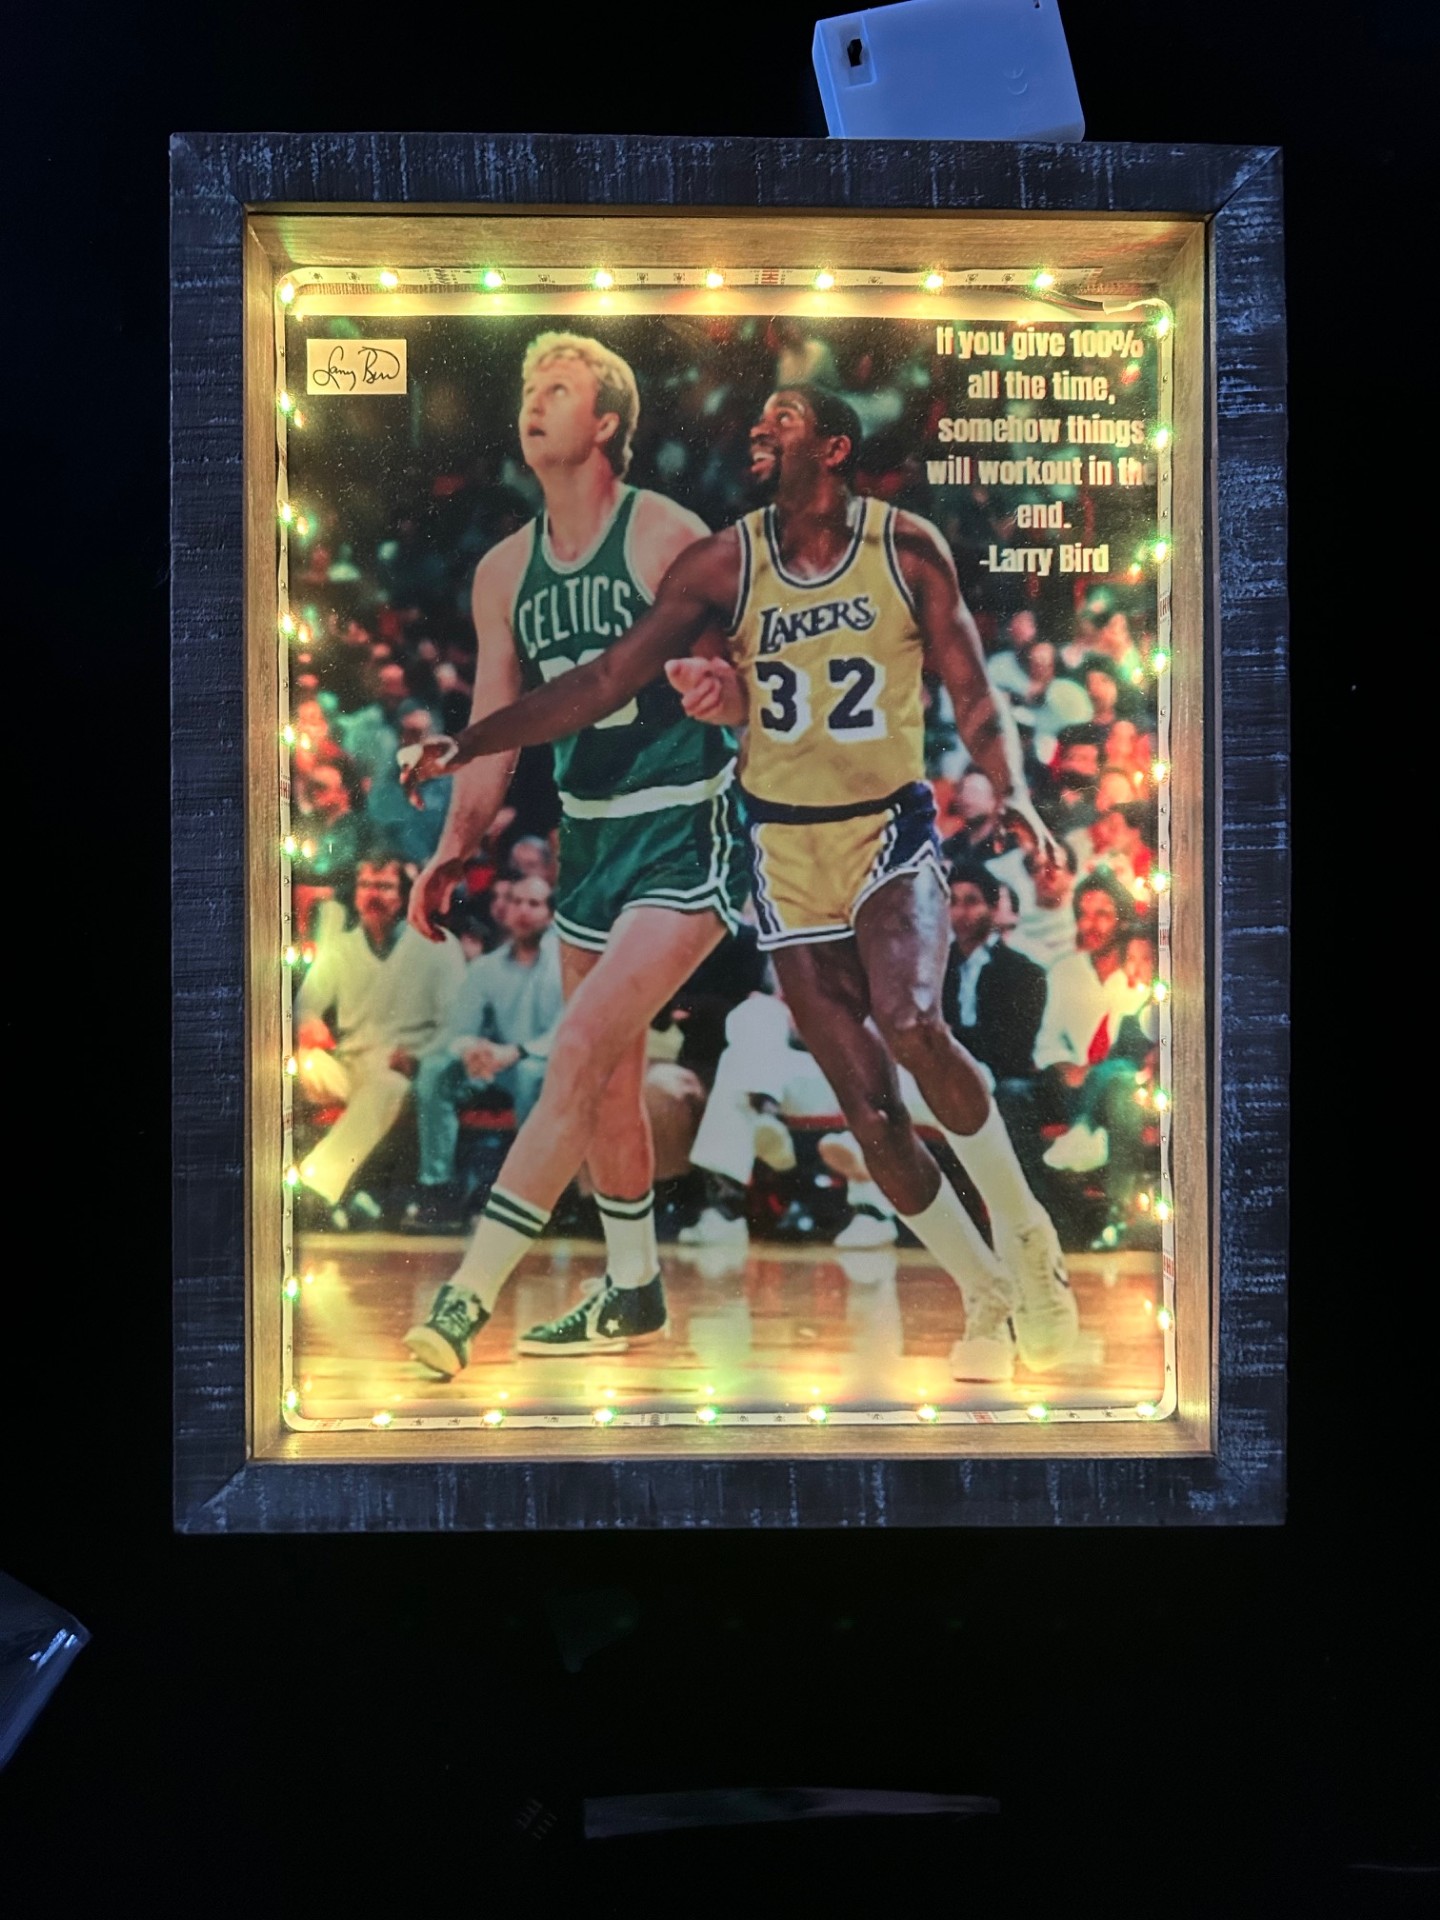
Vintage Sports Framed Picture Report Pt. 2: How
Final Project Report Part 2: How Project Timeline Overview To complete my vintage sports-themed framed picture with integrated LED backlighting, I went through several phases, including research, skill development, material acquisition, design iteration, and fabrication. The following timeline breaks down the key stages, which can also be seen below in image [2]: [2] Timeline…

Main Project Part 2
For my main project this semester, I set out to create an Adirondack-style chair, originally envisioning it built from old skis my dad had collected since the 1980s. This chair was meant to celebrate our shared love of skiing and the retro, adventurecore aesthetic of 90s ski culture. I planned to surprise my dad with…
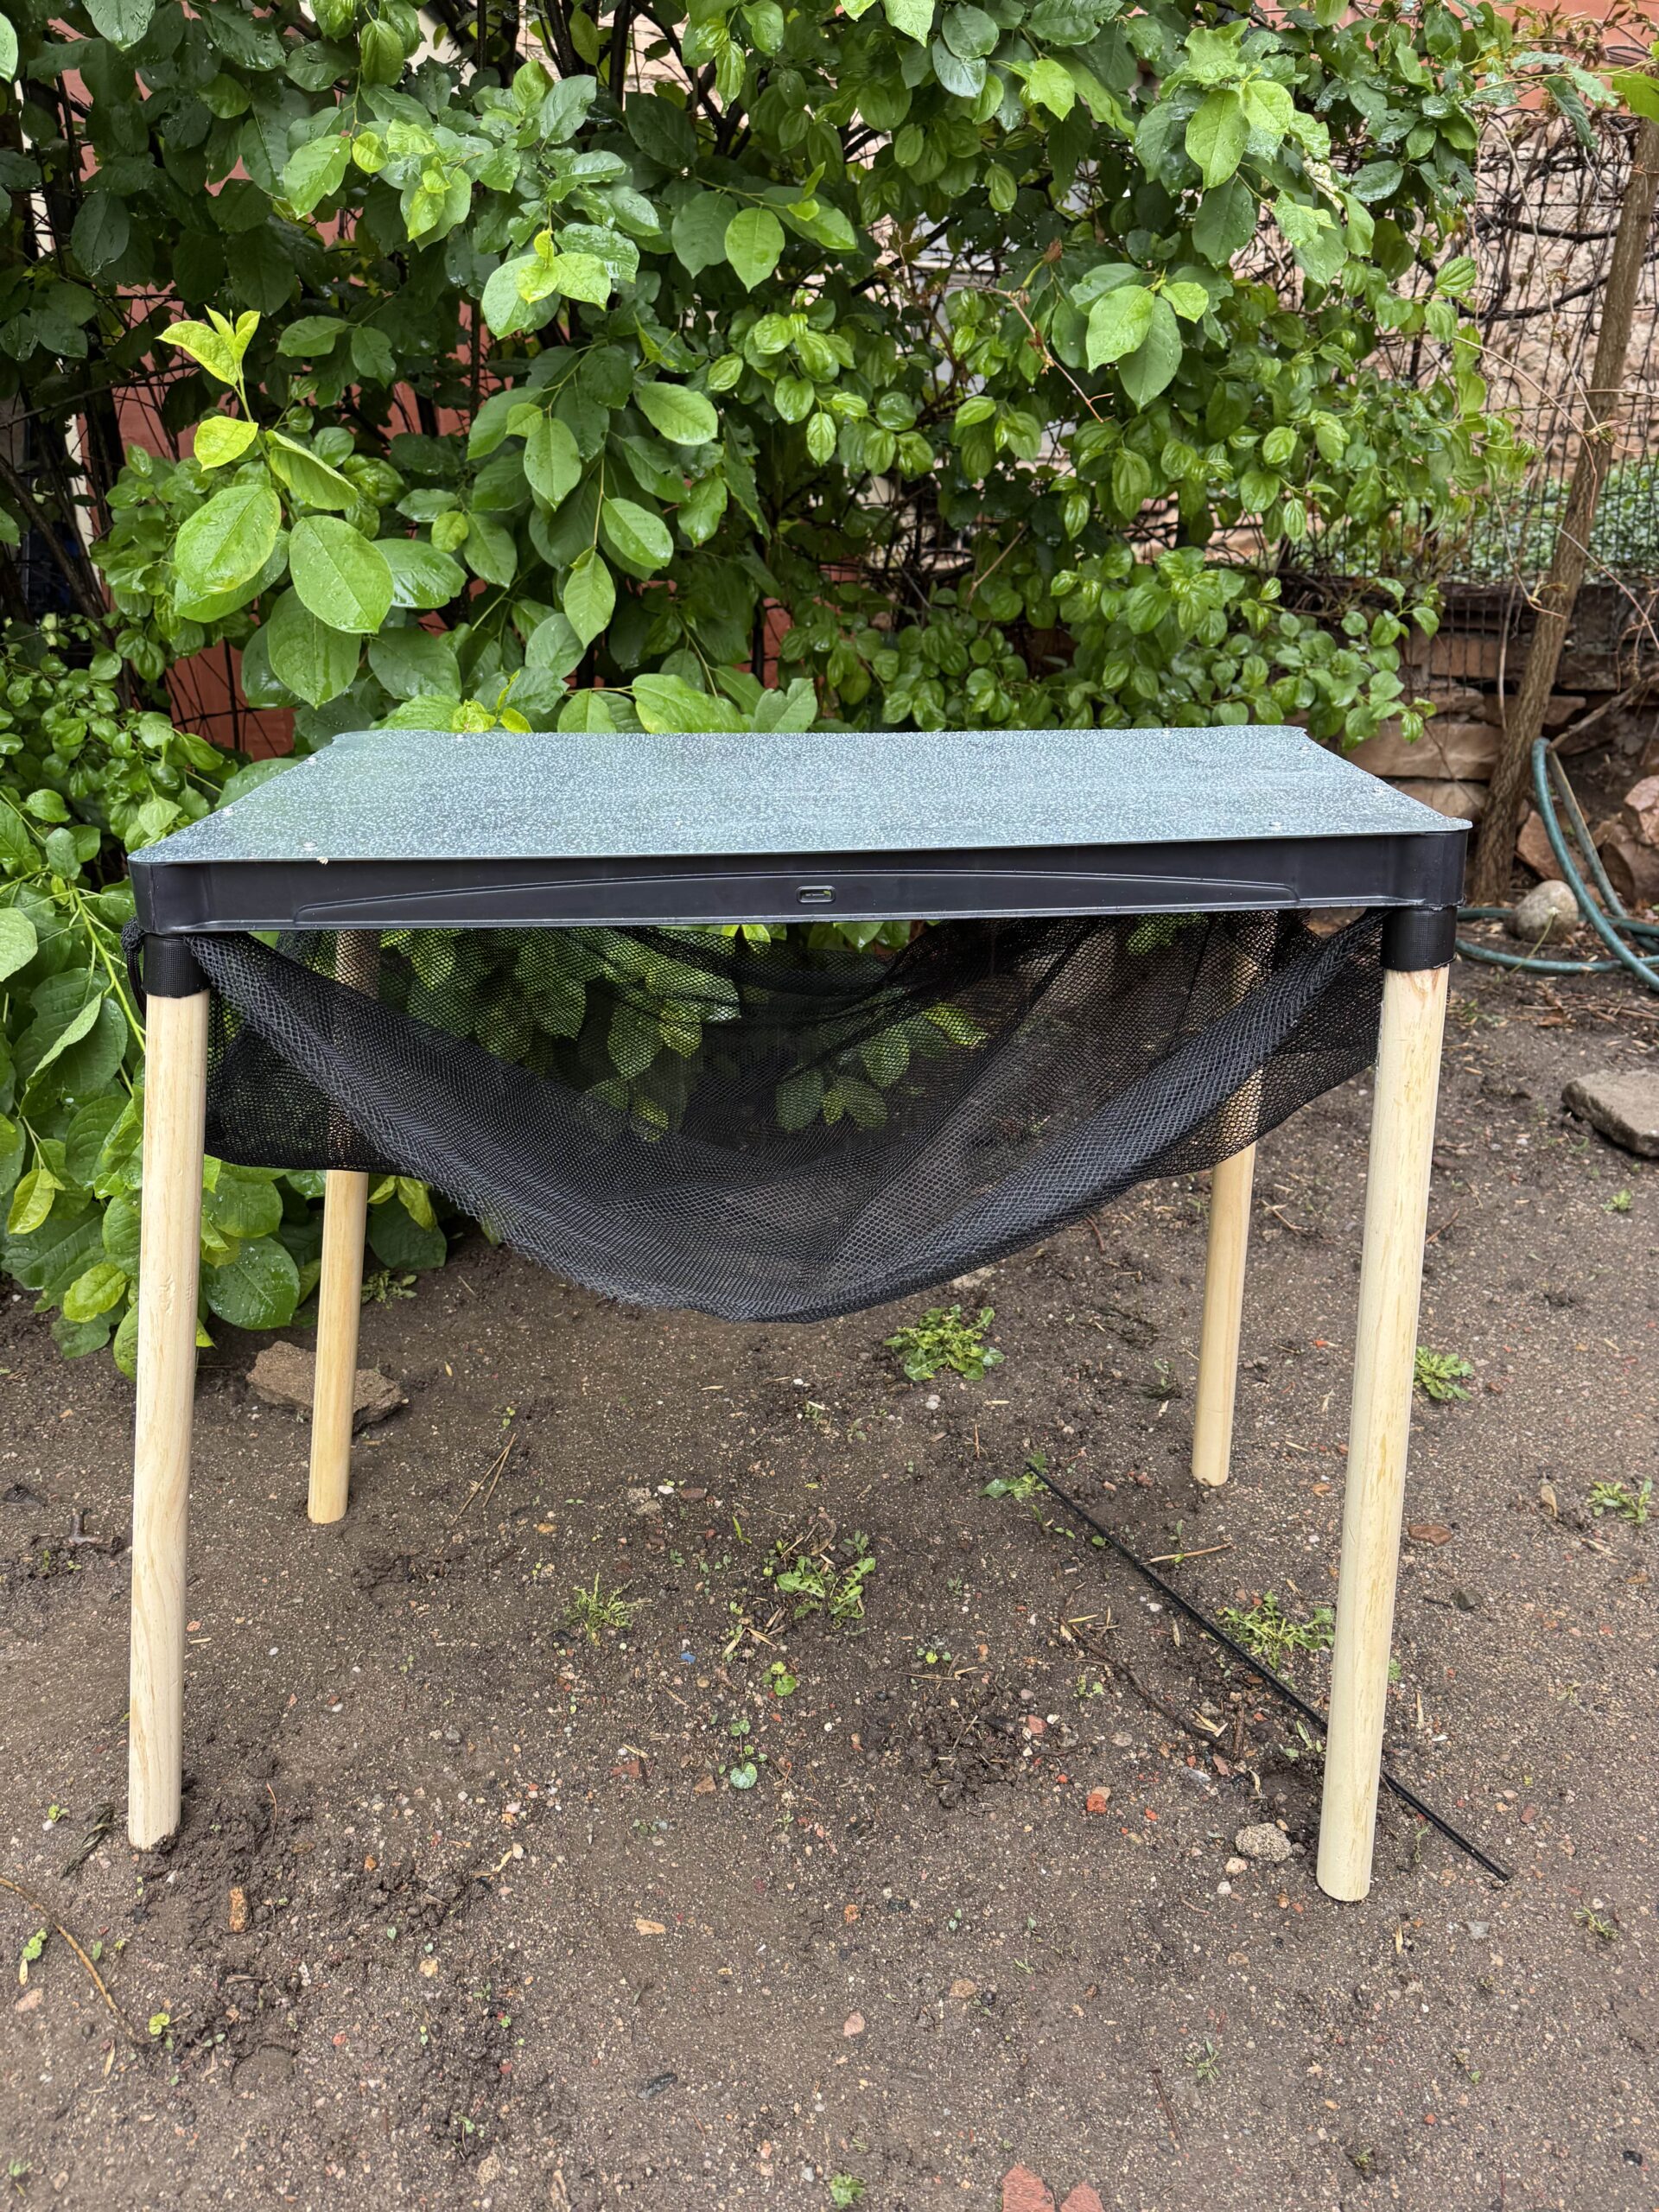
Fabrication and Final Reflections on the Rugged Camp Table Project
Timeline of the Design Process The creation of this project followed a non-linear but intentional design process. My timeline included exploration, ideation, material acquisition, prototyping, and several iterations of design adjustments. Much of the time was spent adapting existing parts to work in harmony with the newly added elements. Below is a description of each…
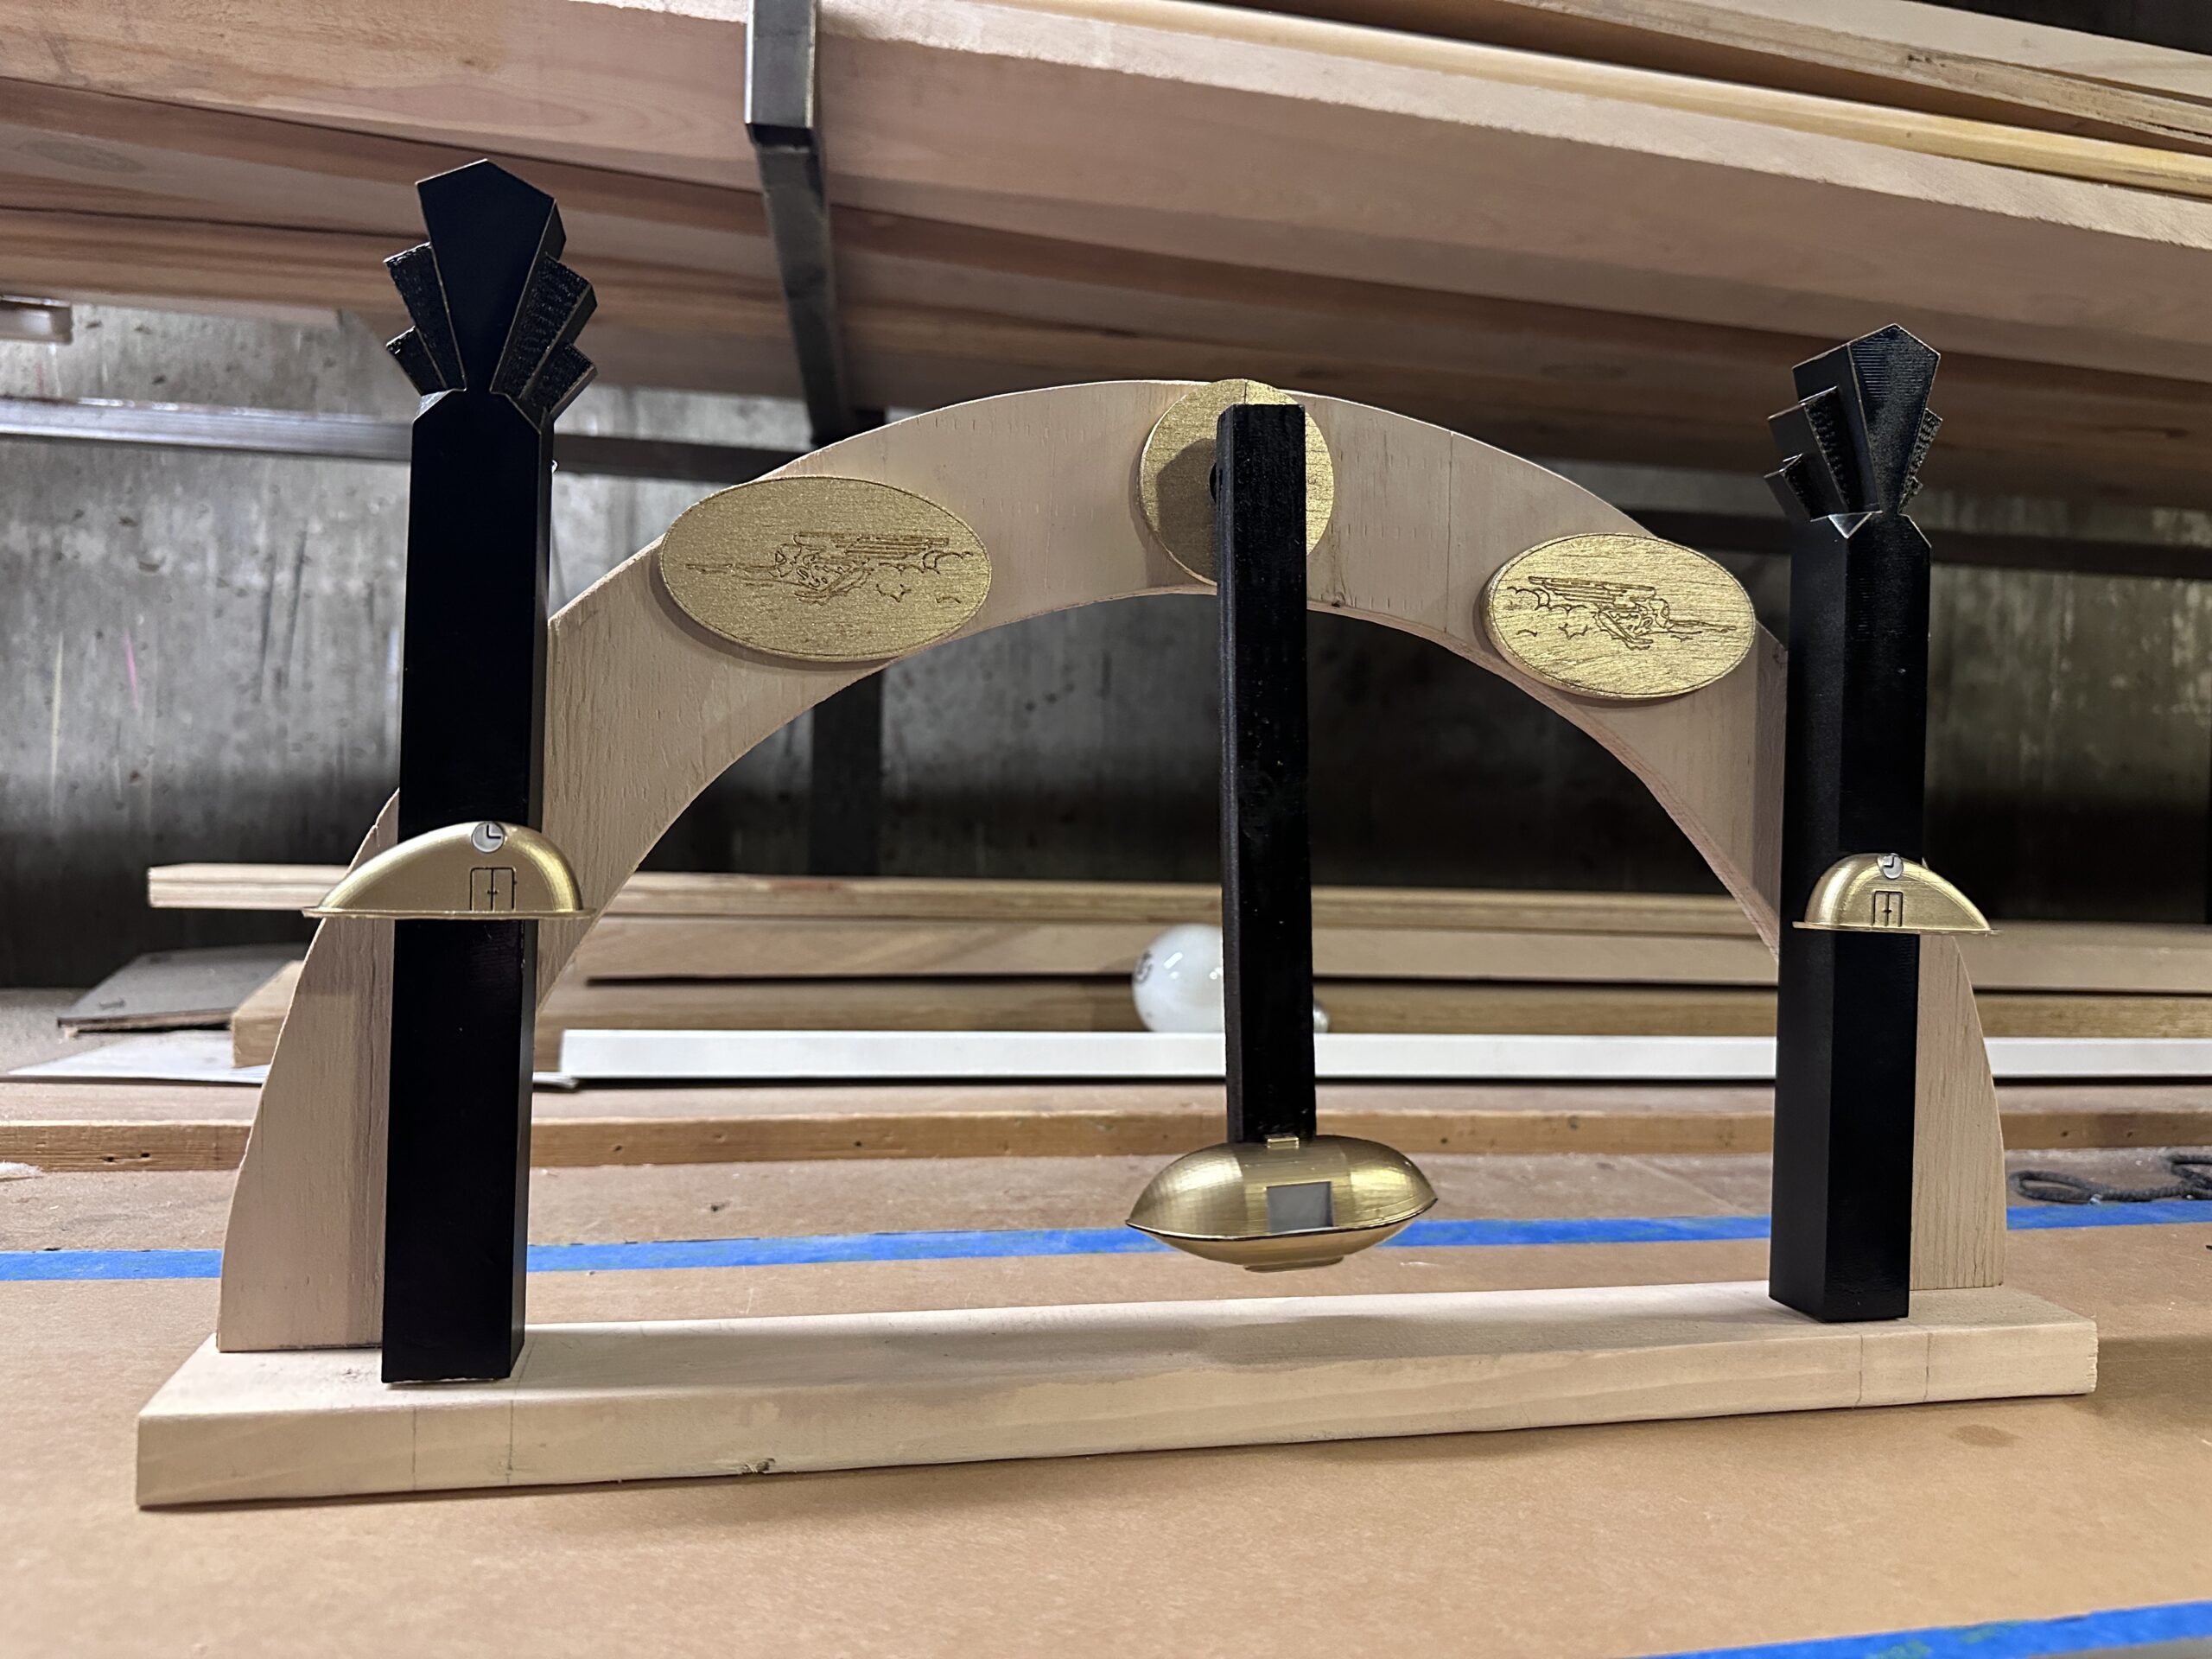
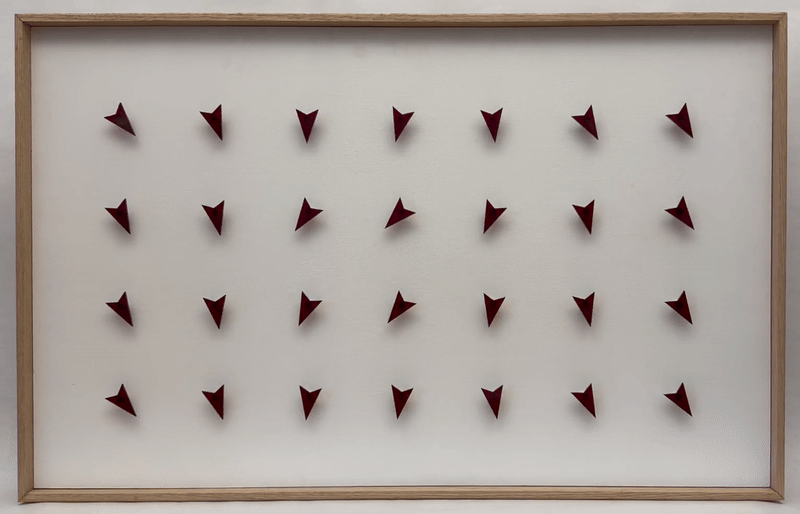
Art Deco Pendulum Final Report Part 2
Art Deco Pendulum Final Report Part 2 I started the construction of the project with a wooden base and frame. I used a piece of 1×4 for the base, and I cut out a piece of ½ inch plywood for the arch. I did all of this construction in the carpentry shop where I work,…
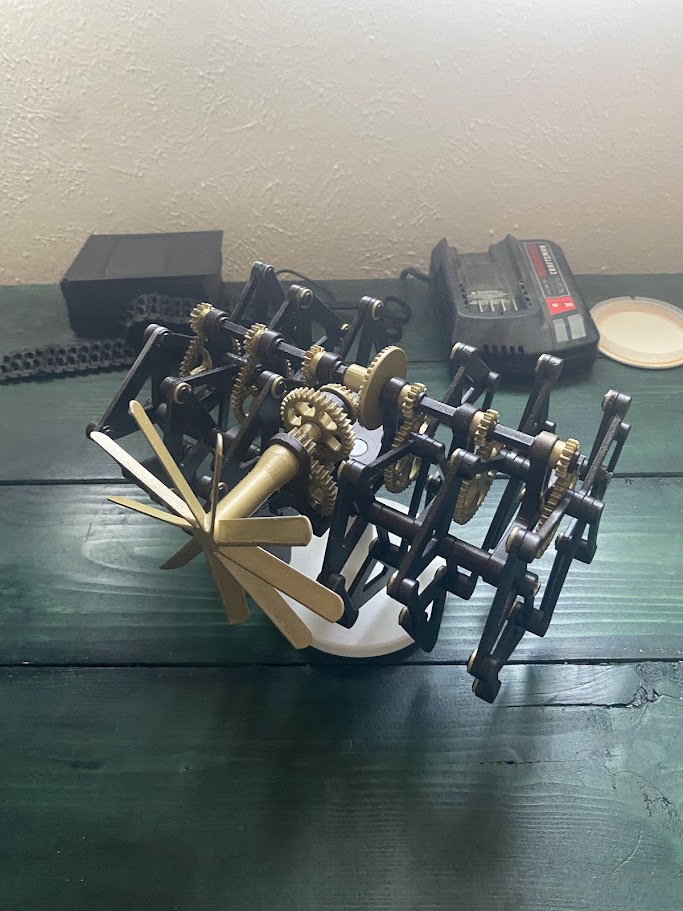
Building a Steampunk Strandbeest: Assembly and Aesthetic Focus
Timeline of the Design Process When I started this project, my goal was to bring a popular kinetic sculpture to life by blending the famous Strandbeest mechanism with the popular aesthetic of steampunk. This creation would celebrate both motion and artistry and become a sculpture where every gear and linkage wasn’t hidden, but proudly displayed.…
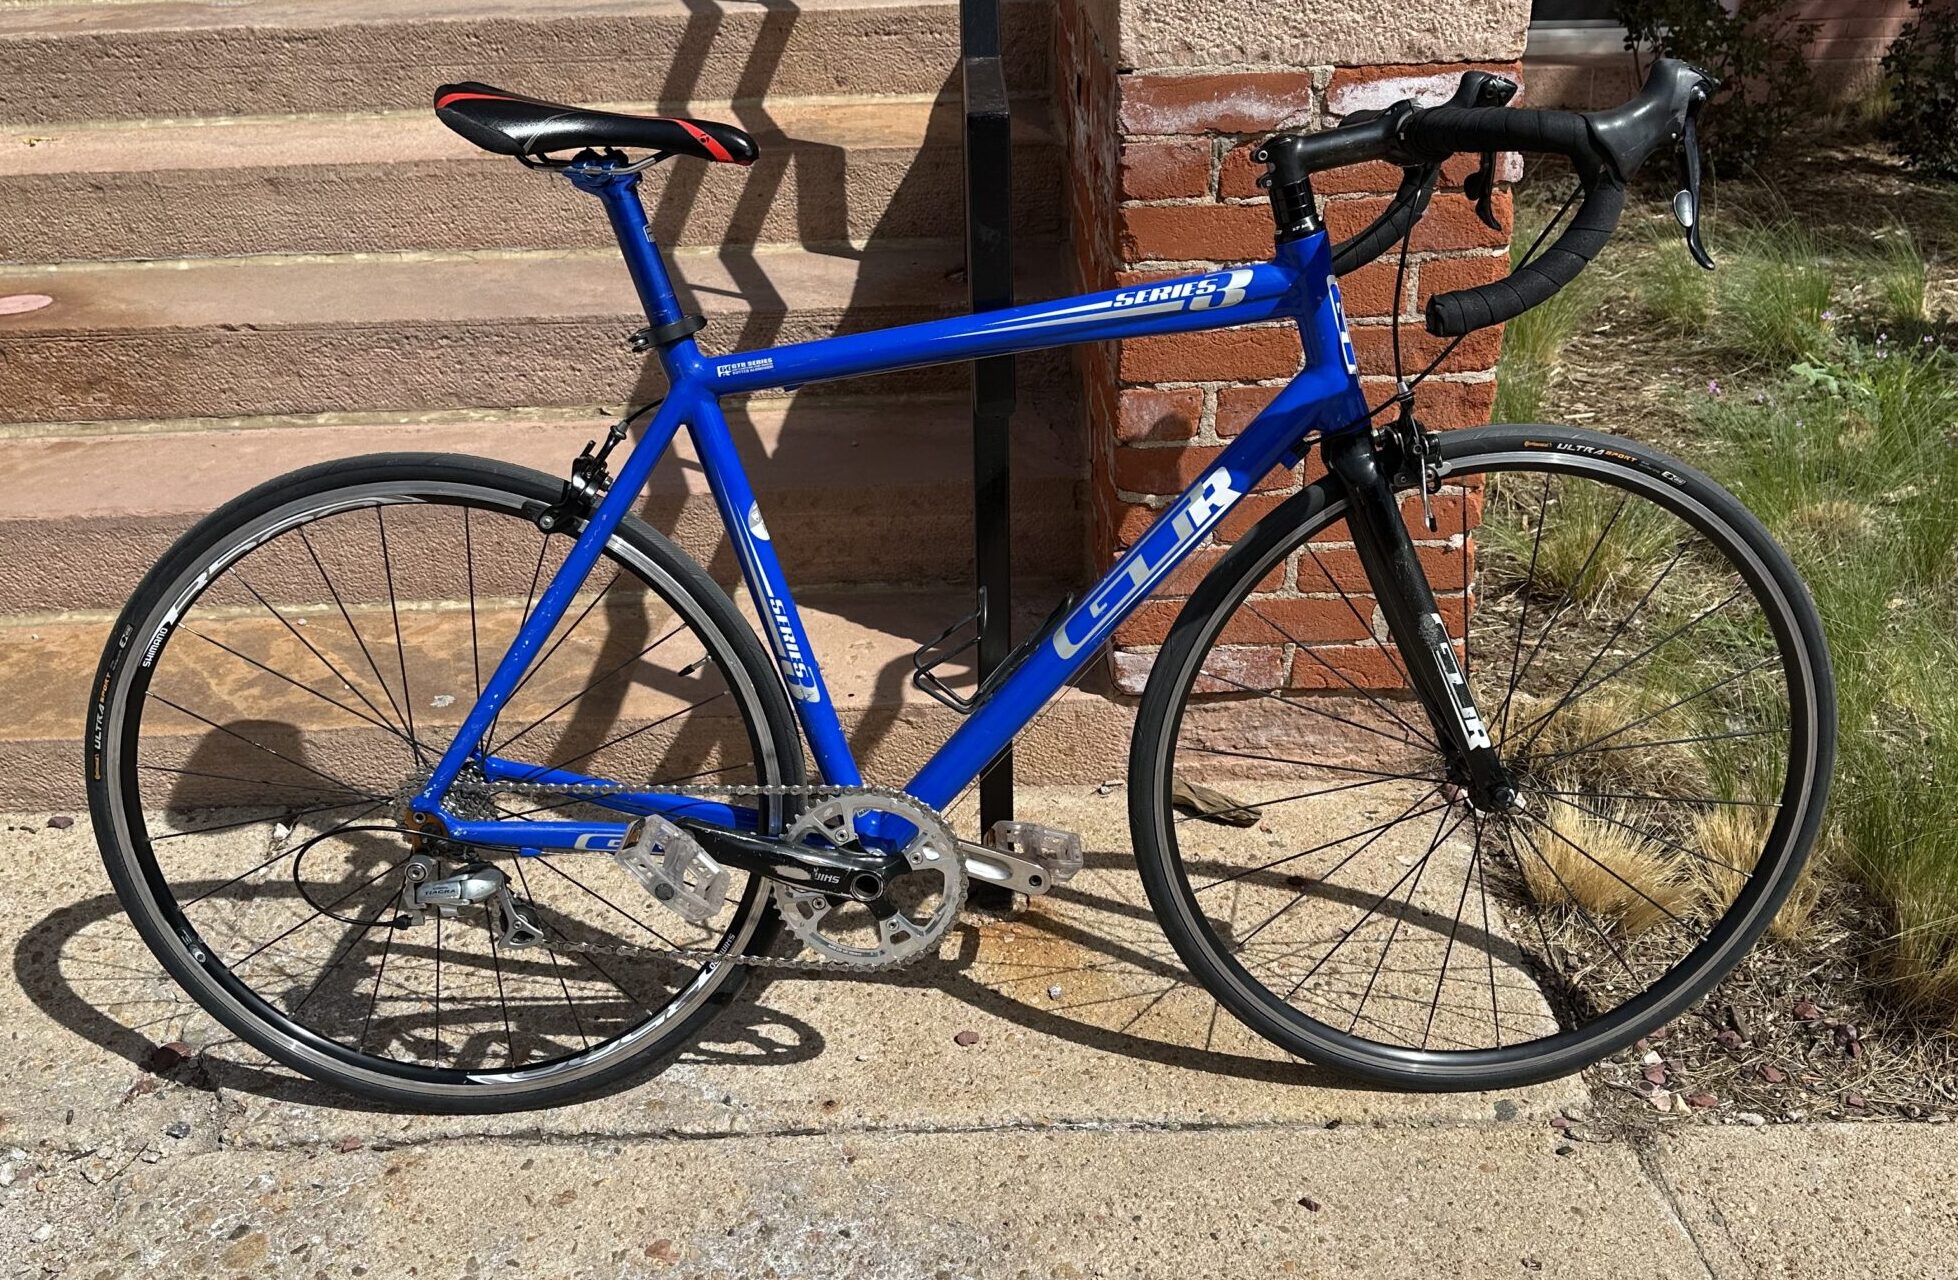
Competition Road Bike Restoration Final Design – Part 2
INTRO And now for the “How” of my Competition Road Bike Final Project. Planning was a large part of this project. Creating a list of goals and how to accomplish them was very important to achieve a final design. Below is a tentative plan I made back when I was presenting my Design Preview back…
Nyctous Acrylic Tunnel Book Fabrication
After selecting my design plans to create a nyctous acrylic tunnel book, I had about four weeks to complete the project. I planned and divided my time in those weeks as follows: Week 1 – Test Plexiglass Laser Cutting and Shapes Week 2 – Design and Fabricate Shapes Week 3 – Wire and Program Lighting…

How the lazy Susan spice rack was made
This post is late because I had to scramble to pull this project together in the last three weeks of the semester. In March, I tore my rotator cuff playing hockey, which put me in a sling and left me unable to use one arm for a while. That made working safely in the woodshop…
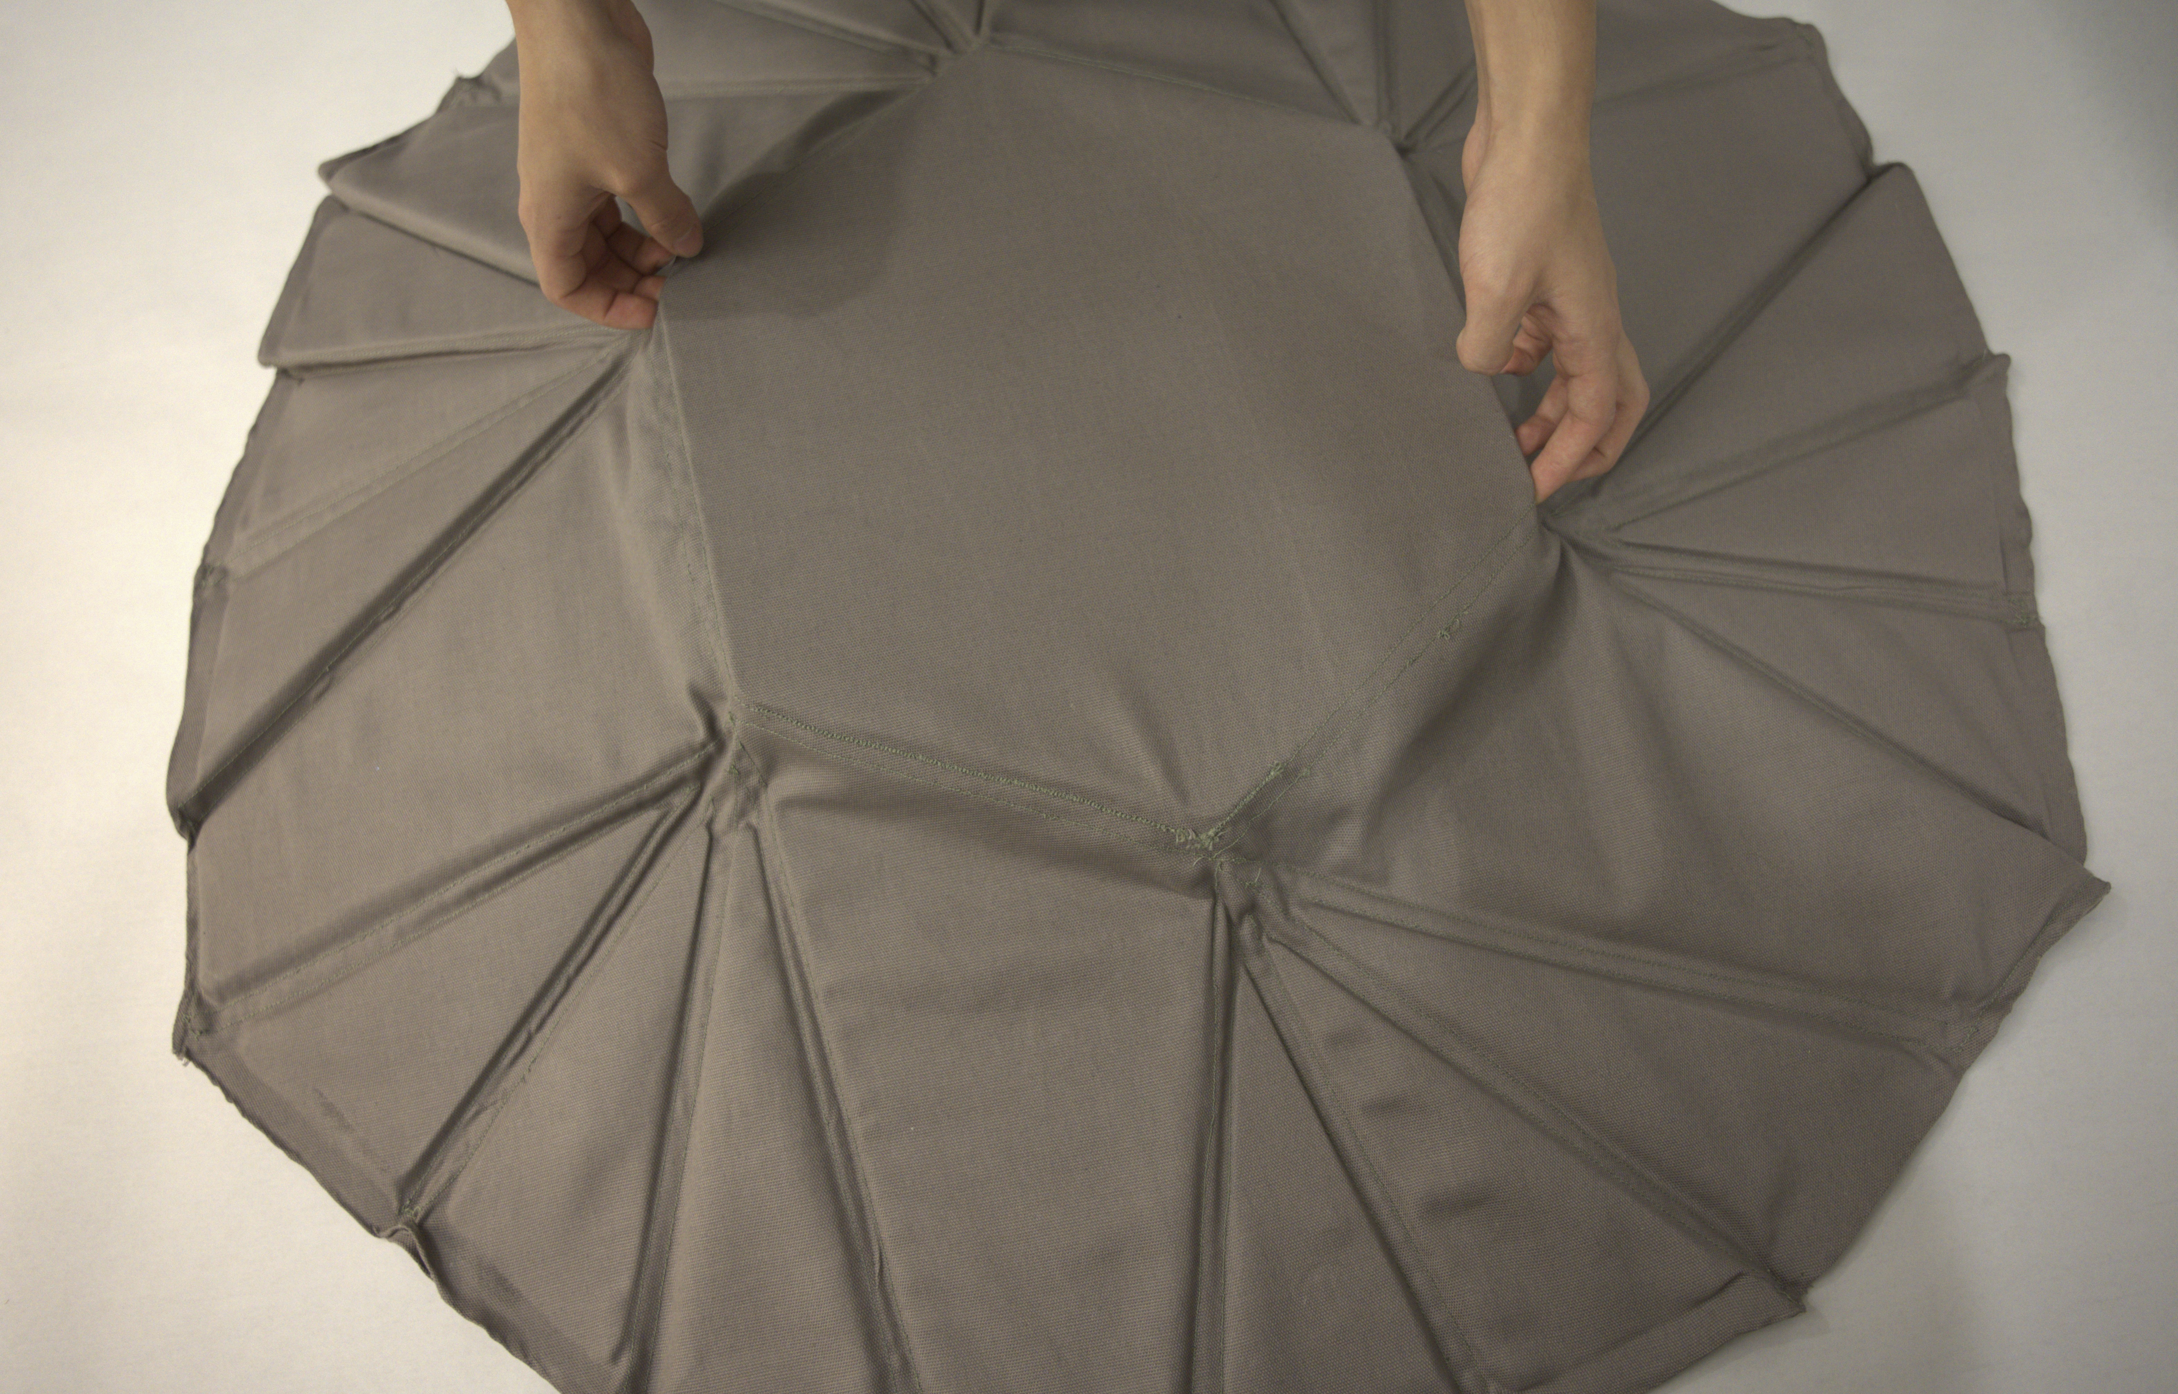
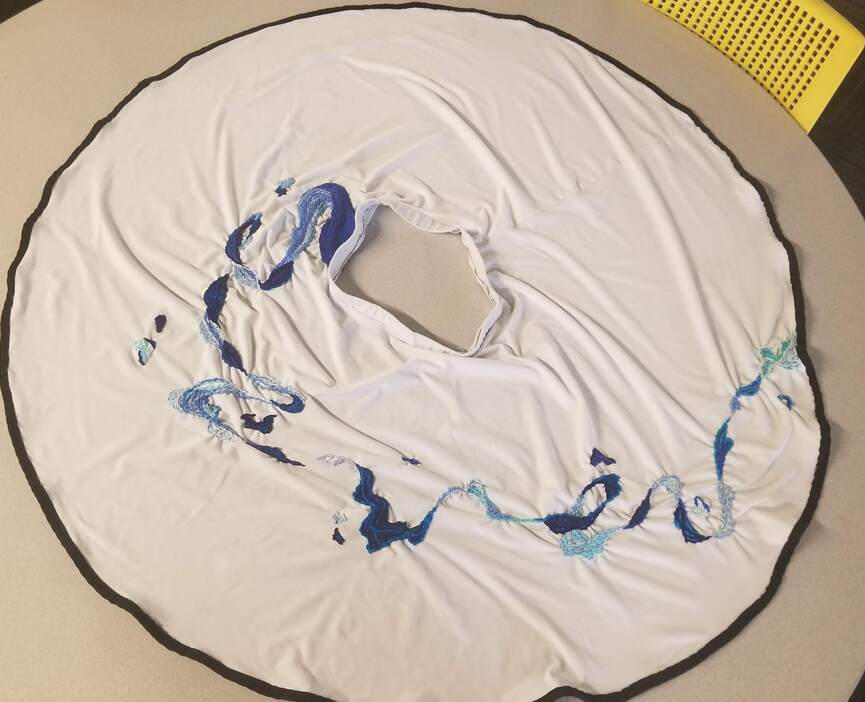
Final project report part 2: storm skirt
Timeline Graphic: The idea and research process lasted all throughout march for this project, and then fabrication began and ended in April. Final photography happened in may just before the expo. The construction process was separated well enough over a few weeks but I still felt rushed by the end. Fabrication Process: One of the…

Mirror + Acrylic Painting: Final Report II
Introduction: Vision and Aesthetic For this project, I wanted to make something visually compelling and conceptually reflective—both literally and aesthetically. Inspired by the Early Virtual Aesthetic, I focused on creating a piece that felt like a frozen moment inside a digital space. This aesthetic comes from early 3D games and computer graphics, known for their…
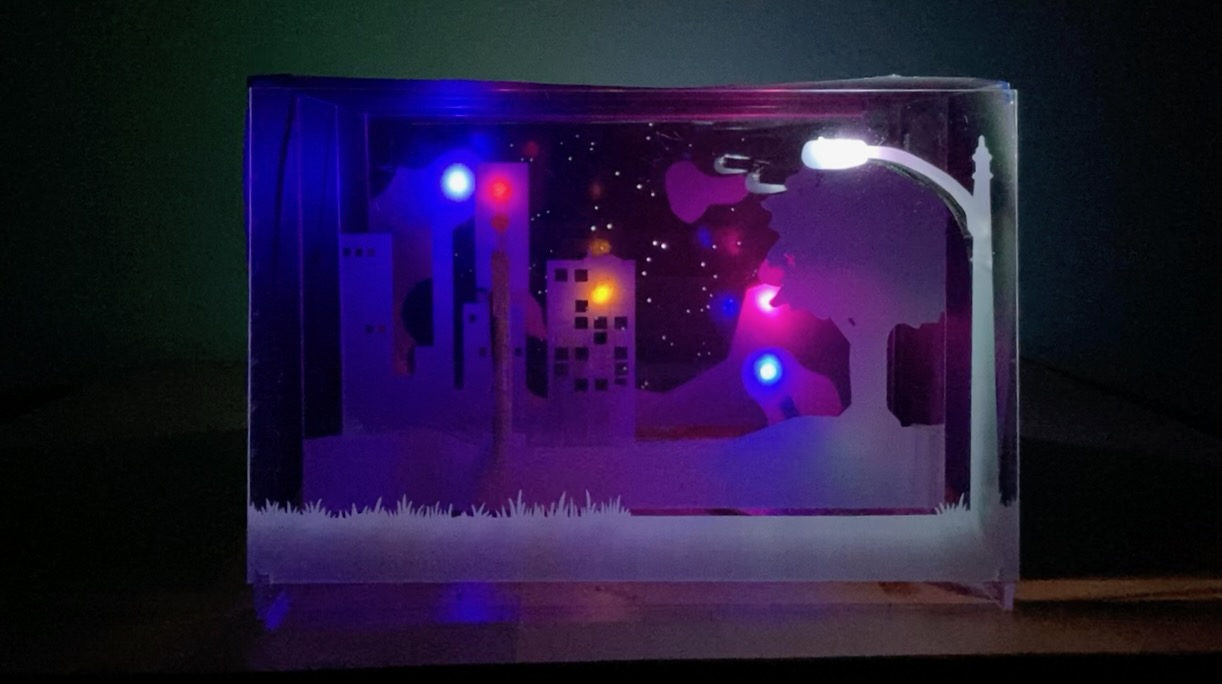
Part 2: How
My design process for the river environment project was anything but linear. It unfolded through continuous exploration, trial and error, conceptual pivots, and a steep learning curve as I navigated unfamiliar materials and techniques. Creating a slice of nature that could function as a self-contained unit proved to be challenging yet rewarding. This project demanded…
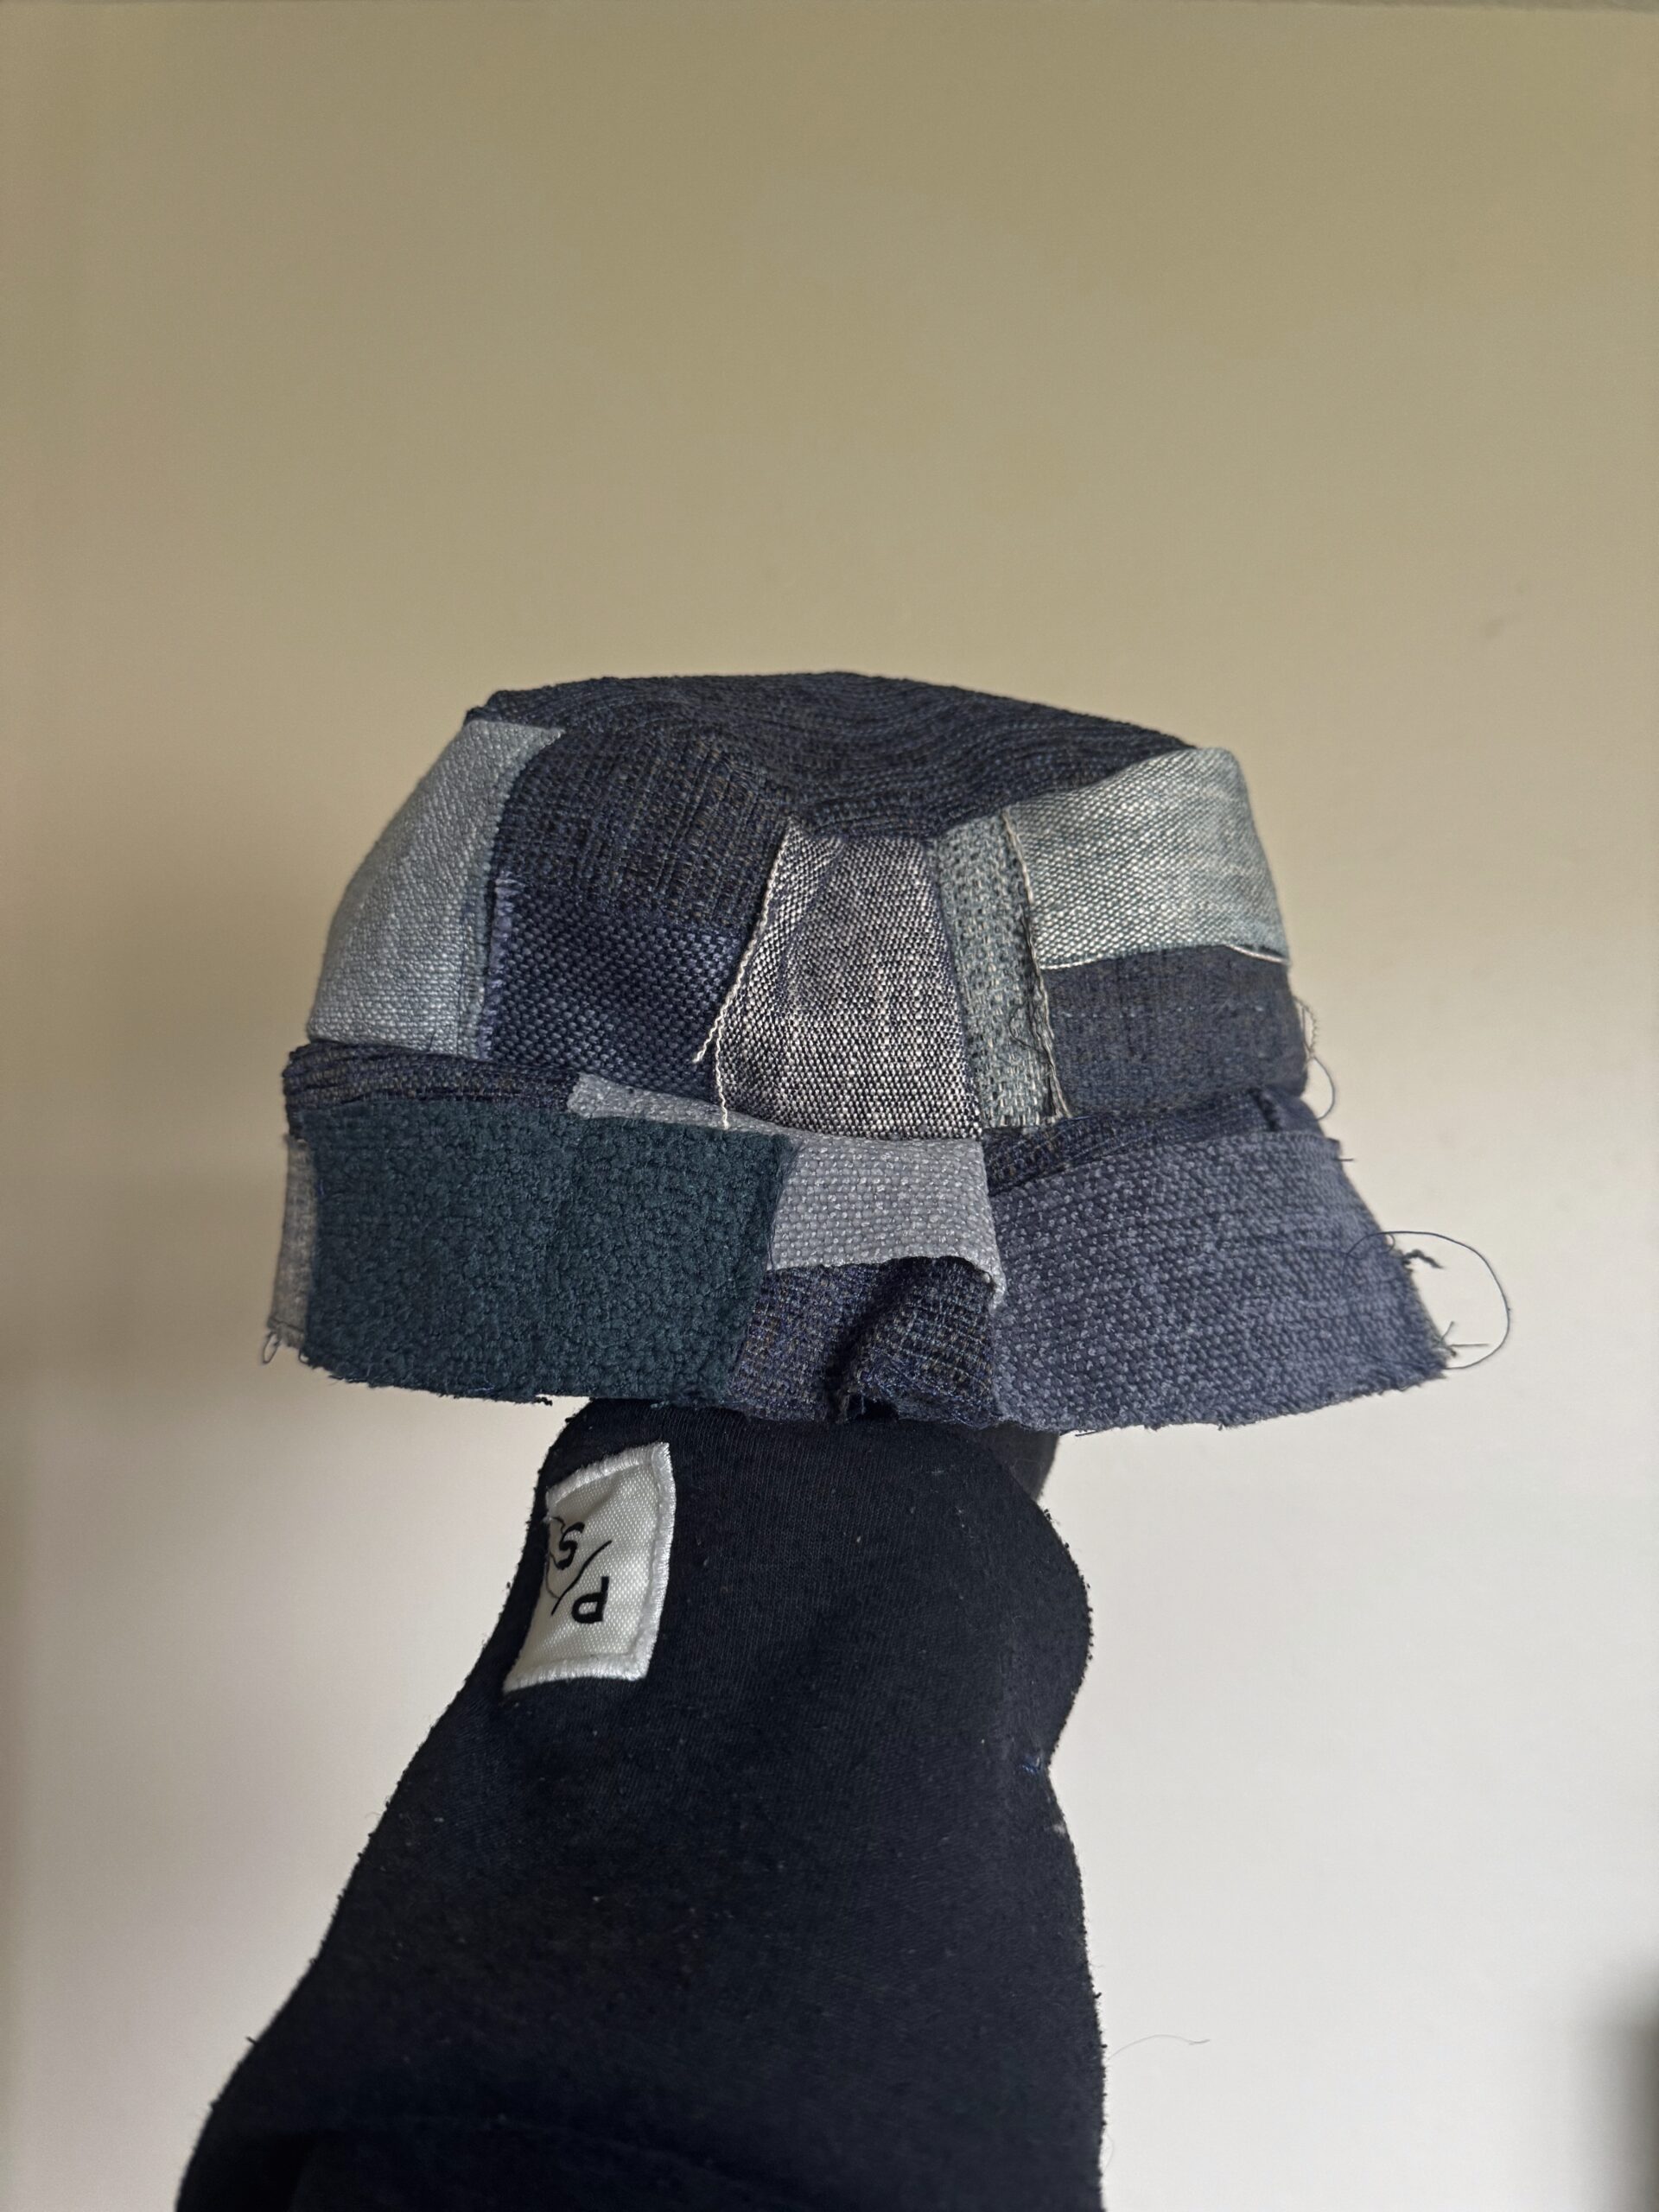
Denim Patched Bucket Hat – The Process
INTRODUCTION: For my final project, I decided to make a bucket hat with denim patches because I want to make a bucket hat that complements my face shape and something that I know blends in with all my different outfits for that quick and effortless look. If you want to learn more about my vision,…
Doodlecore Embroidered Skirts: How
Timeline Because I had expected my project to take a long time, I had to settle on a design and buy the supplies as soon as possible. I anticipated that I would need to spend extra time understanding how to sew and figuring out how to use the sewing machine. Hence, I rushed to get…
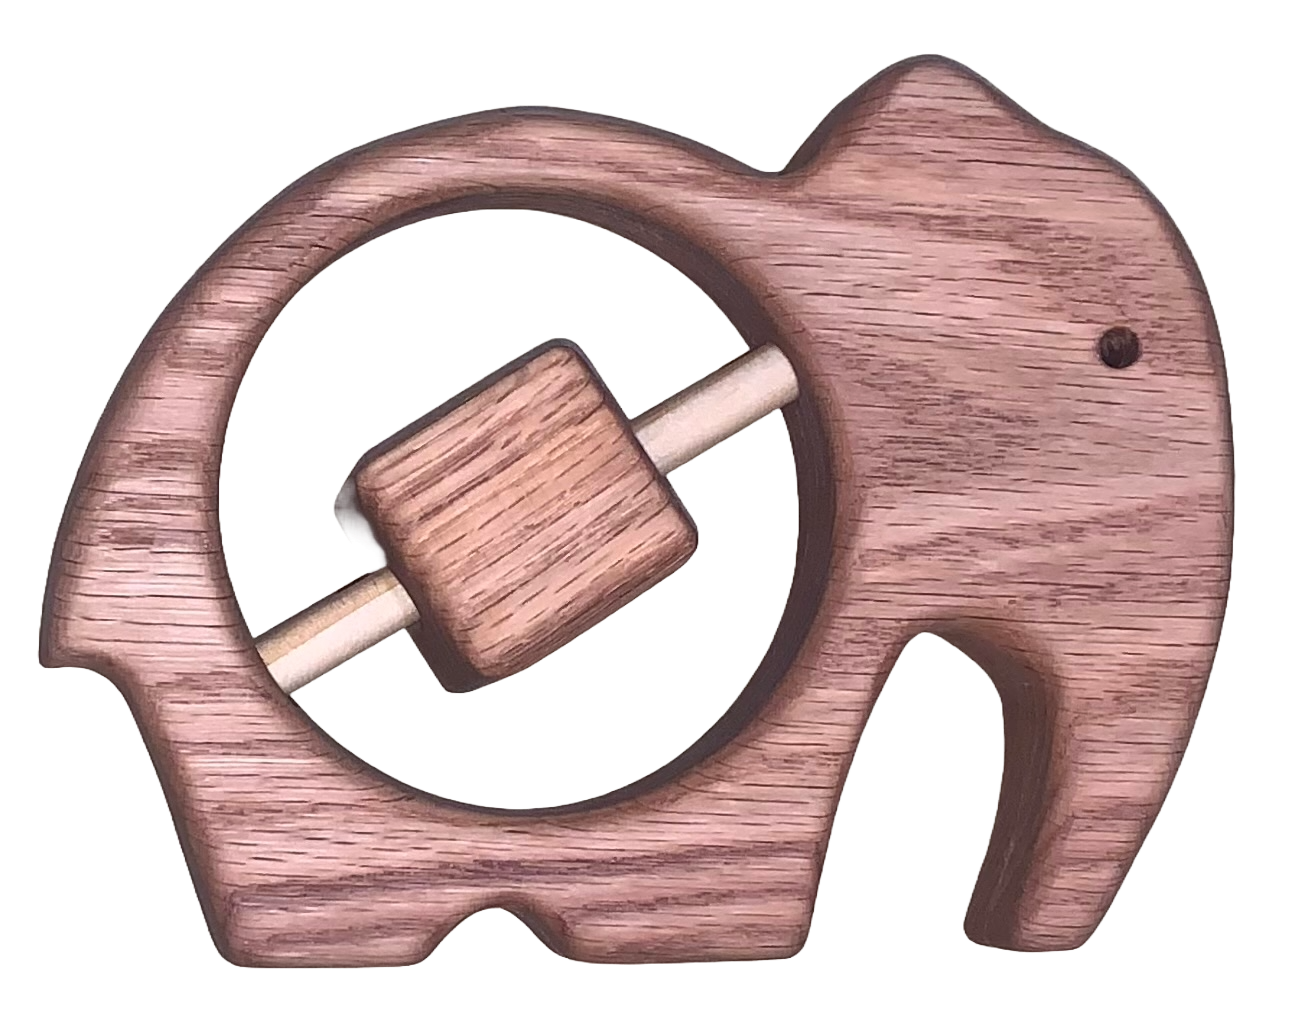
Making a Handmade Wooden Elephant Rattle
Stock Materials The first step in creating the wooden elephant baby rattle was selecting the stock material. I chose oak wood for this project due to its availability as a durable hardwood, which could be conveniently purchased from Home Depot. For the elephant’s body, I acquired a ½ inch × 7 ½ inch × 3…
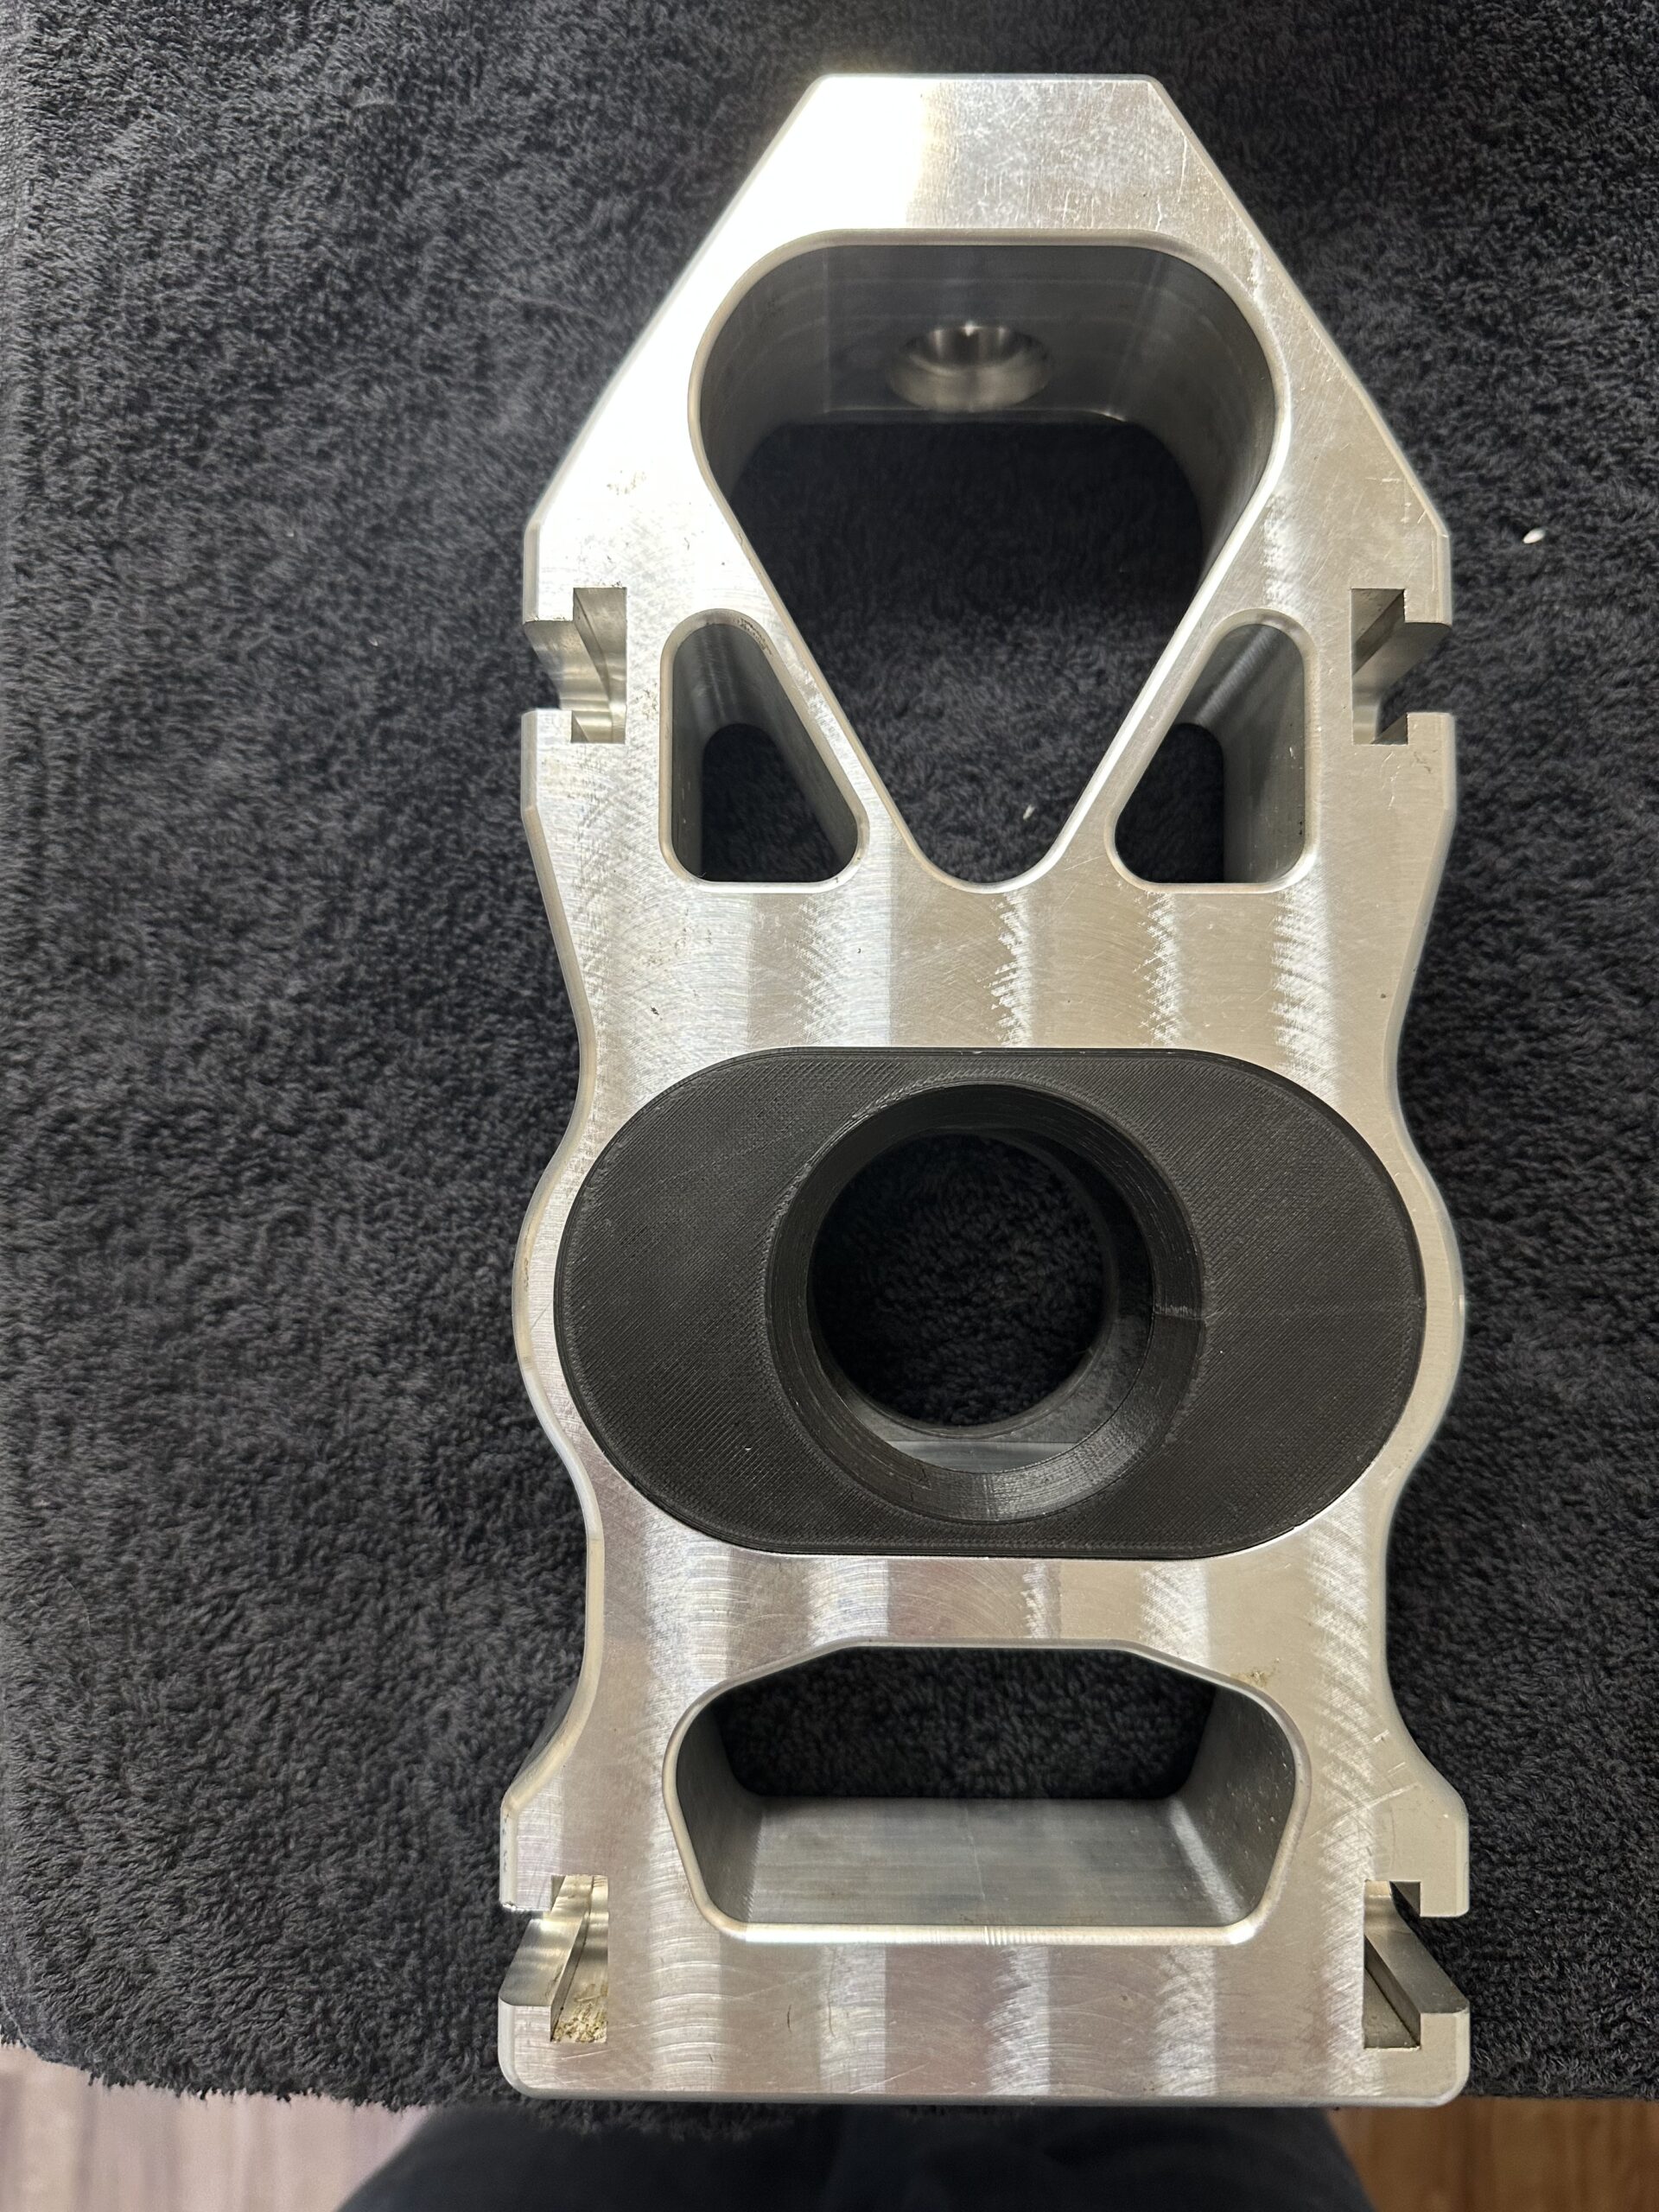
Race Car Uprights: Report Part 2
For my primary design project, I chose to fabricate a custom set of front suspension uprights for my 1965 Ford Mustang race car. In my previous post, I outlined the design methodology I followed, which began with establishing a set of requirements that guided my decision-making throughout the development process. Key factors influencing the design…
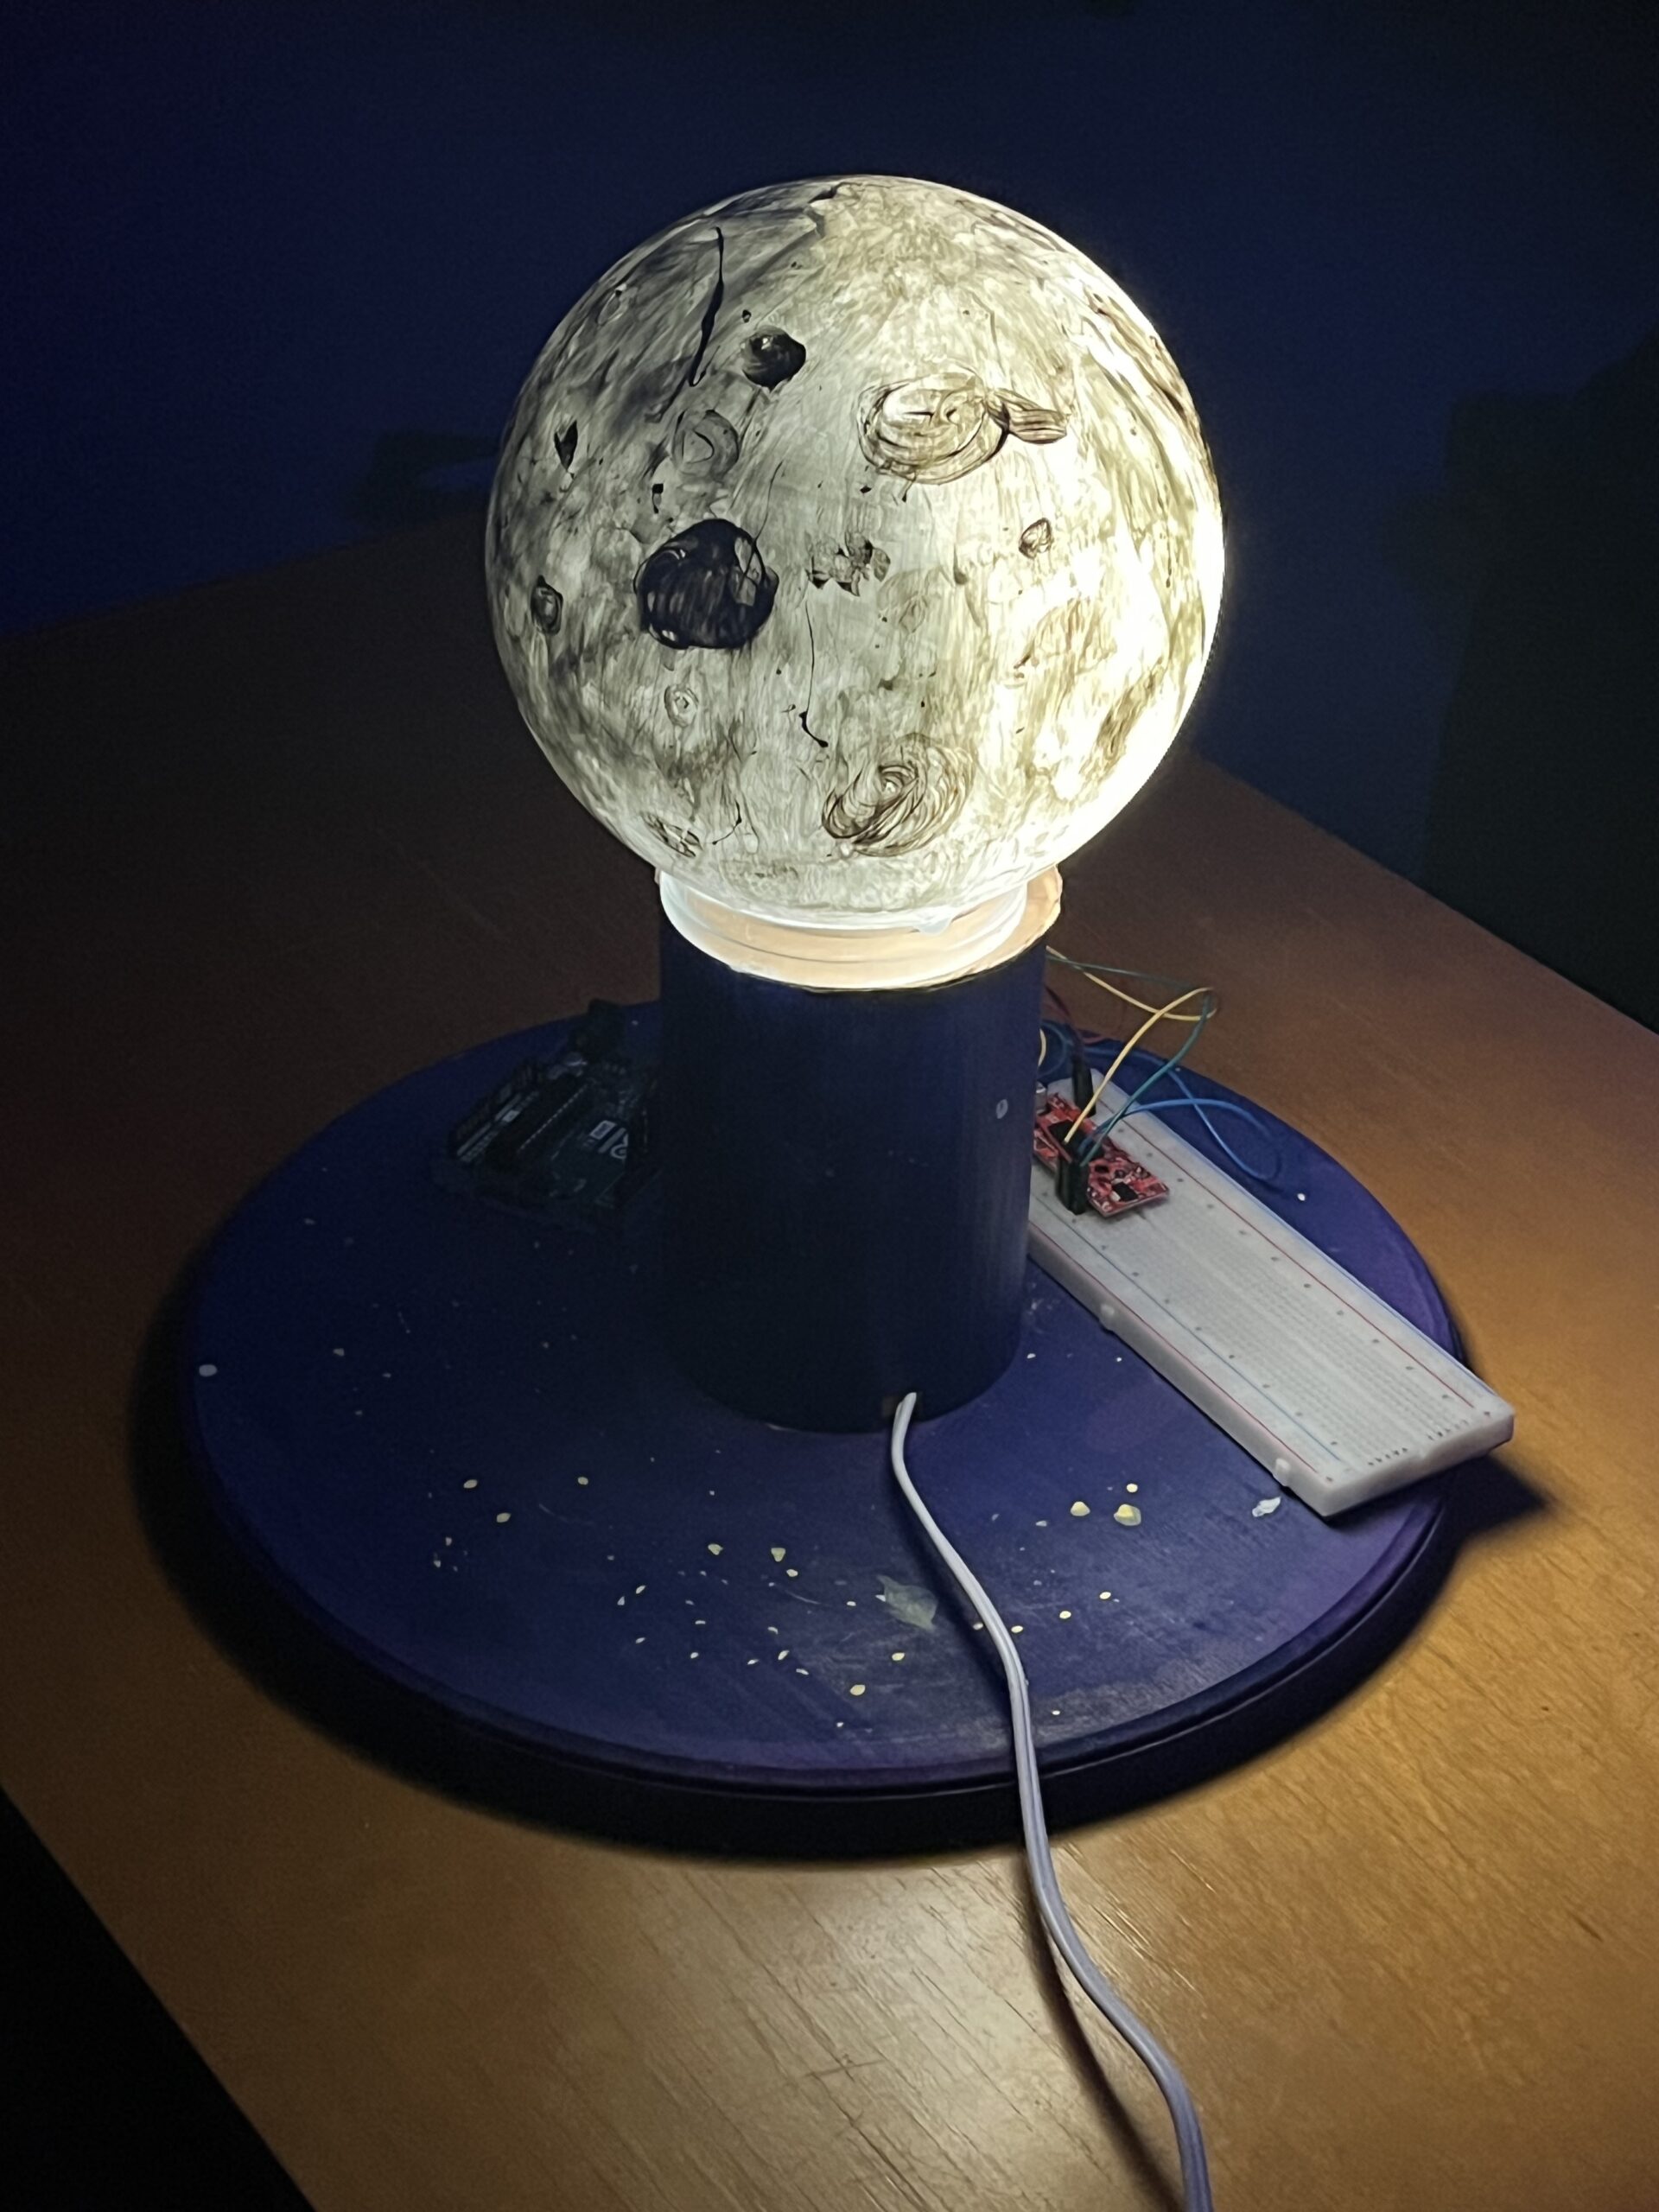
Moon Phase Lamp Part 2: How
In my last blog post, I described in great detail what my final project is, as well as the aesthetic, Lunarpunk, which has dark, lunar related, characteristics. In this post, I will describe, in detail, my timeline for this project, how I designed this project, the different parts that I ordered, how I put them…
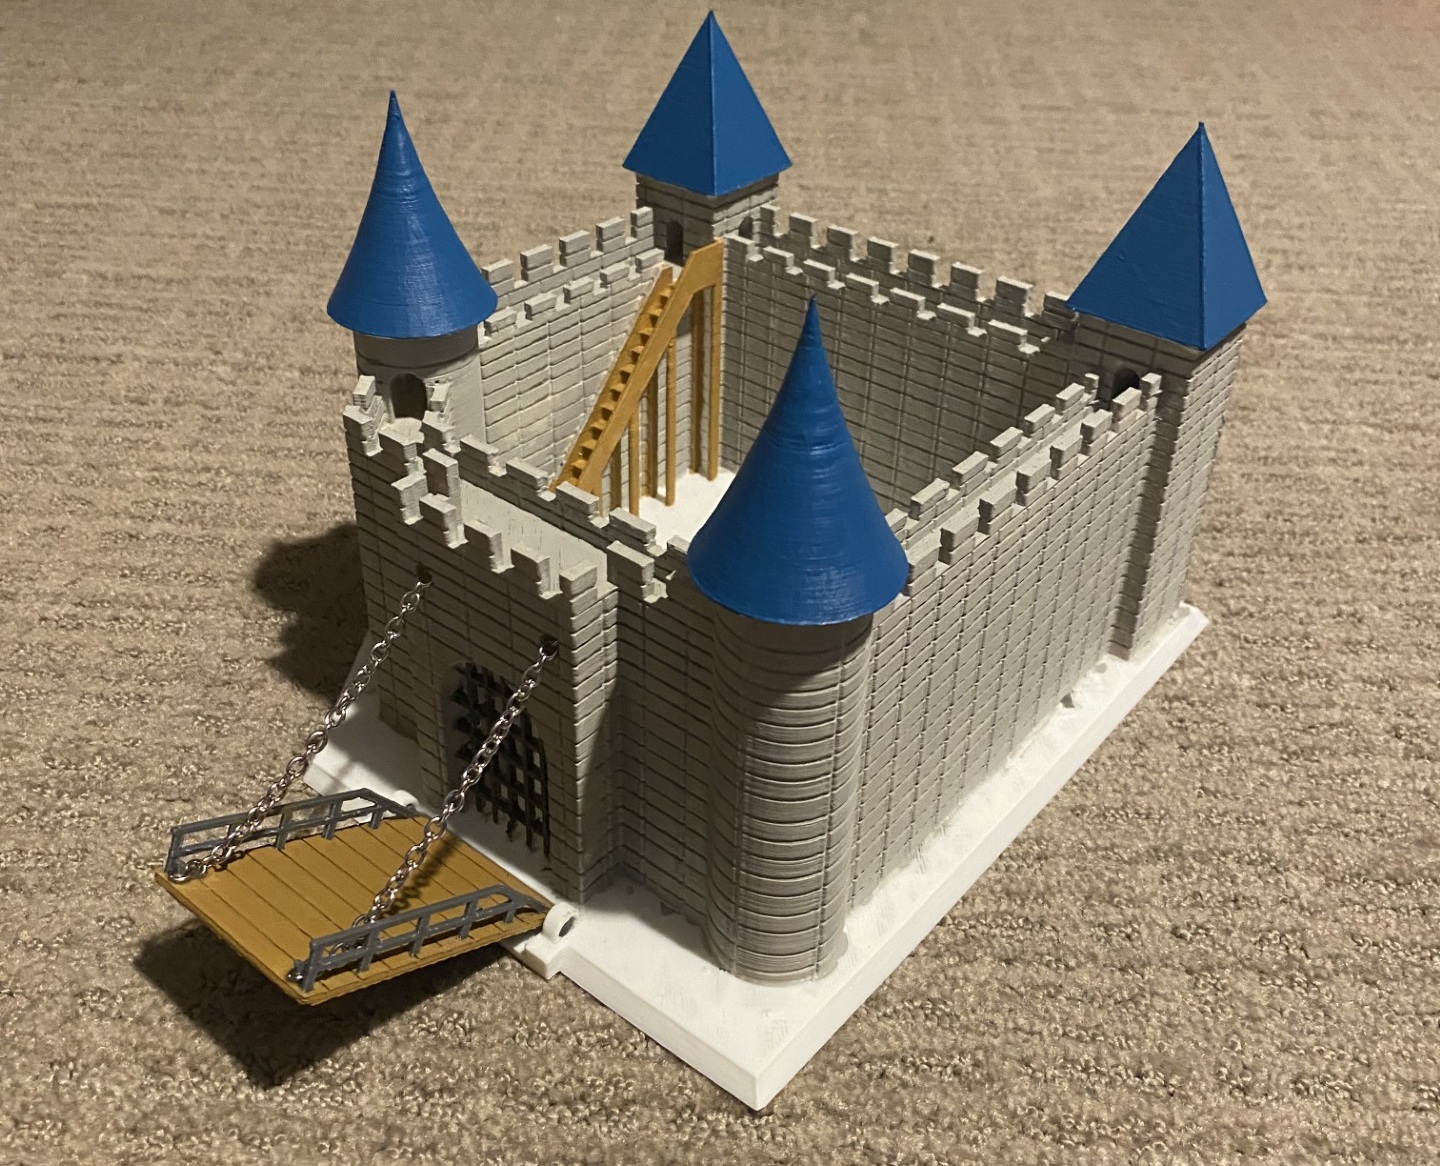
Medieval Castle Fortress Final Report Part 2
Part 1 of my final report went over some of the inspirations I took, specifications I created, aesthetics I wanted to achieve, and displayed the final product. This post will be going more in depth on how I actually created the artifact, what steps were involved, design challenges that arose, and where I want to…

Wooden Display Stand – Final Report P2 How
Below is the timeline I created for the design preview post, and while I largely followed this closely, I was a little too ambitious with what I could get done in that time frame with all the work I had on my plate from Senior Design and other classes. While I did follow this timeline…
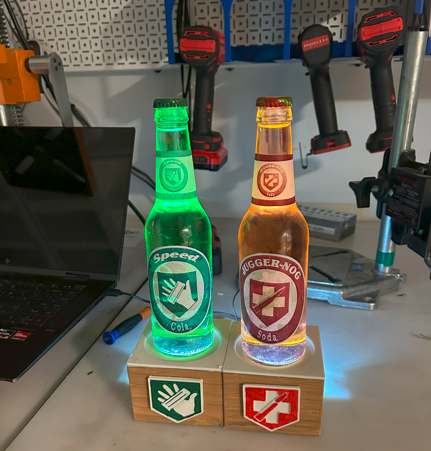
Perk-a-Cola Display: How it was made
The How Behind the Build: Fabricating the Cozy Cabin Perk-a-Cola Display This blog is all about the how—the behind-the-scenes process of actually designing and building my Cozy Cabin Perk-a-Cola Bottle Display. From testing switches to painting fake moss onto a 3D print, this was a hands-on project where I learned a lot just by doing.…
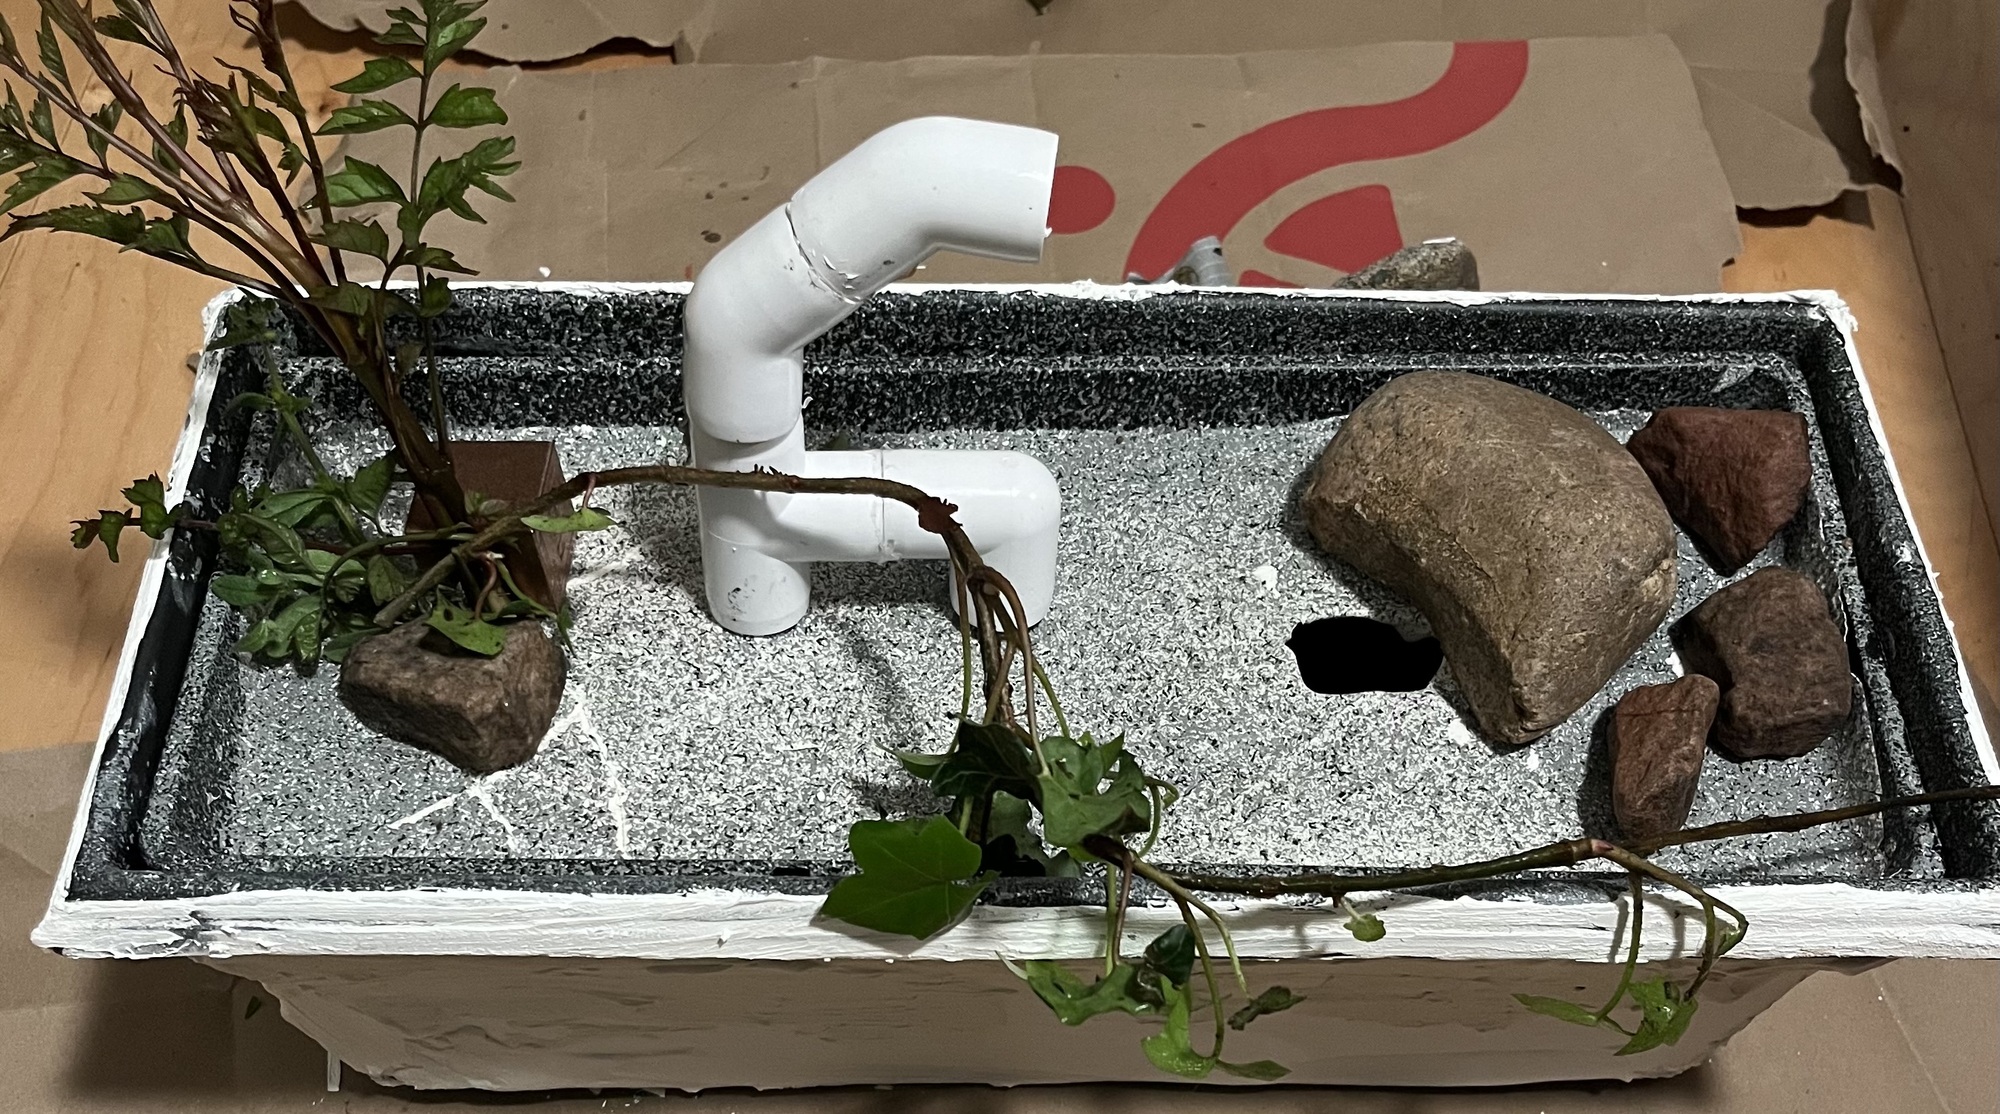
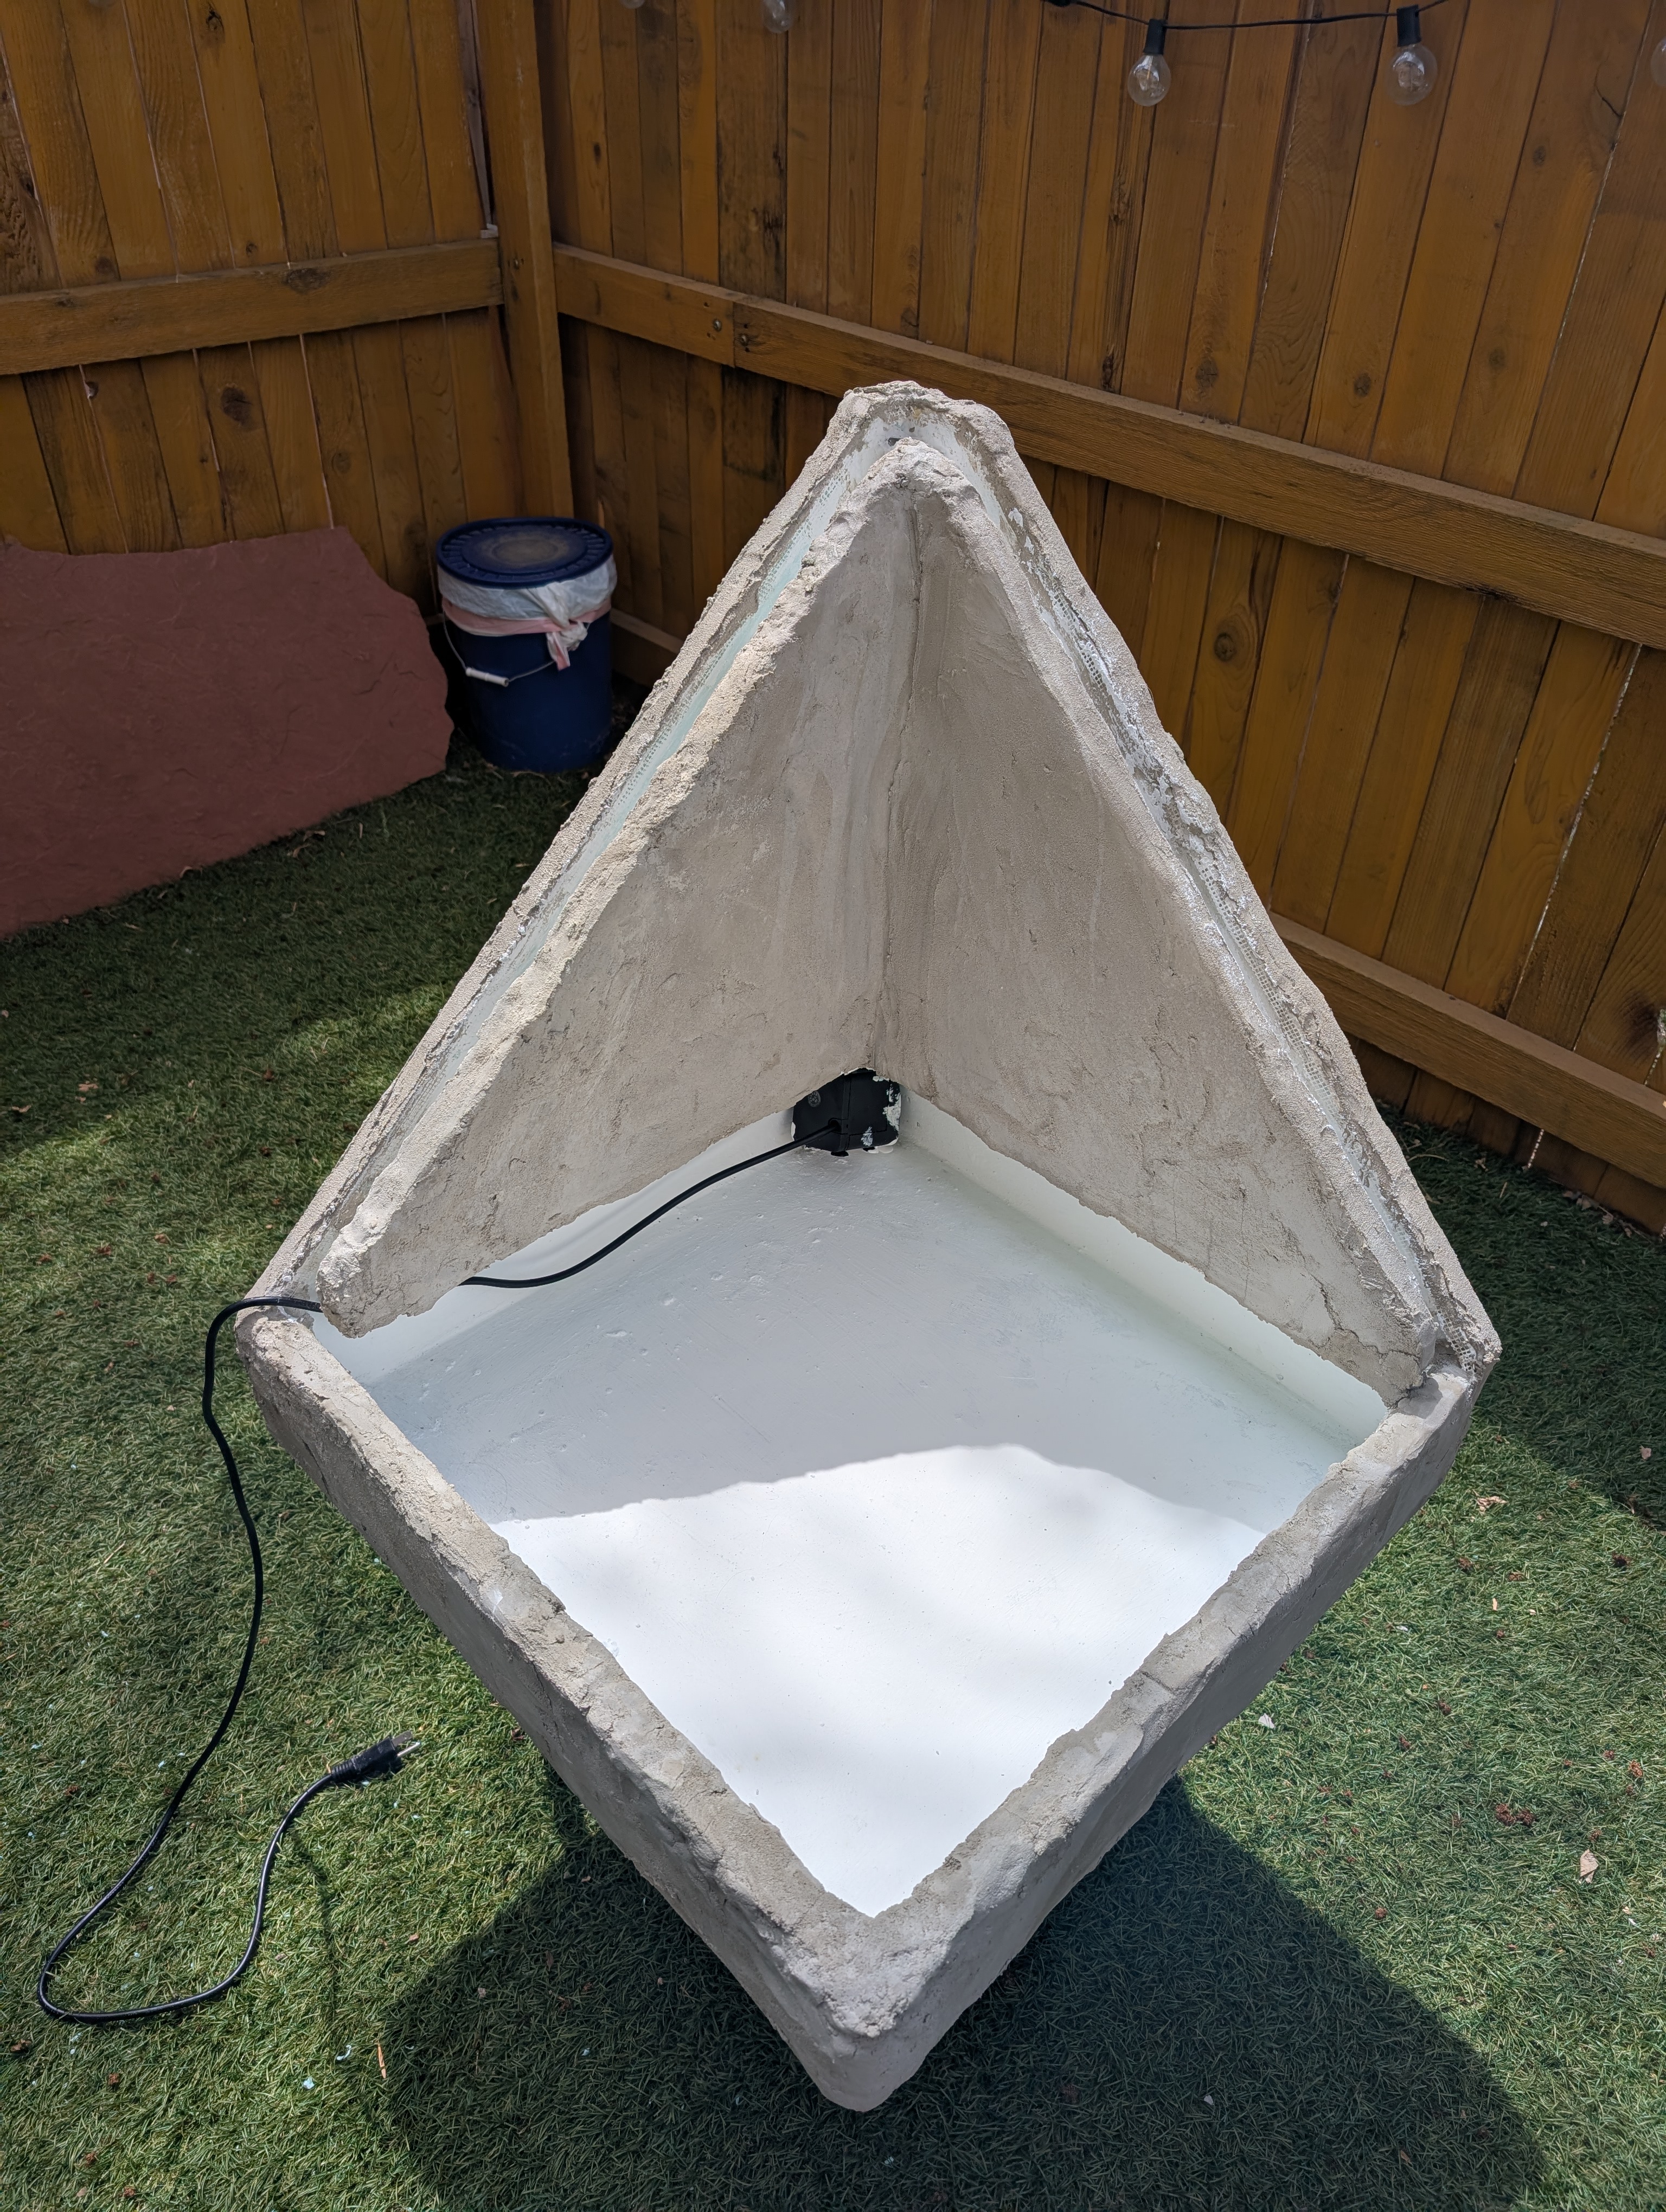
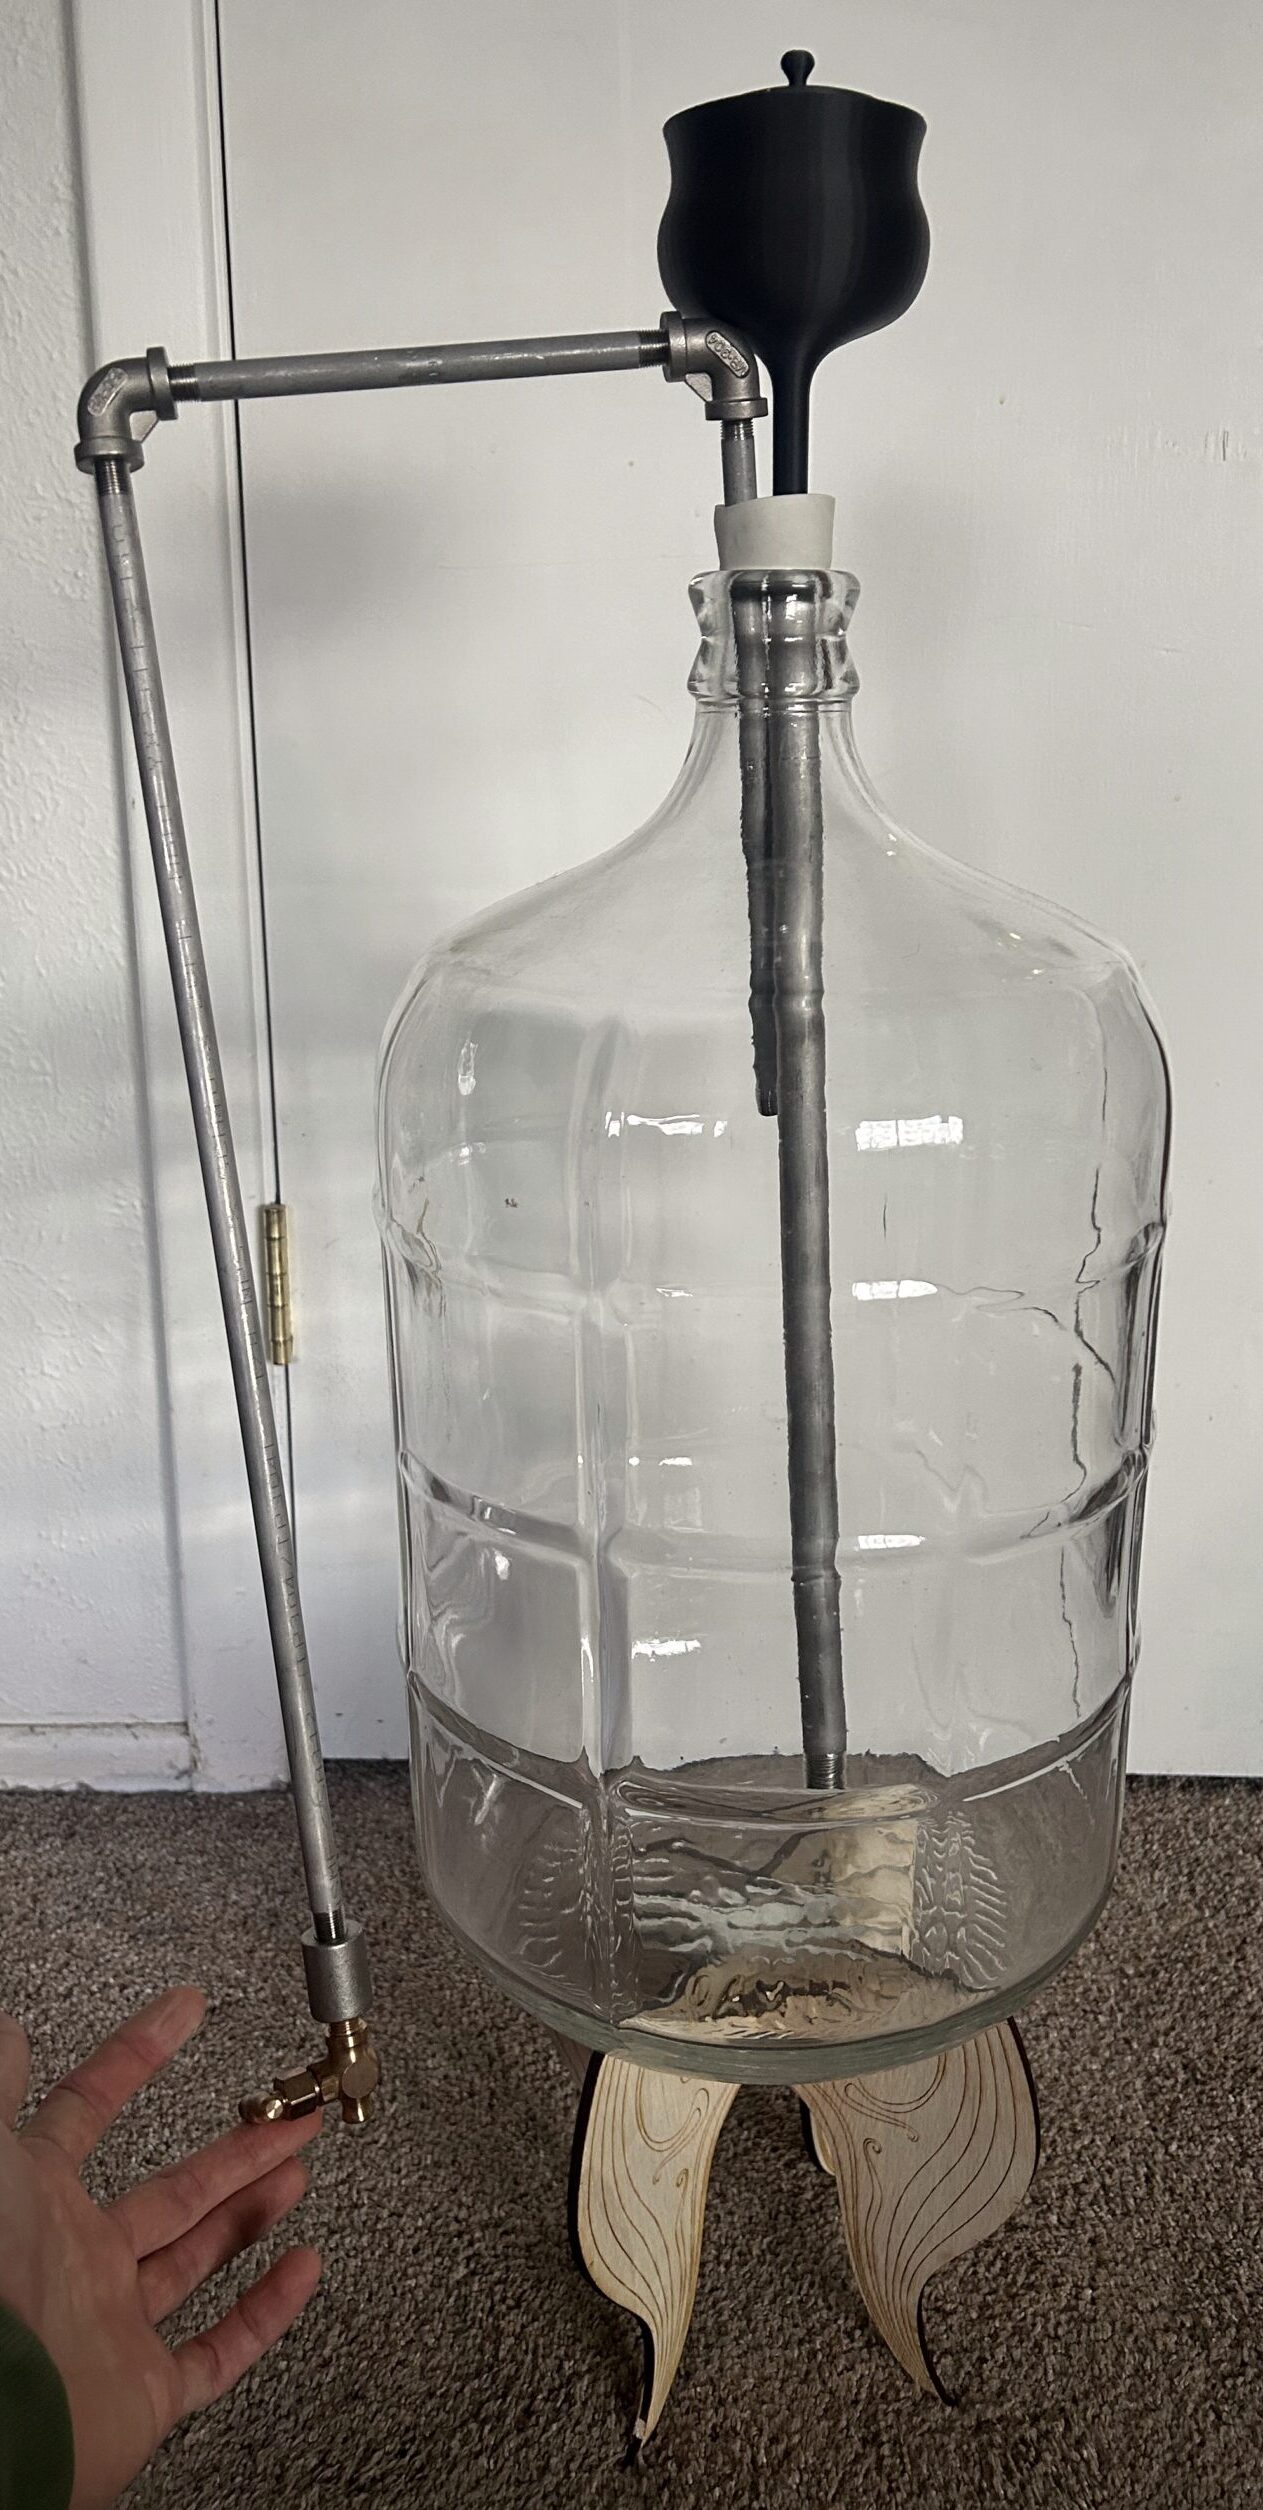
Fountain Planter Final Report 2: How
Introduction For my main project, I decided to construct a planter and fountain combo in the industrial aesthetic. I used PVC and plaster to convey this aesthetic in the fountain and planter parts respectively. The overall assembly sits at about two feet by one foot in footprint, with a height of about a foot. This…
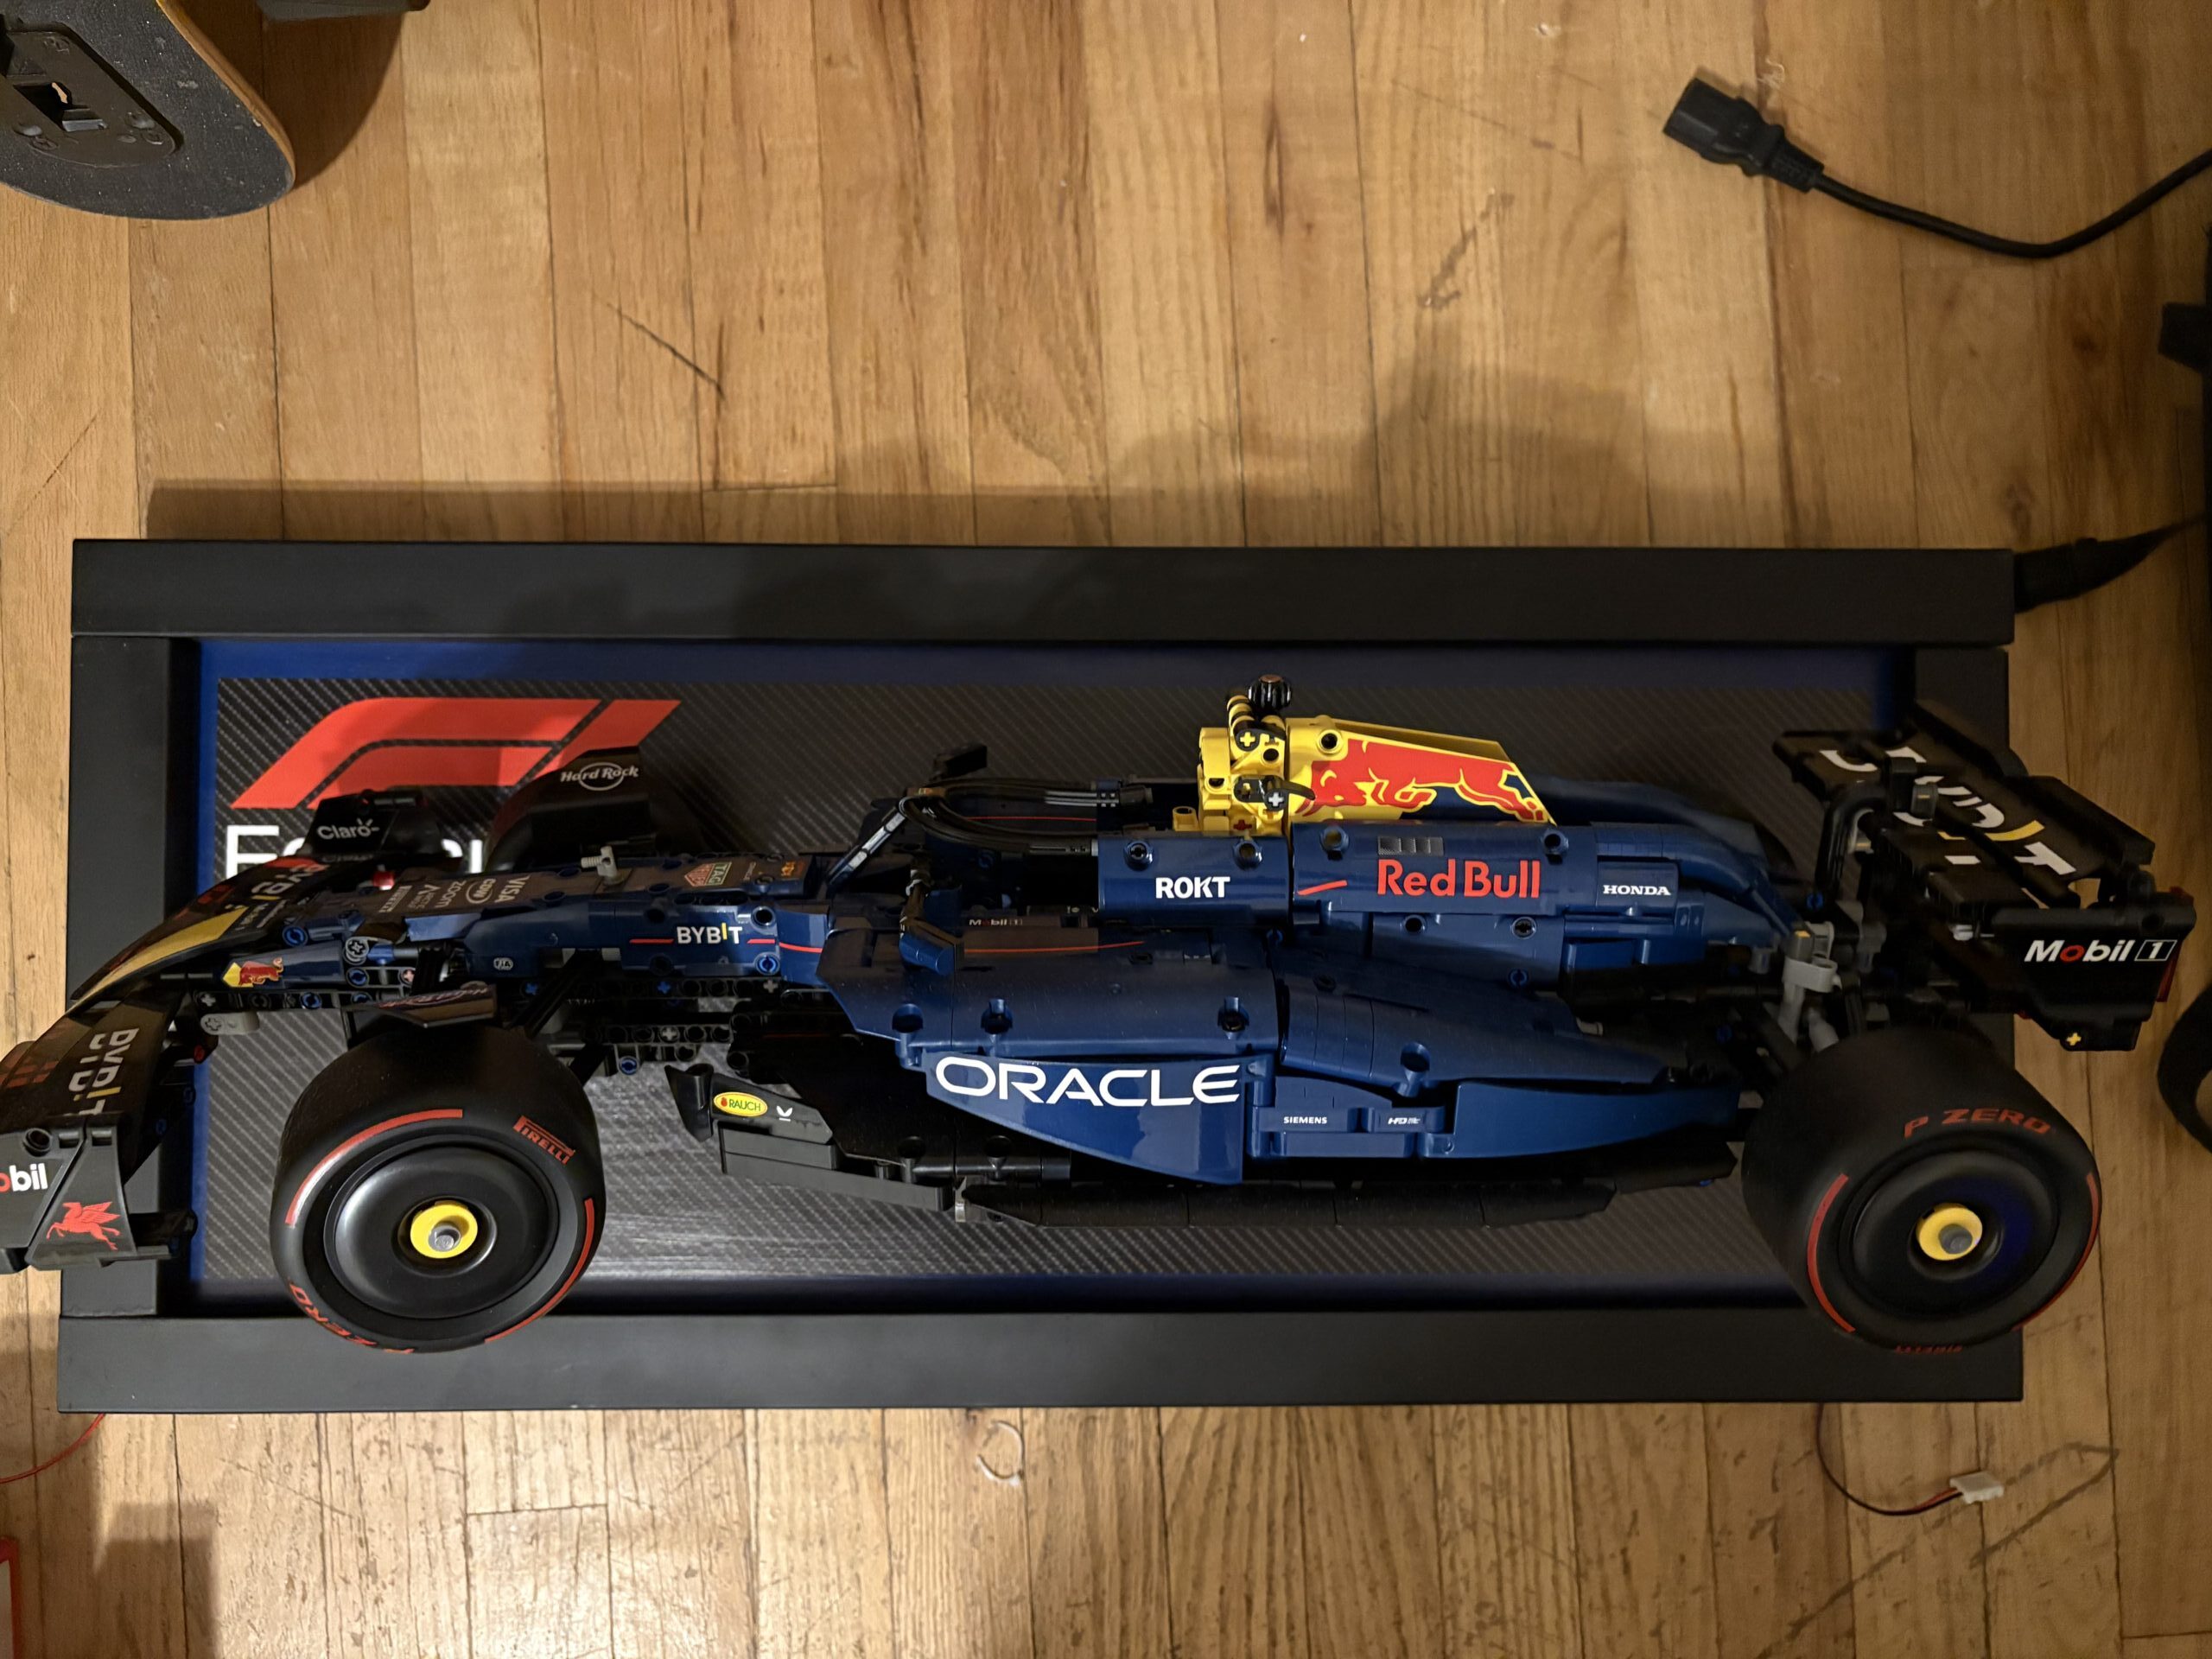
LEGO Formula 1 Display – How it was done
To create this project, there was a ton of work that wen t into this. I had several different phases of the project. There was research, design, build, prototyping, reevaluation/problem solving, and the finished product. I started with some research for the project and then applied that to my design/planning. I did some prototyping with…
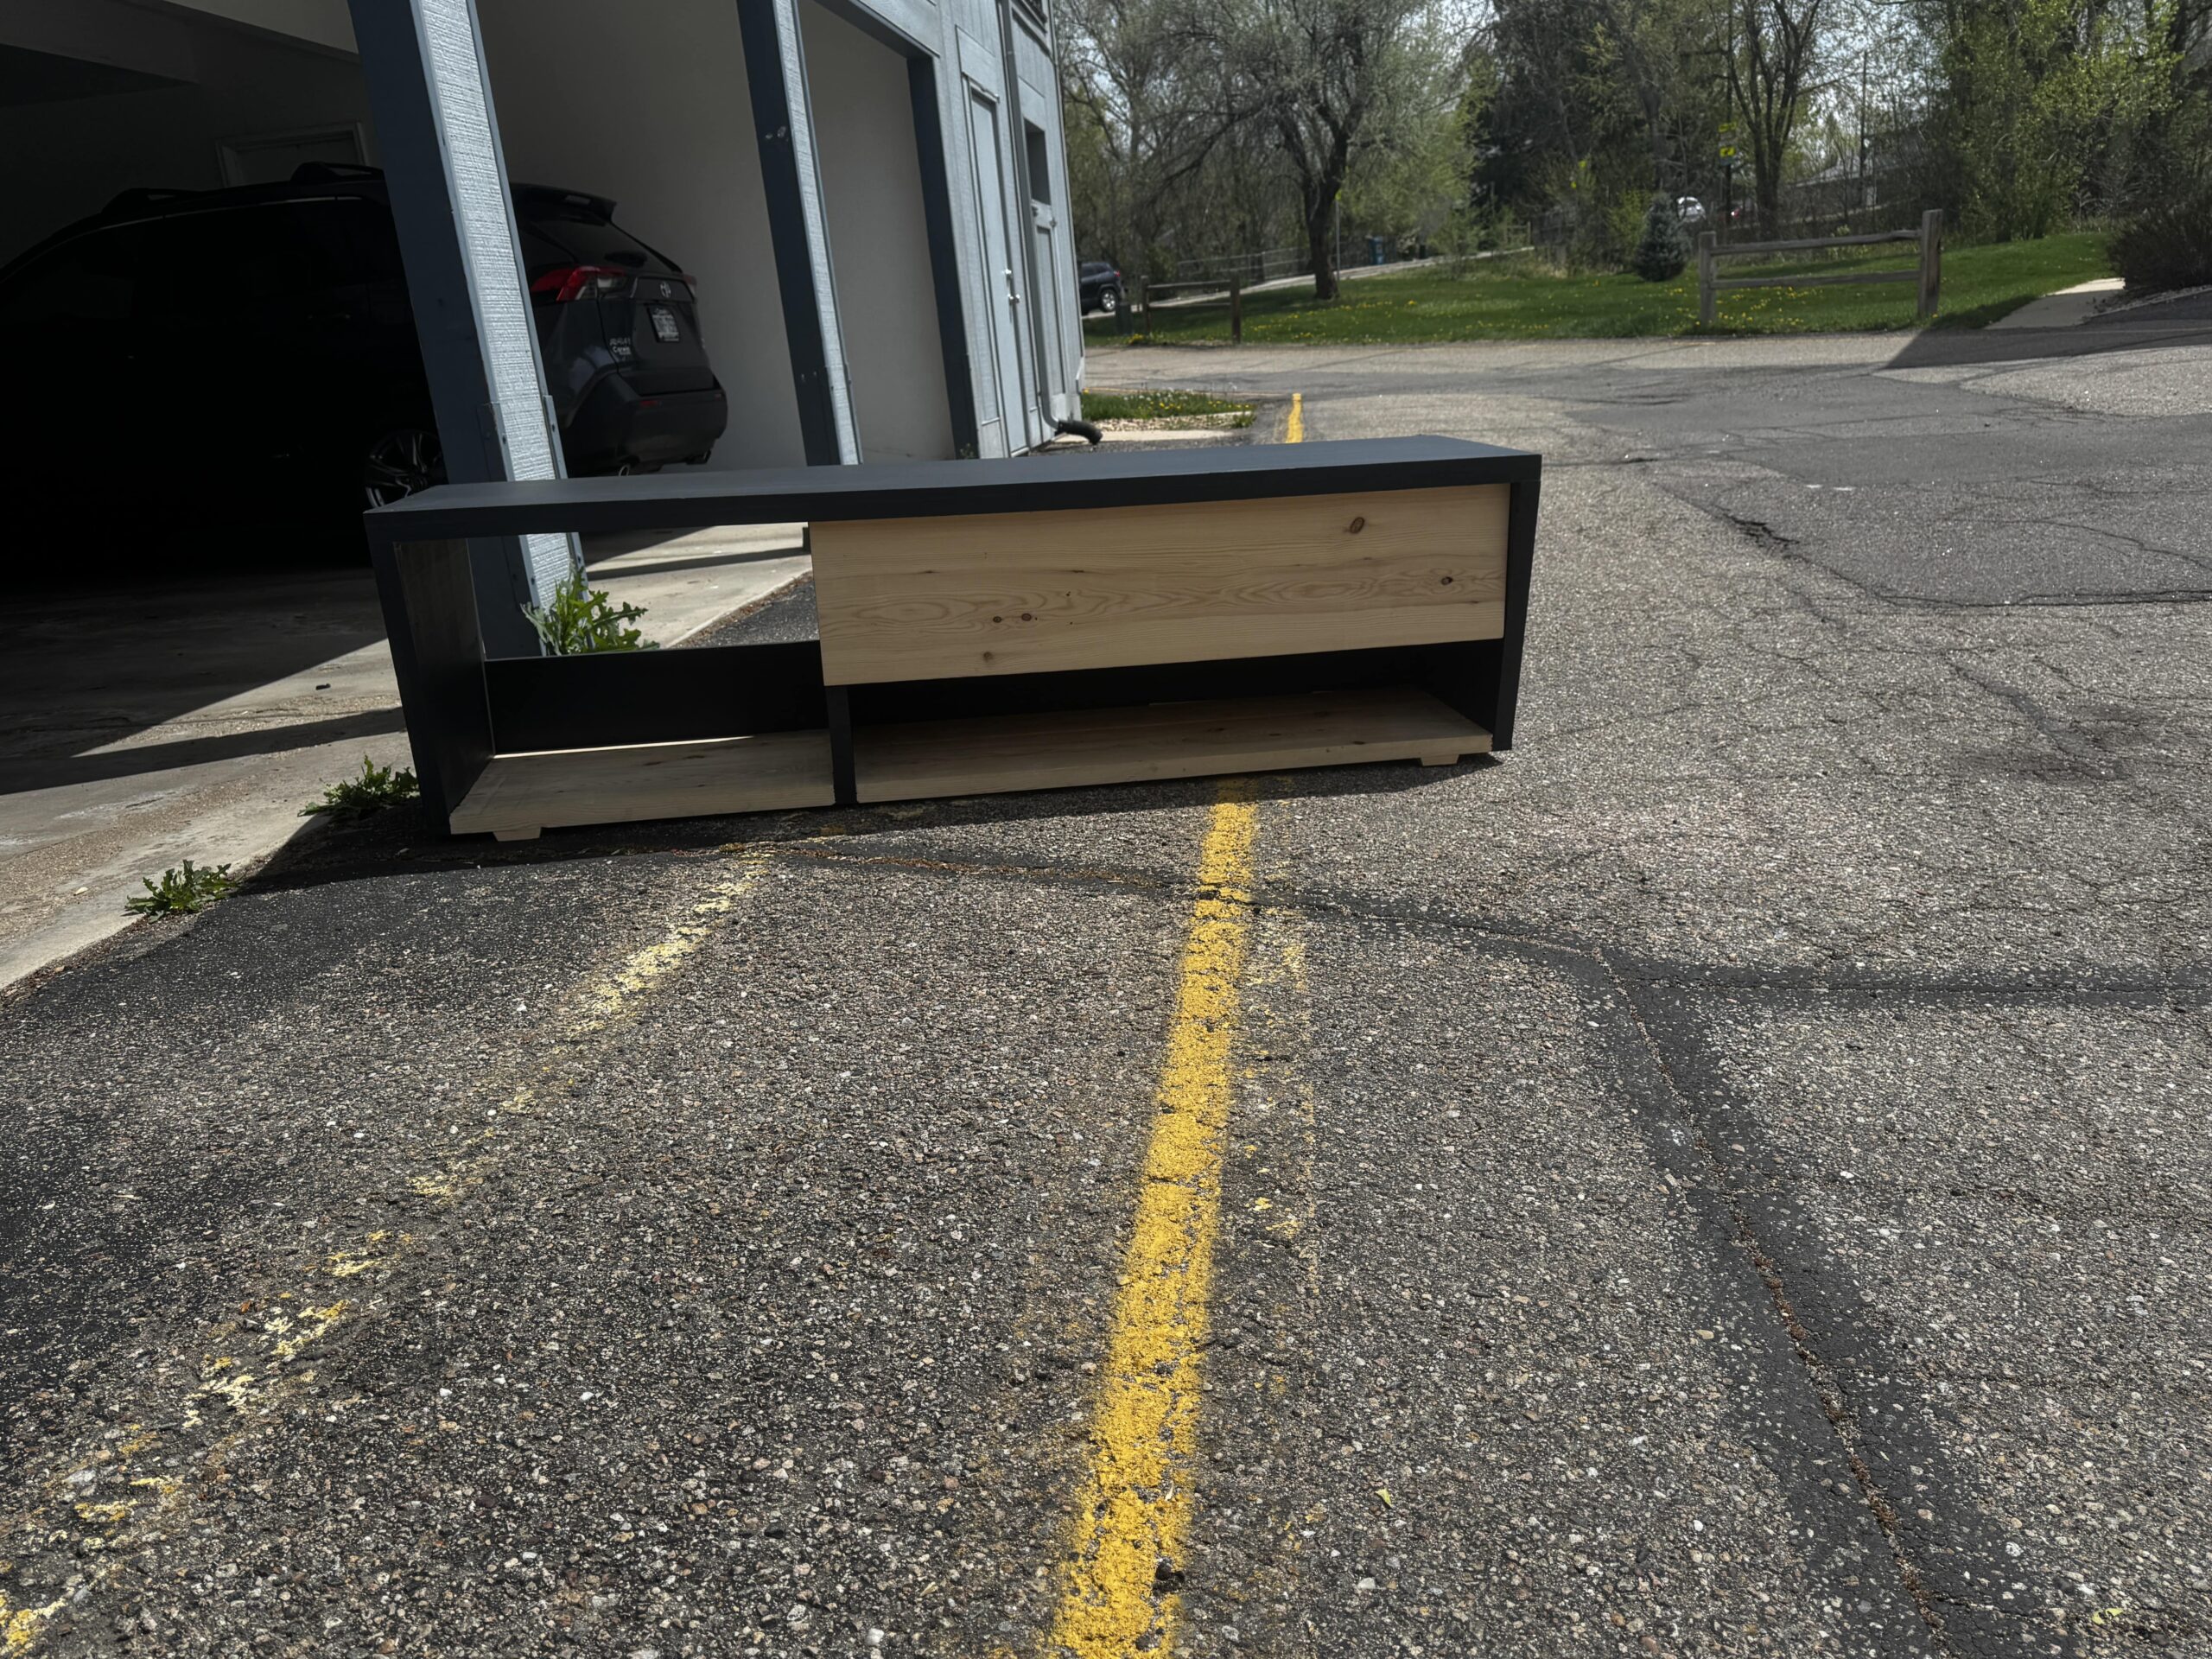
Scandinavian Modern TV Stand
For my final project, I decided to make a Scandinavian modern TV stand. The initial design I settled on was heavily influenced by the “opposite” aesthetic that I chose- Brutalism, as it incorporates a concrete overlay to create the appearance of a thick, overhanging concrete slab. In line with the Scandinavian modern aesthetic, I chose…
Hitbox Final Report Part 2
For this project, my timeline has changed from the original timeline I had. (Figure 1): Updated timeline Due to the mishap with my paint discussed last week, the final assembly was delayed by a lot. Now, I am leaving the electronics work to the future, potentially before or after expo. I do intend on getting…
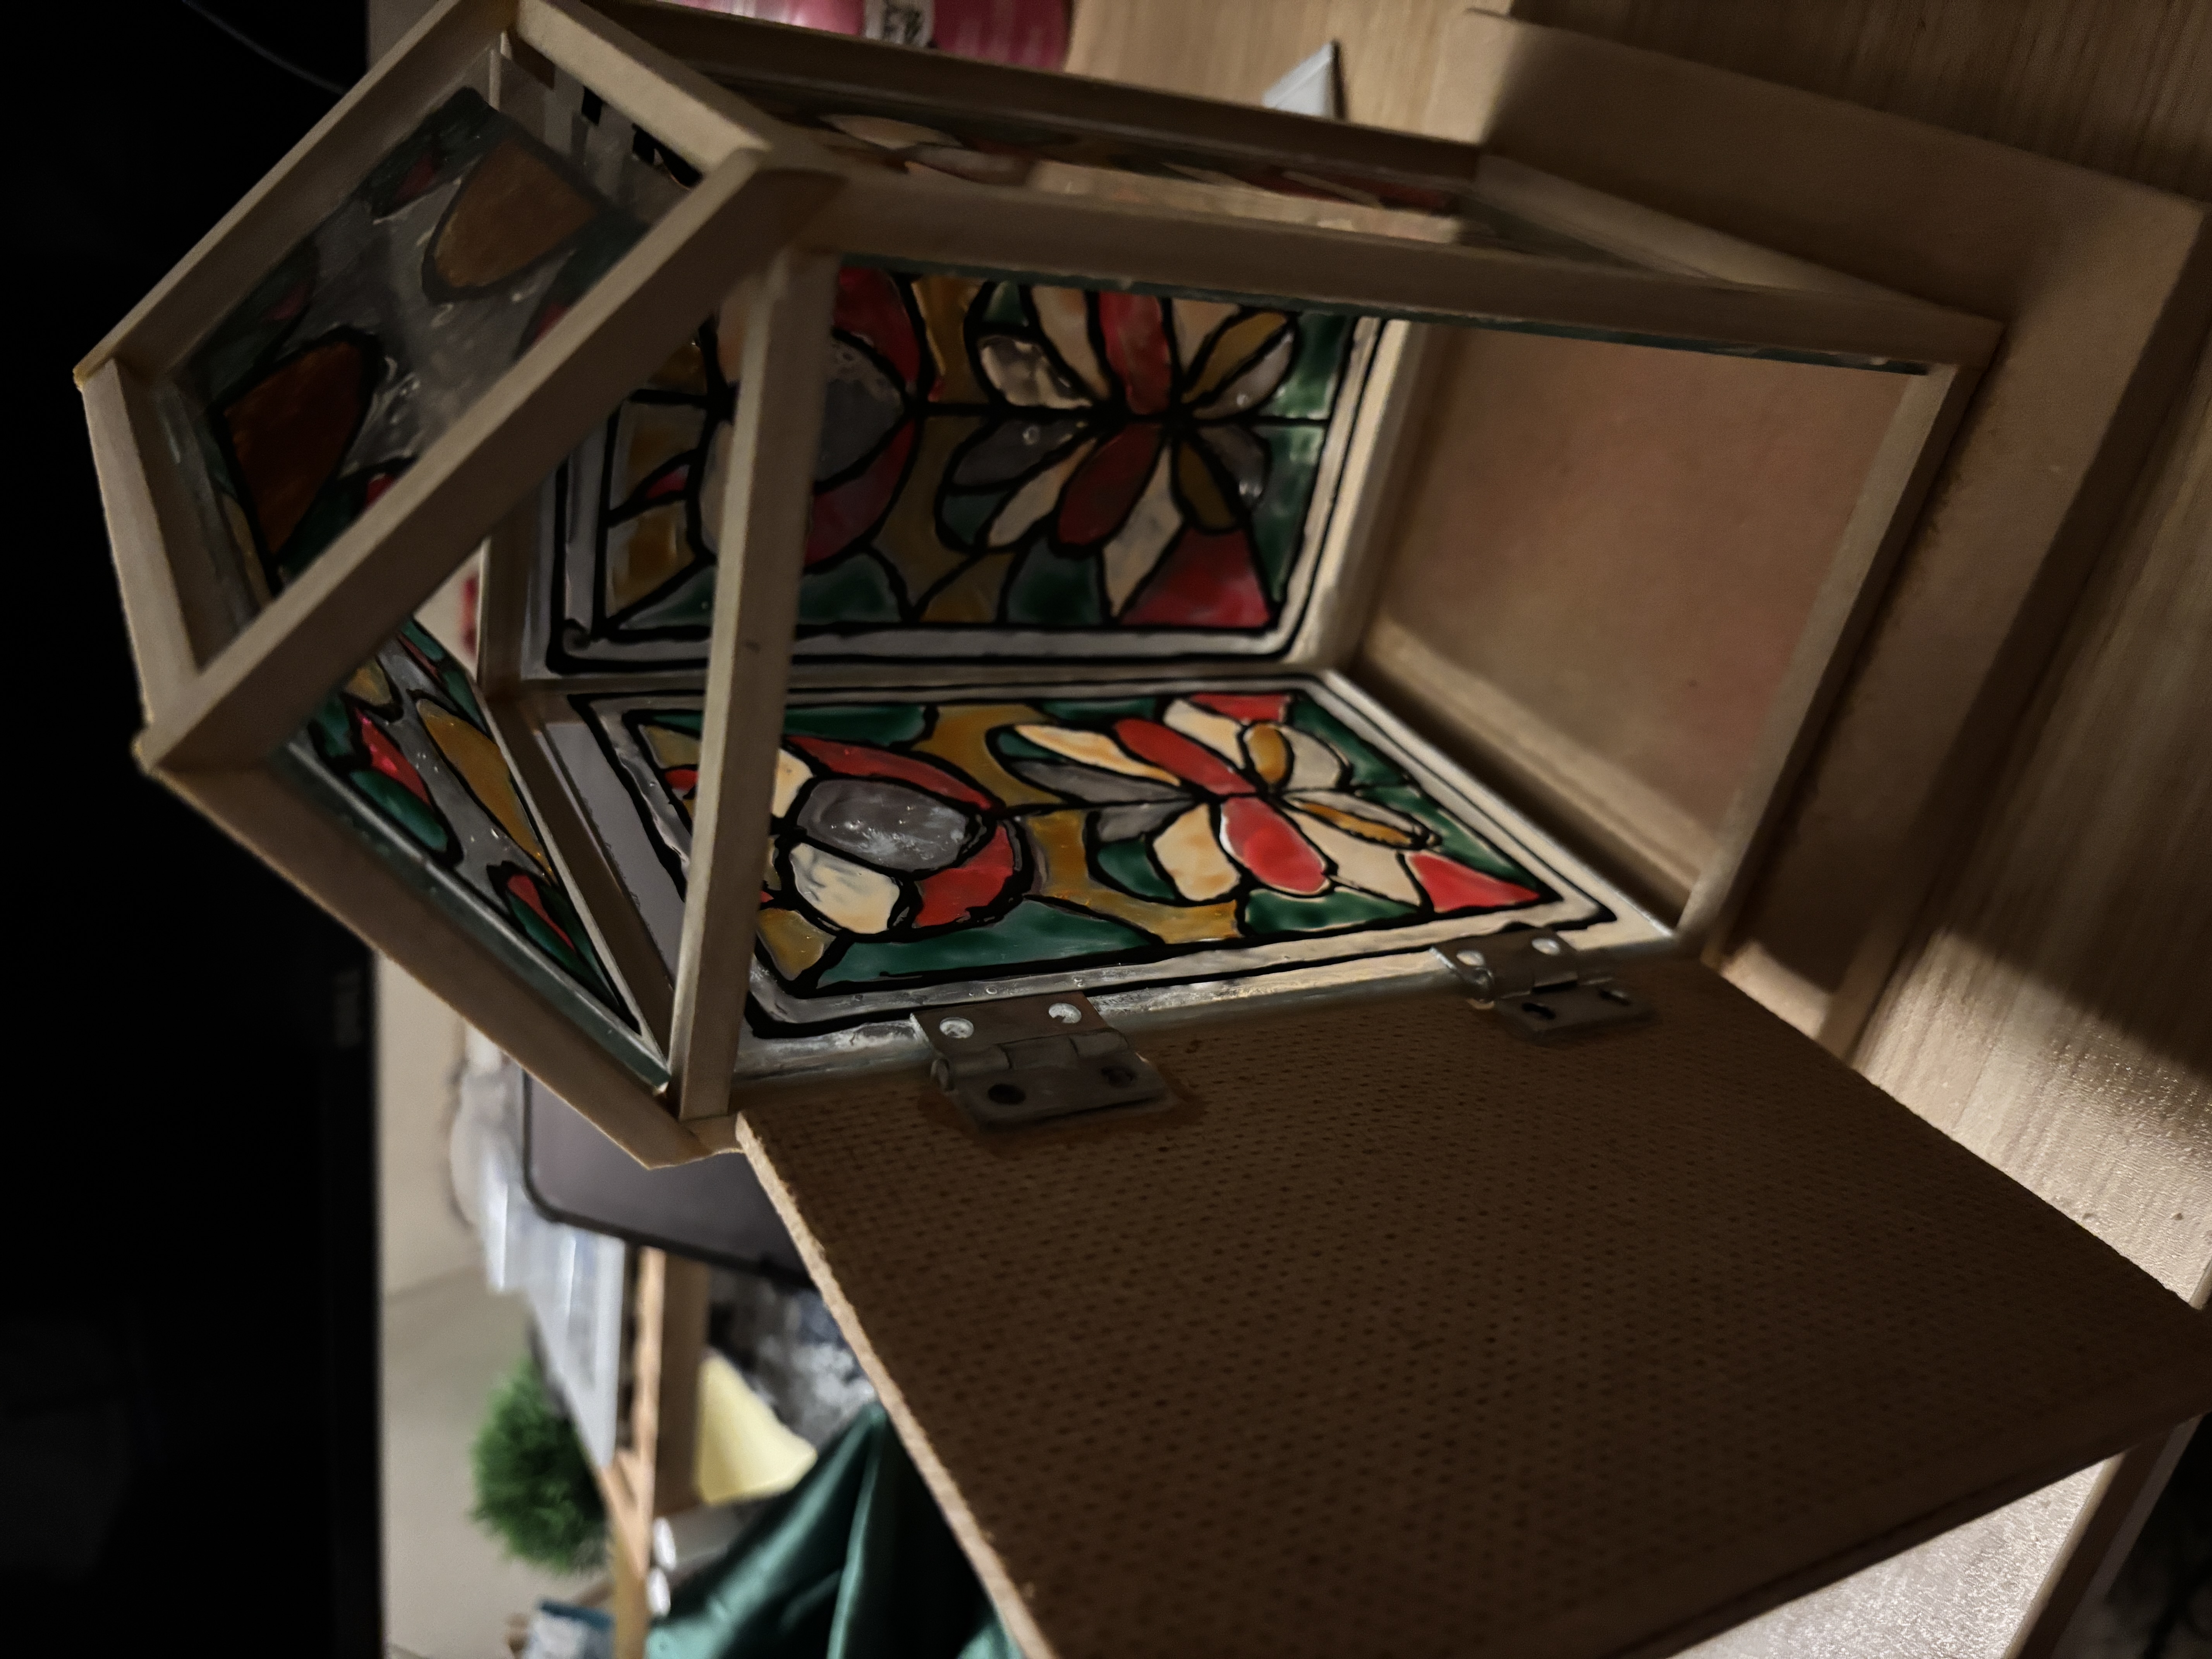
Stained Glass Terrarium Final Report Pt.2
For my final project, I am focusing loosely on the reminiscence theme. Since a lot of my childhood is surrounded by stained glass, I wanted to do something with stained glass and/or have the stained glass look. I am making a glass terrarium. I want to use mixed materials like glass, and wood to make…
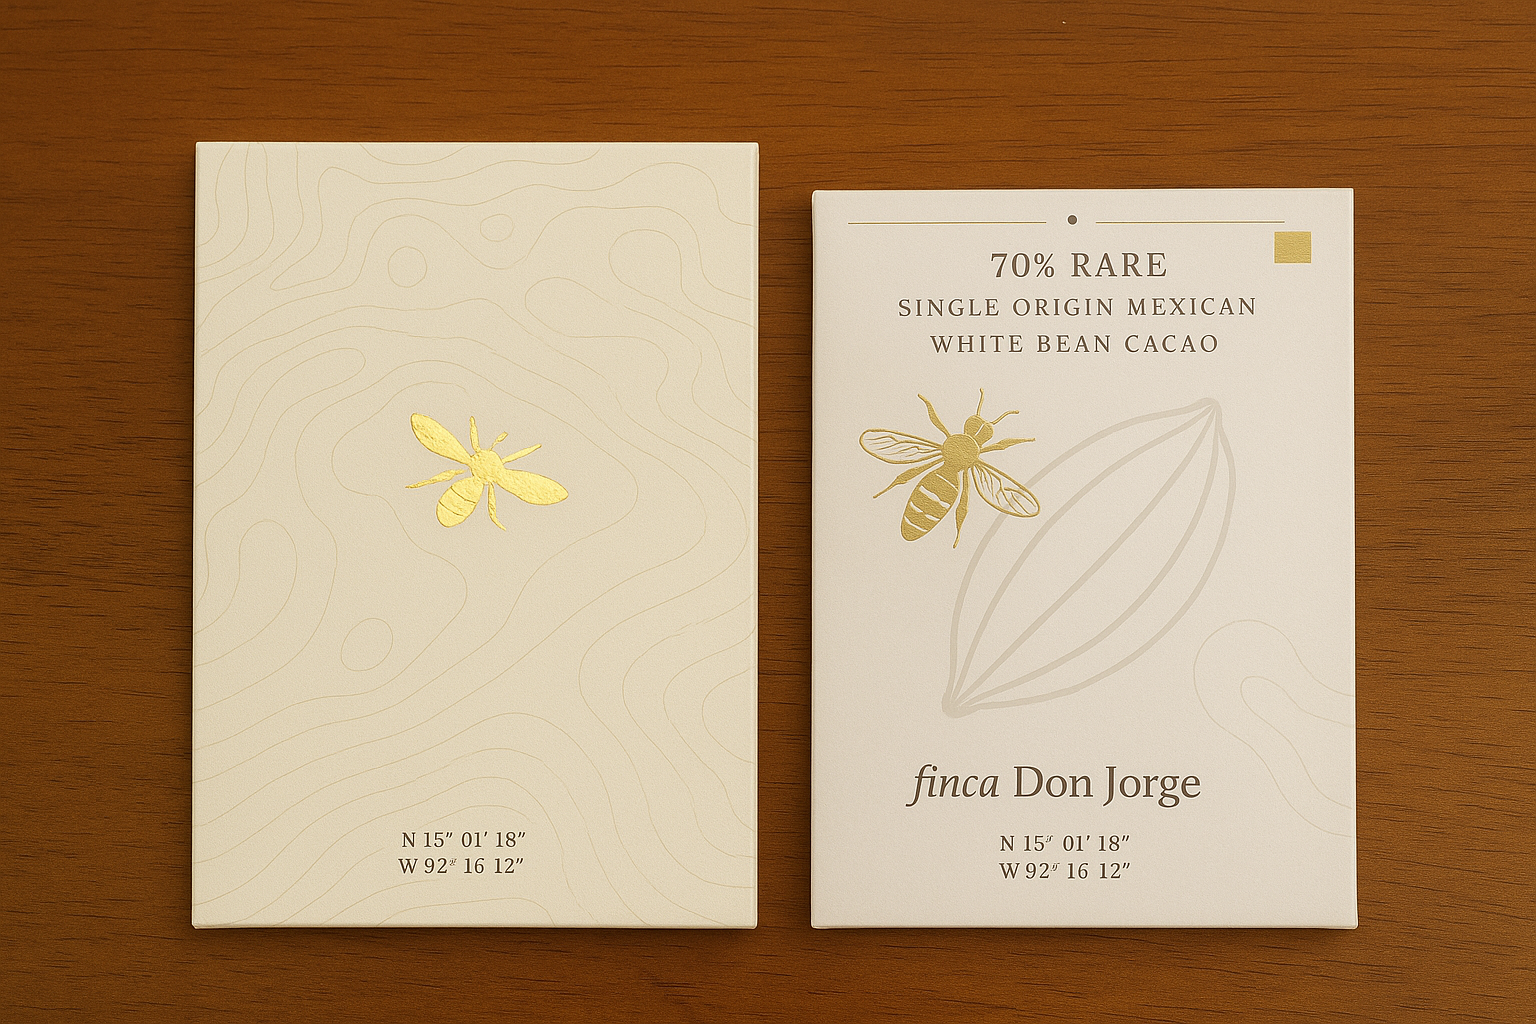
Final Report Part 2: Chocolate Packaging Process
Timeline Graphic The following graphic documents my actual design process over the course of the semester. The process has been split into the following stages: Figure 2: Timeline Fabrication Process Phase 1: Exploration & Concept Refinement The semester began with momentum from my Upcycle project proposal: a vertically integrated chocolate brand inspired by my internship…
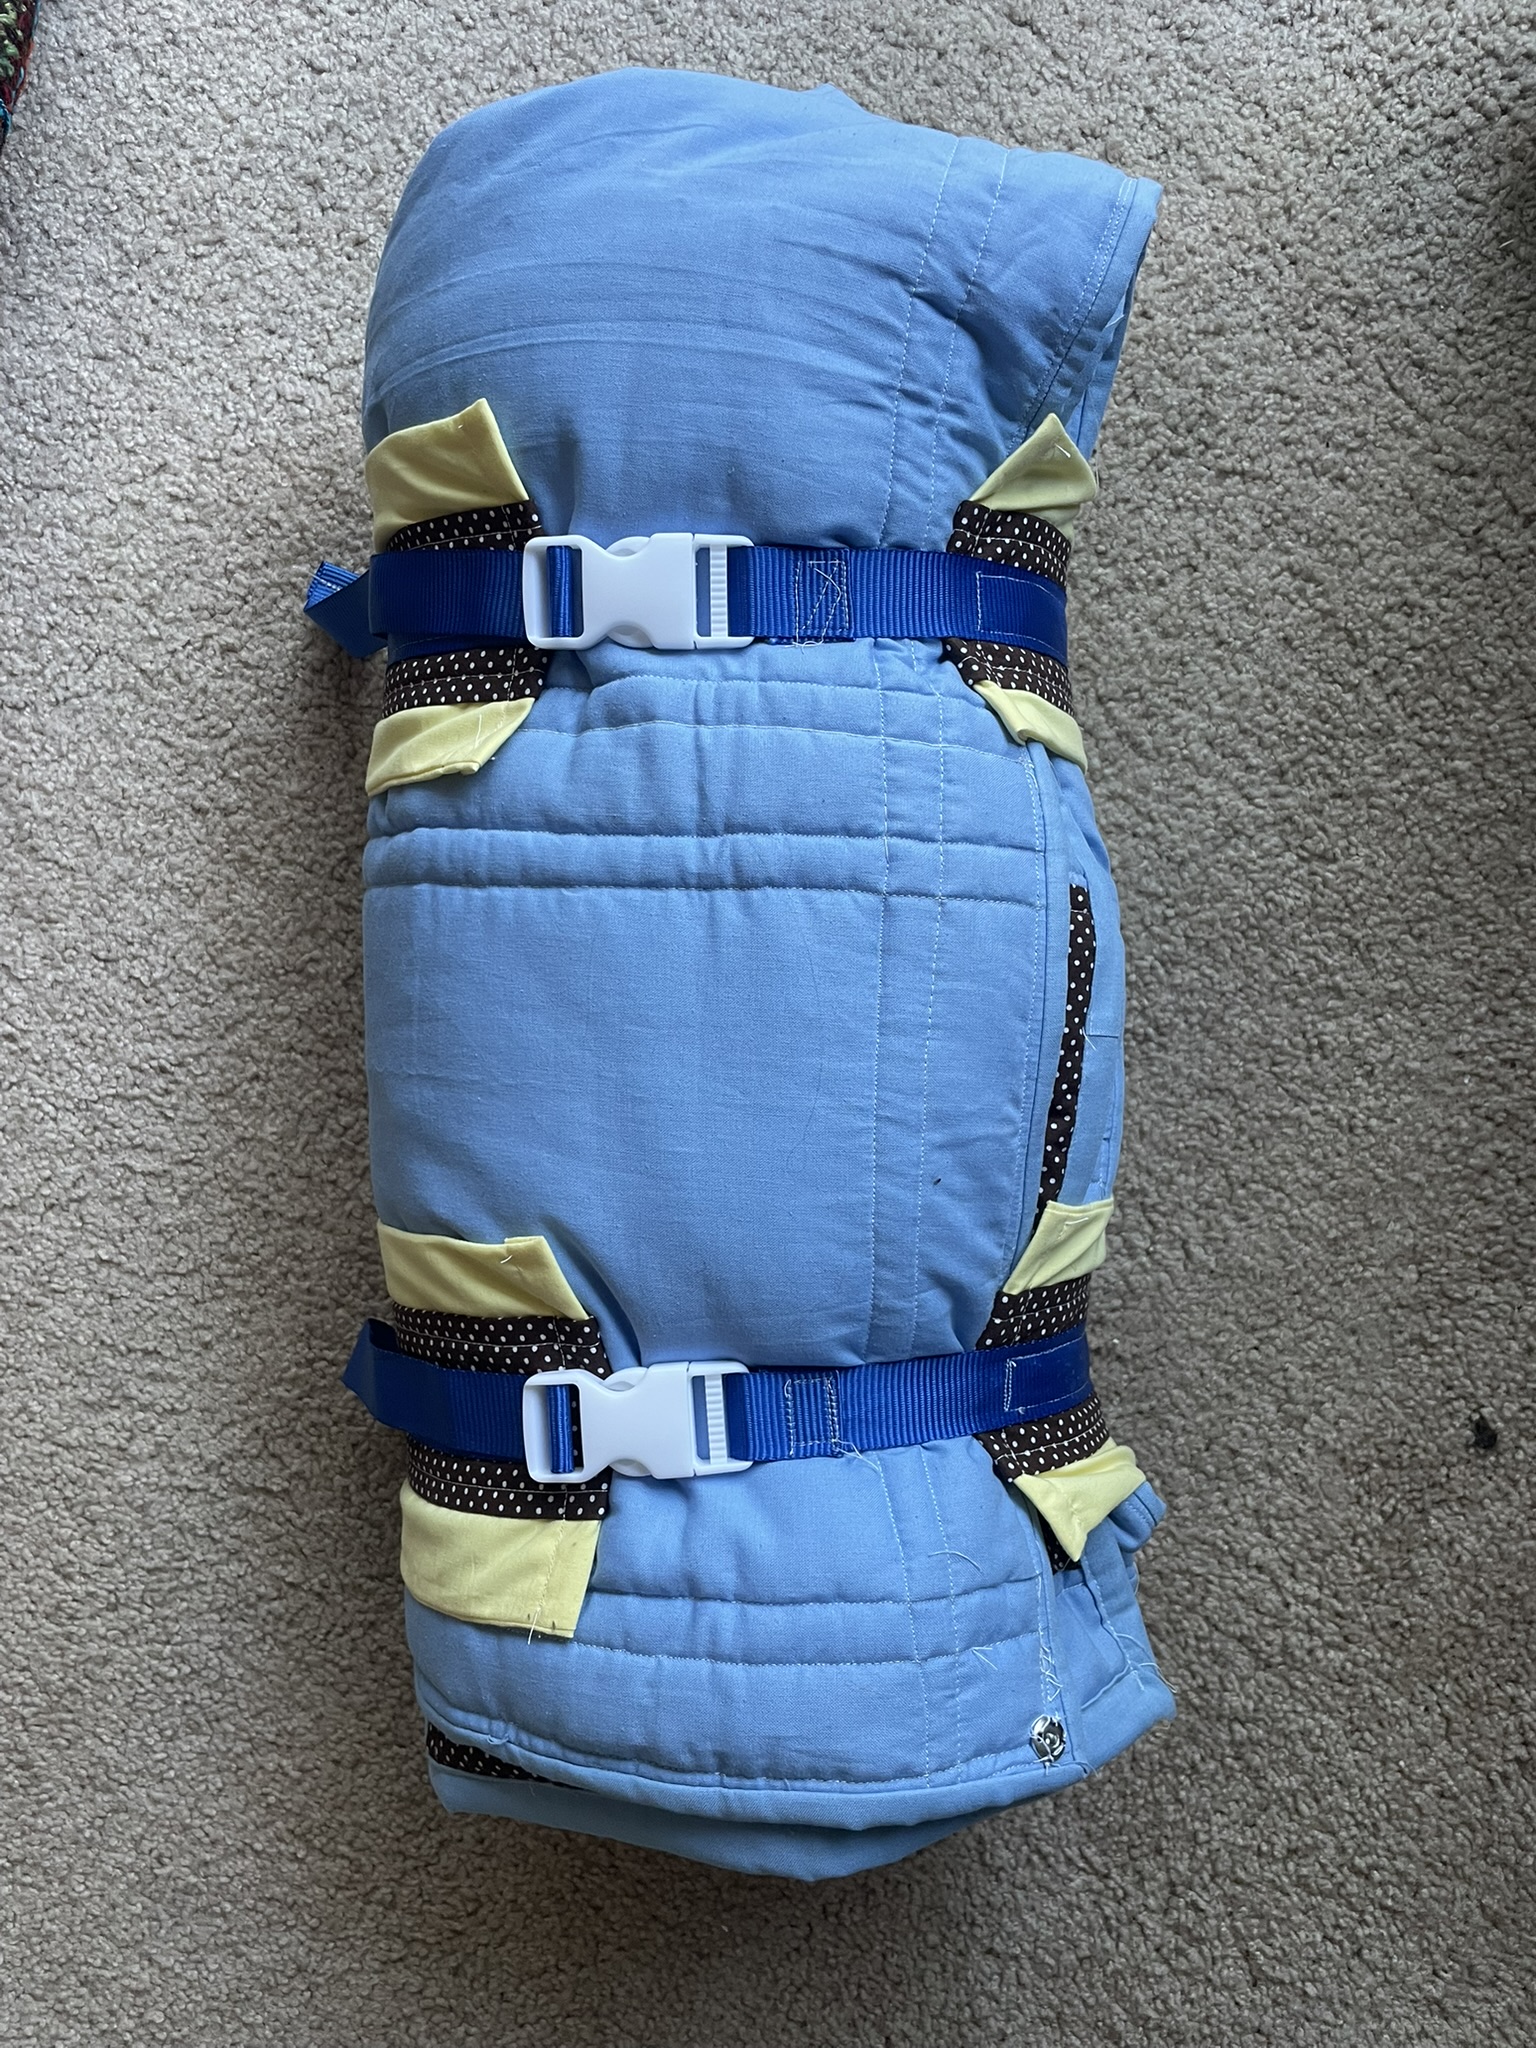
Multifunctional Quilt: the “How”
Fabrication Process Below is an image of my fabrication timeline. Compared to my original planned timeline, this one ended up getting shifted back by a couple weeks, which was anticipated. I’m glad I budgeted for more time than expected. One of my biggest takeaways from this project is that quilting is a very time consuming…
Main Project – Final Report 2
Background: For my final project, I constructed a river epoxy table. This has always been a dream of mine to do as I grew to love wood working after creating a camping kitchen box for my Invention and Innovation class here at CU boulder. This was the first time I really worked with wood and…

From Concept to Completion: Aesthetic Fabrication Journey for my Tree Frame
Figure 1. Final Outcome Introduction The creation of my final project, the layered laser cut tree wall art piece with a hidden photo frame, was more than just a build. It was a journey of aesthetic exploration, emotional connection, trial and error, and iterative design. From the earliest sketches to the final stain and screw,…
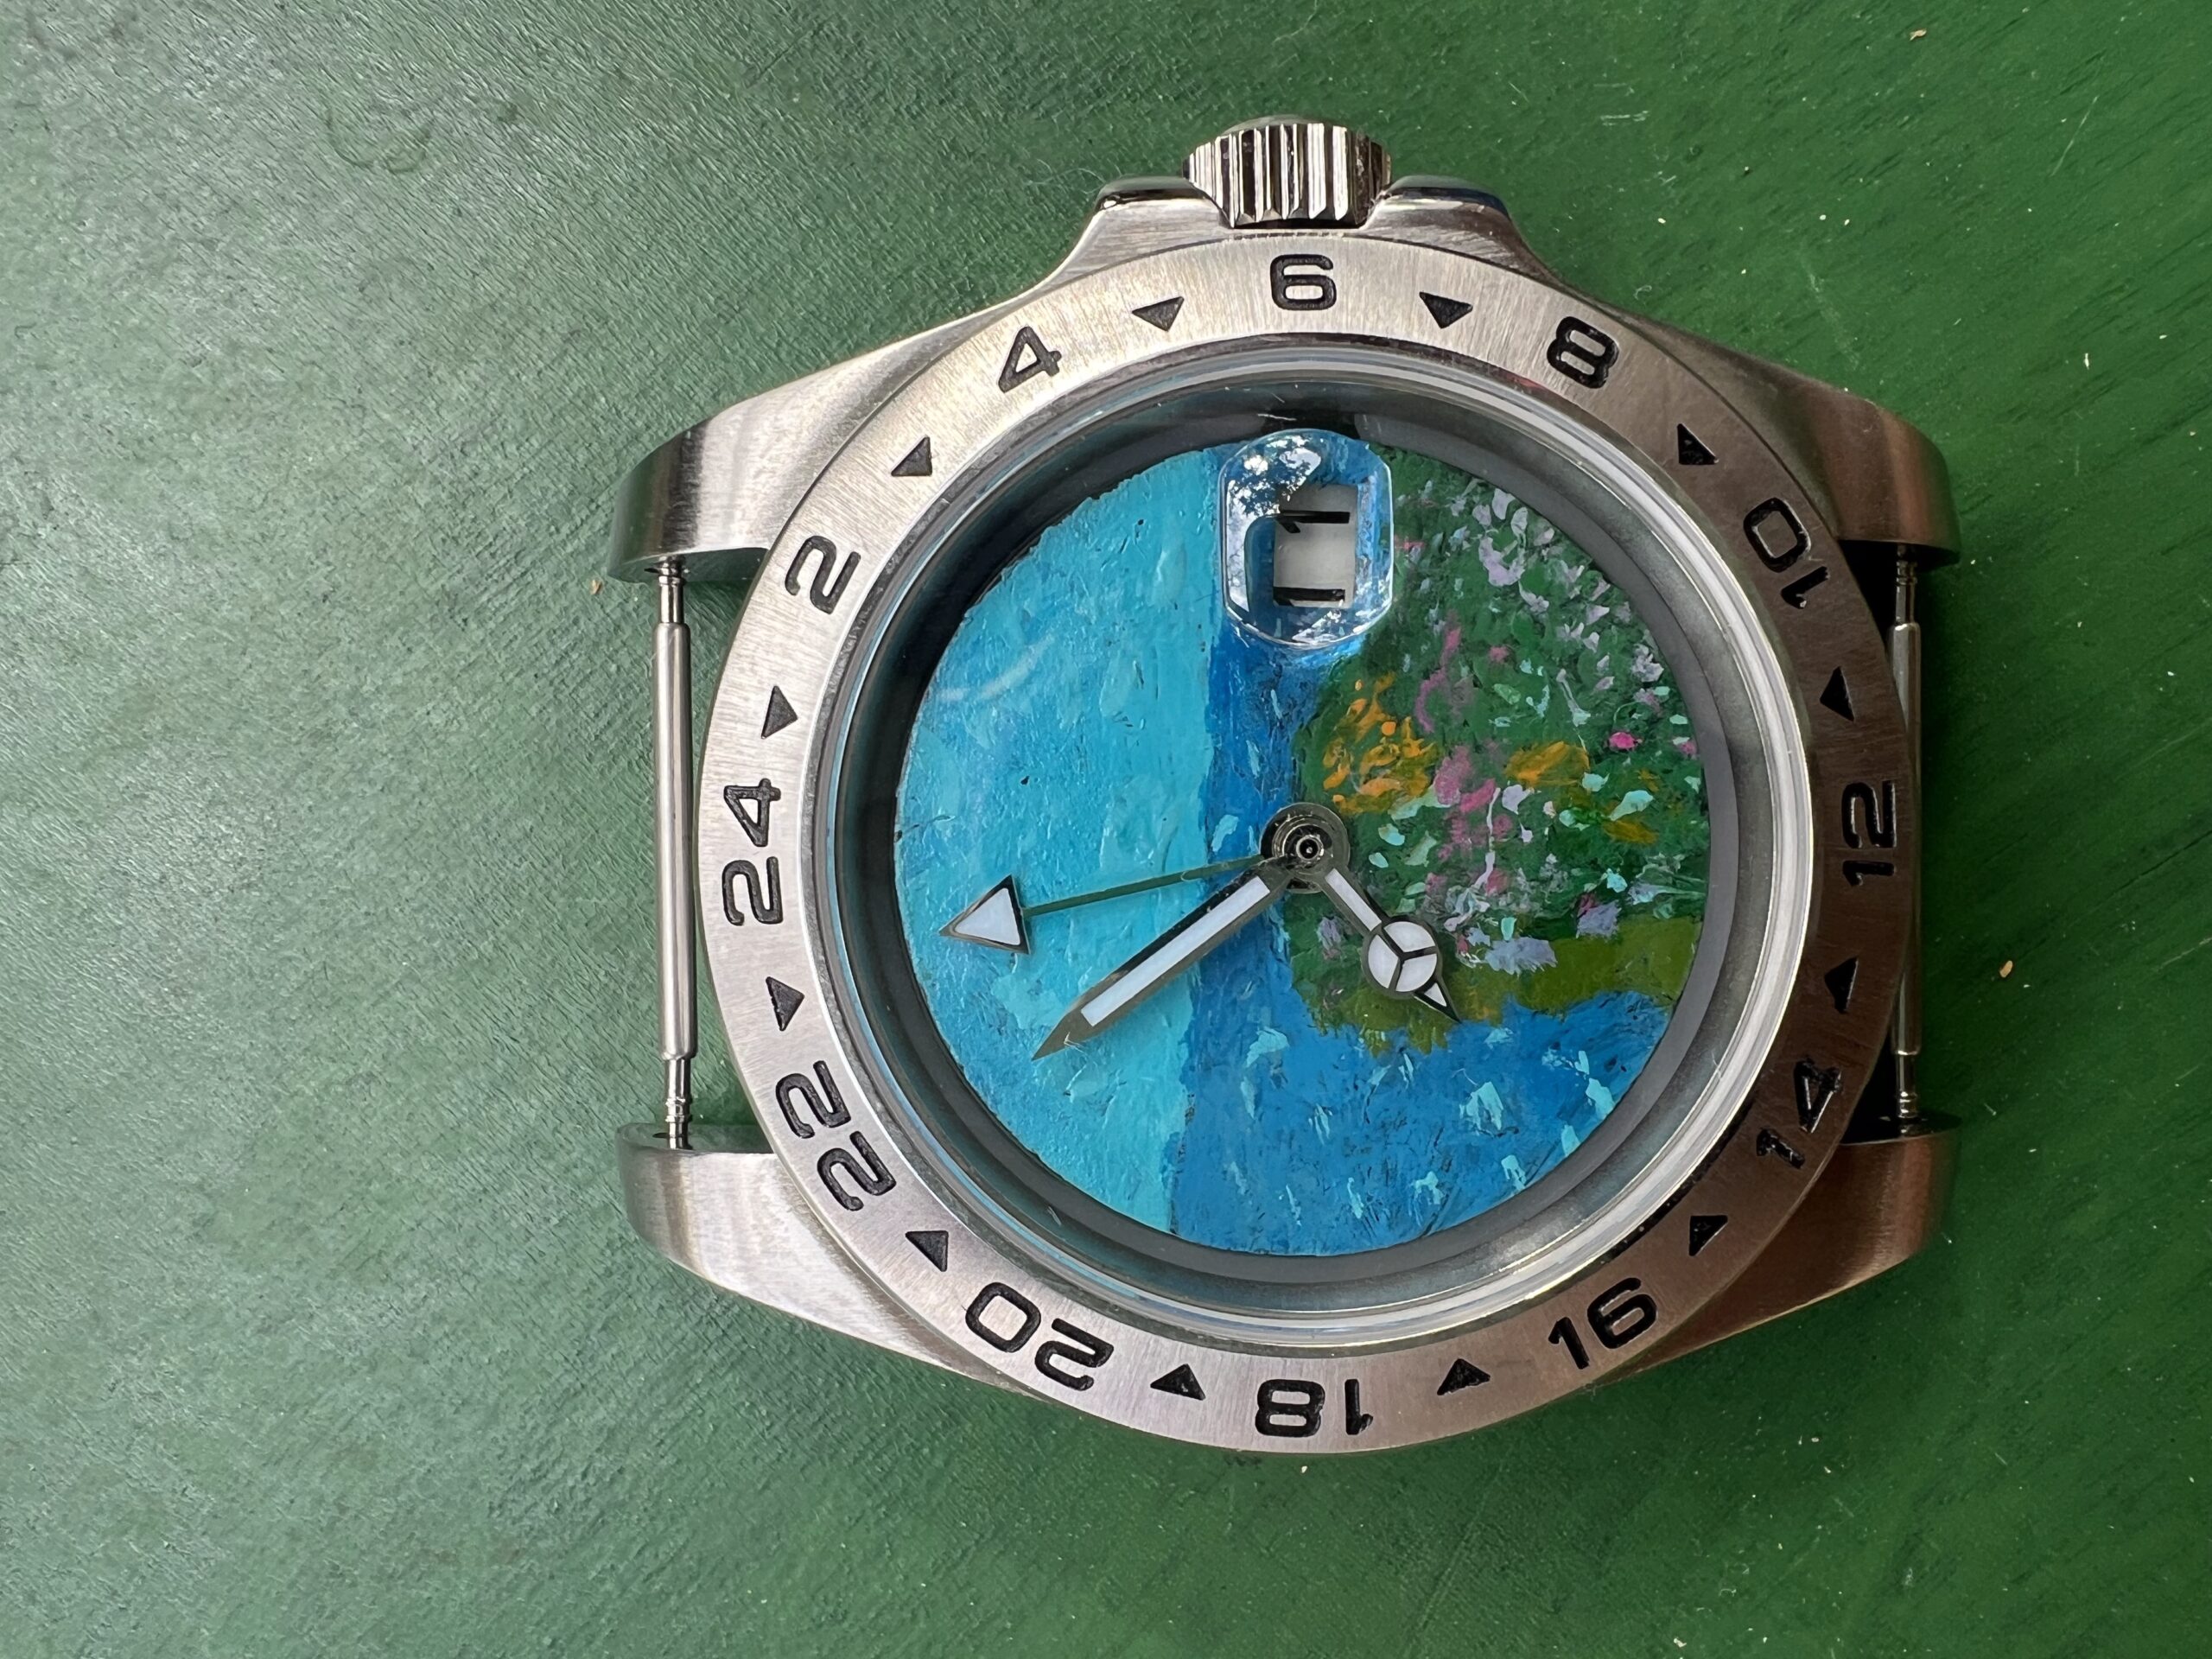
Personalized GMT Watch for my dad – The How
Introduction: From Concept to Creation In Part 1, I laid out the blueprint for my custom GMT watch project – the inspirations, the design choices, and the artistic vision centered around a hand-painted Impressionist dial intended for my father. Now, we move from the drawing board to the workbench. This second part chronicles the “how”:…

Final Report Part 2: Eye of Agamotto – The Making Process
Final Report Part 2: Eye of Agamotto – The Making Process Introduction This post documents the complete fabrication and final reflection for my main project: the Eye of Agamotto. In Part 1, I outlined my aesthetic goals and conceptual direction. In this final report, I will walk through the process of building the artifact, describe…
RailGlow: Timeline and Fabrication Process
Design Timeline Overview The RailGlow project spanned over two months, starting in early March and wrapping up in early May. While the process was generally structured, it included plenty of loops and adjustments as I moved between design, fabrication, and documentation. Below is a breakdown of each key phase and what took place during that…
Minimalist Spice Rack – Part 2
This project was something that I progressively worked on over the course of many weeks, starting with ideation and progressing to the creation of my final product. I am pretty happy with how this project turned out, and while it may not be the fanciest or most complex project, its something that should be functional,…
Art Nouveau Water Filter
My initial inspiration for this project was to combine my knowledge of water filters from my Environmental Engineering undergrad with my love for quality, beauty, and design, to create a badly needed water filter for me and my housemates. Initially I was going to do a different aesthetic, but then when I was exploring aesthetic…
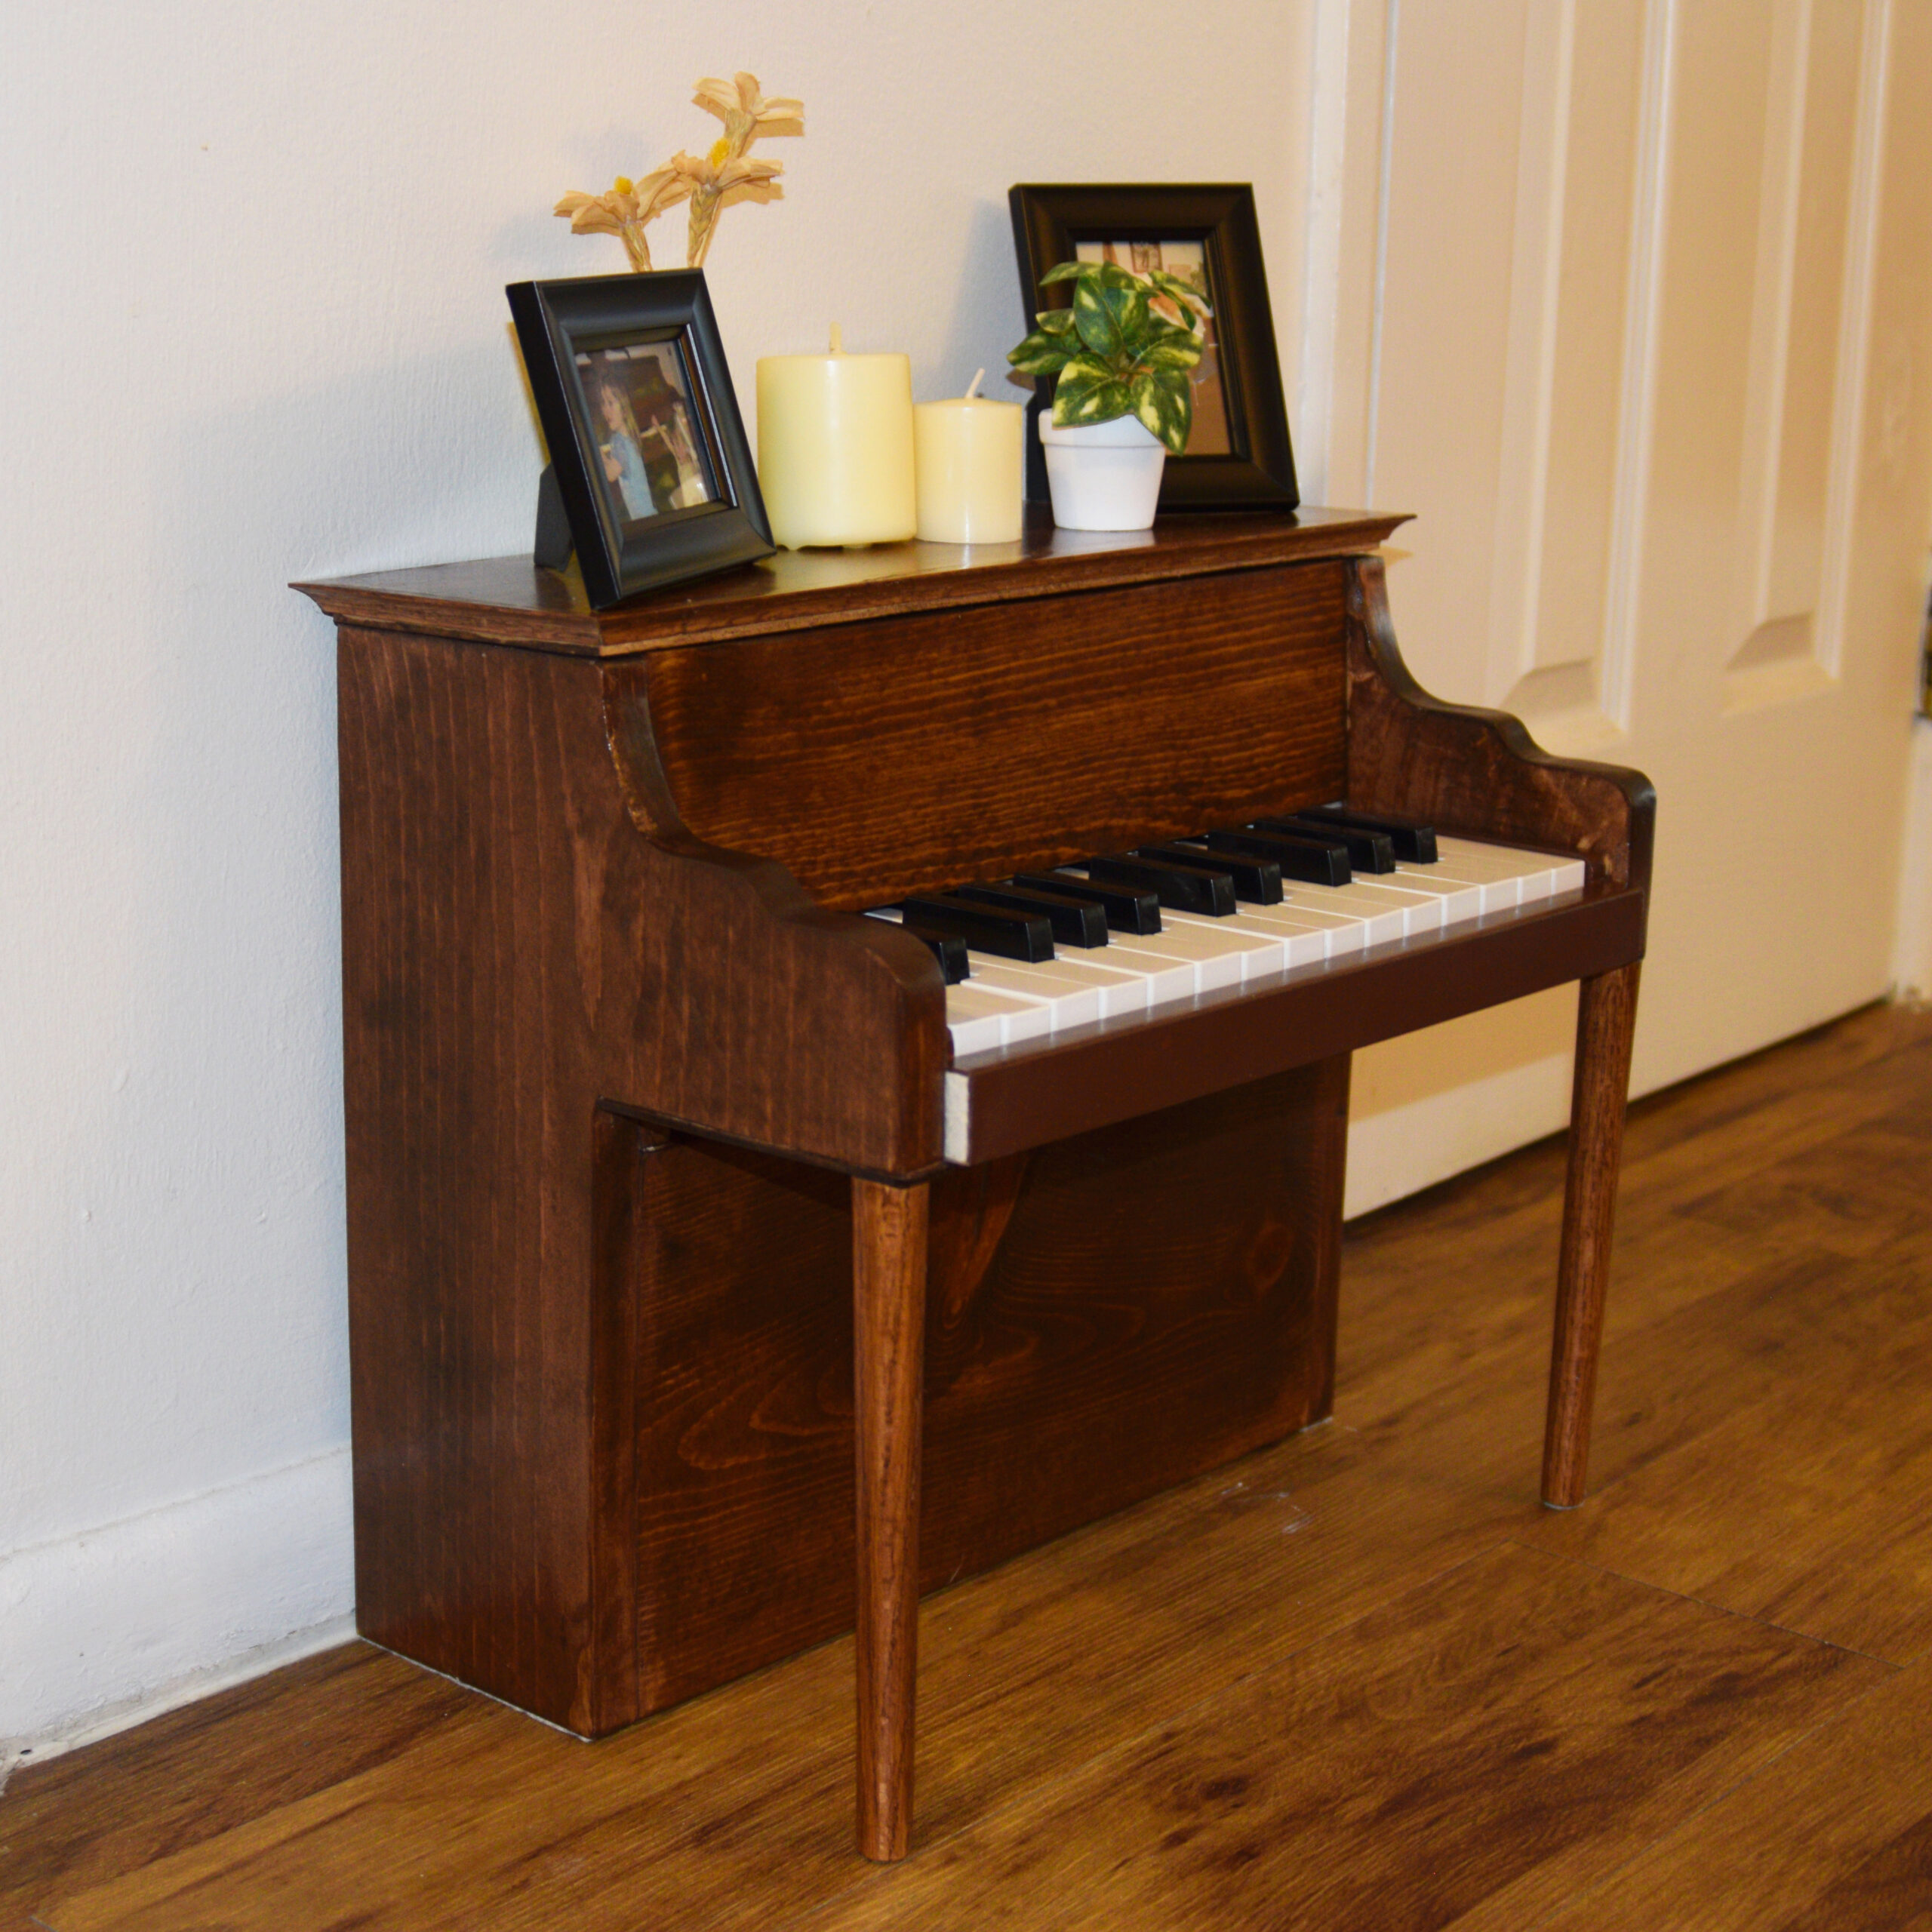
Grandma’s Piano: A Miniature Replica – Final Report Part 2
With projects like this, it’s easy to focus most on the fabrication process, given it is time-consuming and can seem to take forever. The meaning of a piece is important. It is the reason for making the thing. However, there is art, too, in the construction and creation process. I spent the most time working…
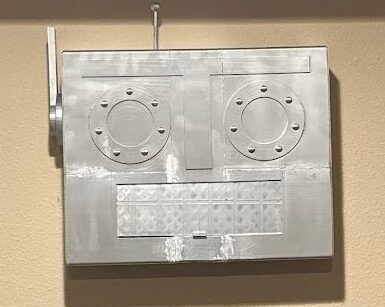
Retro-Futuristic Robot Can Crusher: Part 2 – How
While the aesthetic direction of my retro-futuristic robot head can crusher was driven by mid-century sci-fi, the actual construction process was far more iterative, mechanical, and at times, experimental. In this second part of the report, I’ll walk through the real-world process of turning a sketch into a functional, wall-mounted robot. This post documents my…
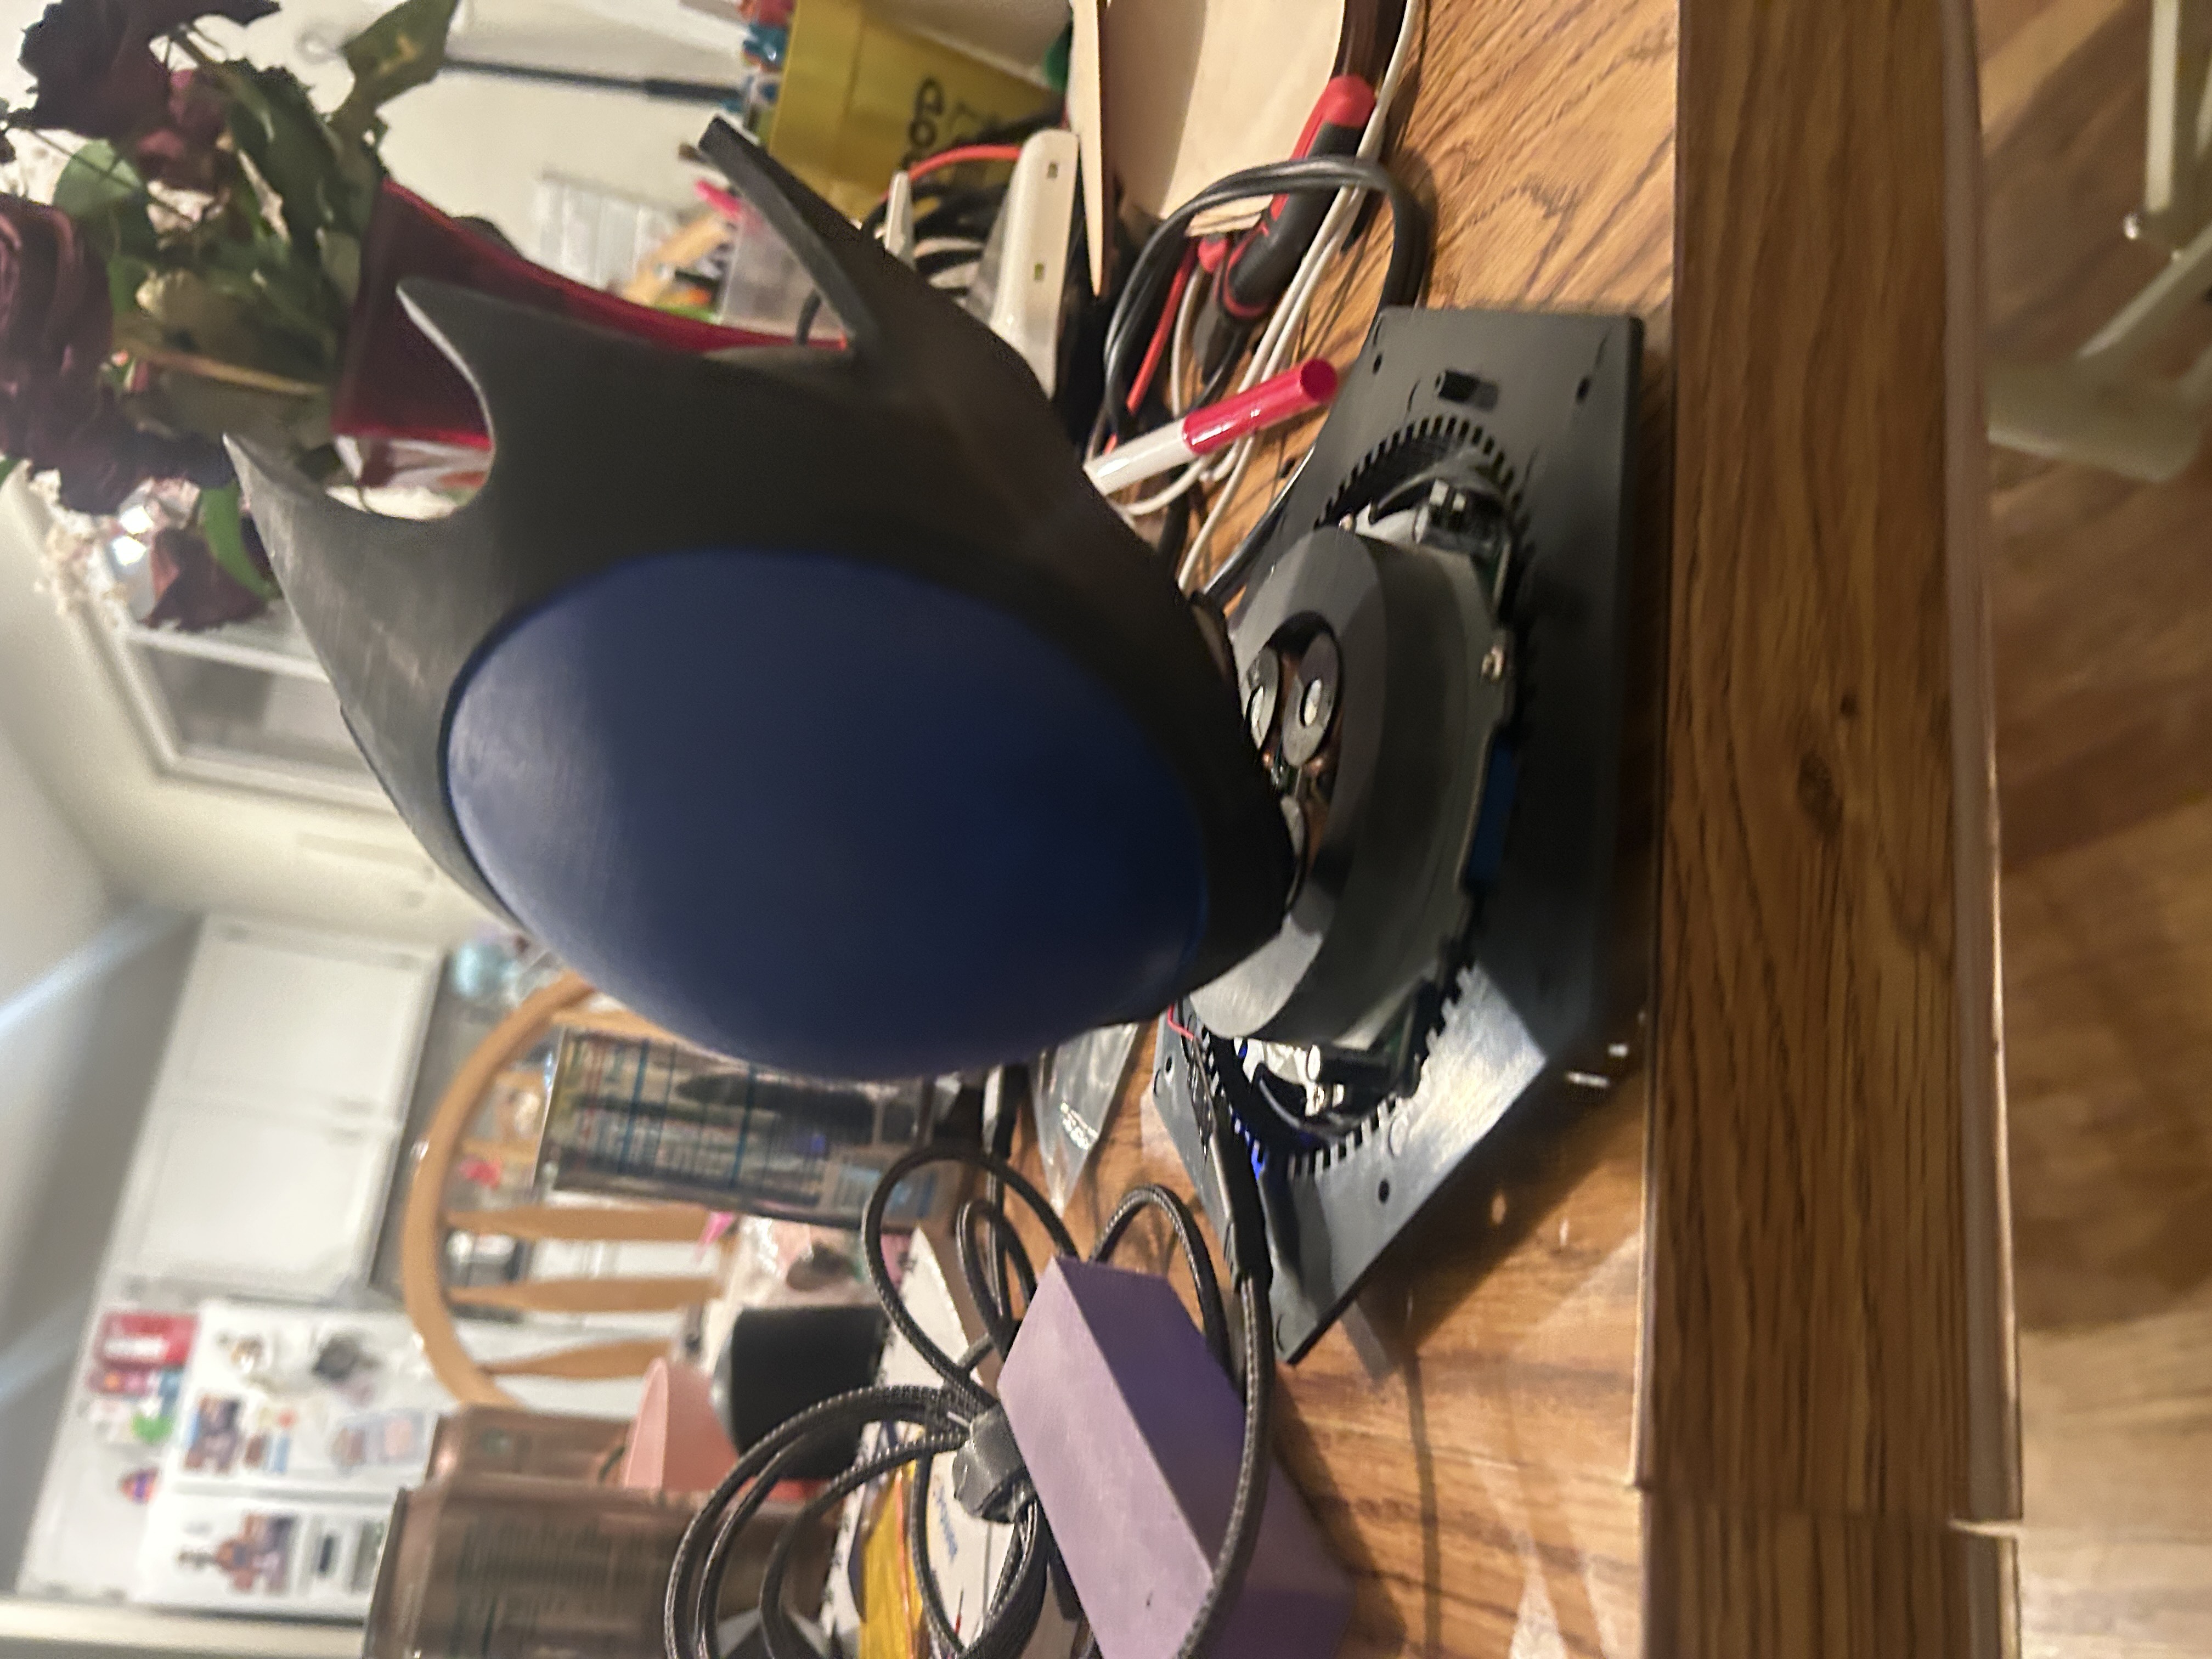
Futuristic Anime Project Execution and Results
Product Introduction My final project is a helmet based on the accessory of the protagonist in the anime Code Geass. This item will stand on a magnetic levitation display that will slowly rotate the object while levitating it using a permanent magnet. This object is intended as a gift for my boyfriend who loves Code…

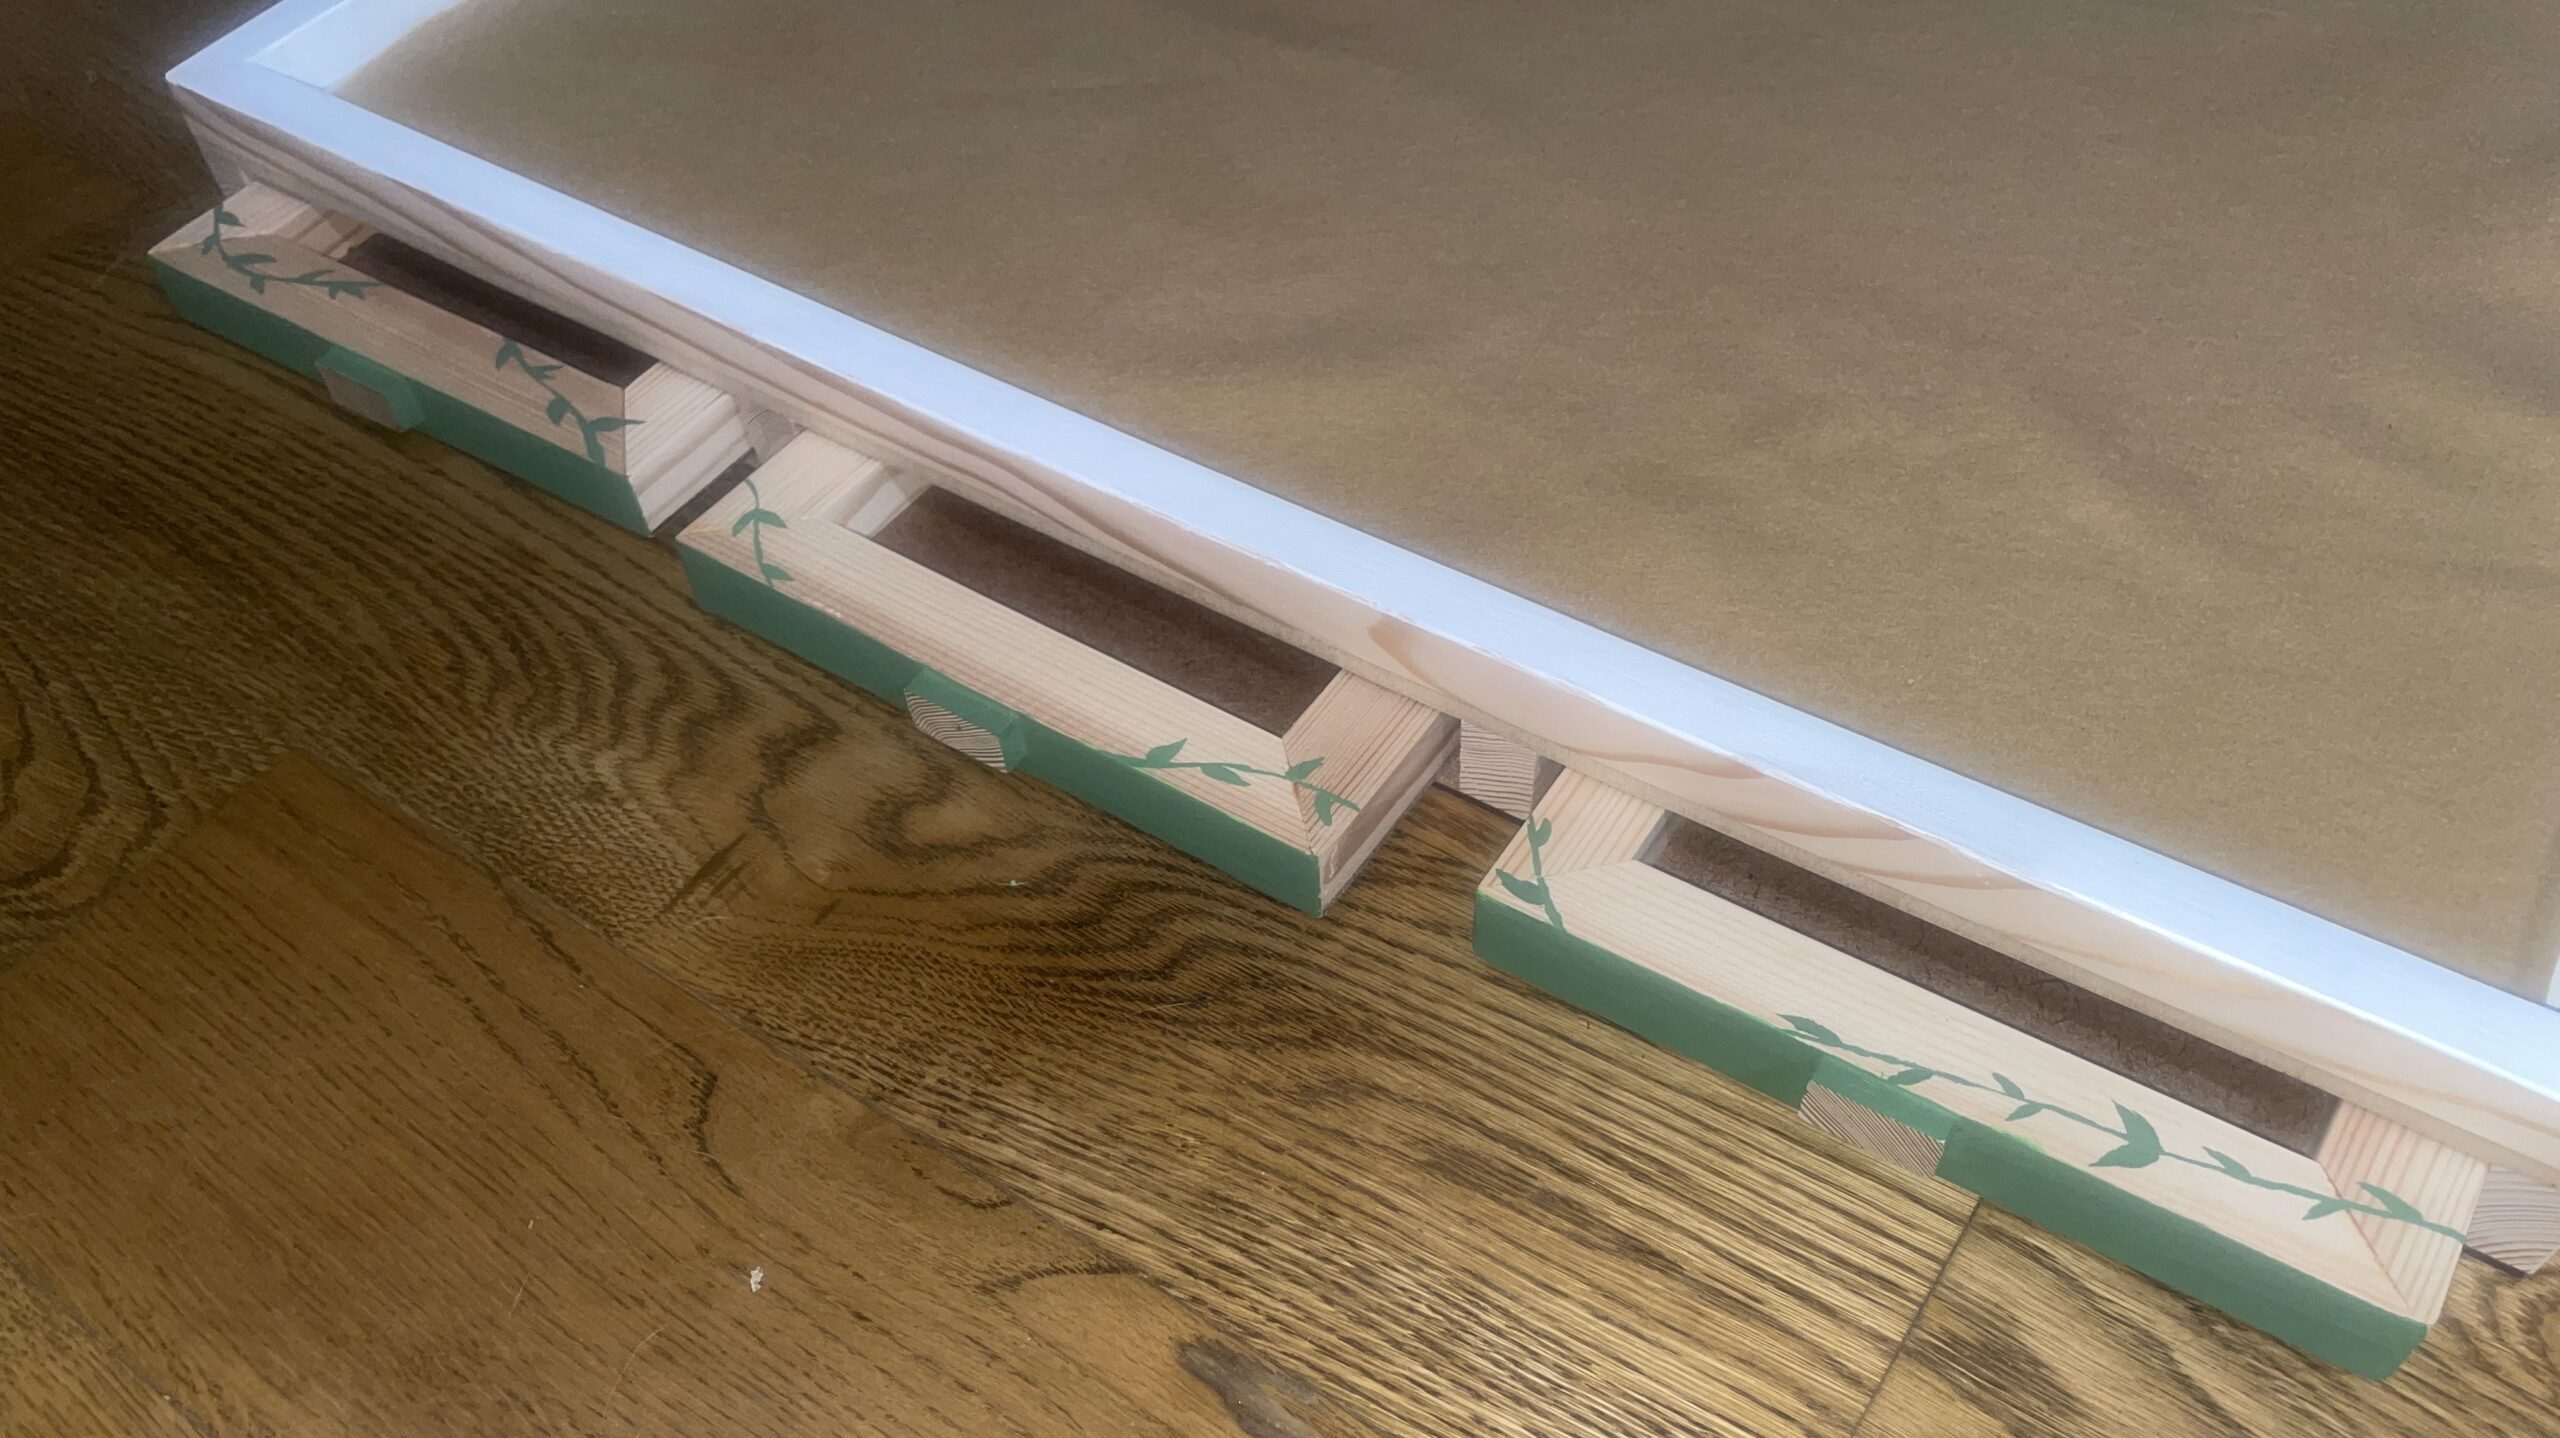
Final Report – Part 2: Stitching Stories and Sparkle
Design Timeline: From Spark to Stitch Before Spring Break – Decided to create a modern take on Rajasthani mirror work for my final project ✨ – Sketched out multiple ideas and finalized one with clean lines and room for embellishment – Asked my mom in India to send me mirror work materials…
Actual Design Process, Fabrication, and Reflection
Introduction Starting this project, I was originally inspired by a longstanding argument I’ve made: “no flat tables in space.” While this might sound ridiculous at first, the point is simple—space demands a different approach to design due to its vastly different environment. Much of our current crew systems hardware simply retrofits terrestrial solutions for this…
Pressure Flaker Final Report Part 2
Design and Fabrication Process For my final project, I set out to create a pressure flaker that reimagines the tool as if it were designed 2,500 years into the future. I wanted something smooth, sleek, and bright — a tool that looks like it belongs in a science fiction world but still feels solid and…
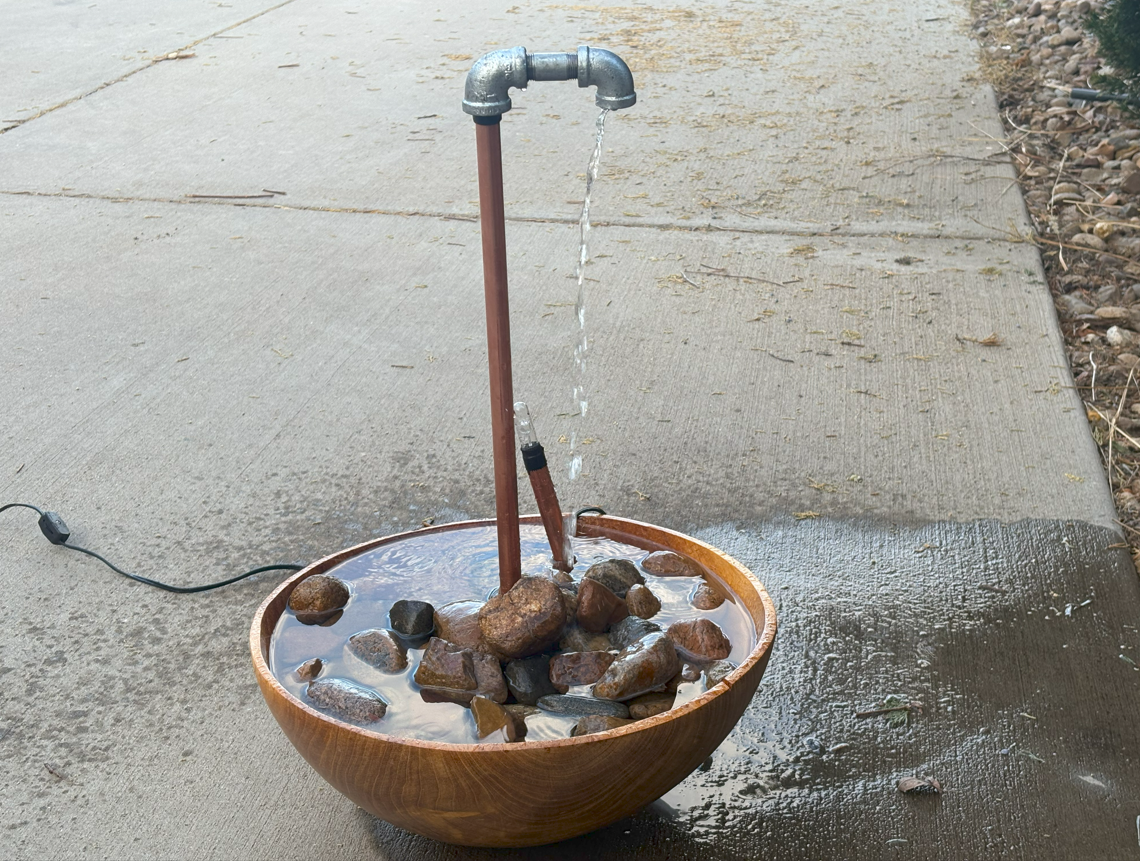
Rustic Farm Style Fountain Build
Designing and building a rustic farm-style fountain offered both a satisfying project for creative expression and an aesthetic addition to my space. The combination of copper pipes, a wooden bowl filled with rocks, and flowing water creates a calming and visually appealing feature that suits gardens, patios, or even interior décor. This essay outlines the…
Mid Century Modern Bookshelf – Part 2: How
Project Timeline Timeline Overview: Ideation (Weeks 1–3): Explored inspirations, designed three separate CAD files: A spinal column shelf with movable shelves An entryway table with kerf-cut corners Final iteration: a hip-height, mid-century modern inspired bookshelf Prototyping (Weeks 3–8): Built cardboard and 3D printed prototypes to test proportions, joinery, and leg designs. Material Shopping (Week 8):…
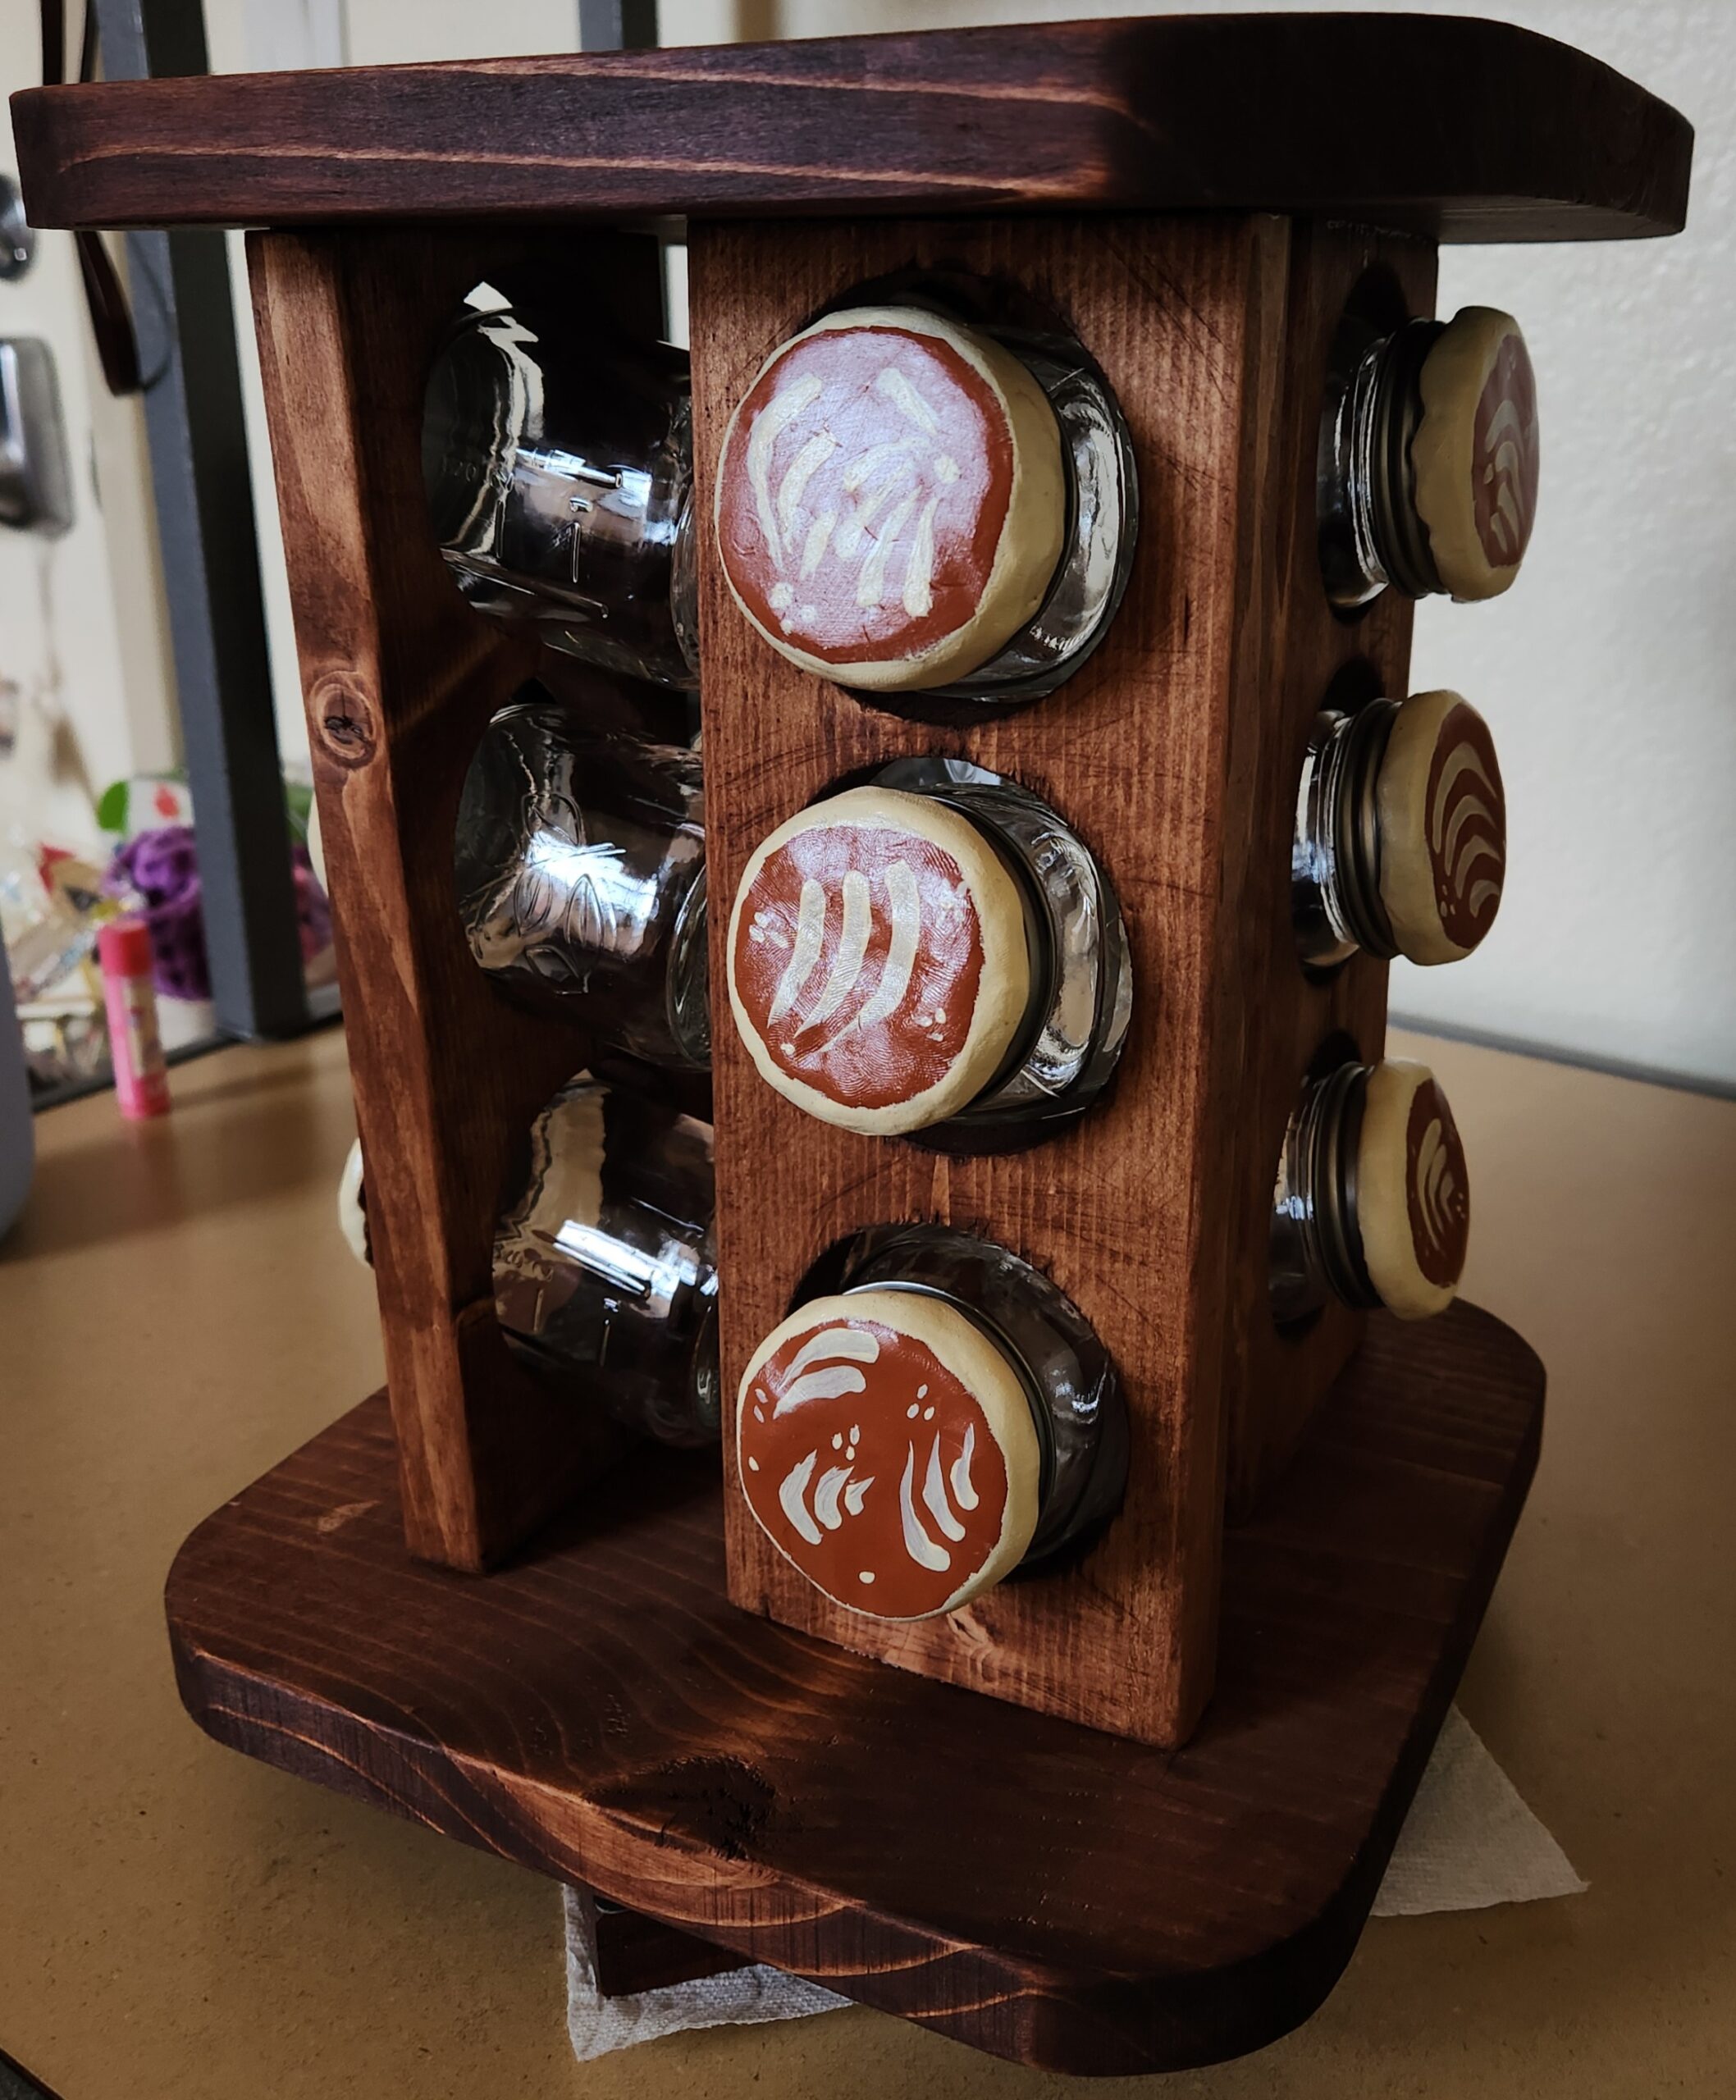
How I Built My Spice Spinner
For my final project, I made a spice spinner for my mom. It was inspired by traditional Mexican ceramics and I wanted it to have a rustic but clean feel. I made this project using common boards, clay, paint, and a lazy Susan bearing. My timeline was flexible because there were a lot of steps…
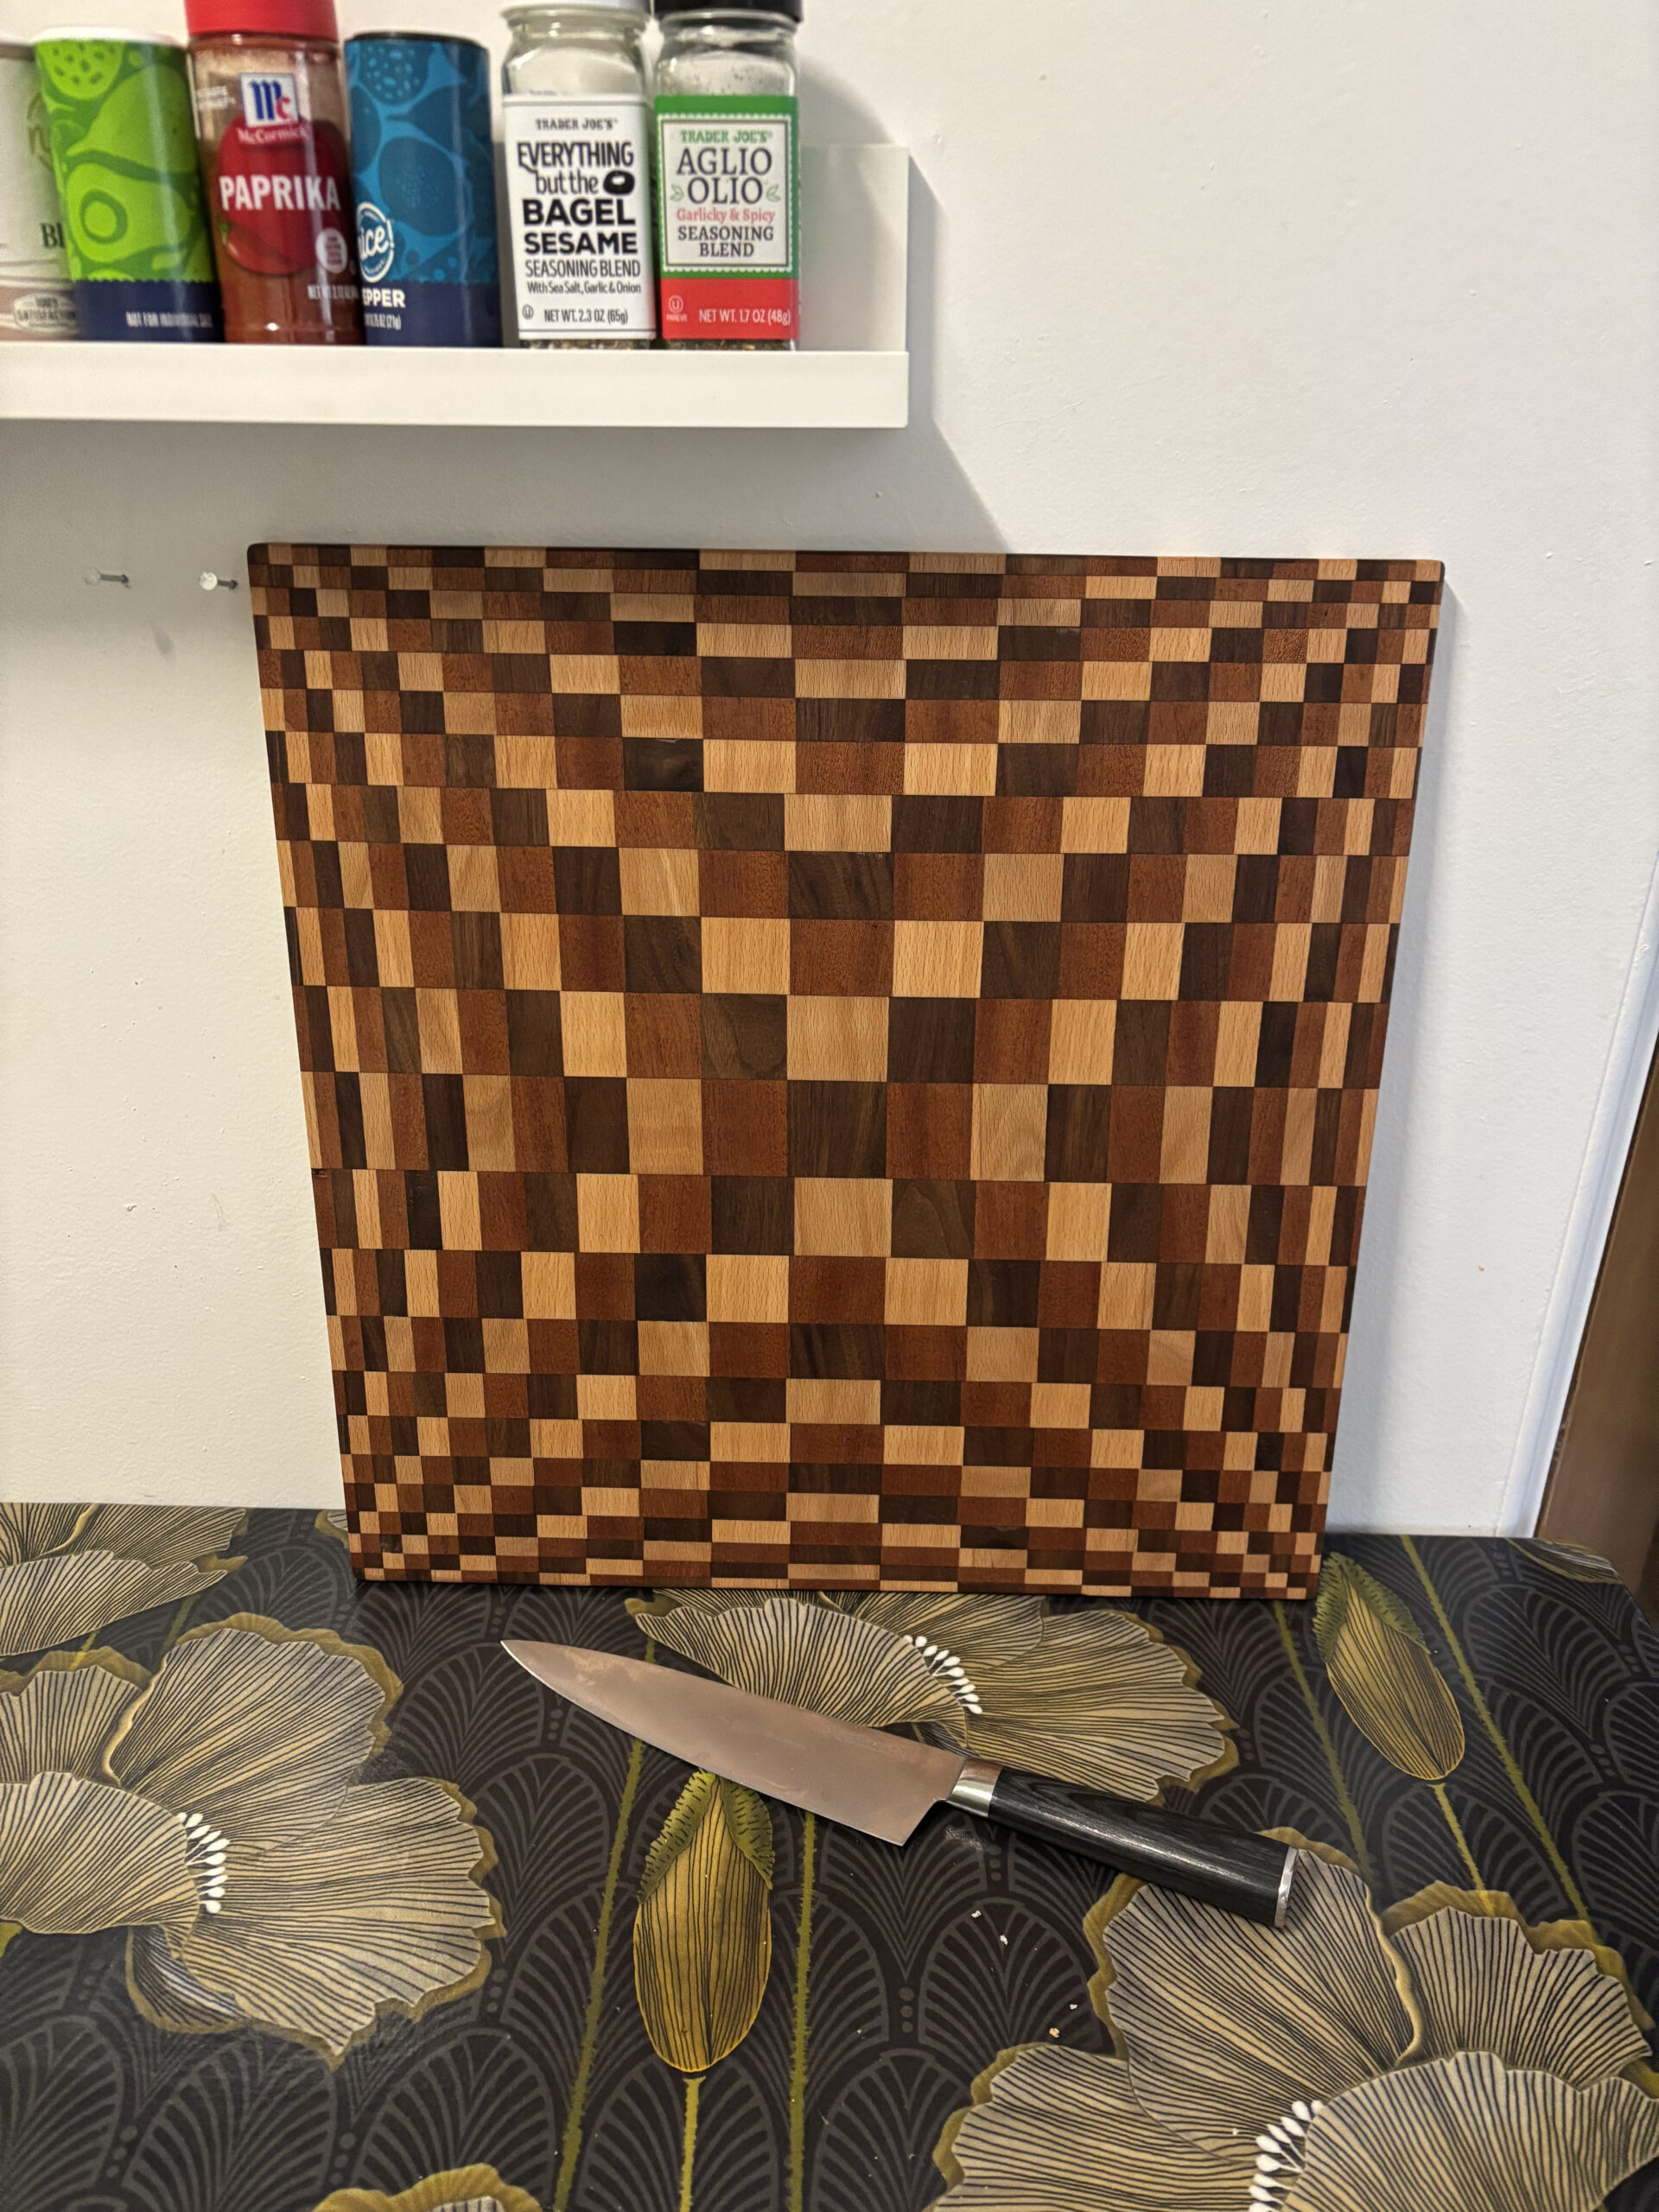
Optical Illusion Cutting Board: Final Report Part 2
Intro This is my final post on the optical illusion cutting board. This has been one of my favorite projects during my time at CU Boulder and I have developed a love for woodworking. The intricate process was a blend of engineering and design, which is something I love most about my major: Creative Technology…
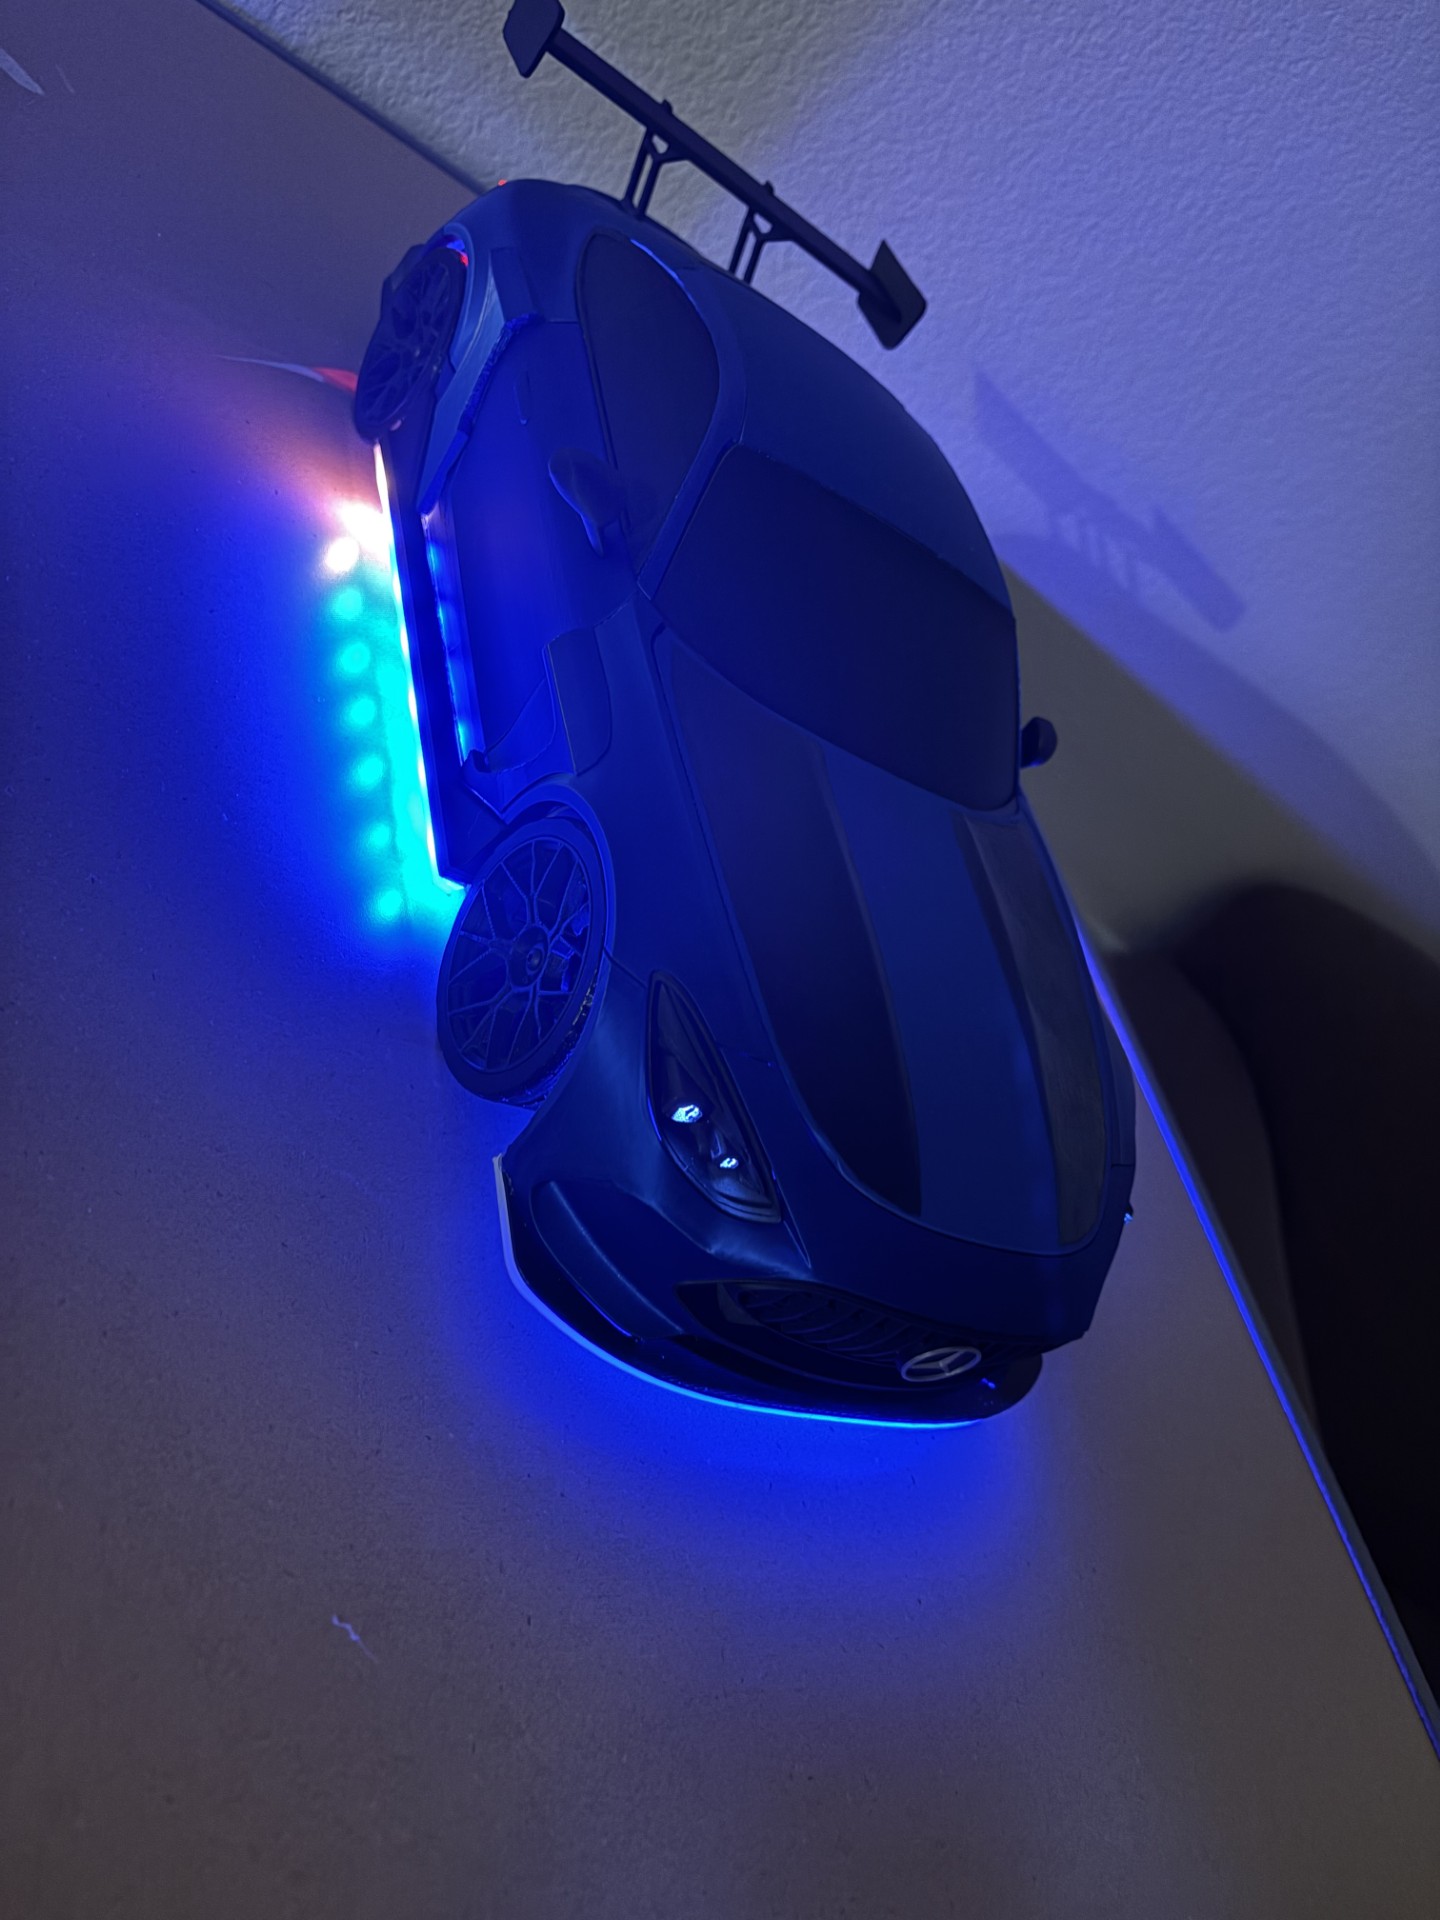
Light AMG GT RC Car – Final Report Part 2
Developing and finishing my vision for this project required that I plan out every step I would need to take to complete it on time. Timeline breaking down major tasks, according to completed dates. Even though I had already been thinking of making an RC car before I started making this project, I still had…
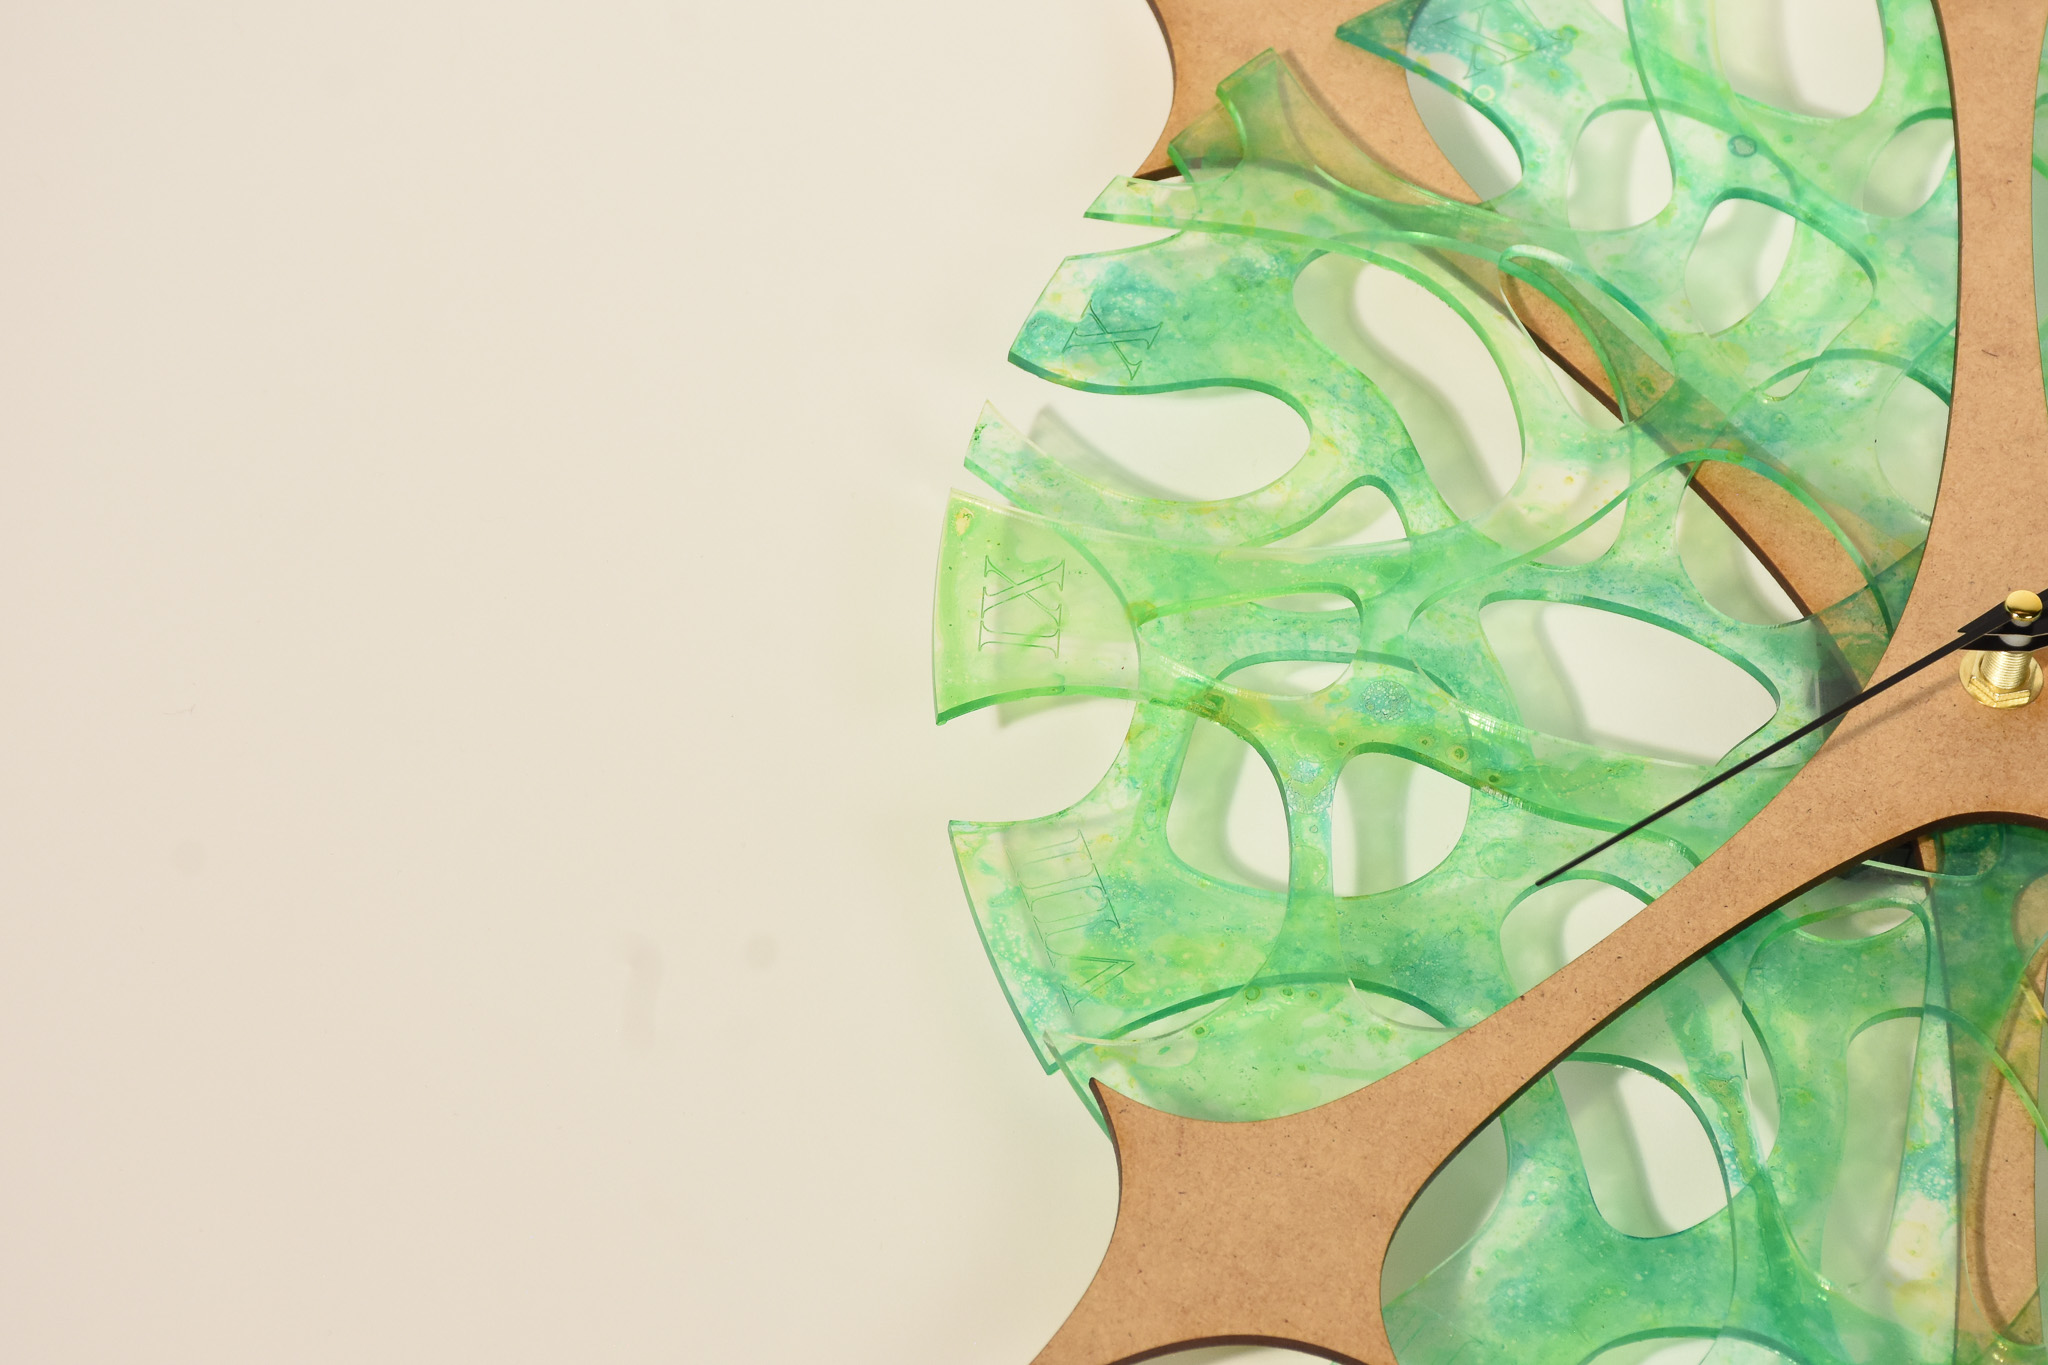
Hex – The Final Product Pt2
In part 1 of this final report, I covered: The Intention: To make a clock representative of personal identity The Aesthetic: Art Nouveau Inspiration: The human eye/iris Modeling: Modeled in Rhino to be laser cut Materials: Acrylic + MDF In this part, I will be covering the prototyping process, final fabrication process and the…
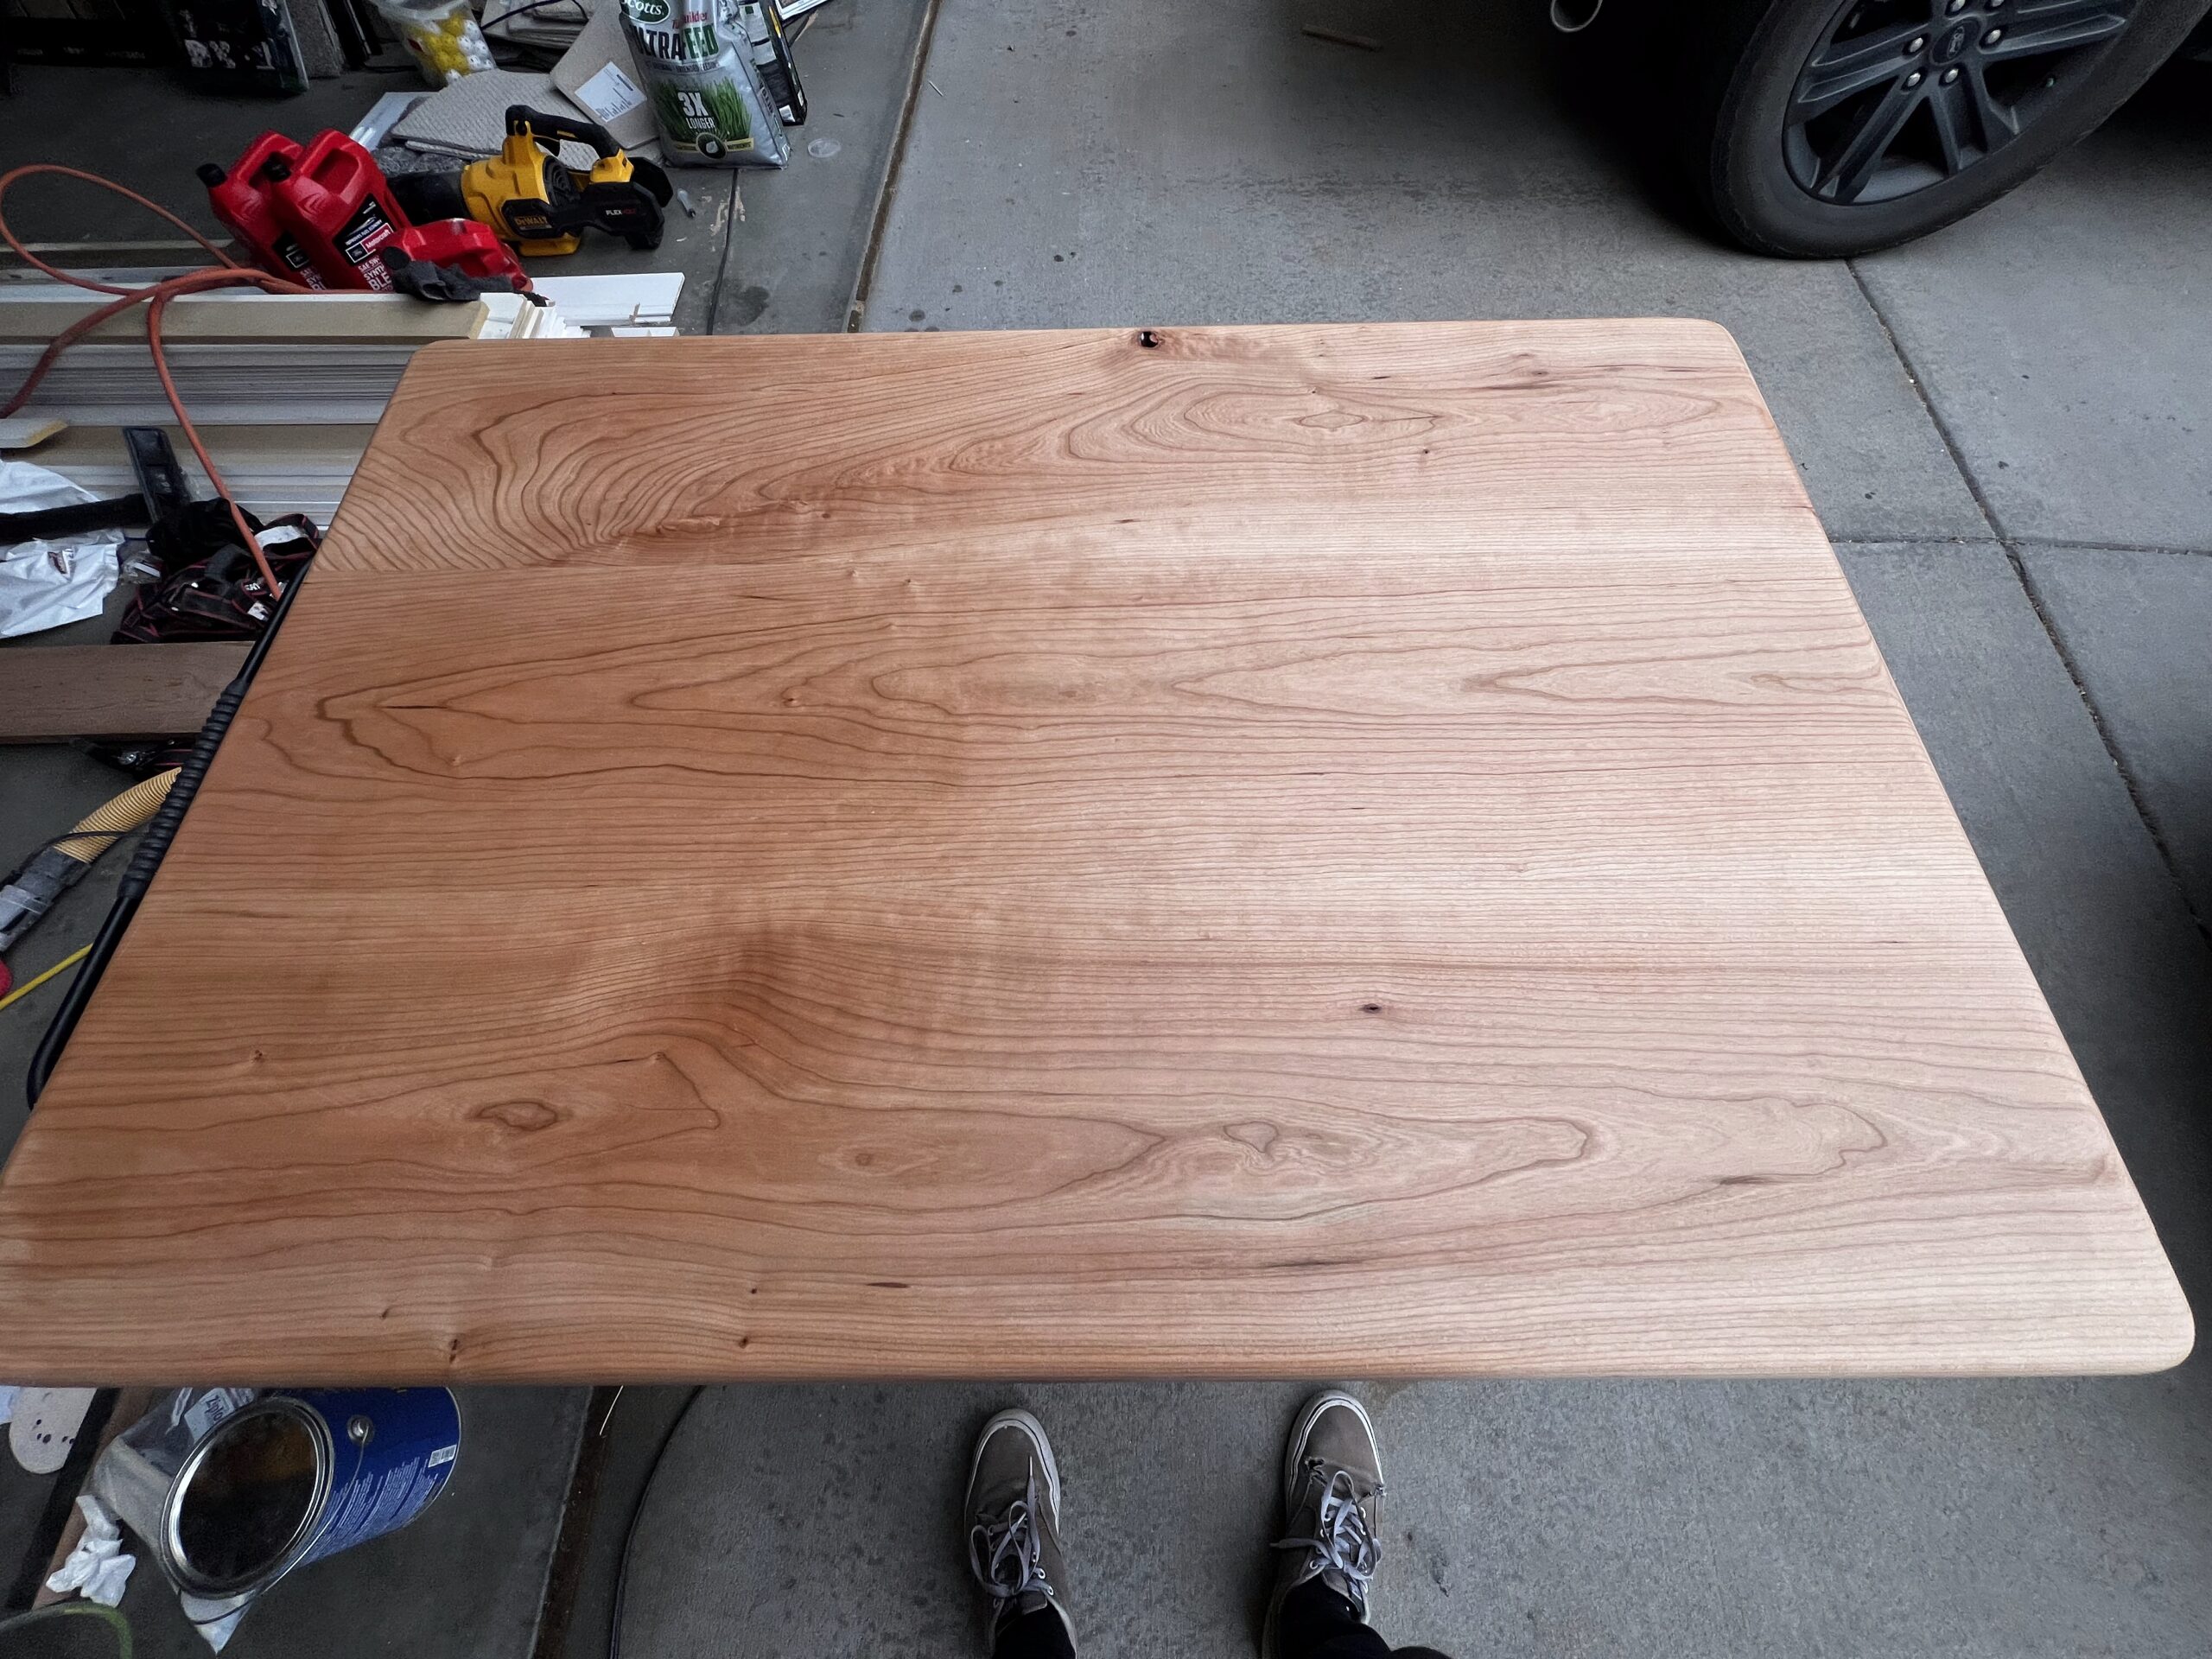
Coffee Table, Final 2
After figuring out the table to build, I began mapping out the timeline to construct the project. It was planned to be completed in 4 weeks. The wood was to be bought the week 4/5, the board assembled and cut 4/5-4/9, the board sanded 4/14-4/18, edging and staining, 4/28-5/2, and the legs fully cut/assembled/sanded/stained 4/29-5/6.…
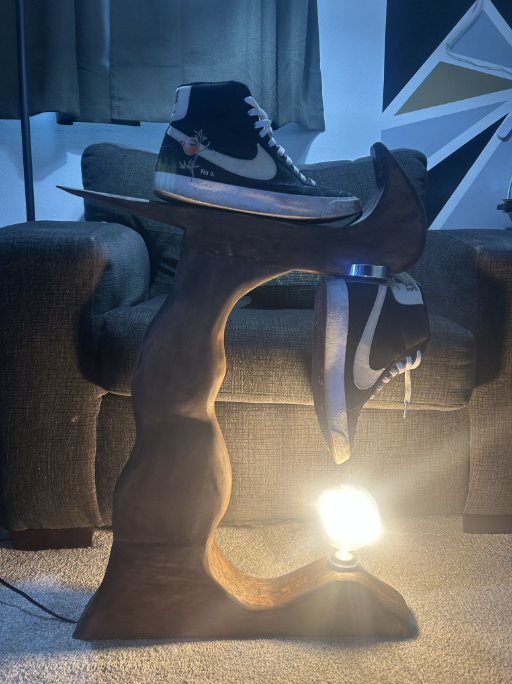
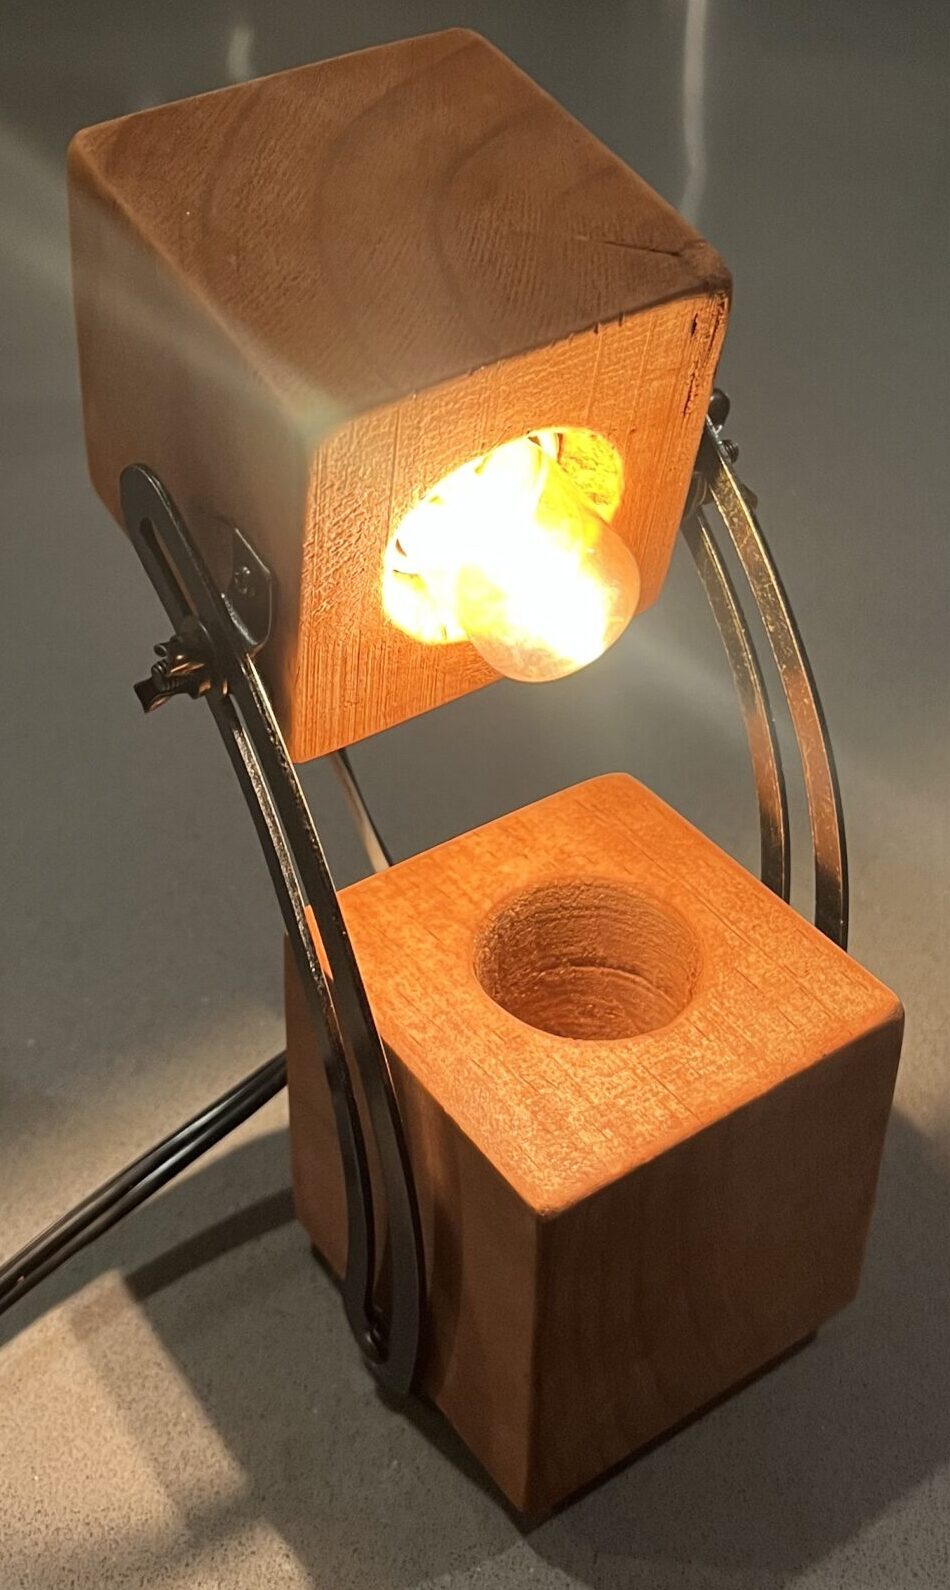
Magic Crystal Bedside Lamp
For my final project, I wanted to try and create a special bedside lamp that contains a variety of useful features making it not only aesthetically interesting but uniquely functional as well. The Problem: I currently have a small electric candle by my bedside that I use as a low level light while I”m getting…
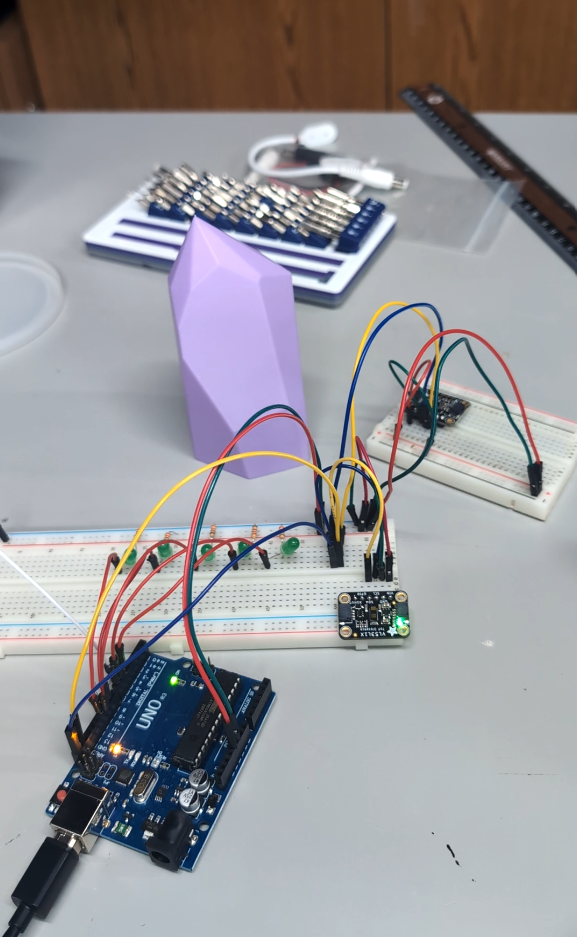
Point Out: The Final How
What began as a fascination with the hypnotic movement of vector fields transformed into a physical embodiment of digital motion. My servo array project aimed to capture the mesmerizing flow of those internal visions that had captivated my imagination. Initially, I aspired to create something in the De Stijl tradition—geometric, bold, and structured. However, as…
Final Report Part 2 – How – Vinyl Lamp
For my final project I built a vinyl lamp in the retro futurism aesthetic. I picked a vinyl lamp because I wanted to build something functional I could use long after this class is over and I picked the retro futurism aesthetic because I felt it fit well with the lamp design and vision. Retro…
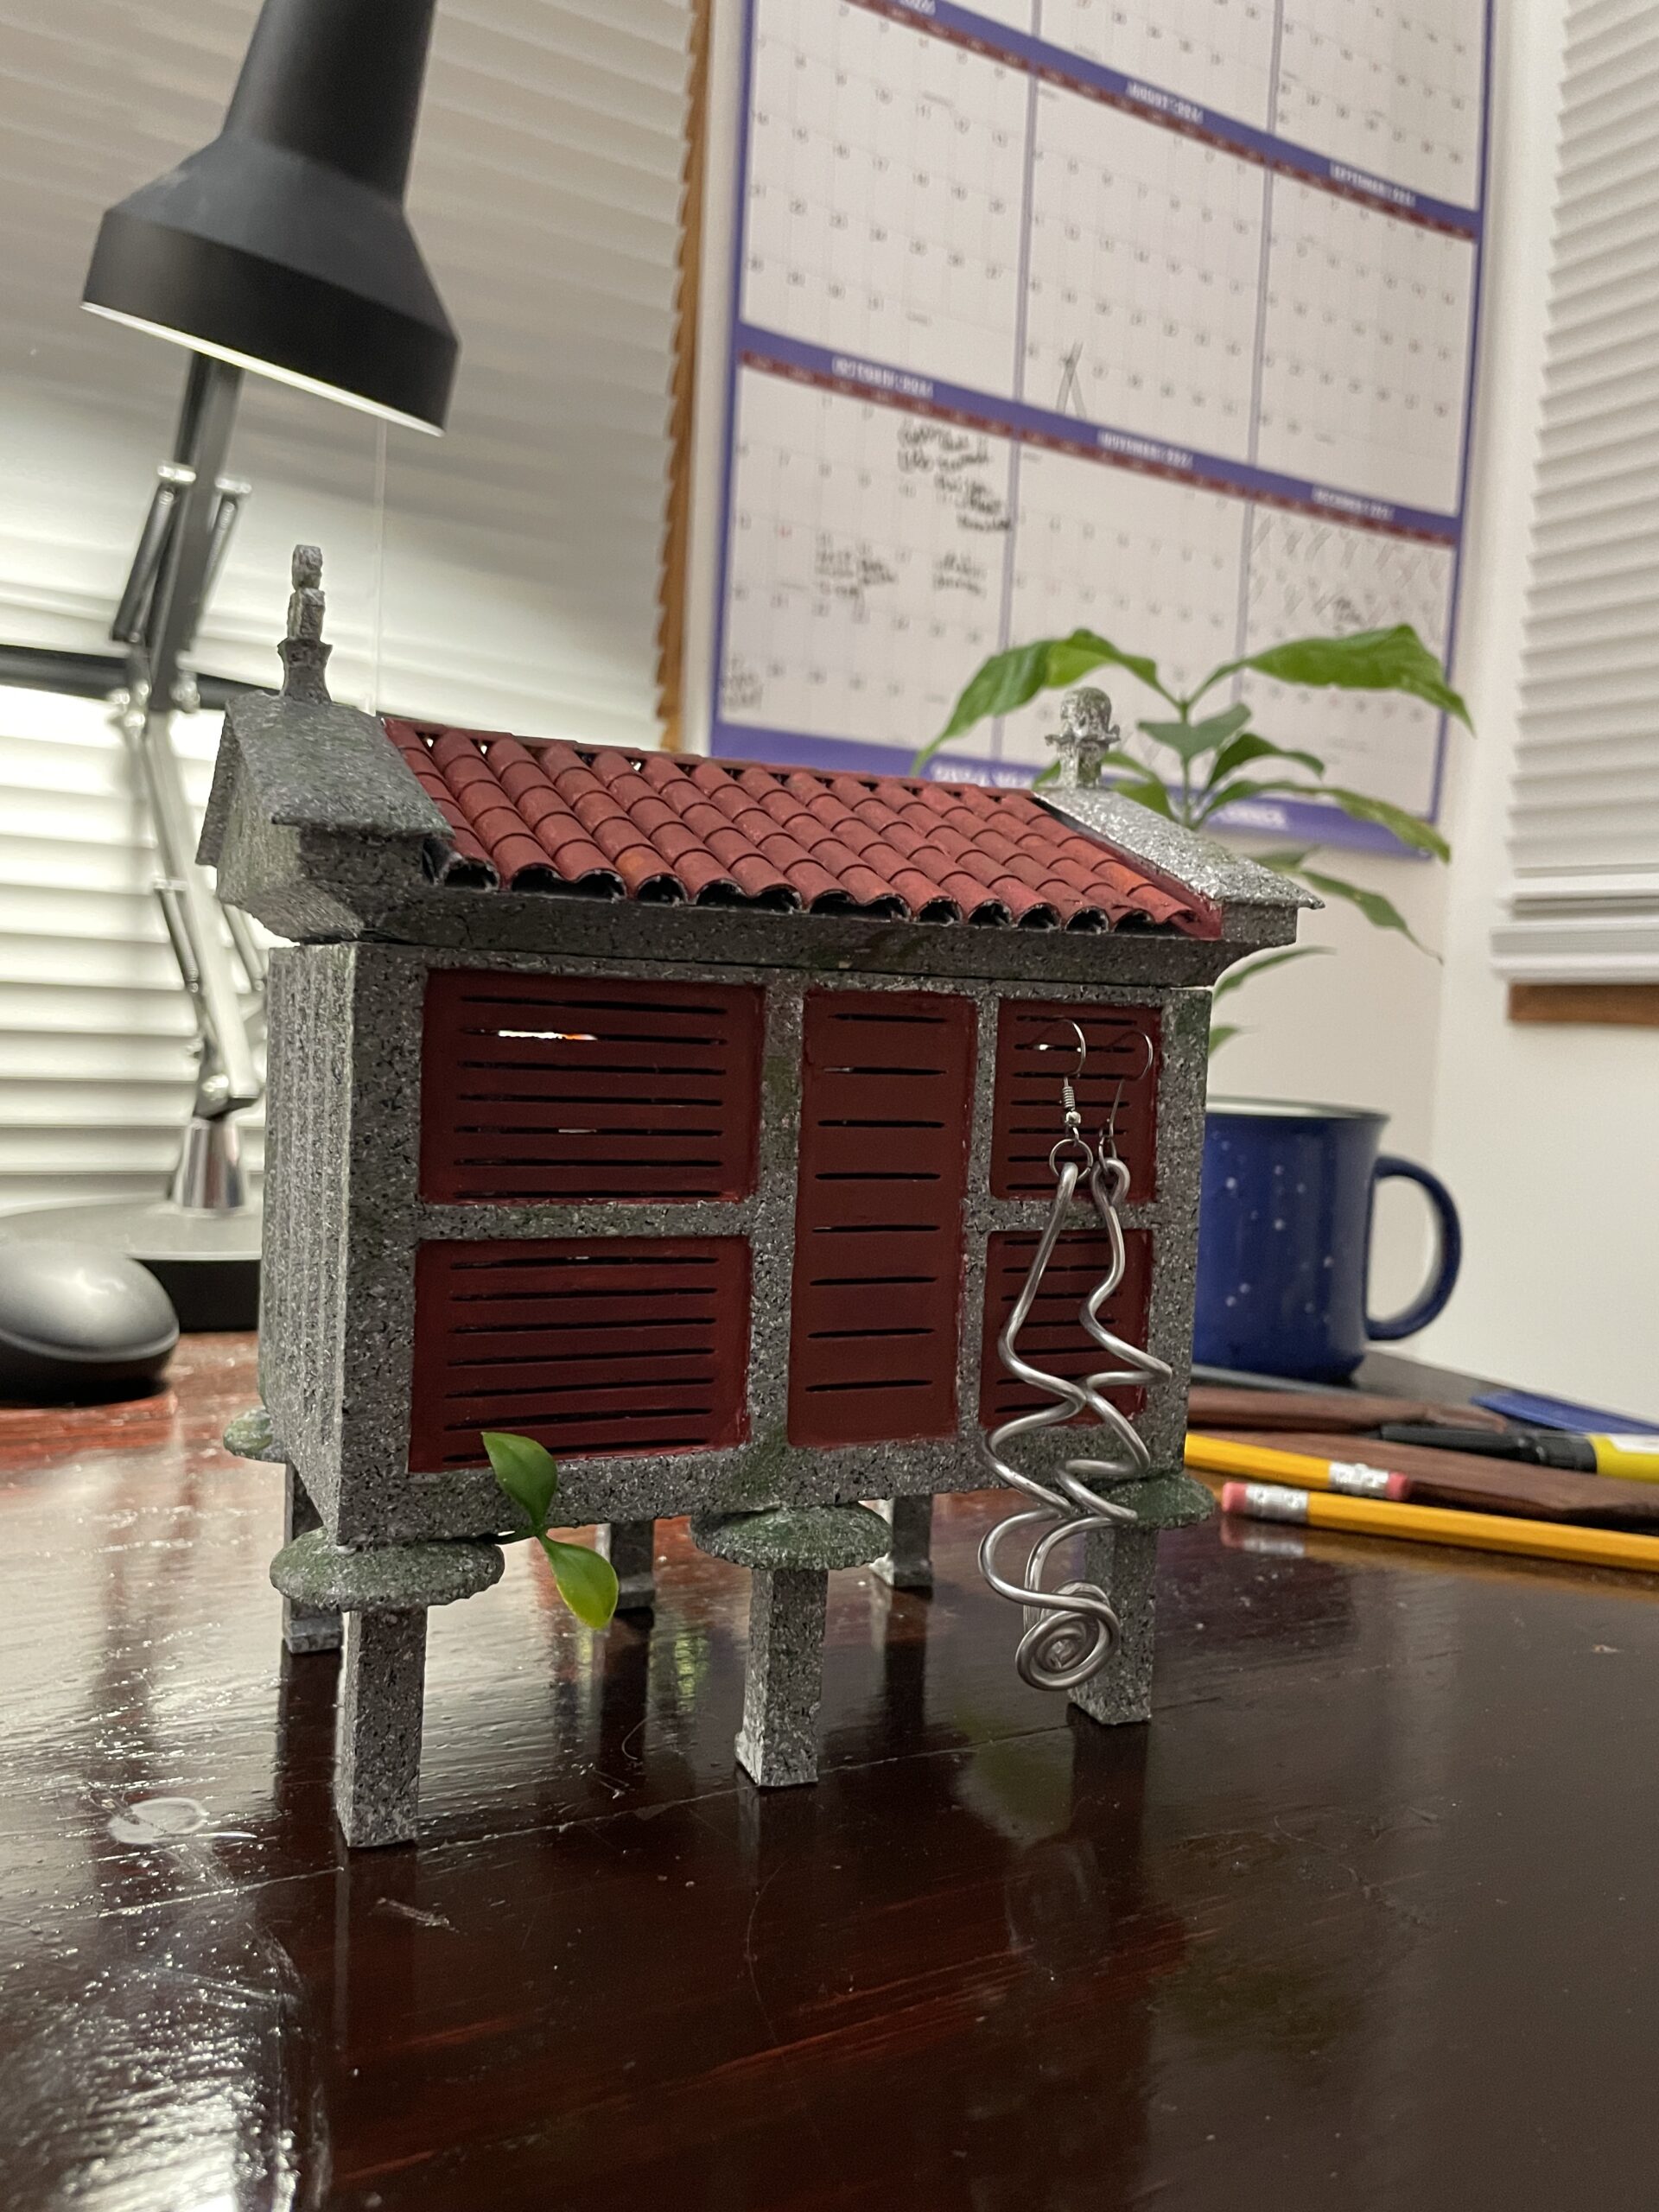
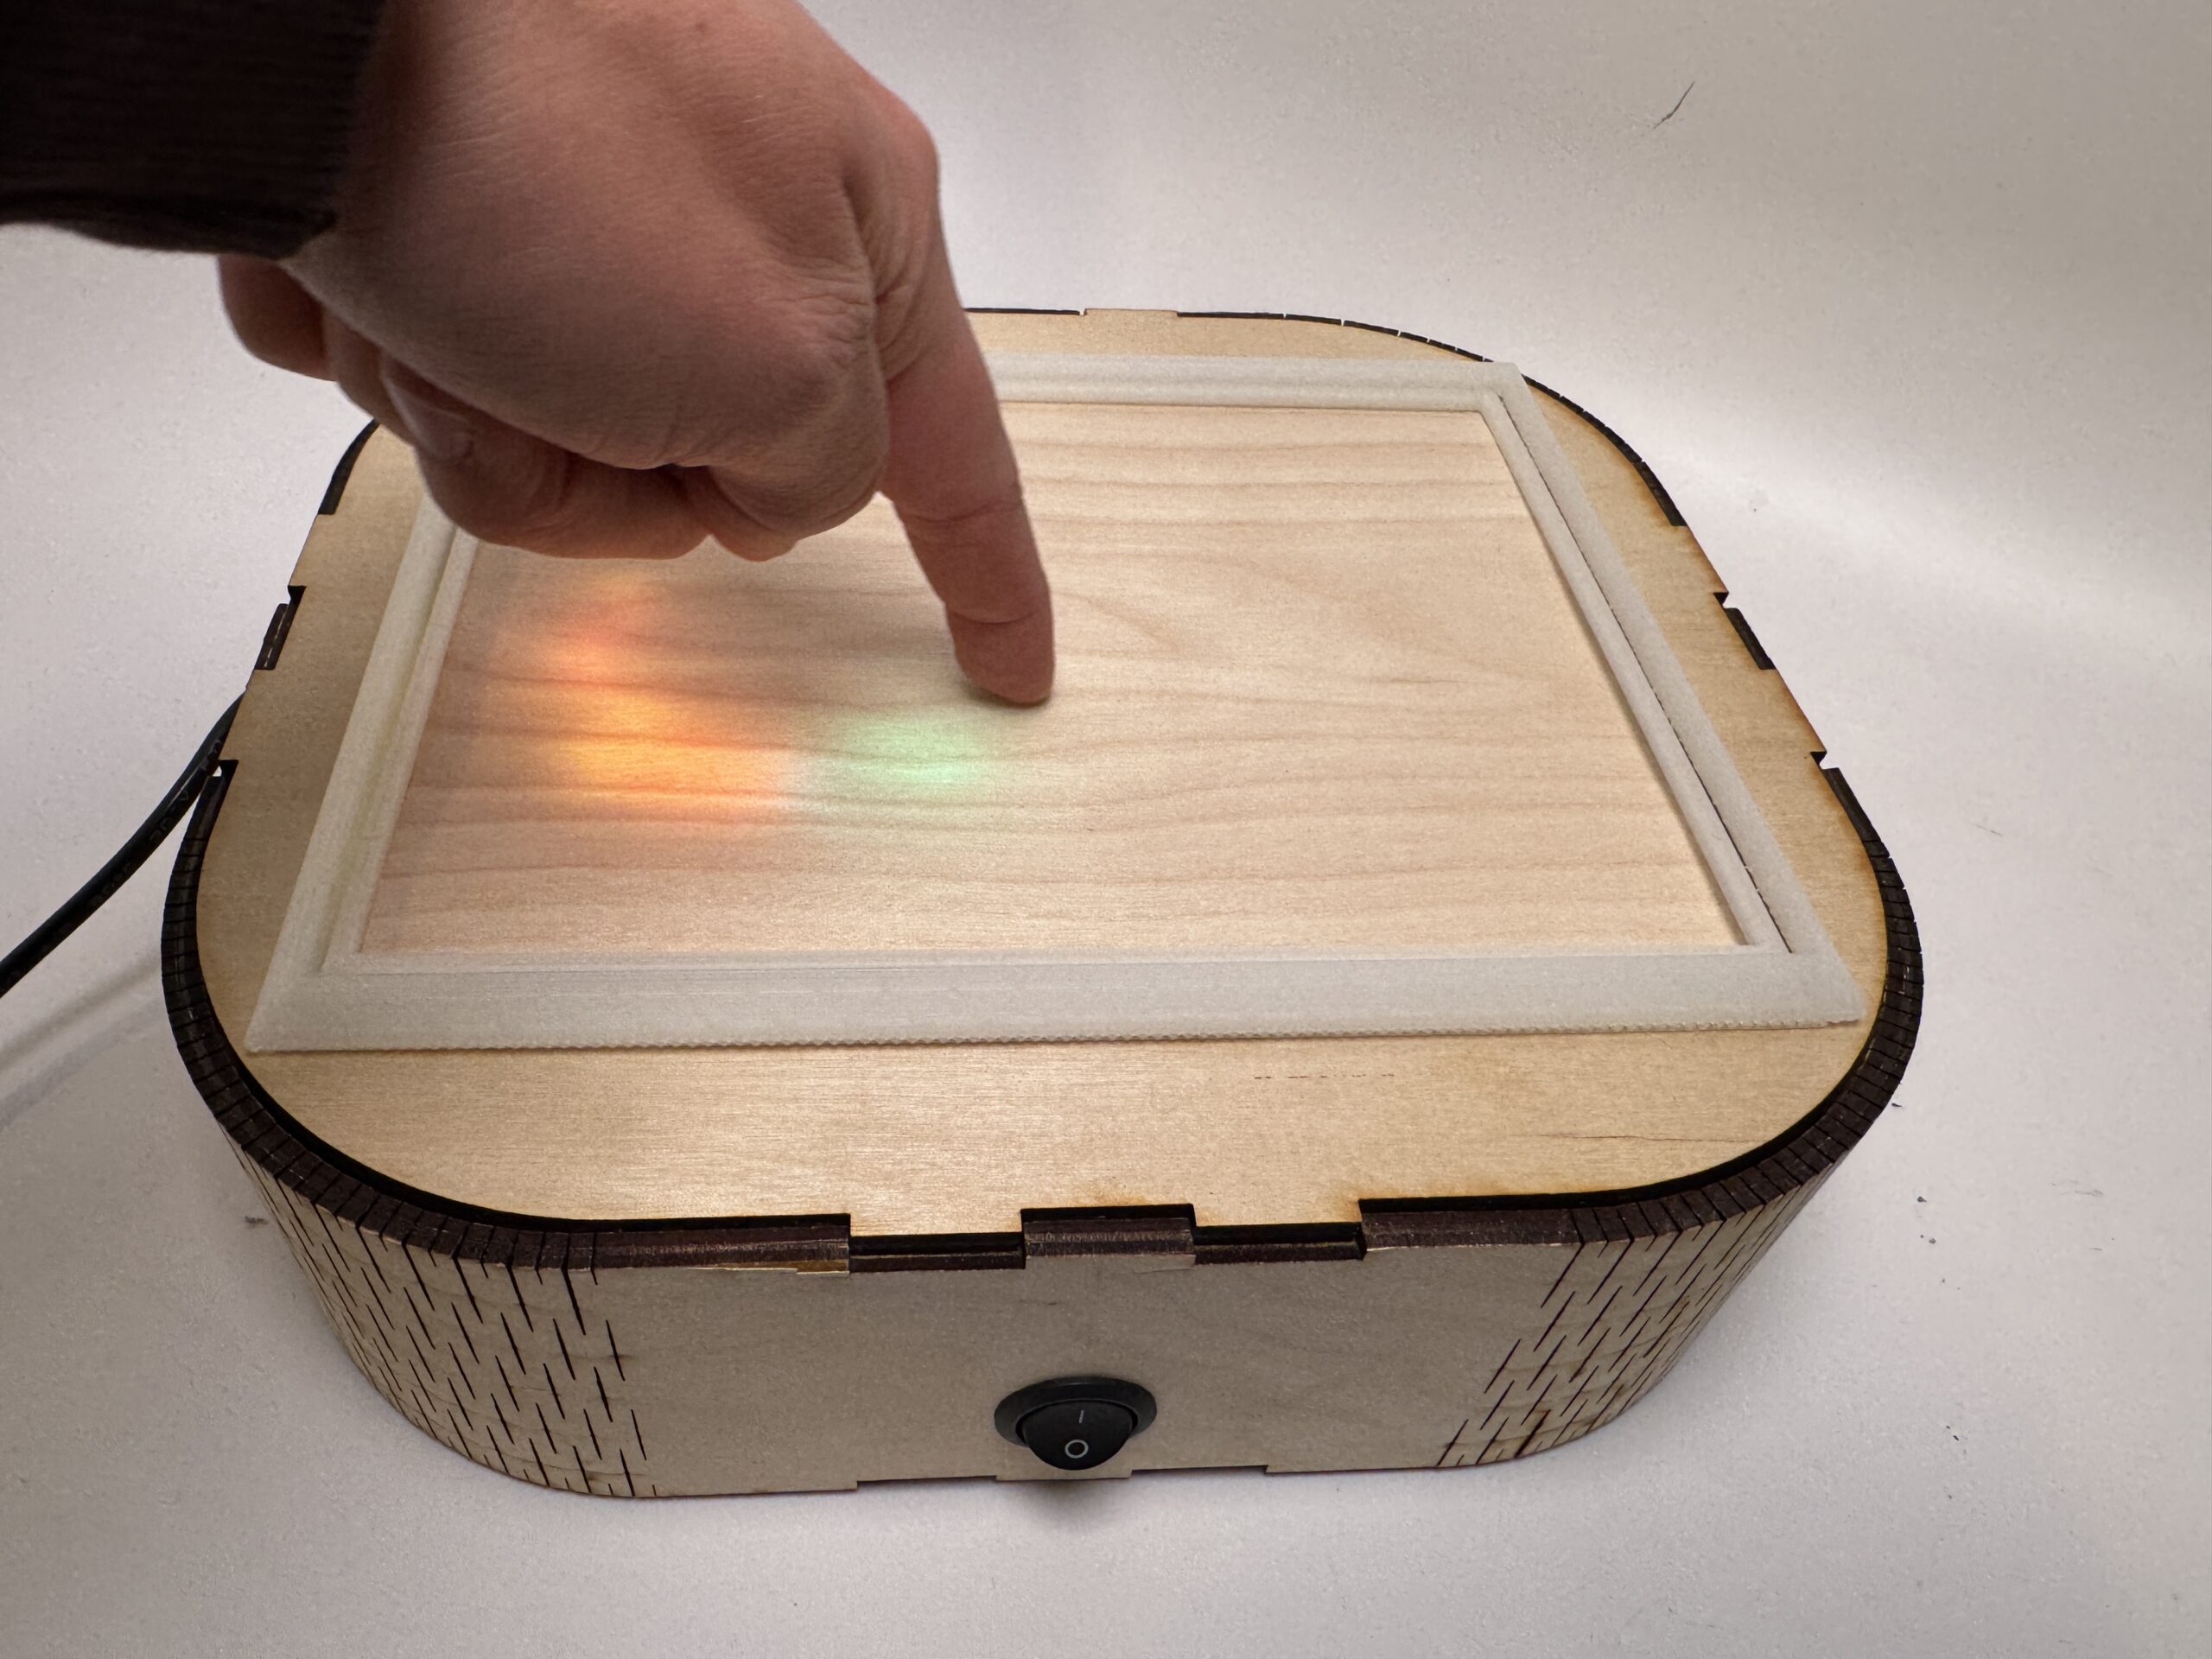
Horreo Jewelry Box–Fabrication
Introduction Jewelry box’s are so lame. There are just classy wooden boxs that are timeless and beautiful, so I plan on reinventing them. But what do I plan on changing the shape of a jewelry box to you might ask…a Galician horreo!!! Now I am aware that is seemingly random. However, this is because I plan…
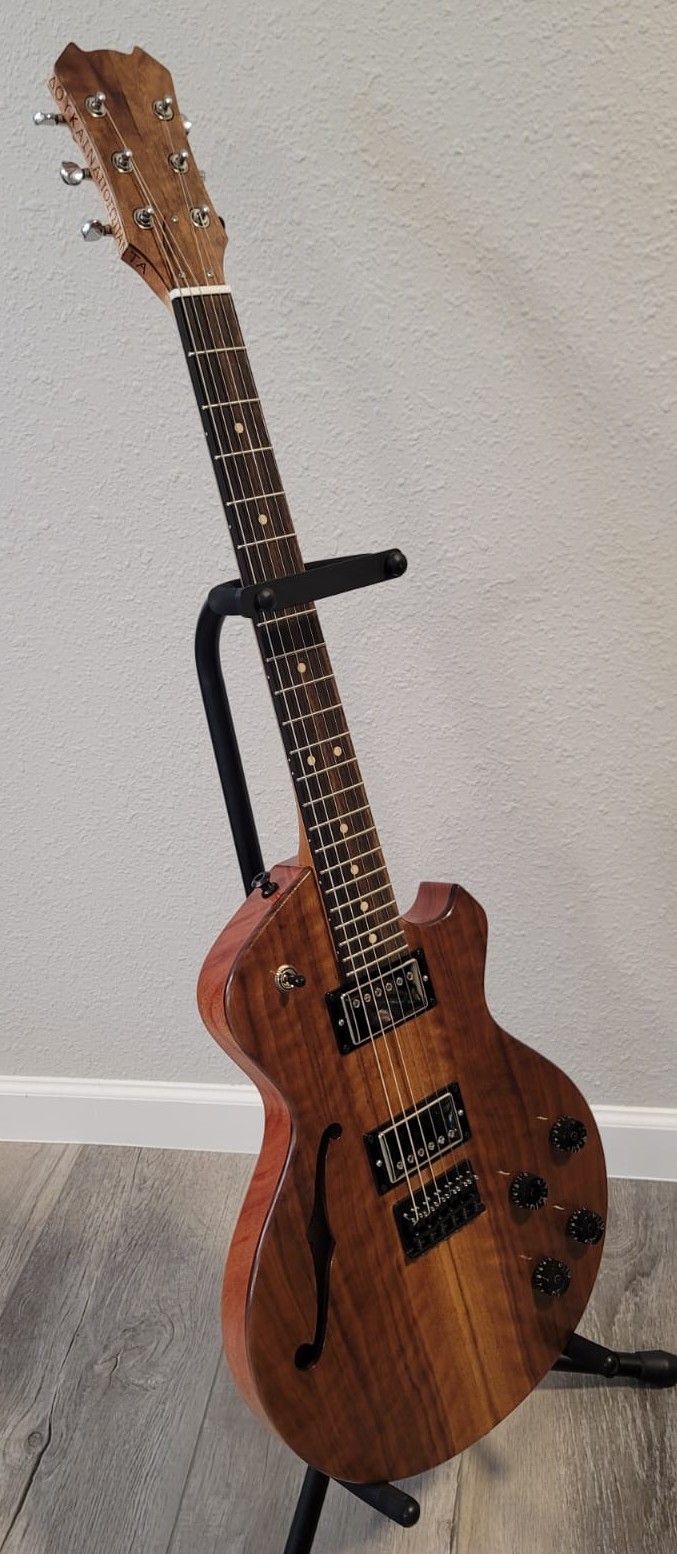
Making Extol: Custom Electric Guitar – Part 2
How does a luthier make an electric guitar? At the outset, my guess was as good as the next guy’s. Building isn’t terribly complicated, like putting parts together into a Franken-Strat, but what about cutting an original shape yourself? The Extol electric guitar is my own custom design that seeks to embody the characteristics of…

Glass Block Lamp Final Report: The How
Introduction: For my main project, I made a mid-century modern furniture inspired floor lamp. I used glass blocks and diffused LED strips as the primary lighting element, and the frame is manufactured using pine hardwood. The overall height of the lamp is ~3.5 feet tall, and is powered by a wall plug. The LED strip…
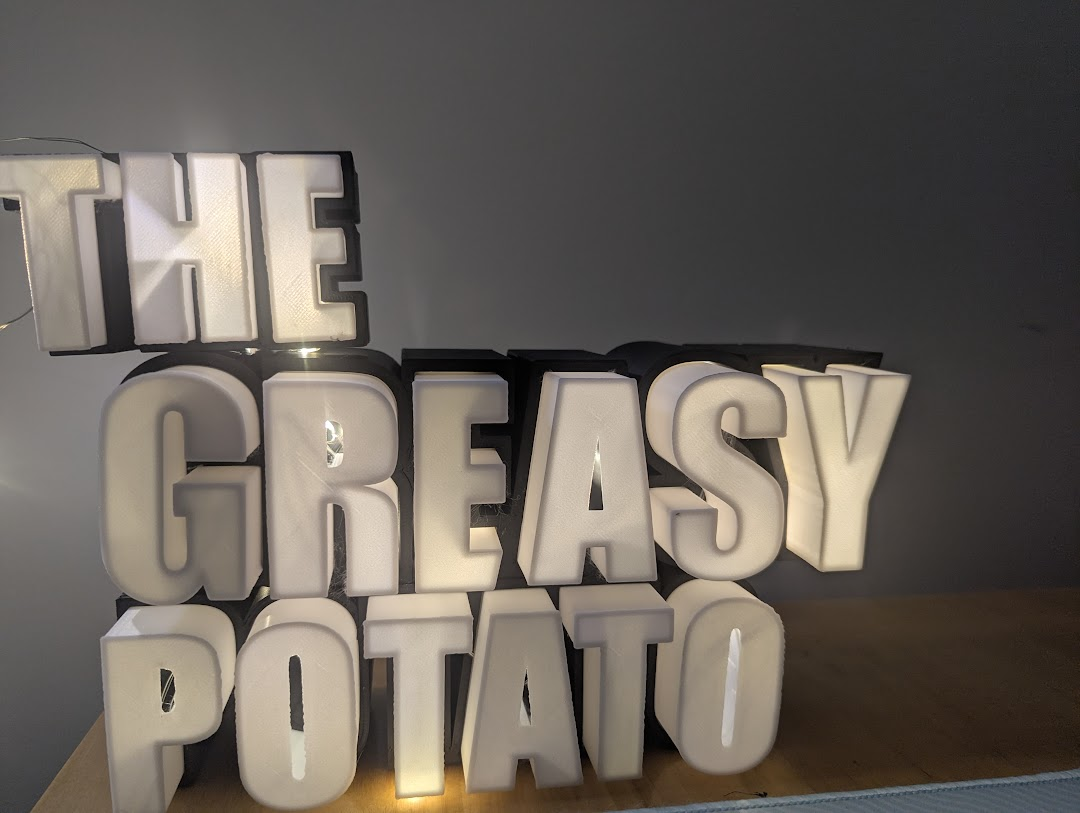
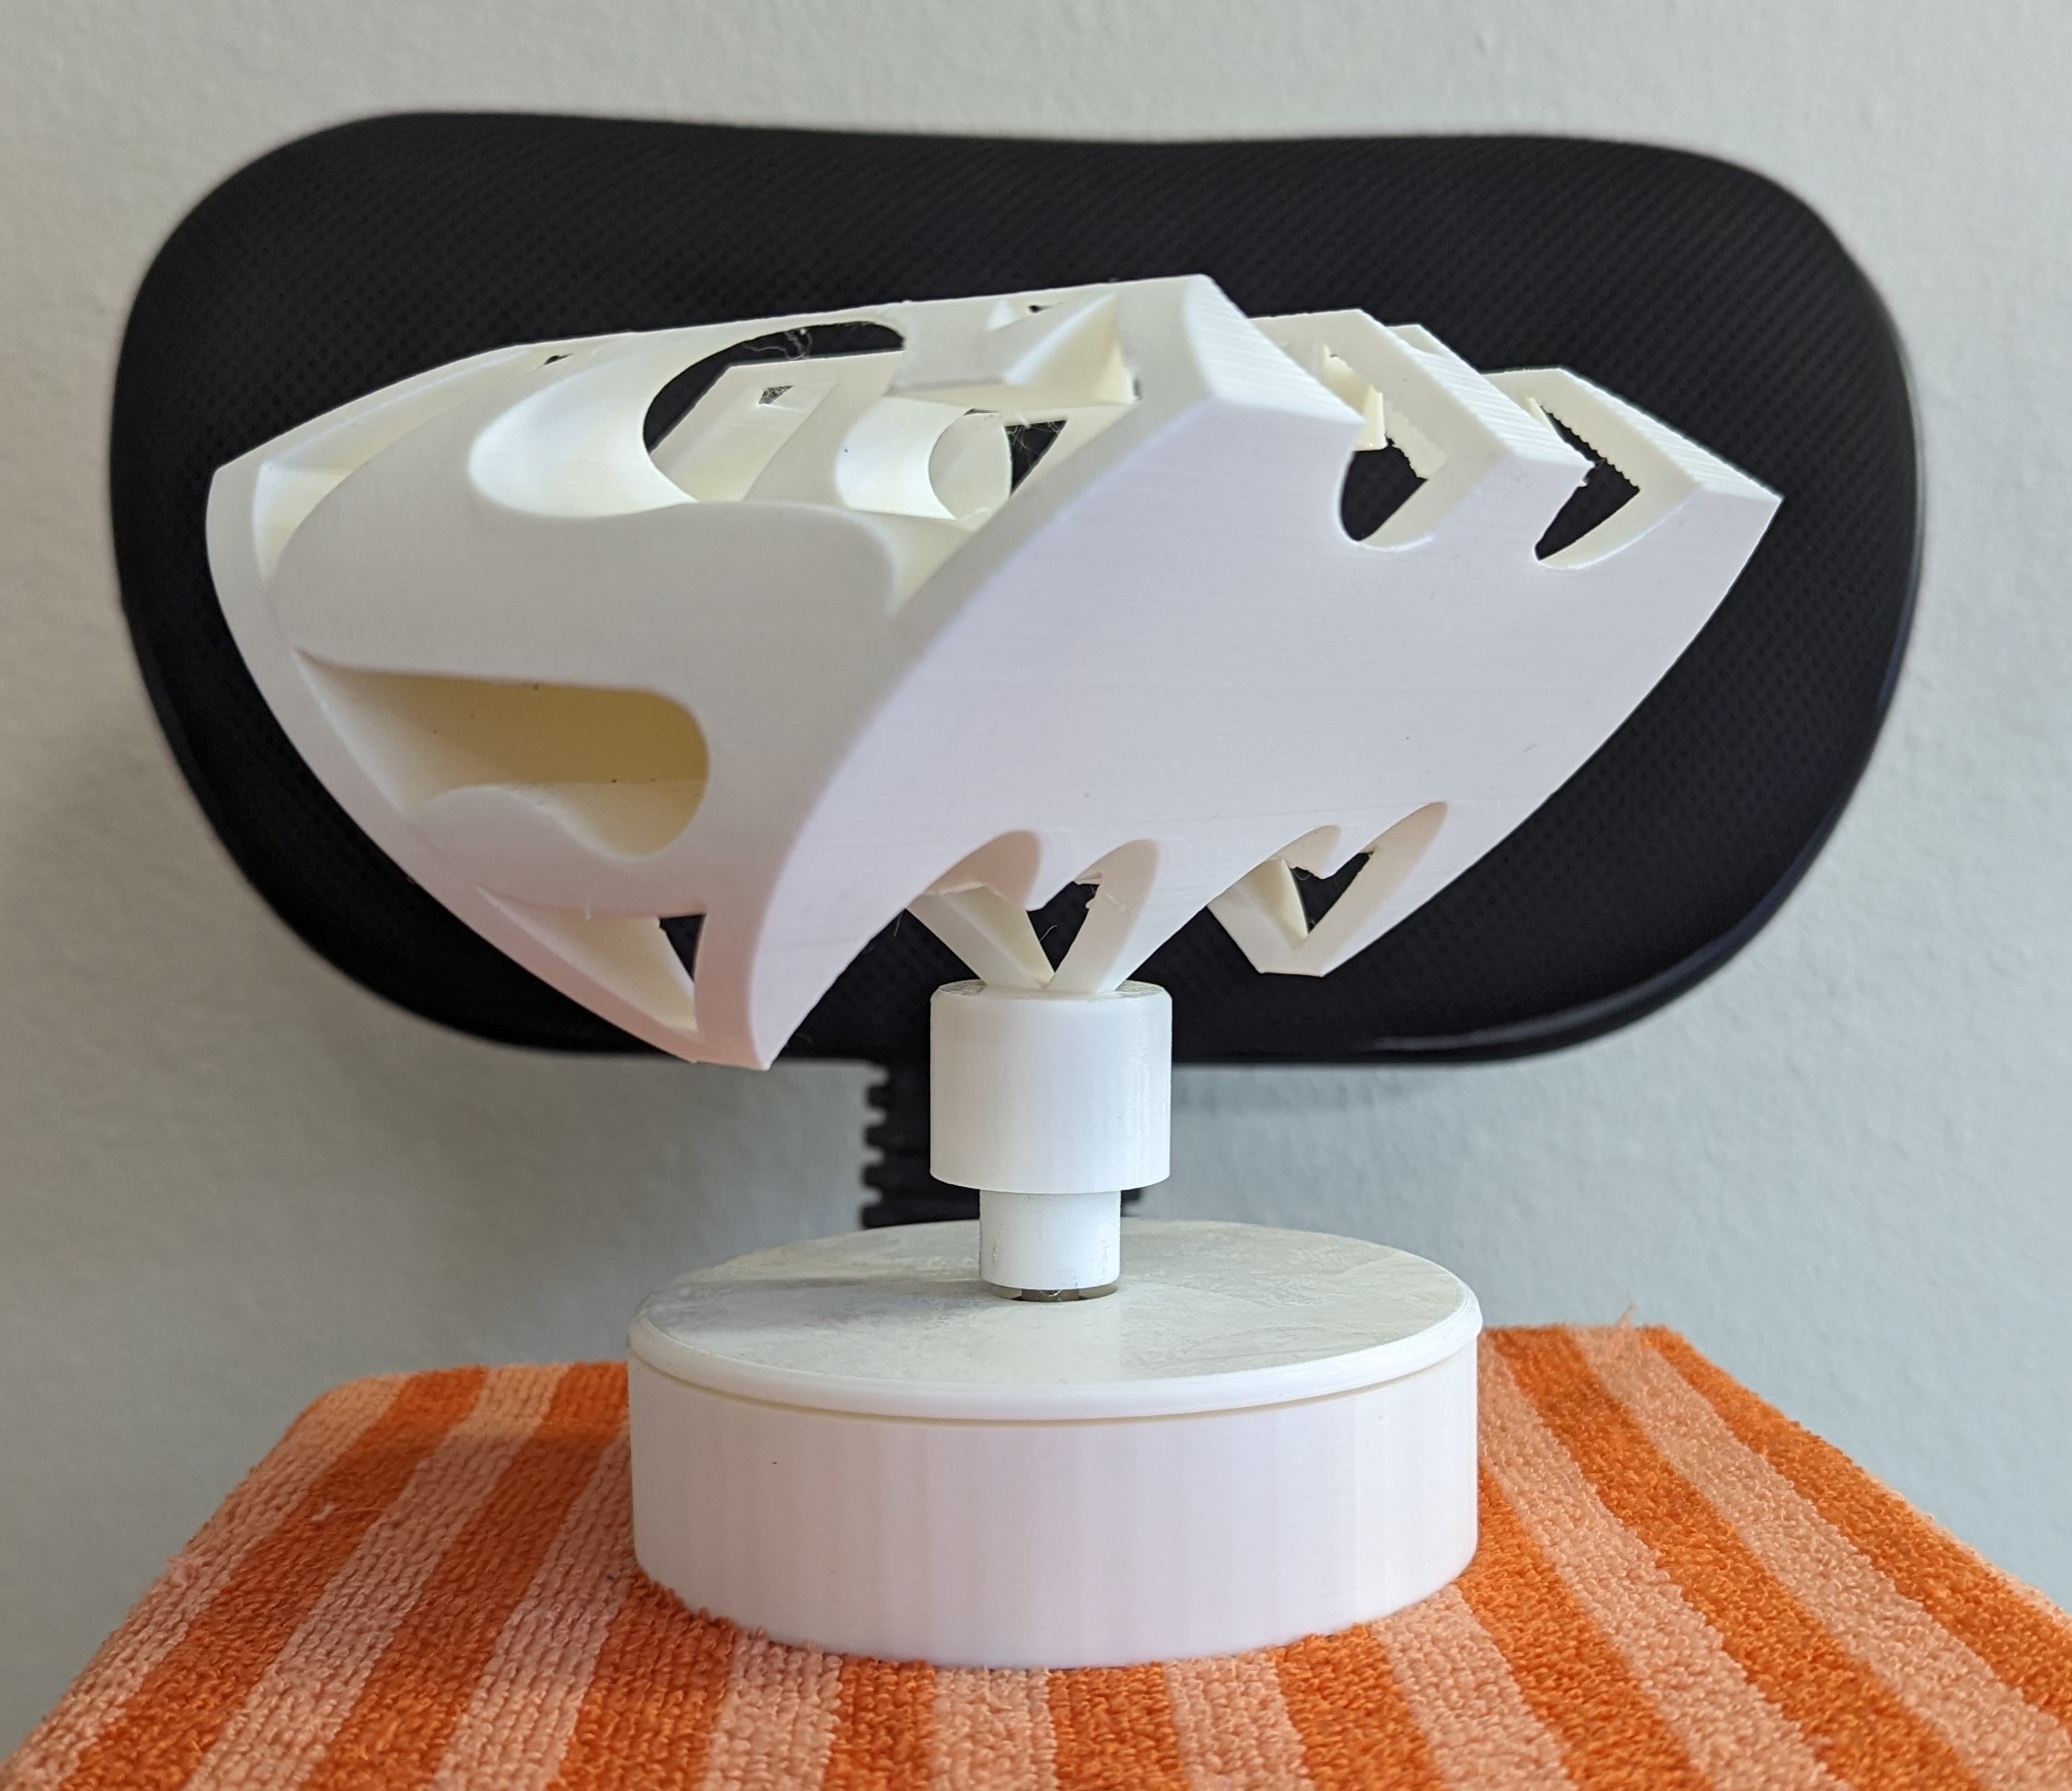
Neon-Inspired 3D Printed LED Sign Final Report part 2
Introduction For my final project, I set out to create a neon light-inspired 3D printed sign. This idea was born from a desire to add personalized decor to my home office—something that felt both unique and reflective of my interests. As a big fan of Marvel and DC comics, I wanted to incorporate elements of…
Wöddha Finale: Part Two
As mentioned in Part One, I was inspired to create some form of user-driven product for my final project, one that combines my love for woodworking with my love for creative technology. With a special focus on aesthetics as part of this class, I also wanted the user’s contributions to add to the overall aesthetic…
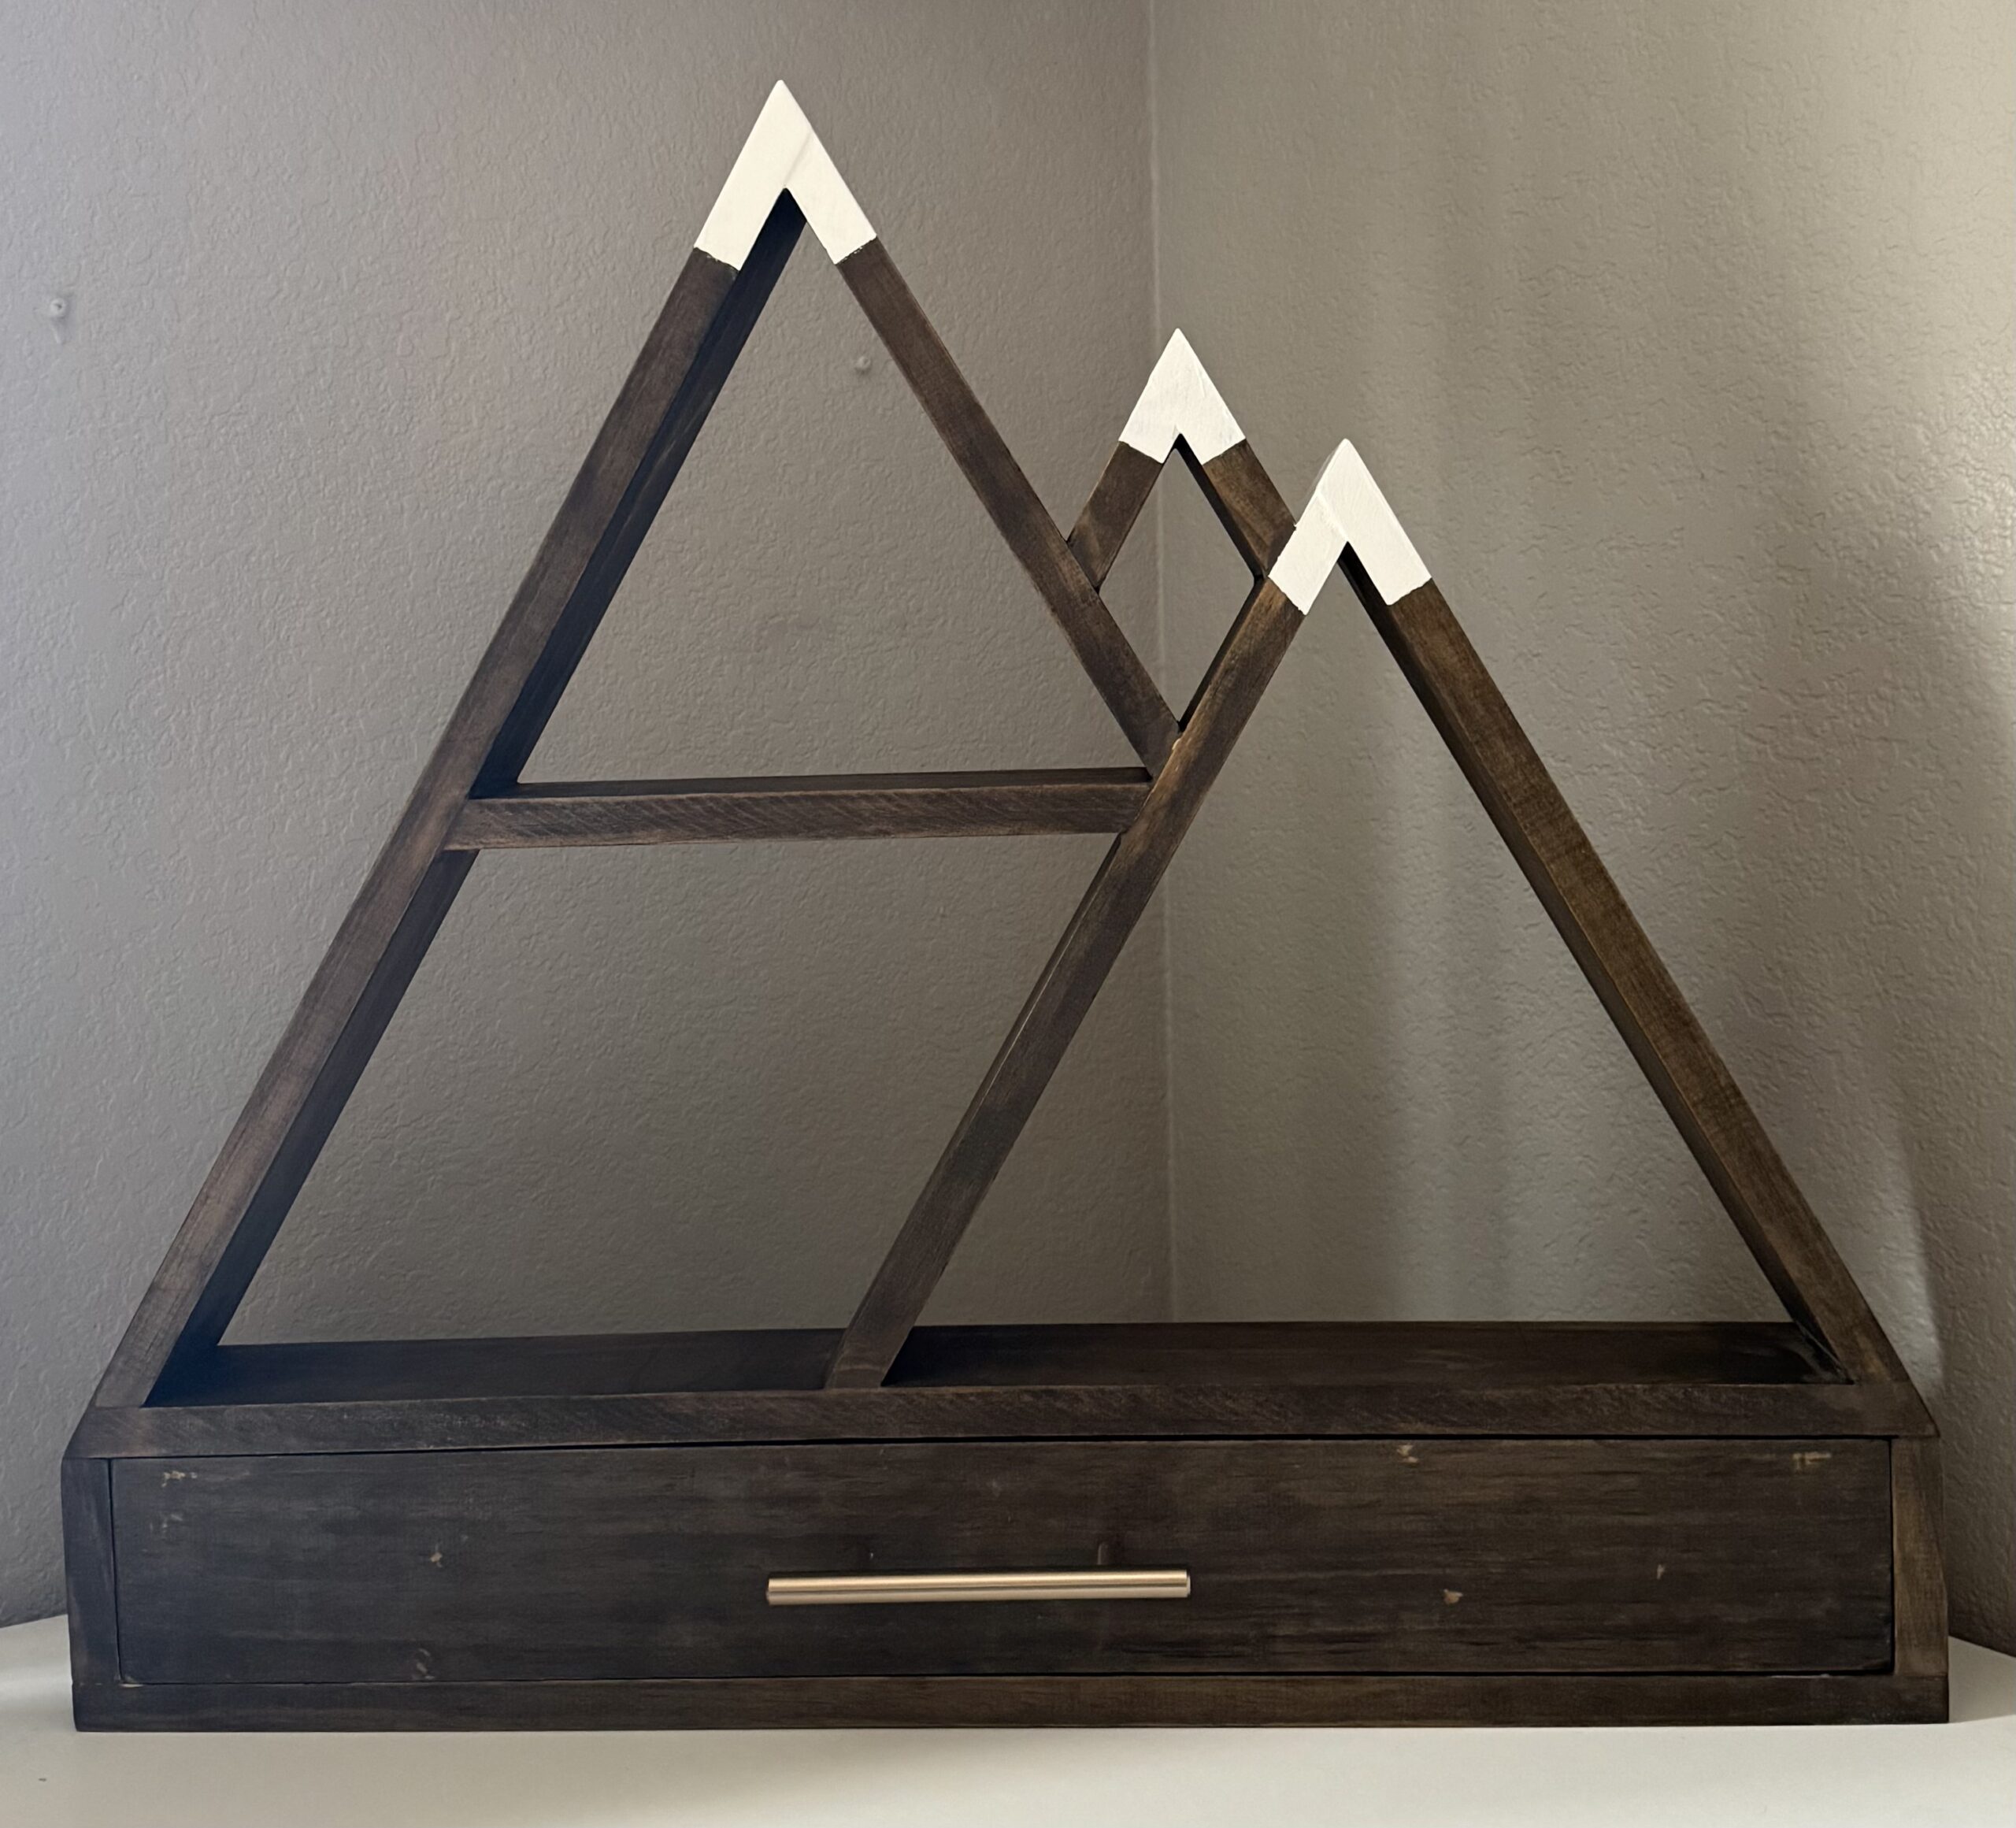
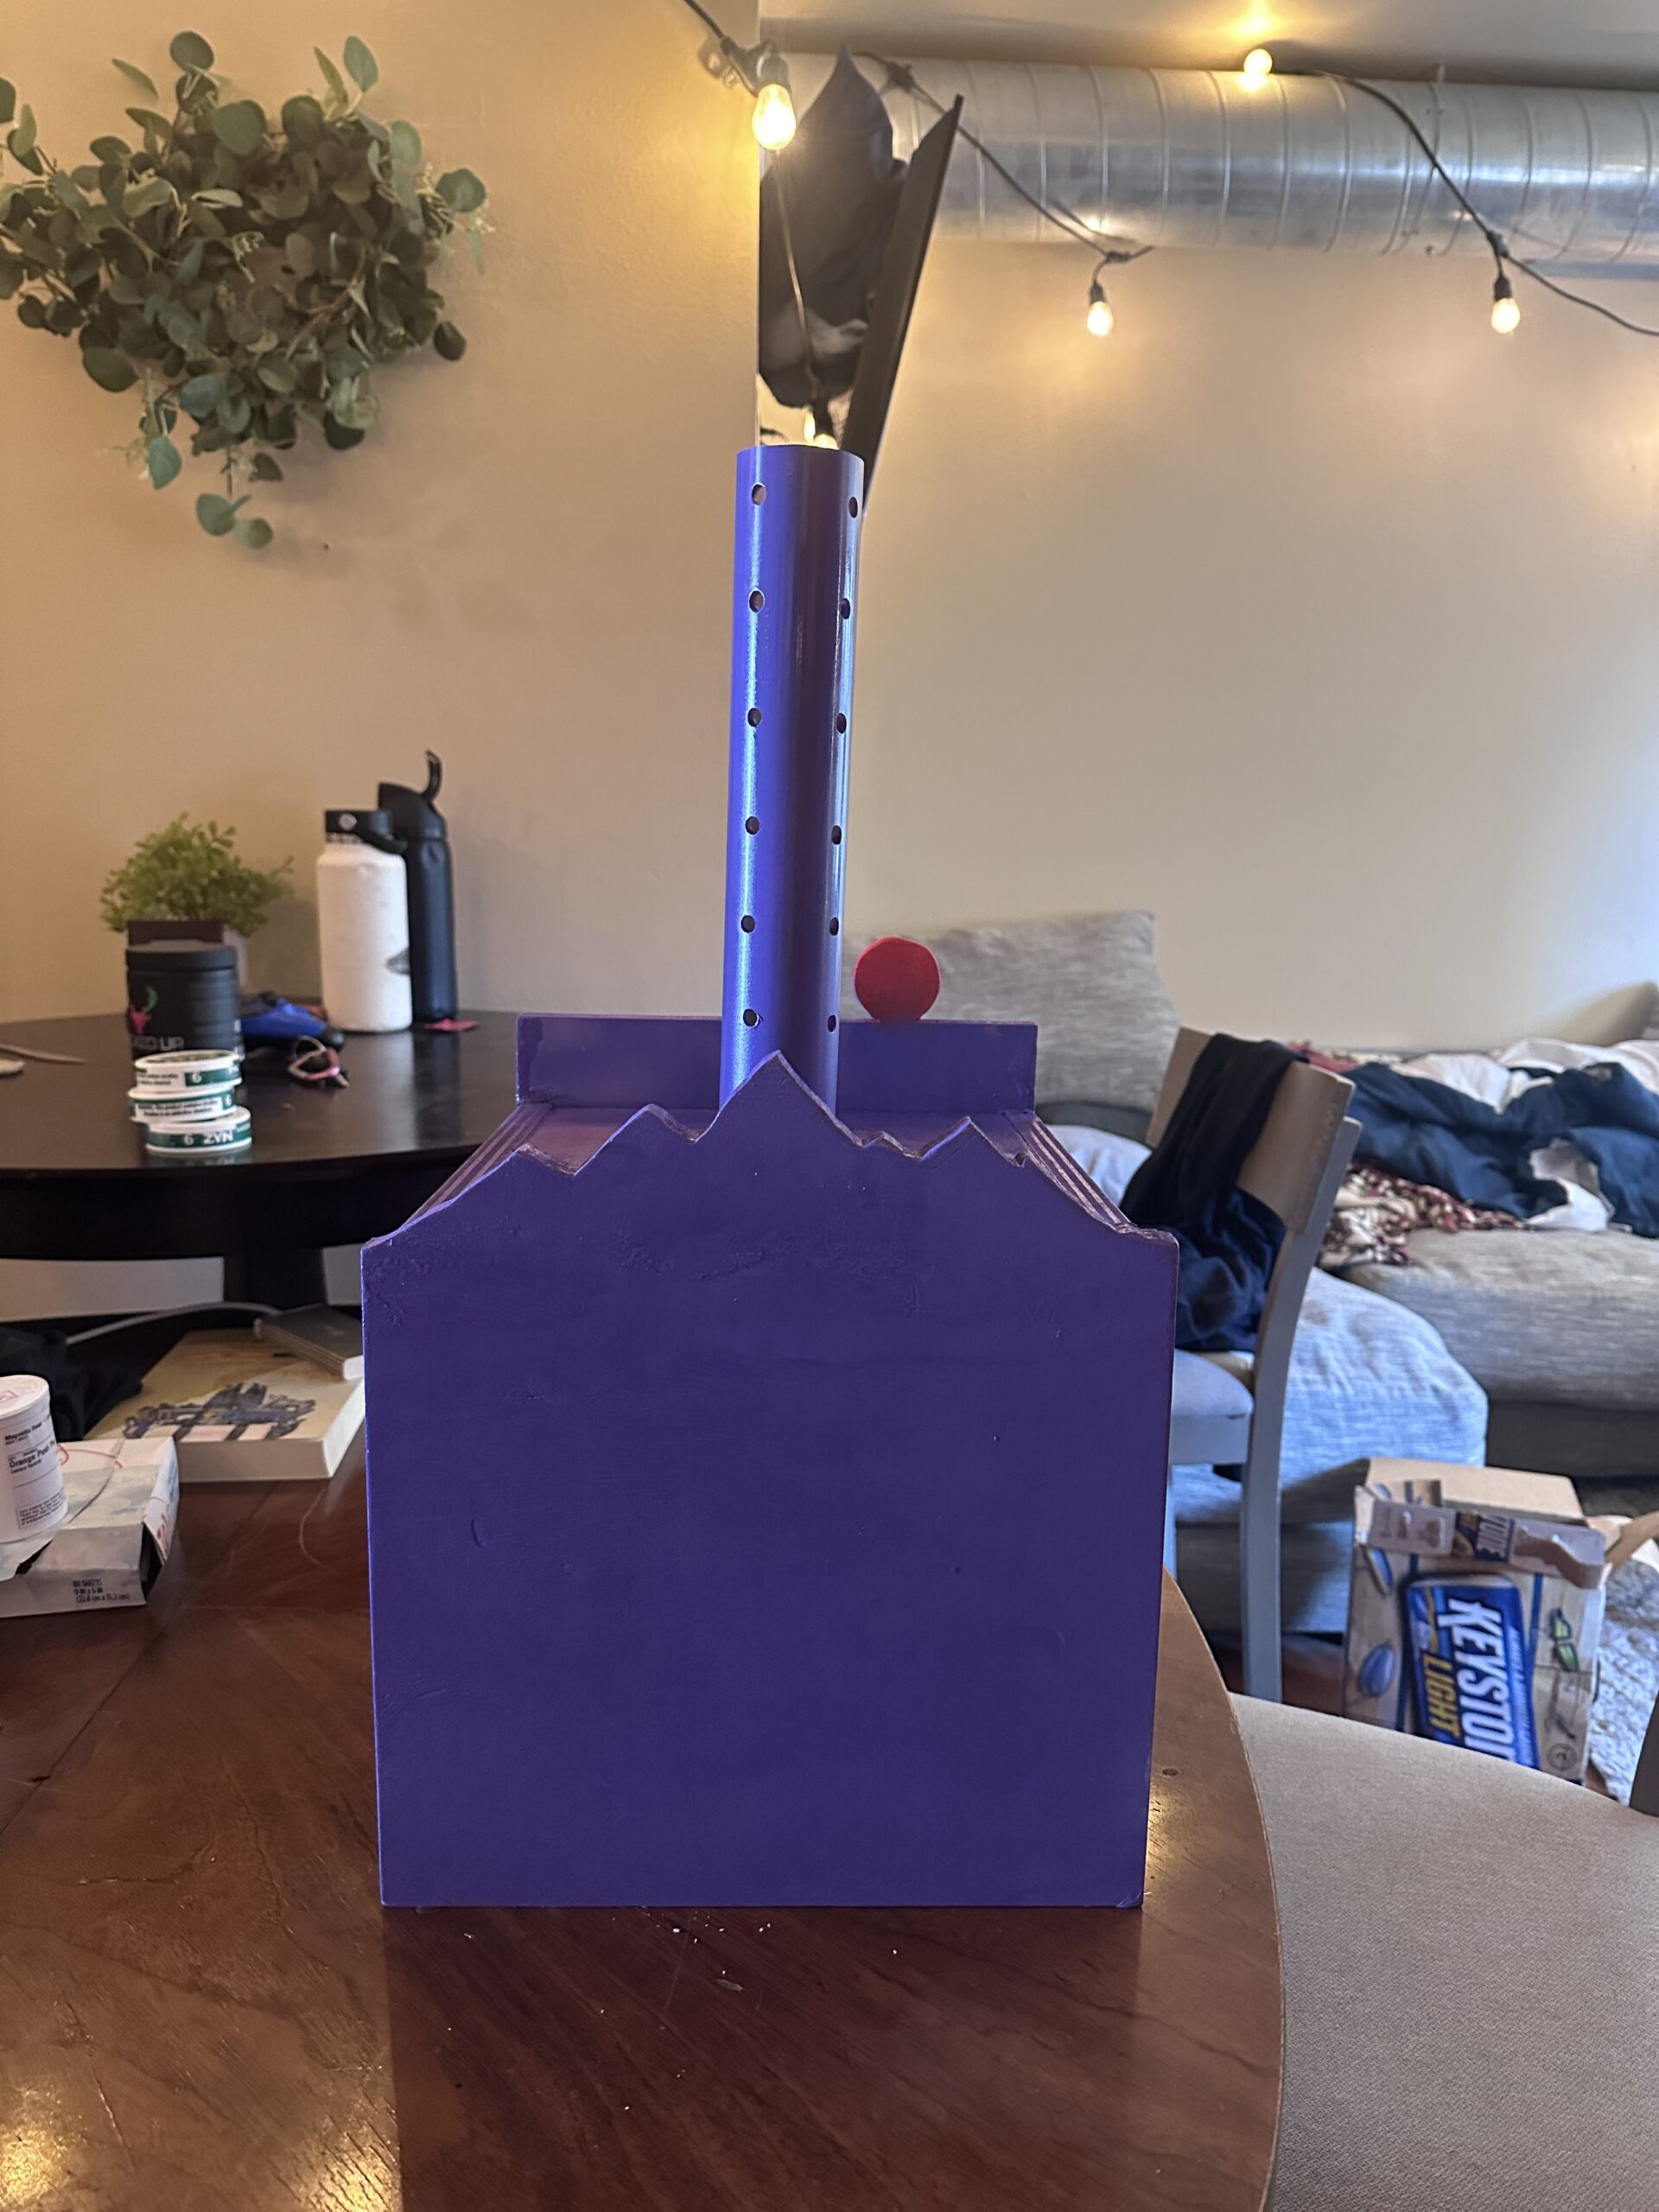
Final Report Part 2: Mountain Shelf
For my final project, I wanted to revisit and refine a past creation—a mountain shelf I originally made a few years ago. The inspiration came from my appreciation of clean yet warm design styles and a desire to bring functionality into a decorative piece. I aimed to modernize and elevate the original shelf by making…
Organic Minimalist Puzzle Holder – Answering the “How”?
Timeline When I was first beginning this project, I had created a Gantt Chart that outlined all of my tasks and was supposed to help me follow a certain process to ensure I stay on schedule. However, not too surprisingly- my plans were altered as I started in the woodshop and received advice/guidance that impacted…