

Inspiration and Aesthetic Vision
The goal of this project was to upcycle glass liquor bottles into functional drinking glasses and decorative vases while embracing an Industrial Vintage aesthetic. This aesthetic is characterized by raw materials, rugged texture s, and a utilitarian approach that values repurposing and history. Industrial Vintage design often incorporates aged metal, exposed hardware, and distressed finishes, creating an intentionally rough, factory-inspired look.
I wanted to capture this aesthetic by preserving the original branding and decals on the bottles while transforming them into something new. Instead of stripping them down for a minimalist look, I embraced the character of the bottles, allowing their existing designs to dictate the final appearance. My initial vision focused on drinking glasses, but as the project evolved, some bottles took on different forms due to the cutting results—becoming vases or containers instead.
During my research, I explored different cutting techniques and finishing methods to find one that was both accessible and effective without requiring specialized tools. This led me to the string and fire method, a technique that allows for bottle cutting with basic household materials.
Choosing the String and Fire Method
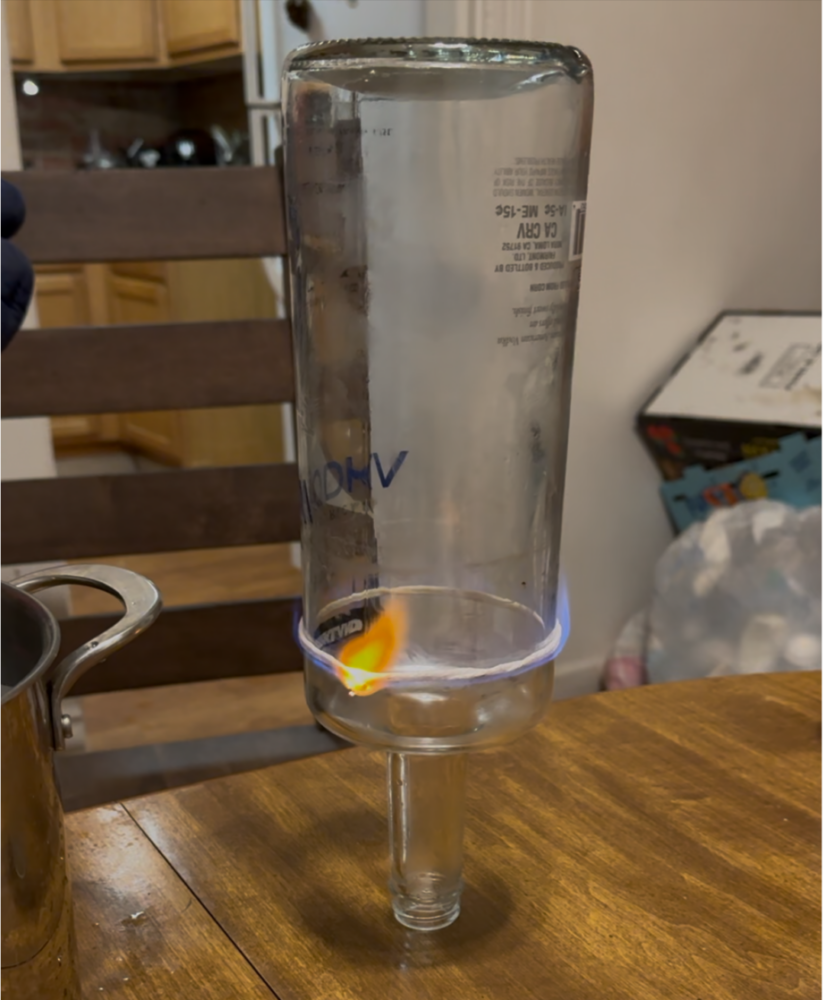
After considering various methods, including a glass cutter with hot water and a wet saw for precise cuts, I decided to use the string and fire technique. This method appealed to me because it required only a few simple materials—cotton string, acetone or rubbing alcohol, and cold water. The process involves wrapping a soaked string around the bottle, setting it on fire, and then quickly submerging it in ice water to create a clean break.
The main advantages of this method were:
- No specialized equipment – I didn’t need power tools, making it an accessible DIY approach.
- Preservation of bottle details – Since this method does not involve aggressive grinding, it allowed me to maintain the logos and decals on the bottles, reinforcing the Industrial Vintage aesthetic.
- A reasonable success rate with practice – While some breaks were rougher than others, trial and error helped refine the process.
That said, I knew there would be challenges, particularly with ensuring clean, even breaks. I anticipated that some bottles would break unevenly or not at all, requiring multiple attempts and adjustments.
Fabrication Process
Step 1: Selecting the Bottles
I chose four distinct liquor bottles for this project:
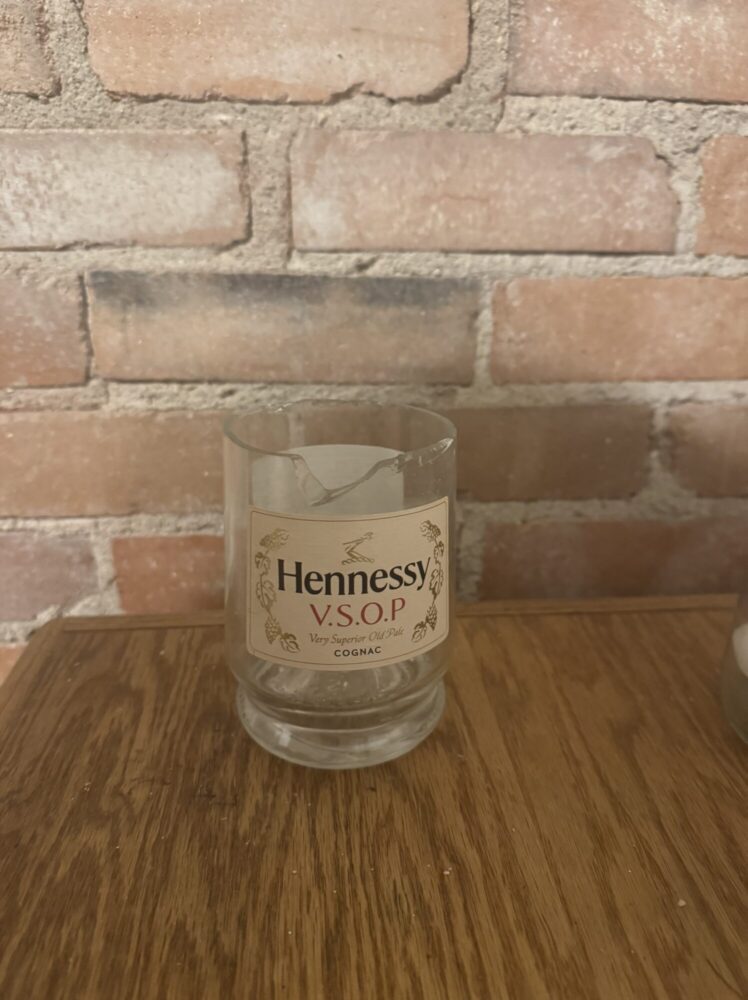
- Hennessy bottle – With its rounded shape, this bottle had the potential to become a unique tumbler or a statement vase.
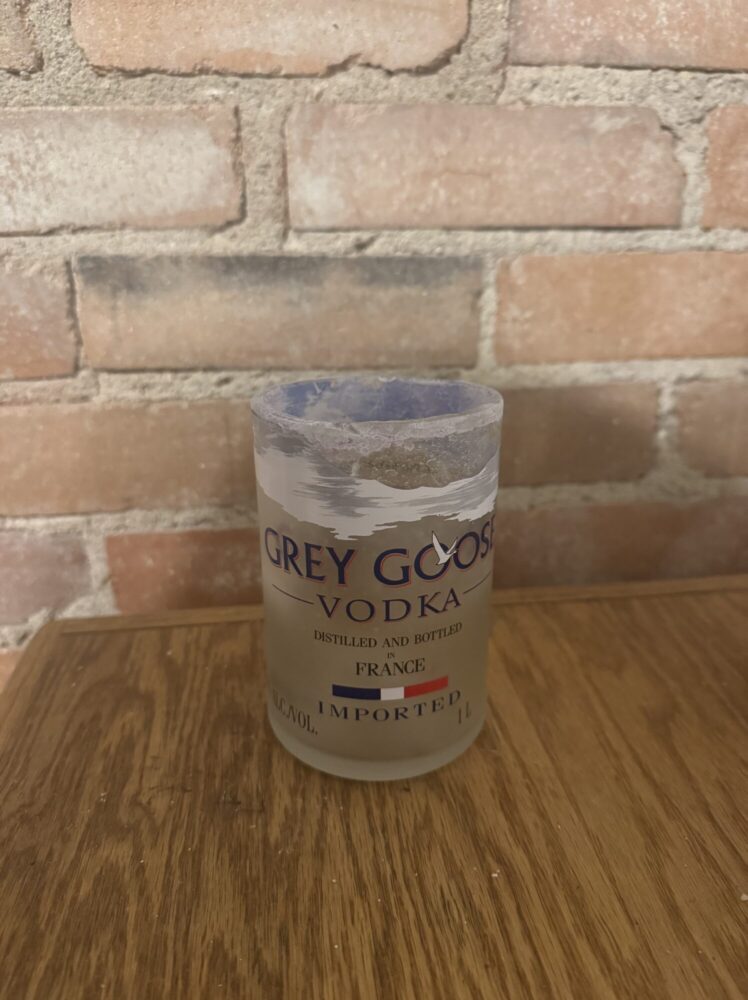
- Grey Goose bottle – Its tall and elegant design made it well-suited for a drinking glass or flower vase.
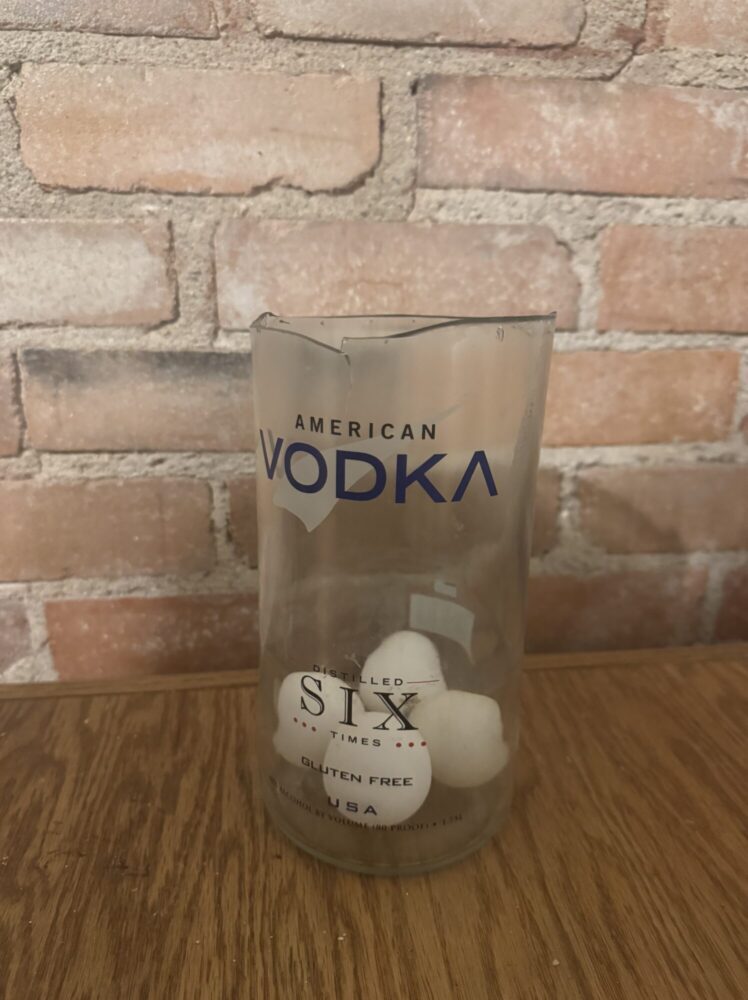
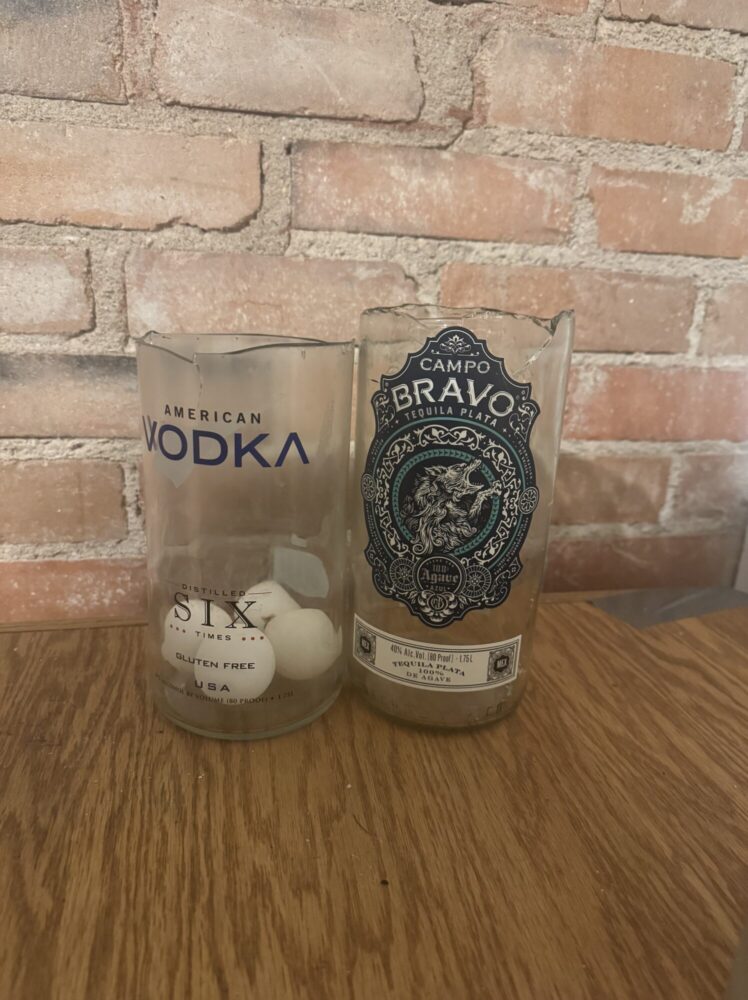
- Kirkland Vodka bottle – A large, sturdy bottle that worked well as a statement vase or storage container.
- Campo Bravo Tequilla bottle – Similar to the Kirkland bottle, a large bottle that could be used as a vase or storage
Each of these bottles featured unique branding and etching, which added to their aesthetic value. The goal was to maintain these details while shaping them into new functional pieces.
Step 2: Cutting the Bottles
The string and fire method was executed as follows:
- Soaking in fuel – The string was saturated in acetone or rubbing alcohol to allow for a consistent burn.
- Wrapping the string – Then the cotton string was wrapped around the bottle at the desired cutting point and tied securely to ensure an even break.
- Igniting the string – Once lit, the bottle was slowly rotated to evenly distribute heat along the cutting line.
- Thermal shock – Immediately after the flame burned out, the bottle was dunked into a pot of ice-cold water. The rapid temperature change caused the glass to fracture along the heated line.
- Refining the edges – After breaking, the edges were sanded using progressively finer wet sandpaper, starting with 100 grit and moving up to 600 grit to achieve a smoother finish.

While the process generally worked well, the first few attempts resulted in rough or jagged edges, leading to the need for additional sanding. Some bottles also broke irregularly, requiring multiple tries to get usable pieces.
Step 3: Refining the Edges and Final Adjustments
Sanding played a crucial role in making the bottles both functional and visually appealing. Since the cuts were not always perfectly smooth, I spent extra time refining them with wet sandpaper. Had I planned for more precision from the start, I would have used a glass cutter to create a scoring line before the burn, which may have resulted in cleaner breaks.
Another challenge was that some bottles were too large or had uneven edges, making them less ideal for drinking glasses. These pieces were repurposed into vases or storage containers instead, which aligned well with the flexibility of the Industrial Vintage aesthetic.
Lessons Learned and Overcoming Challenges
While the string and fire method proved to be an accessible way to cut glass bottles, the process was not without its challenges. The first few attempts resulted in uneven breaks, with some bottles refusing to crack cleanly along the heated string line. In some cases, the fracture extended unpredictably, ruining the intended cut and requiring me to start over with a new bottle.
One of the most significant factors in achieving a successful cut was ensuring an even burn. If the string was not fully saturated with acetone or if the fire did not distribute evenly around the bottle, the break would be inconsistent. Through trial and error, I found that using thicker cotton string and making sure it was completely soaked led to more reliable results. Rotating the bottle at a steady pace also helped distribute heat more evenly.
Another challenge was controlling the water temperature during the rapid cooling step. Initially, I used only cold tap water, but after inconsistent results, I switched to ice water. The dramatic temperature change improved the break quality, leading to a higher success rate.
Sanding was another area that required patience. Some cuts left sharper edges than expected, requiring extra time with finer-grit sandpaper. In the future, I might experiment with a rotary tool or a glass polishing compound to achieve a more refined finish.
Despite these challenges, the learning process added to the project’s value. The imperfections and adjustments made along the way reinforced the Industrial Vintage aesthetic, embracing the raw and handmade nature of the final artifacts.
Evaluating the Results – Comparing to Functional Goals
Originally, the intent was to create a set of drinking glasses. However, after the fabrication process, the results were mixed:
- One bottle successfully became a drinking glass – The Grey Goose bottle worked well for this purpose, with a relatively even cut and smooth edges after sanding.
- Others were repurposed – The Hennessy and Kirkland Vodka bottles had uneven or larger openings, making them better suited for vases or decorative containers.
In the end, the project did meet my functional goals, but with some unexpected outcomes. The ability to adapt and repurpose the bottles into new forms was a key takeaway from this process.
Comparing to Artistic Goals
The project successfully embodied the Industrial Vintage aesthetic. Key design elements that contributed to this included:
- Preserved logos and decals – These details maintained the authenticity of the original bottles, reinforcing their repurposed nature.
- Raw, hand-crafted feel – The cutting method and finishing techniques allowed for slight imperfections, which added to the industrial charm rather than detracting from it.
- Contrast between rough and refined elements – While some of the edges were sanded smooth for functionality, the bottles retained their original textures, branding, and shape, keeping the vintage character intact.
Had I pursued a more modern aesthetic, I would have focused on ultra-clean cuts, frosted or painted finishes, and refined polishing techniques. However, the rougher, more natural result aligns well with my original vision.
What’s Next?
At this stage, I have no further plans to refine or expand on this project. The final artifacts met my expectations, and I am satisfied with the outcome. However, if I were to revisit bottle-cutting in the future, I would consider:
- Using a scoring tool before burning to improve cut precision.
- Experimenting with different sanding techniques for even smoother finishes.
- Exploring additional bottle shapes and colors to create more variations in final pieces.
For now, the completed pieces serve as both functional and decorative objects, demonstrating how discarded materials can be transformed into something new while maintaining their original character.
Final Thoughts
This project was an engaging exploration of upcycling and industrial design. Through trial and error, I gained valuable insights into glass cutting, material limitations, and aesthetic refinement. The final pieces reflect the balance between craftsmanship and imperfection, embracing the inherent history of each bottle while repurposing them into functional art.
While I do not plan to continue this project, it has reinforced my appreciation for hands-on fabrication and industrial design principles. The process highlighted the potential of everyday objects to be transformed into something unique, proving that even discarded bottles can find new life with a bit of creativity and effort.
3 Comments. Leave new
Love how you took something so simple like old bottles and turned them into functional art. The fact that you embraced the imperfections and made them work with the Industrial Vintage vibe is awesome. If you did this again, would you try using a different technique for a smoother finish, or maybe even experiment with other materials ?
I love how you embraced the Industrial Vintage style with your upcycled bottles! The string and fire method was a great choice, and keeping the branding really added character. Even with the challenges, the final pieces turned out awesome, and it’s cool how you adapted them into vases and containers. Great use of creativity!
The detailed documentation of your fabrication process is a strength of this post. Your step-by-step explanation of the string and fire method provides valuable insights for readers who might want to attempt similar projects. I also liked the transparency about both successes and setbacks makes your post not only informative but also genuinely helpful. I’m curious about how you determined where exactly to make your cuts on each bottle. Did certain features of the bottles (like logos, shape transitions, or text) influence your decision about where to place the cutting line?