
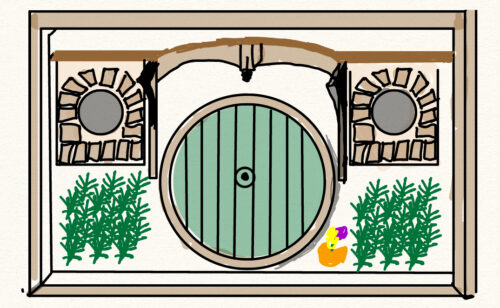
For my main idea, I’m designing a hidden compartment behind a fantasy-inspired art piece. This piece will incorporate a dynamic locking mechanism—something that blends into the artwork while also serving as a functional element. This project should have a chameleon-like aesthetic—somewhere between minimalist, fantasy, and whimsical. I am shooting for a blend of simplicity, storytelling, and playfulness. I have always loved soft fantasy/sci-fi stories like Dune or Harry Potter or even more modern stories like The Last of Us, but my all time favorite story has always been The Lord of the Rings so I want to incorporate an art piece from the book/movies. I envisioned a hobbit door that opens to reveal a secret compartment when a certain part of the artwork is manipulated. I feel like I have landed on the idea of turning a knob or rotating a small window will trigger the mechanism, unlocking the hidden space.
The vision for my project is like most hidden compartments projects. I want people to admire the art or ignore it altogether without being able to realize the true nature of what lies beneath. Where the fantasy aesthetic comes in, is that people who know me well will know I love fantasy stories and small fun engineering projects, therefore, people who really know me will be able to anticipate the design almost like an investigator.
In terms of specifications, the frame of the piece will measure 12×8 inches, while the hidden compartment itself will be approximately 4x4x4 inches. My design goal is making the compartment easily concealed and subtle, much like fantasy artifacts like the Holy Grail or the One Ring. I aim to create a simple one-turn unlocking mechanism, with the potential to add a second movement if time allows. I will likely put this piece in the bathroom or basement area of my house and install in between two studs in a wall frame that way it does not come loose
Artistic vision and aesthetic
As previously stated, the centerpiece of the design will be a fantasy-inspired hobbit door. I am striving for a minimalist aesthetic alongside the fantasy elements. If time permits, I would also like to incorporate intricate details into the decorative framing style to enhance its overall aesthetic appeal.
Alternative Aesthetic
I loved my current idea; however, I explored different ideas and aesthetics, some that went in wildly different directions. One alternative idea I strongly considered was a ski lift-inspired spice rack in a mechanical aesthetic, which sounded kind of ridiculous to say out loud. I was particularly drawn to the use of bicycle drivetrain components—gears, bike chain links, metal rods, nuts, and bolts. The idea of a ski lift powered by a bike chain, smoothly transporting spice jars from one end to another, felt like a fascinating fusion of mechanical design and playful engineering. The element of motion in the mechanical design would have been the rotating of the spices along the “ski lift line” by a hand-turned gear. Another alternative was a mechanical aesthetic hidden compartment. In this version, the art piece would have been a bicycle, and rotating its drivetrain would have revealed a concealed space. This idea took inspiration from a piece of art in my house—a bicycle frame made of metal wiring. While both concepts intrigued me, they would have been significantly more time-consuming and ultimately I had to prioritize time over many other aspects of the project.

Plans for final
First, I have researched simple yet effective locking mechanisms. I do not want to make the locking feature overly complicated but maybe have two different movements that open the door while ensuring that the movement is smooth. Then, I will prototype different mechanisms to determine which best fits my vision. In terms of material selection, I plan to use a combination of wood for the box/frame components, acrylic for the locking mechanism, and 3D-printed filament for anything that’s too complex that I may want to add later.

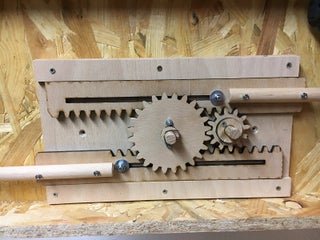
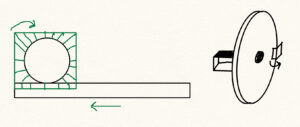 Figures – (Top and Bottom). simple drawings of locking mechanisms. (Middle) Locking mechanism inspiration
Prototyping to date
So far I have been in the all consuming spring senior year slog and am planning to do most of my prototyping and fabrication during spring break. Luckily I just need wood and a few cuts on acrylic so I should be able to do most of what I need to do at home.
How you are going to make it
Overall, I do not think I will need too many skills that I do not currently possess. The biggest skill that I will need to rehash is cutting drywall effectively and fixing any drywall holes that I will inevitably leave behind.
Week of 17-21 March – This week I will be mainly prototyping a few locking mechanisms. I found a few quick online tutorials so I will start there. Most of them are simple latches that are activated by physically adding rotation which moves a retraining piece out of the way. I am still also considering some linear pull locking mechanisms or even something a little more advanced if I can find a tutorial or fun way to incorporate a story element. If this week work blends into the next, I am not too worried based on lack of spring break assignments.
Spring Break – This will be the biggest week for shopping manufacturing and assembly. I have the wood, screws, and tool at my house but may do mostly CAD design… My goal is to have the first prototype of the lock by Monday, the box, frame, and art piece done by sunday. I will not be too upset if it ends up getting pushed into the next week.
Week of 31 March – 4 April – This week will all depend on spring break tasks, however, I am hoping this week I have a relatively good looking art piece. At this point I can take a stud finder and drywall saw and cut out the section I need for my design. If everything goes well, It will relatively cover the misaligned cut and I can do a simple paint touch up to make sure everything blends together.
Last few weeks 7-18 April – These weeks will be left as buffer incase I need to make adjustments to my design. This week will likely be large due dates for other class projects, therefore I would love to set a completion day in between the two weeks, maybe around 10 April.
I will provide documentation at each step, whether it goes well or not, in order to add to the final project post and hit all the necessary pictures or videos.
Several challenges may arise during manufacturing, so contingency plans are necessary. If the locking mechanism does not mate correctly, I will have backup options such as alternative latches or magnets. Material misalignment is another possible issue, as wood and acrylic can sometimes warp or not fit precisely, so I will carefully test all pieces before final assembly to ensure a proper fit. Time constraints are also a concern, given that fabrication is planned for spring break, but this is why I have prioritized more simple designs to allow for shorter manufacturing times.
The only thing I am still really debating is whether to design and cut some of the main art components with acrylic or the one-eighth wood on the laser cutter and then paint it, or to make it in the wood shop. The detailed sections are likely going to be small and will require the band saws, which will require a little more time in the wood shop. If I design strictly with the laser cutter in mind, I will have to consider laying multiple pieces on top of each other in order to add the extruded nature of the door overhang. This would maybe be ideal for me as It allows me to prioritize work I can do at home rather than drive to school.
Manufacturing Steps.
- Research simple locking mechanisms and identify one that best fits the project.
- Build rough prototypes to test locking functionality.
- Adjust dimensions and design based on test results.
- Gather necessary materials, including wood, acrylic, screws, and tools.
- Cut wood to size for the frame (12×8 inches) and hidden compartment (4x4x4 inches).
- Cut acrylic pieces for the locking mechanism.
- Sand and prepare materials for assembly.
- Assemble the wooden frame and secure it properly. This will probably involve making square cuts instead of joints to simplify assembly.
- Construct the hobbit door out of wood, ensuring it fits within the frame.
- Integrate locking mechanism, making sure movement is smooth.
- Align the mechanism with the compartment to ensure it locks and unlocks properly.
- Use a stud finder to locate the installation area between two wall studs.
- Cut out the drywall section where the frame will be placed.
- Secure the frame within the cutout, ensuring a snug and level fit.
- Cover any misaligned cuts and touch up with paint as needed.
- Stain or paint the wood for a polished look.
- Add decorative details to enhance the fantasy-inspired aesthetic.
- Apply finishing touches to the artwork including the little trees from some old fake plants
Photo Credit. Picture4, Locking mechanism inspiration. Timo Reinhardt. 2017. https://www.instructables.com/Wooden-Locking-Mechanism/
2 Comments. Leave new
Hi Isaiah, your hobbit door interactive piece look very cozy and engaging. It looks like you have a very well defined and established timeline. As for your alternative, the mechanical ski lift spice rack is fantastic. I would definitely get that one day for a cabin or a very large kitchen. Cheers.
For my main idea, I’m designing a hidden compartment behind a fantasy-inspired art piece. This piece will incorporate a dynamic locking mechanism—something that blends into the artwork while also serving as a functional element. This project should have a chameleon-like aesthetic—somewhere between minimalist, fantasy, and whimsical. I am shooting for a blend of simplicity, storytelling, and playfulness. I have always loved soft fantasy/sci-fi stories like Dune or Harry Potter or even more modern stories like The Last of Us, but my all time favorite story has always been The Lord of the Rings so I want to incorporate an art piece from the book/movies. I envisioned a hobbit door that opens to reveal a secret compartment when a certain part of the artwork is manipulated. I feel like I have landed on the idea of turning a knob or rotating a small window will trigger the mechanism, unlocking the hidden space.
The vision for my project is like most hidden compartments projects. I want people to admire the art or ignore it altogether without being able to realize the true nature of what lies beneath. Where the fantasy aesthetic comes in, is that people who know me well will know I love fantasy stories and small fun engineering projects, therefore, people who really know me will be able to anticipate the design almost like an investigator.
In terms of specifications, the frame of the piece will measure 12×8 inches, while the hidden compartment itself will be approximately 4x4x4 inches. My design goal is making the compartment easily concealed and subtle, much like fantasy artifacts like the Holy Grail or the One Ring. I aim to create a simple one-turn unlocking mechanism, with the potential to add a second movement if time allows. I will likely put this piece in the bathroom or basement area of my house and install in between two studs in a wall frame that way it does not come loose
Artistic vision and aesthetic
As previously stated, the centerpiece of the design will be a fantasy-inspired hobbit door. I am striving for a minimalist aesthetic alongside the fantasy elements. If time permits, I would also like to incorporate intricate details into the decorative framing style to enhance its overall aesthetic appeal.
Alternative Aesthetic
I loved my current idea; however, I explored different ideas and aesthetics, some that went in wildly different directions. One alternative idea I strongly considered was a ski lift-inspired spice rack in a mechanical aesthetic, which sounded kind of ridiculous to say out loud. I was particularly drawn to the use of bicycle drivetrain components—gears, bike chain links, metal rods, nuts, and bolts. The idea of a ski lift powered by a bike chain, smoothly transporting spice jars from one end to another, felt like a fascinating fusion of mechanical design and playful engineering. The element of motion in the mechanical design would have been the rotating of the spices along the “ski lift line” by a hand-turned gear. Another alternative was a mechanical aesthetic hidden compartment. In this version, the art piece would have been a bicycle, and rotating its drivetrain would have revealed a concealed space. This idea took inspiration from a piece of art in my house—a bicycle frame made of metal wiring. While both concepts intrigued me, they would have been significantly more time-consuming and ultimately I had to prioritize time over many other aspects of the project.
Plans for final
First, I have researched simple yet effective locking mechanisms. I do not want to make the locking feature overly complicated but maybe have two different movements that open the door while ensuring that the movement is smooth. Then, I will prototype different mechanisms to determine which best fits my vision. In terms of material selection, I plan to use a combination of wood for the box/frame components, acrylic for the locking mechanism, and 3D-printed filament for anything that’s too complex that I may want to add later.
Figures – (Top and Bottom). simple drawings of locking mechanisms. (Middle) Locking mechanism inspiration
Prototyping to date
So far I have been in the all consuming spring senior year slog and am planning to do most of my prototyping and fabrication during spring break. Luckily I just need wood and a few cuts on acrylic so I should be able to do most of what I need to do at home.
How you are going to make it
Overall, I do not think I will need too many skills that I do not currently possess. The biggest skill that I will need to rehash is cutting drywall effectively and fixing any drywall holes that I will inevitably leave behind.
Week of 17-21 March – This week I will be mainly prototyping a few locking mechanisms. I found a few quick online tutorials so I will start there. Most of them are simple latches that are activated by physically adding rotation which moves a retraining piece out of the way. I am still also considering some linear pull locking mechanisms or even something a little more advanced if I can find a tutorial or fun way to incorporate a story element. If this week work blends into the next, I am not too worried based on lack of spring break assignments.
Spring Break – This will be the biggest week for shopping manufacturing and assembly. I have the wood, screws, and tool at my house but may do mostly CAD design… My goal is to have the first prototype of the lock by Monday, the box, frame, and art piece done by sunday. I will not be too upset if it ends up getting pushed into the next week.
Week of 31 March – 4 April – This week will all depend on spring break tasks, however, I am hoping this week I have a relatively good looking art piece. At this point I can take a stud finder and drywall saw and cut out the section I need for my design. If everything goes well, It will relatively cover the misaligned cut and I can do a simple paint touch up to make sure everything blends together.
Last few weeks 7-18 April – These weeks will be left as buffer incase I need to make adjustments to my design. This week will likely be large due dates for other class projects, therefore I would love to set a completion day in between the two weeks, maybe around 10 April.
I will provide documentation at each step, whether it goes well or not, in order to add to the final project post and hit all the necessary pictures or videos.
Several challenges may arise during manufacturing, so contingency plans are necessary. If the locking mechanism does not mate correctly, I will have backup options such as alternative latches or magnets. Material misalignment is another possible issue, as wood and acrylic can sometimes warp or not fit precisely, so I will carefully test all pieces before final assembly to ensure a proper fit. Time constraints are also a concern, given that fabrication is planned for spring break, but this is why I have prioritized more simple designs to allow for shorter manufacturing times.
The only thing I am still really debating is whether to design and cut some of the main art components with acrylic or the one-eighth wood on the laser cutter and then paint it, or to make it in the wood shop. The detailed sections are likely going to be small and will require the band saws, which will require a little more time in the wood shop. If I design strictly with the laser cutter in mind, I will have to consider laying multiple pieces on top of each other in order to add the extruded nature of the door overhang. This would maybe be ideal for me as It allows me to prioritize work I can do at home rather than drive to school.
Manufacturing Steps.
Research simple locking mechanisms and identify one that best fits the project.
Build rough prototypes to test locking functionality.
Adjust dimensions and design based on test results.
Gather necessary materials, including wood, acrylic, screws, and tools.
Cut wood to size for the frame (12×8 inches) and hidden compartment (4x4x4 inches).
Cut acrylic pieces for the locking mechanism.
Sand and prepare materials for assembly.
Assemble the wooden frame and secure it properly. This will probably involve making square cuts instead of joints to simplify assembly.
Construct the hobbit door out of wood, ensuring it fits within the frame.
Integrate locking mechanism, making sure movement is smooth.
Align the mechanism with the compartment to ensure it locks and unlocks properly.
Use a stud finder to locate the installation area between two wall studs.
Cut out the drywall section where the frame will be placed.
Secure the frame within the cutout, ensuring a snug and level fit.
Cover any misaligned cuts and touch up with paint as needed.
Stain or paint the wood for a polished look.
Add decorative details to enhance the fantasy-inspired aesthetic.
Apply finishing touches to the artwork including the little trees from some old fake plants