
Introduction
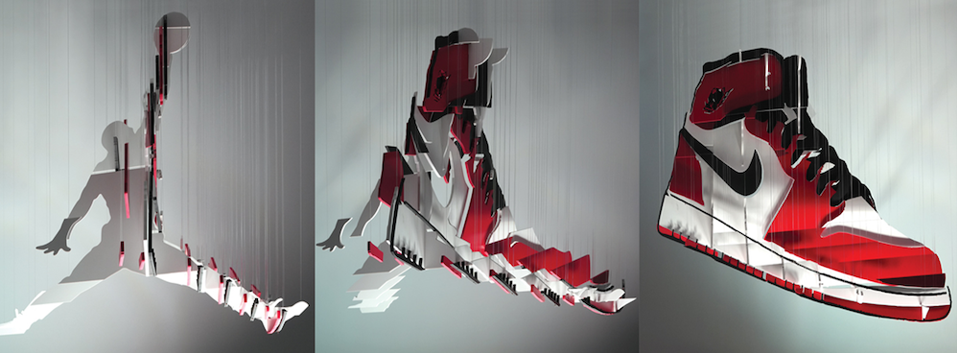
For my main project, I am developing a rotating 3D sculpture that presents two distinct images depending on the viewing angle. The concept plays with perception, allowing one form to transform into another as the sculpture rotates. This aligns with the project’s emphasis on aesthetics first, function second, where motion itself becomes part of the artistic expression. The key challenge is ensuring that the transformation is clear and smooth, maintaining visual appeal from all angles.
To achieve this, I plan to 3D print the sculpture with an intricate structure that allows for two different perspectives to emerge from different angles. The sculpture will be mounted on a slow-moving motor (around 1 RPM) to allow the transformation to happen gradually. A bearing system will ensure smooth rotation, preventing any jerky movements that could break the illusion.
This project is inspired by existing optical illusions, anamorphic sculptures, and dual-image art techniques. The main goal is to explore how perspective alters perception, and how we can design objects that tell two different stories depending on the angle from which they are viewed.


Concept Exploration and Design Choices
I have explored multiple ideas for the two-perspective transformation and am currently considering several options:
Potential Designs
-
Cube → Sphere
- A geometric transition where the object appears as a cube from one angle and a perfect sphere from another.
- Would require careful sculpting to ensure smoothness and an effective blend of sharp and rounded edges.
-
Lock → Key
- From one side, the sculpture looks like a padlock, while from the other, it reveals a key shape.
- This concept plays with symbolism, representing security and access.
-
Smiley Face → Sad Face
- A shift in facial expressions that conveys an emotional transformation.
- Would require subtle depth variations to maintain the illusion while avoiding an uncanny look.
-
Superhero Logo → Alter Ego
- Example: Spider-Man’s mask from one view and Venom’s face from another. Or Batman to Superman Logo.
- This idea plays on the duality of identity, a common theme in superhero narratives.
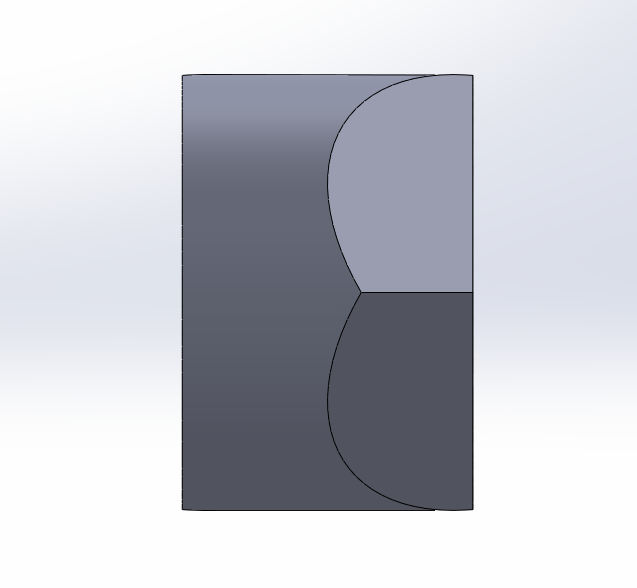
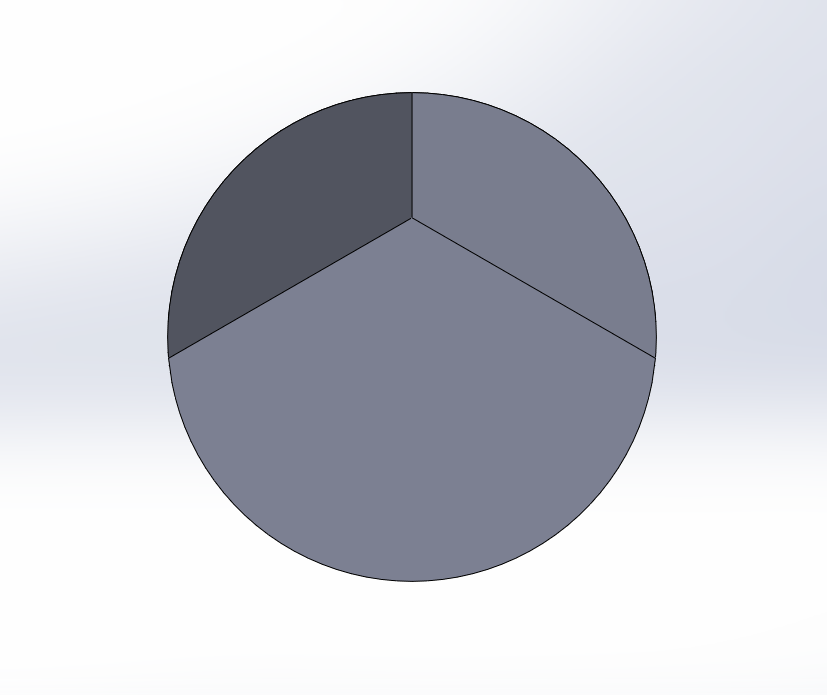
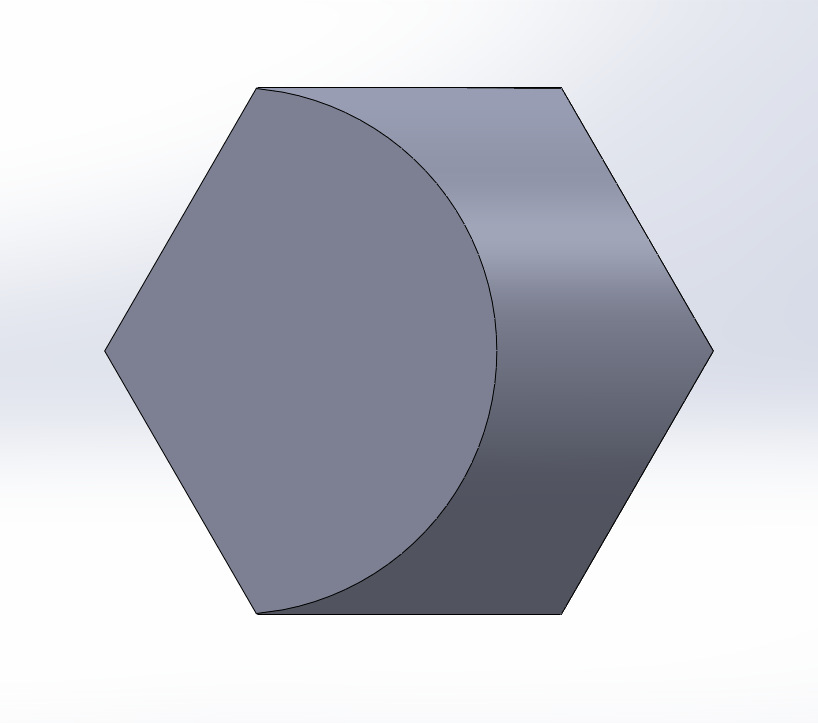
To test feasibility, I created a SolidWorks model that features three distinct shapes (rectangle, circle, hexagon) positioned 60 degrees apart. The idea was to determine how well different forms can emerge depending on the viewing angle. If this test model works effectively, it will provide insights for refining the final transformation sculpture.
Technical Design and Mechanism
The rotating sculpture will consist of the following key components:
-
Base
- Houses the motor and provides stability.
- Likely to be made from wood, acrylic, or 3D-printed plastic.
-
Motor (1 RPM)
- Ensures slow and steady movement to maintain the illusion.
- Likely a DC motor with a power adapter or battery supply.
-
3D-Printed Sculpture
- The main visual element featuring the dual-perspective transformation.
- Printed in PLA or PETG for strength and smooth finish.
-
Small Bearing
- Allows for smooth and precise rotation, reducing friction and stress on the motor.
Material Selection
The primary material for the sculpture will be PLA:
- High print quality
- Good durability
- Ease of post-processing (sanding, painting, etc.)
The base will likely be made from wood or acrylic for better stability.
Timeline and Progress Plan
| Date | Task | Details |
|---|---|---|
| March 15 – 20 | Finalize the design choice | Decide on the best transformation (e.g., superhero, lock-key, smiley-sad face) based on feasibility and aesthetics. |
| March 21 – 25 | Create detailed CAD model | Design a refined 3D model with optimized transitions between the two perspectives. |
| March 26 – 30 | Print small-scale test | 3D-print a scaled-down version to verify visibility of transformations and check print quality. |
| April 1 – 5 | Fabricate final sculpture | Print the full-scale version using high-quality settings, ensuring smooth surfaces and clear transitions. |
| April 6 – 10 | Assemble motor mechanism | Attach the sculpture to the motor using bearings, ensuring stable and precise rotation. |
| April 11 – 14 | Test movement and refine | Run motor tests to verify rotation speed and effect clarity; adjust if needed. |
| April 15 – 17 | Finishing touches | Apply post-processing techniques (sanding, painting, or coating) to enhance appearance. |
| April 18 – 20 | Document final results | Capture high-quality images and videos for the final presentation. |
| April 21 – 22 | Prepare final report & presentation | Compile all progress, design iterations, and results into a well-documented final submission. |
This plan ensures sufficient time for testing, refining, and documenting the final artifact.
Fabrication Process
-
Finalizing the 3D Design
- Using SolidWorks, I will create an intricate dual-perspective model.
- Optimize the geometry to ensure clarity of both images from their respective angles.
-
Printing a Small-Scale Prototype
- A scaled-down version will be printed to check transition effectiveness and structural integrity.
- Adjustments will be made to enhance clarity and printability.
-
Printing the Full-Scale Model
- Using high-resolution settings for smooth surfaces.
- If necessary, print in multiple parts and assemble for better quality.
-
Building the Base and Motor Setup
- The 1 RPM motor will be installed in the base.
- A bearing system will ensure smooth rotation.
-
Final Testing and Refinements
- Adjust motor speed if needed.
- Sand and paint the sculpture for an improved finish.
Challenges and Considerations
-
Ensuring a Clear Transition Between Images
- The design must be carefully optimized so that one shape fades seamlessly into the other without unwanted distortions.
-
Balancing Detail and Printability
- Some complex transitions may lose clarity due to layer resolution in 3D printing.
- May need post-processing techniques like sanding and painting.
-
Motor Speed and Stability
- 1 RPM is a good starting point, but testing may reveal the need for a speed controller.
Conclusion and Next Steps
With the SolidWorks feasibility test complete, my next step is to finalize the transformation choice and refine the 3D model. Once the design is locked in, I will proceed with small-scale prototyping before fabricating the final sculpture. This project is an exciting blend of art, movement, and perception, pushing the boundaries of how we interpret physical objects based on perspective. I am eager to see how the final sculpture turns out and to explore how different angles can completely change the way we perceive form and space.
References:
(1)https://www.saatchiart.com/art/Sculpture-Dual-Perspectives-Gray/804891/6465345/view
(2)https://www.cgtrader.com/3d-models/architectural/decoration/dual-perspective-sculpture-illusion
(3)https://cargocollective.com/matthieu-robert-ortis/Ombre-portee
(4)https://www.thisiscolossal.com/2014/10/anamorphic-glass-sculpture-thomas-medicus/
(5)https://www.thisiscolossal.com/2022/10/tom-lawton-wonder-sculpture/
(6)https://www.forbes.com/sites/nargessbanks/2023/09/21/michael-murphy-perceptual-experience/
(7)https://chatgpt.com/
4 Comments. Leave new
Great project, I really like the key and lock idea it would be cool if within the transition you could animate the key going into the lock somehow. Good luck!
Thank you! I really liked the symbolism of the key and lock too. Animating the key entering the lock would definitely enhance the narrative — but for now the sculpture itself does not move, might be something I explore in a future version with more mechanical components. Appreciate the suggestion!
I think this is a great project. Will you try to color the different sides different colors or will it all be the same color?
Thanks! I’m keeping the sculpture monochrome on purpose—part of the illusion is that it looks like a single, unified shape until that final 90° rotation reveals the second identity. Using color might give it away too soon, and I wanted the surprise to come purely from the shift in perspective.