
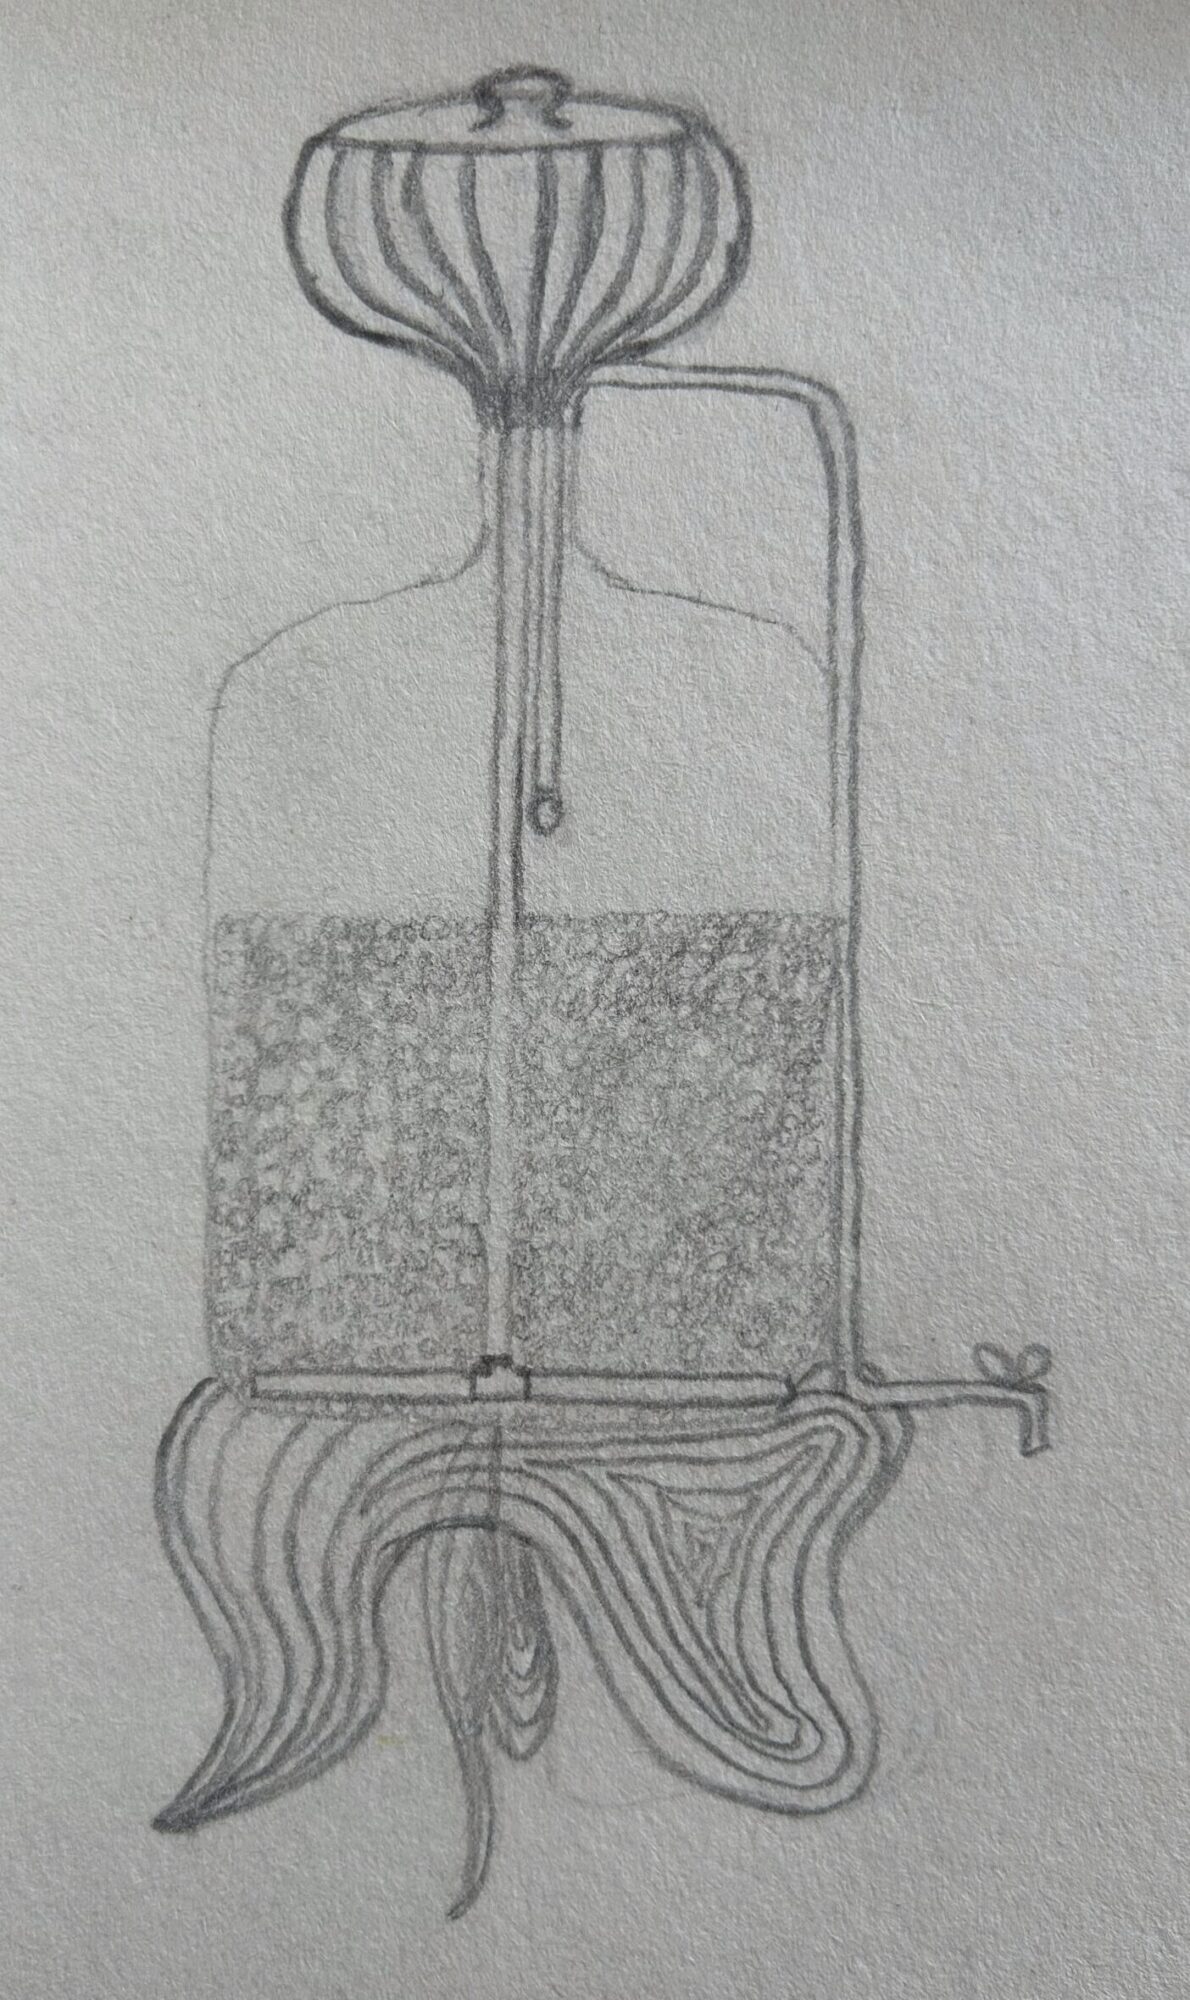
After doing the ‘Alternatives’ exercise last week I decided that I really liked how my water filter project might look with an Art Nouveau Aesthetic. I modified the plans slightly to make it more practical, with straight tubing and a smaller base.
The materials I plan on using are as follows:
- Laser cut craft wood for base, I may prototype using acrylic (~$30)
- Stainless steel piping (~$100)
- Doesn’t leach metals into water
- Threaded, making it much easier to connect then copper
- Relatively expensive. Luckily I don’t need that much!
- 5 gallon glass jug (~$50)
- 3D Printing Material for funnel (~$15)
- 1/2 Cubic Foot Activated Carbon (~$80)
One of the reasons I decided to go with this design is that after taking the laser cut course and seeing how incredibly precise the machine was, and how good it is at making smooth curves, I thought it would be a really good tool for making whiplash curves and many concentric lines. I may end up doing two mirrored layers of wood (so you can see the design from both sides) for the base and glue them together for added structural integrity. I plan to use a light wood so the lark laser cuts stand out. Ideally I would sand the edges and finish the wood, but this isn’t necessary for it to be functional, as the base shouldn’t come in contact with any water.
For the piping component, the easiest option would definitely be to use PVC (plastic) pipe, as it is cheap and quite easy to connect. However, PVC is quite ugly and one of my roommates is concerned about microplastics, and so I will rule out this option. I considered using copper piping but the connections are expensive and involve cutting the pipes and soldering which is above my paygrade. I found threaded stainless steel pipes of various lengths, and the necessary connections on McMaster-Carr, which is a great option as it is aesthetically pleasing, and I will get high quality, waterproof, parts at specifically chosen lengths with little effort on my part. I especially like the on/off valve that I have chosen even though it is overkill for this project (it can handle lots of heat and pressure), because it has curves, looks kind of retro, and I think it will look good against the curves of the base.

I don’t want to drill through glass or attempt to make a rigid & watertight glass-to-pipe seal, which is why I will get extra piping so I can run this system using a siphon. The on-off valve, tubing, 90-joints, t-joint, and a pipe can be seen in the photo above, there is other tubing not pictured as well, and an inlet suction strainer. I was thinking of doing a 3 gallon glass jug but my roommate convinced me that because ~5 people will be using this and each person should be drinking a gallon a day, a 5 gallon glass jug would be a better option, so that’s what I’m planning on getting.

I will need a funnel for pouring the water into the top of the filter, I am hoping to be able to 3D print this part but if that’s not necessary I will design it so it can also be used with a normal funnel. I plan to make the funnel in the Art Nouveau ‘Garlic’ style (as seen in my sketch at the top of this post). This part will need to be waterproof and food safe, based on my research it seems like the best way to do this is by coating the 3D printed part with a food safe epoxy, and making sure that the epoxy fully cures before I use it.
I will buy the activated carbon in bulk. Based on my research it can be very dusty when you’re working with it, so I plan to have a water sprayer nearby so I can mist the activated carbon, keeping it moist and not dusty.
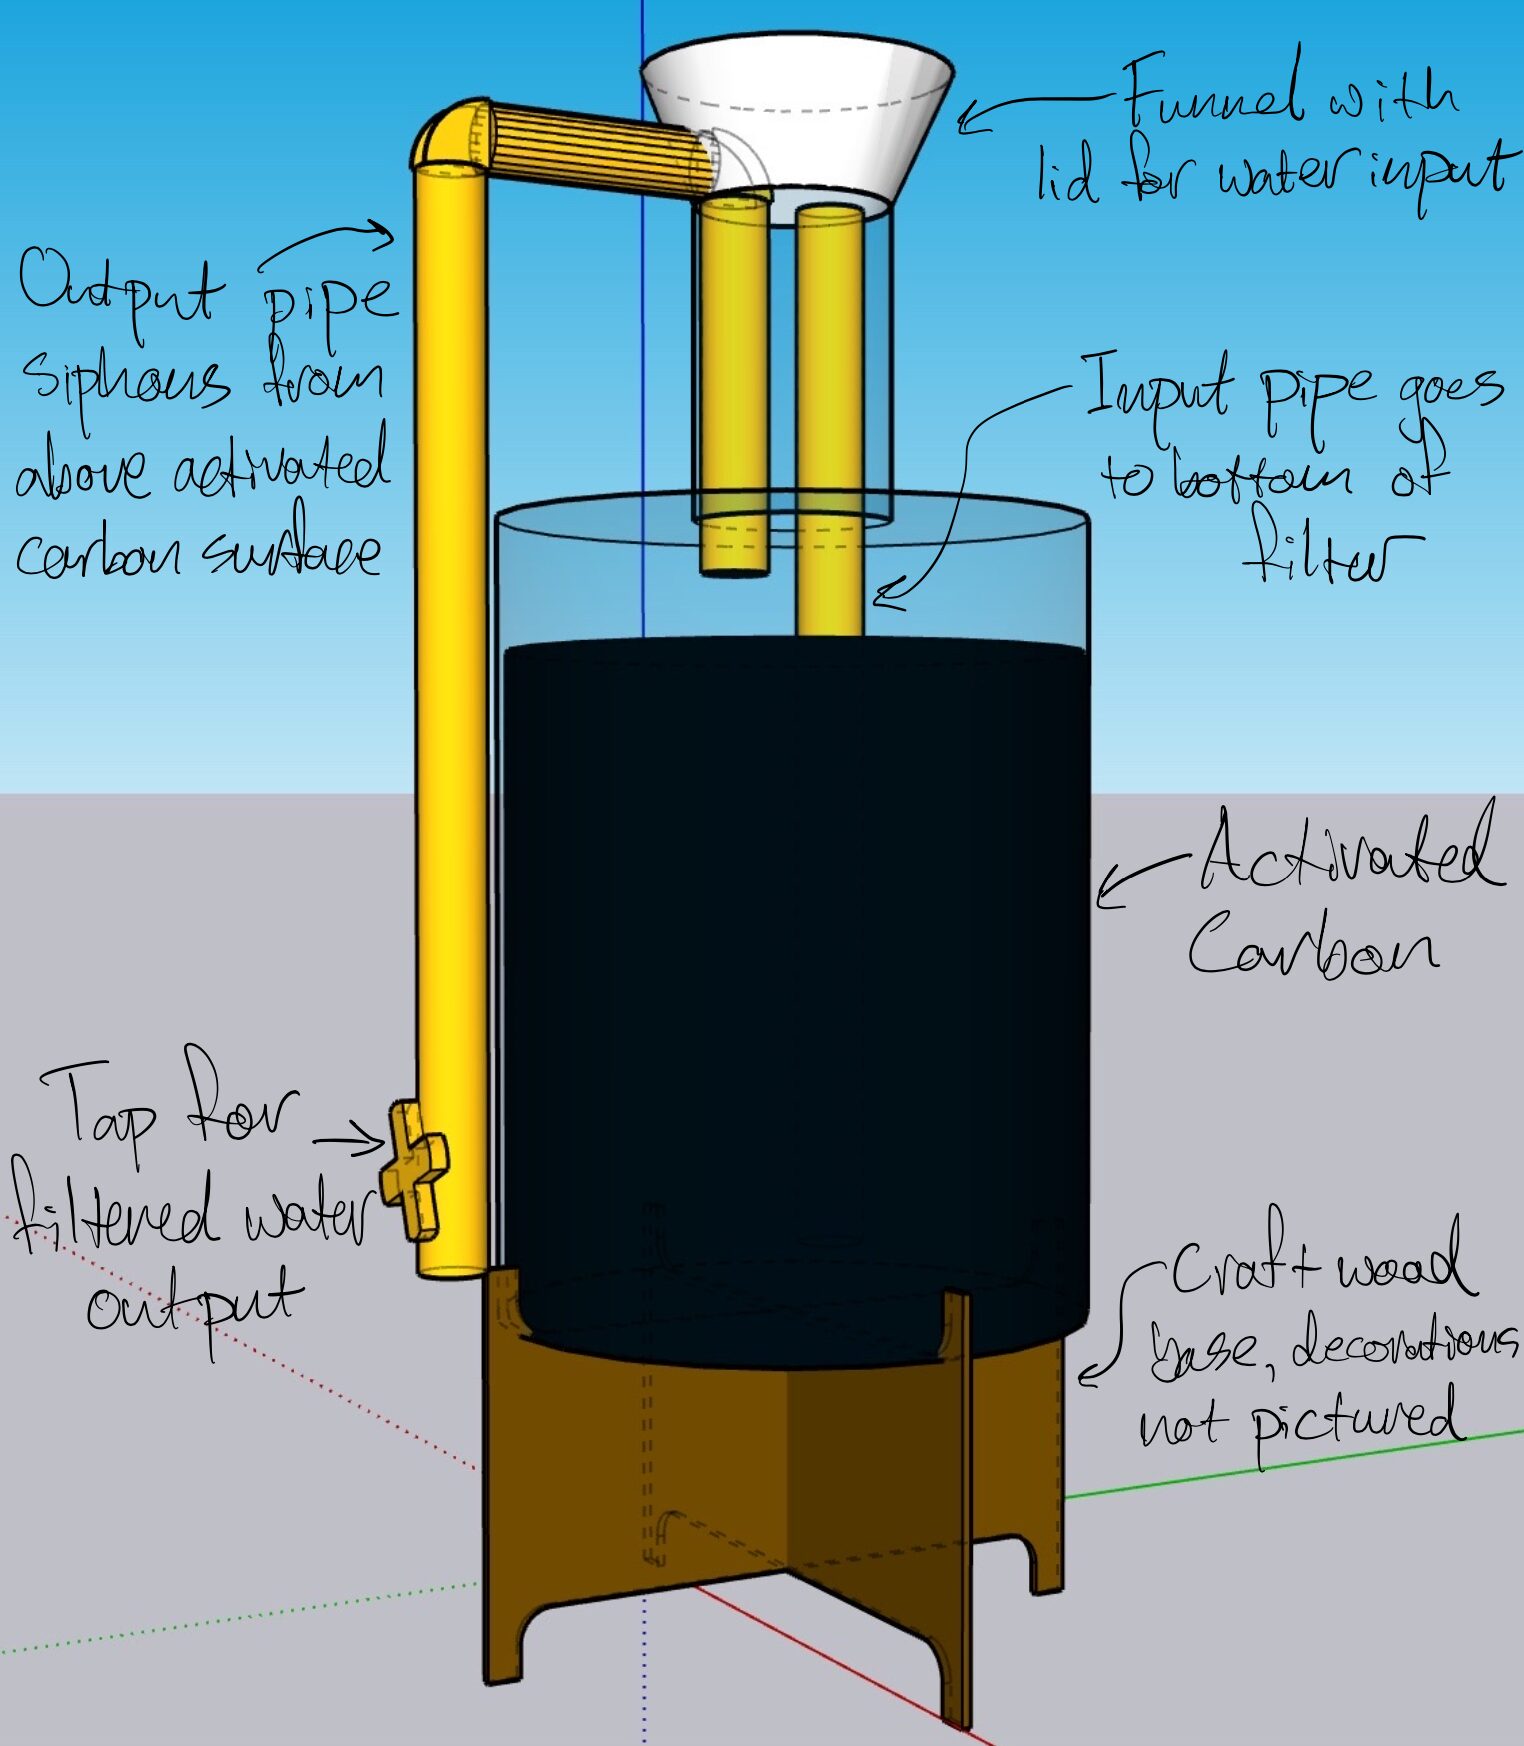
My most recent, labelled, CAD model of my filter can be seen below. The water enters through the top, moves straight down to the bottom of the filter, and then is siphoned from above the surface of the activated carbon.
My timeline is as follows:
- 3/16: Finalize jug size and activated carbon amount. Order glass jug, activated carbon, and go to McGuckins/Home Depot to learn about copper pipe options.
- 3/23: Start creating a laser cutting model for the base. I will first make a first-draft square base to get the proof of concept. I want to ziptie the nozzle to the base, and so on my first-draft I will make a long hole capable of sliding the zip tie to find the right nozzle-height, I will then use that dimension in my final Art Nouveau base design.
- 4/6: Start creating a CAD model for the funnel and piece that holds the pipes in place.
- 4/13: Begin printing and refining 3D printed parts, and laser cut parts.
- 4/20: Assembly and fine tuning up until final presentation.
Sources:
https://www.discountwatersofteners.com/resin-and-media/1-2-cubic-foot-activated-carbon/?srsltid=AfmBOooK5w8mRB5G5LYes45S2NgyPW04eOkXnQXS5xtKh7rLFHnRYM4b
2 Comments. Leave new
Hi Jules, this project is great! I think you have a very interesting concept with the water filtration system, and it is awesome you are tailoring this to your personal aesthetic. This project seems like it has some very technical components, but you have obviously put a lot of thought into it. Have you looked into the specific pipe sizing you might need for your desired flow rate? I cannot wait to see the progress of this project!
I love this project, I think organizing your work into a detailed timeline is a good idea. This will allow you to complete all the necessary steps in a timely manner. I look forward to seeing the final design for this project.