
As a happy hobbyist in the RC airplane area, I enjoy messing around and building different RC aircraft. I’ve dabbled in creating a drone to building an entire RC airplane from foamboard. The only problem comes to the flying part. I am terrible at piloting. Every aircraft I have is either broken or has major battle scars from my flying skills. That is why I am pursuing an RC car for this project.
Specifically, I want to focus on making an RC drift car. Making a drift car come from two main reasons. For one, I’ll have more access to indoor areas to drive, especially with the crazy weather in Colorado. Secondly, I have a big interest in sports cars, and an RC drift car would allow me to build one of my favorite sports cars.
Having this idea of what I want to accomplish gave me a few things to determine for this project. I would have to figure out what chassis I would be using to have a functional RC car. Another thing is the car model I wanted to use, which could involve recreating any car in CAD or using an existing one off the internet. Finally, the important aspect for the project was the aesthetic.
Focusing on the aesthetic, I originally had thoughts about going with the race car aesthetic with modern elements. This would involve making the car look functionally fast with aerodynamic body elements and a lot of different shapes that would give the resemblance of sponsored logos. However, something else caught my eye that I couldn’t help but pursue.
A youtuber by the name B is for Build is a fabricator of custom high end vehicles. One of their vehicles really stood out to me in the sense of the aesthetic. They took a neglected and non-running Lamborghini Murcielago and created a cyberpunk inspired version of it. The gunmetal gray is in line with what is expected with cyberpunk base colors. Additionally, the added body kit enhances the sharp geometries frequently showcased in the cyberpunk aesthetic. The aspect that really inspired me was the lighting elements. They are using a lighting technique called edge-lit. To achieve this affect, laser engraved pieces of clear material (such as acrylic) are lit up causing only the edge and engraved sections to illuminate. Seeing the edge-lit lighting and the hints of cyberpunk in this project car led me to decide to branch out and try this light version of the cyberpunk aesthetic.
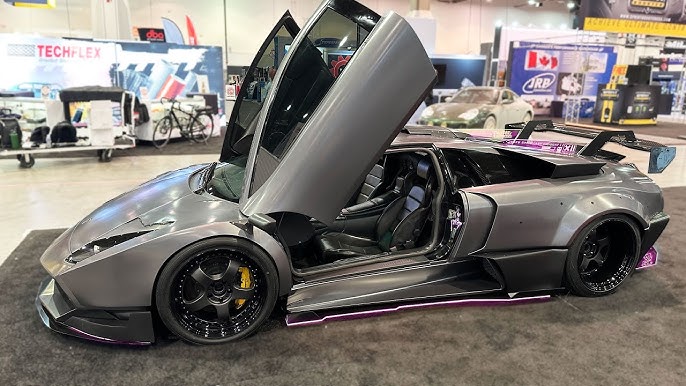
B is for Build’s Cyberpunk Lamborghini Murcielago
Once I knew the general aesthetic I wanted to go with, I also wanted to decide on some visual elements such as the color scheme. A piece of media instantly came to mind that would fit perfectly. In Spiderman Across the Spiderverse, Spiderman 2099 has a very futuristic and cyberpunk inspired aesthetic. Specifically, the portals from his technology opening across the multiverse is exactly what I imagine with my RC car’s color scheme. The magentas, yellows, oranges, and purples are perfect for a cyberpunk lighting scheme. Additionally, a dark background really emphasizes the portal colors. Now, picture the RC car in a dark color, with the lighting effects in the same magenta, yellow, orange, and purple. That is exactly what I want to achieve.

Spiderman Across the Spiderverse (2023) Movie Poster
Having the light cyberpunk aesthetic mostly figured out, I also determined the specifics on bringing this aesthetic to life in an RC car. Initially, I had thoughts about possibly designing an entire chassis from scratch. However, this poses a large challenge that not even my skills from the CU Racing team would help make this in a timely manner. Vehicle dynamic research and countless hours of analysis would be required to even start this process. This led me in the path of searching for a well-documented and easily-manufacturable chassis. I knew I wanted a 1/10 scale car since it would allow me to integrate the aesthetic much more easily. Having these requirements in mind, I came across a chassis from DukeDoks.
The DKS-Basic chassis is an almost fully 3D printable chassis compatible with 1/10 scale car bodies. Having it mostly 3D printable allows me to completely manufacture it myself with my personal 3D printer. Additionally, there is a community around this chassis that have integrated various car models to this chassis. Not worrying about designing a functional chassis has allowed me to focus more on the design of the aesthetic.
DukeDok’s DKS-Basic 1/10 scale RC Chassis, mostly 3D printable
The next step necessary for bringing the light cyberpunk aesthetic to life is the exact car model I want to modify. I initially wanted to modify a Chevrolet Camaro to fit onto the chassis. However, this brought two issues. One, the existing models were not great and accurate to modify. Second, any model I imported into SolidWorks to modify would crash my computer due to the extreme amounts of polygons. SolidWorks also did not want to make the mesh model into a modifiable solid or surface model. Thus, I decided to look into the community of car models already adapted to this chassis. That is when I came upon one of my favorite supercars, the Mercedes-Benz AMG GT Coupe.
The specific model I am using and modifying is from Cormango on Makerworld, who made the body also fully 3D printable. I chose this car since the brand is known for minimalist, modern, and luxurious aesthetics. I wanted to try something new, and what better than a car model that has nothing to do with the aesthetic I chose.
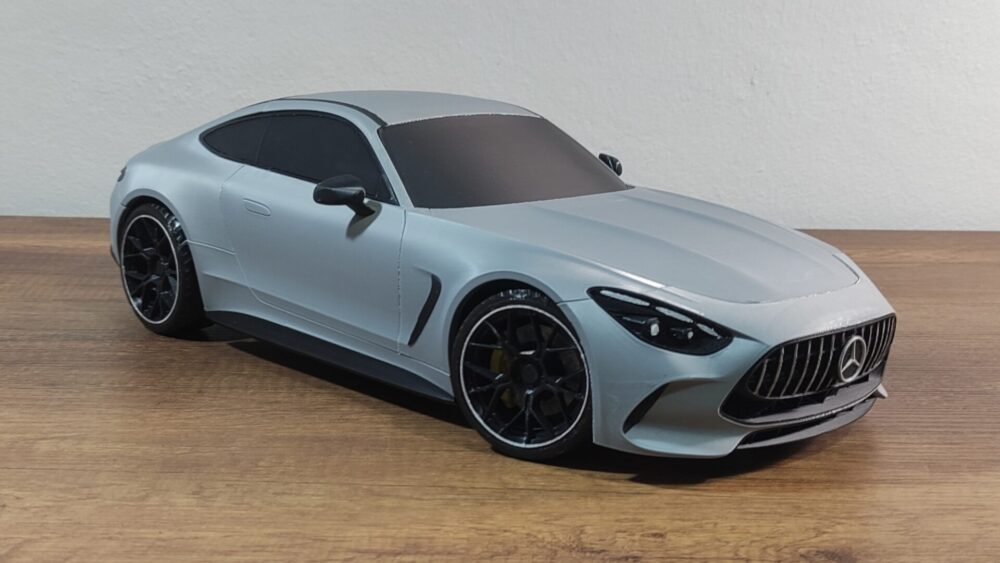
Cormango’s AMG GT 63 Coupe 1/10 Model/RC Car
With all the aspects narrowed down, I have my full vision for this project. It will be a 1/10 scale RC car based on DukeDok’s RC Chassis. The body of the car will be based on Cormango’s AMG GT model, printed in Polymaker’s Panchroma Silk Dark Blue PLA to contrast the magenta and yellow lighting scheme and accents. The body will have stylistic additions to better match the sharper geometries shown in cyberpunk. I want the aesthetic to still match the elevated impression that AMG has with their cars. To achieve the lighting, I am using clear acrylic pieces that will be laser engraved and then illuminated by Adafruit’s Neopixel RGB LED, controlled by a small Arduino. For the powertrain of the chassis, I am using an electric motor kit from Hobbywing. I also plan on adding functional headlights and taillights to the car body.
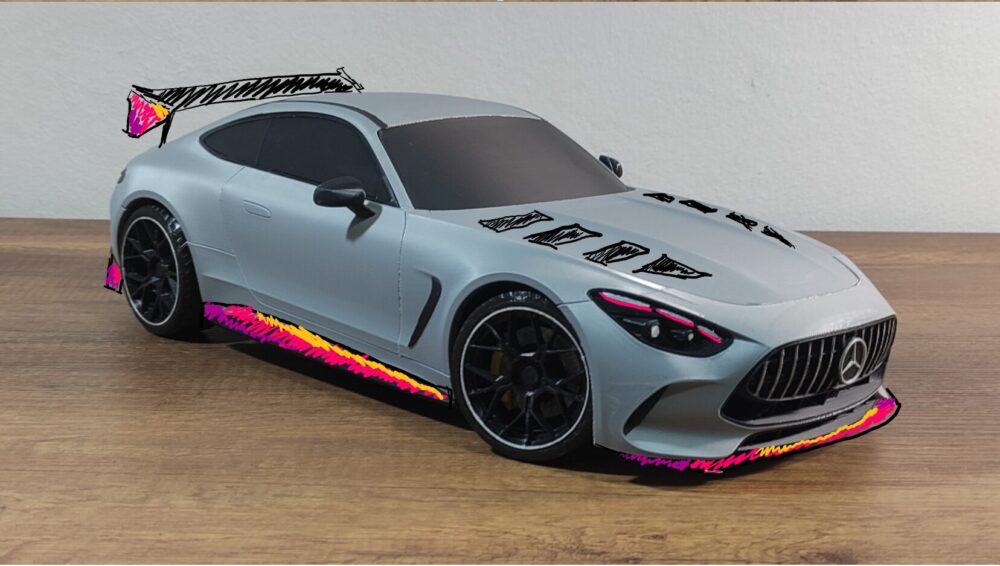
Sketch over Cormango’s picture showcasing initial concept for this RC car.
I also explored a few different aesthetics, such as a Post-apocalyptic aesthetic and minimalist aesthetic. The Post-apocalyptic version features rugged armoring, but I also decided to envision it as a freshly modified car for the apocalypse. For the minimalist version, I took more of the approach that car manufacturers are using for their electric cars by removing most of the stylistic design elements such as grills and keeping everything more clean and aerodynamic. While these are both great options to explore, the cyberpunk aesthetic gave me a grander vision.
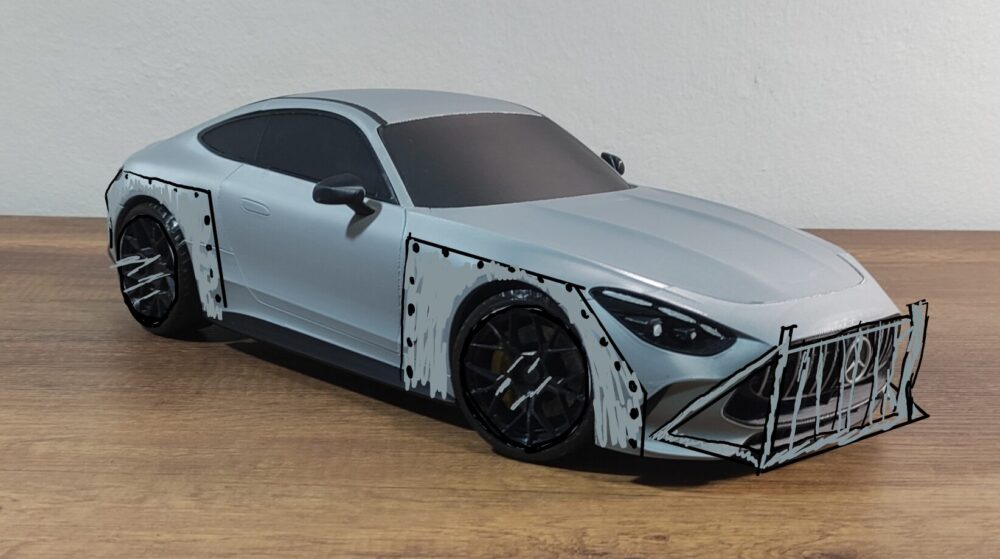
Sketch over Cormango’s picture showcasing the Post-apocalyptic aesthetic
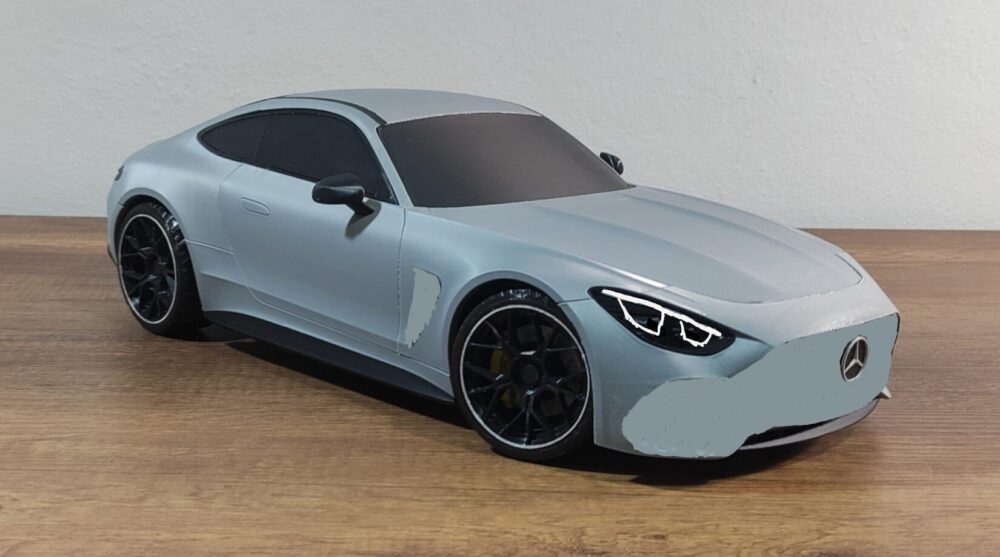
Sketch over Cormango’s picture showcasing the minimalist aesthetic
Breaking down the necessary tasks to finish this project on time, I created the following timeline graphic.
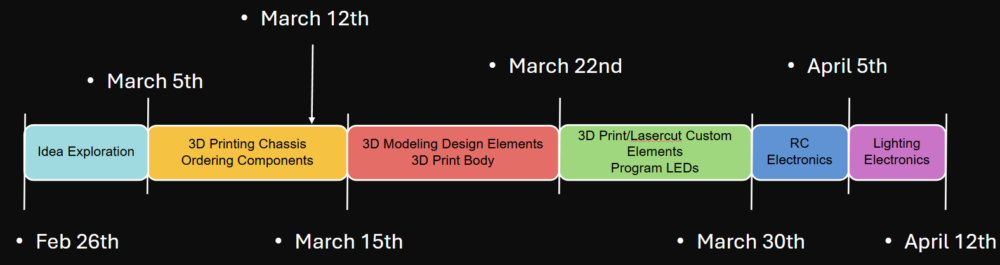
Scheduled Timeline for completing RC Cyberpunk Car Project
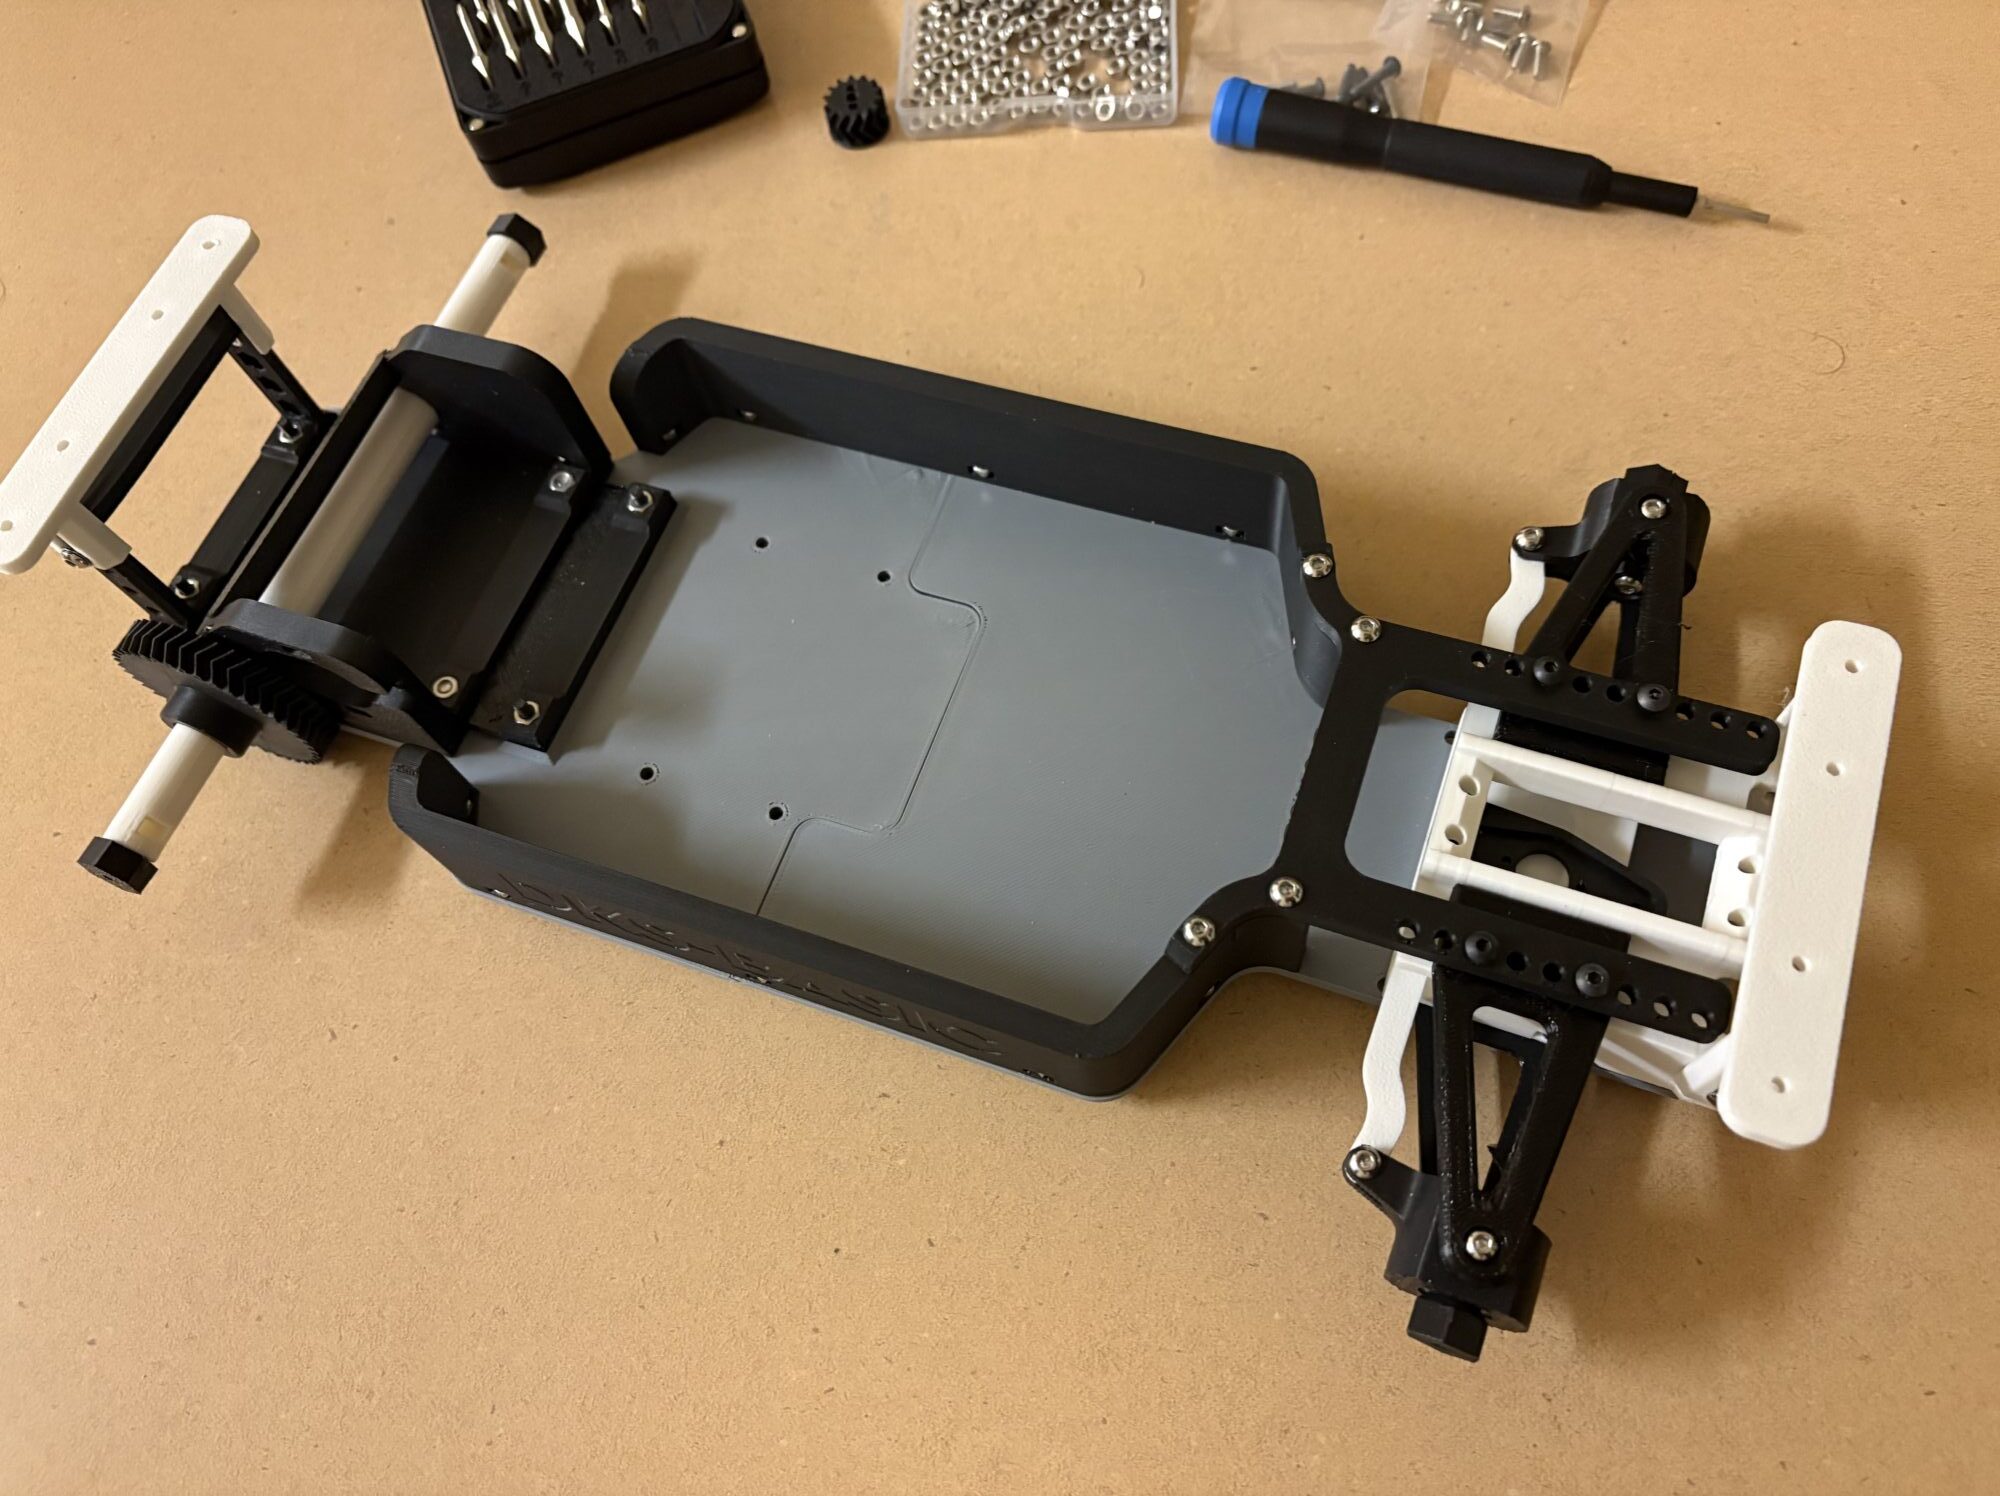
Idea exploration has already been completed, and is detailed earlier in the post. I am currently in the process of 3D printing all the chassis components and ordering everything I need to finish the project. For printing the chassis, I have been using Polymaker’s Polyterra PLA in a variety of colors, along with Amazon Basic’s TPU filament on a BambuLab A1 mini with a 0.4mm nozzle, 0.2mm layer height, and 15% infill. M3 fasteners hold most of the chassis together, and a few ball bearings allow the axles to rotate freely. Printing of the remaining chassis components will be done in the next few days. All that is left to order is the RC motor kit.
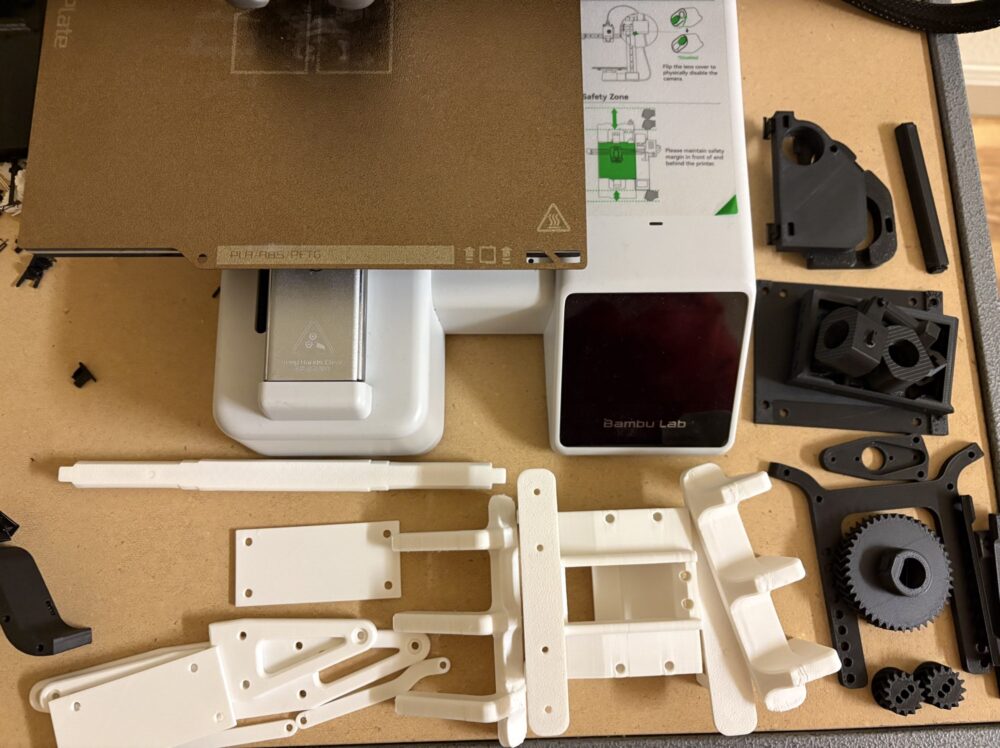
Chassis components piling up as they get printed
For the red phase of the timeline, it gets a little more complicated. I have the AMG body as stl files, which saves the model as multiple polygons. This is great for 3D printing, but terrible for SolidWorks. Because I cannot open more than one body part at a time, I decided on a different approach to modifying the body. I will print the body fully, and using the dimensions I have in hand, I will design around it. This way I can keep moving forward with design without the risk of losing all progress due to SolidWorks crashing. The main idea is to make a body kit for the car, which can easily be attached to the main body. This process is done to full sized cars whenever someone wants to modify it’s form.
Once I have the modifications finalized, I plan to print them while simultaneously working on making the lighting electronics function. This will be a simple program for the Arduino and basic wiring for all the LEDs. I want to make sure the lighting will work before working on the RC electronics, since the RC electronics are plug and play while the lighting is custom. Once both electronic systems work separately, I will further integrate them together and hopefully everything still works.

Current progress of chassis, only needing wheels and body mounting hardware
References:
- Cyberpunk Lamboghini Murcielago, B is for Build, https://www.youtube.com/watch?v=SosVXUy-i68
- Movie Poster, Spiderman Across the Spiderverse (2023), IMDB, https://www.imdb.com/title/tt9362722/
- DKS-Basic Chassis, DukeDoks, https://dukedoks.com/portfolio/guia-chasis-rc/
- AMG GT 63 Coupe 1/10, Cormango, makerworld, https://makerworld.com/en/models/877085-amg-gt-63-coupe-1-10-scale-rc-car-display-model?from=search#profileId-845122
4 Comments. Leave new
This is an extremely interesting project and it is making me consider making my own version for fun. I like that you found a chassis that is 3-D printable and I’m glad you went into depth explaining that. When it comes to the electrical side of things, what power source do you plan to use for this? Are they going to be separate, or are you hoping to combine them and run off the motor power? Overall great plan I’m eager to see the final product.
For power, the motor and its control will run off a Lipo battery I already have. Since these batteries can be dangerous, I got a power bank to power the LED’s. It makes everything a little simpler, and it makes it possible to change out the body for another car model if I choose in the future.
This is such a cool project! I am excited to see edge-lit lighting in RC scale! What kind of LEDs do you plan to use?
Thank you. I am planning on using Adafruit’s Neopixel RGB LEDs since they are easily programmable in Arduino IDE. They also are bright enough for the application.