
In my previous blog post, I stated that for my project, have decided to make an educational diorama of the moon’s phases. This diorama will include small artificial plants and planets/stars to enhance the aesthetic.
To make this educational, I plan to create a moon out of plastic or paper and place a stepper motor with an attached light. The light will be shielded on one side to replicate the reflection of the sun’s light on its surface. The stepper motor will rotate at a defined rate of degrees per day, allowing it to match the moon’s phase patterns and replicate them on my diorama. While sketching initial ideas for my project, I came up with two different designs. The first design fit the Lunarpunk aesthetic, and the second one fit the Solarpunk aesthetic. Both sketches are pictured below.
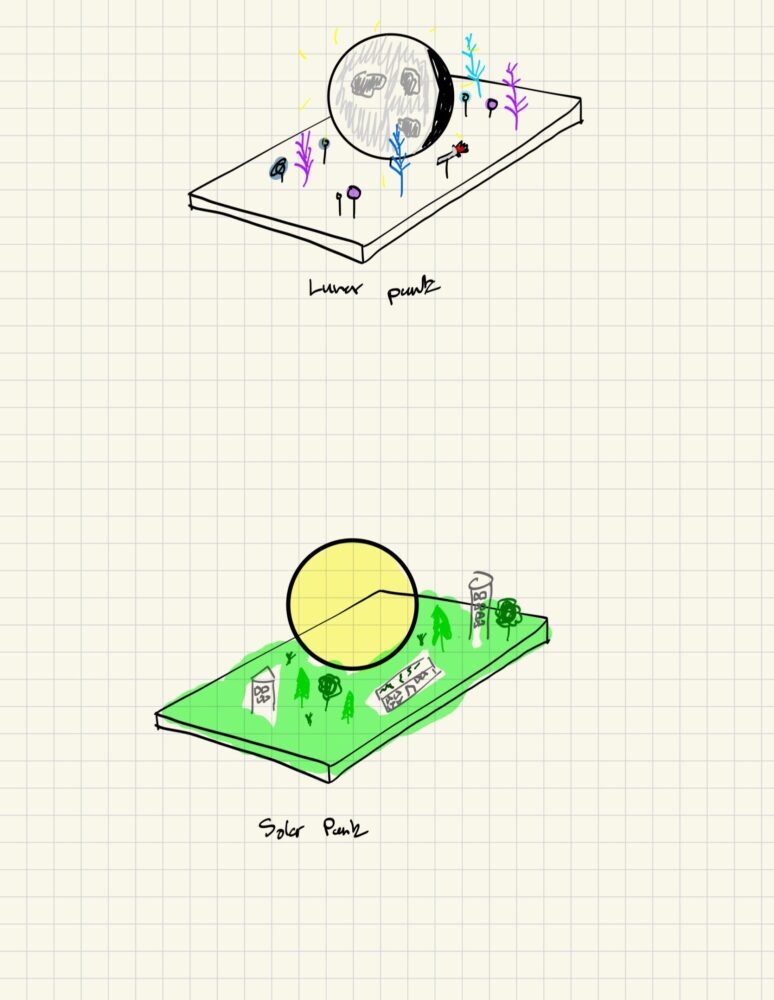
While I was sketching, I noticed that it was a lot easier to come up with ideas for the Lunarpunk-themed one. I was also considering adding small trees that light up or glow in the dark to help fulfill the naturalism part of this aesthetic. When sketching the Solarpunk version of this aesthetic, I noticed that I didn’t really have a lot of ideas on how to decorate the model and make it match the aesthetic. I included the sun in the middle, but I don’t know how I would make this dynamic or educational. I also wasn’t sure what to add in terms of decorations to the diorama. I tried adding futuristic-looking buildings and trees, but overall I feel as though this design falls short compared to the Lunarpunk version.
For my design, I have decided on the Lunarpunk aesthetic. I feel as though it would be easier to replicate into my artifact, I have lots of ideas on how to tailer my design towards this aesthetic. I also believe this would give me a great opportunity simulate the Moon phases with my project. The Moon is a very important part of the Lunarpunk aesthetic. The Lunarpunk aesthetic is also relatively new and undefined, so this could be a great opportunity to add my own mark on it.
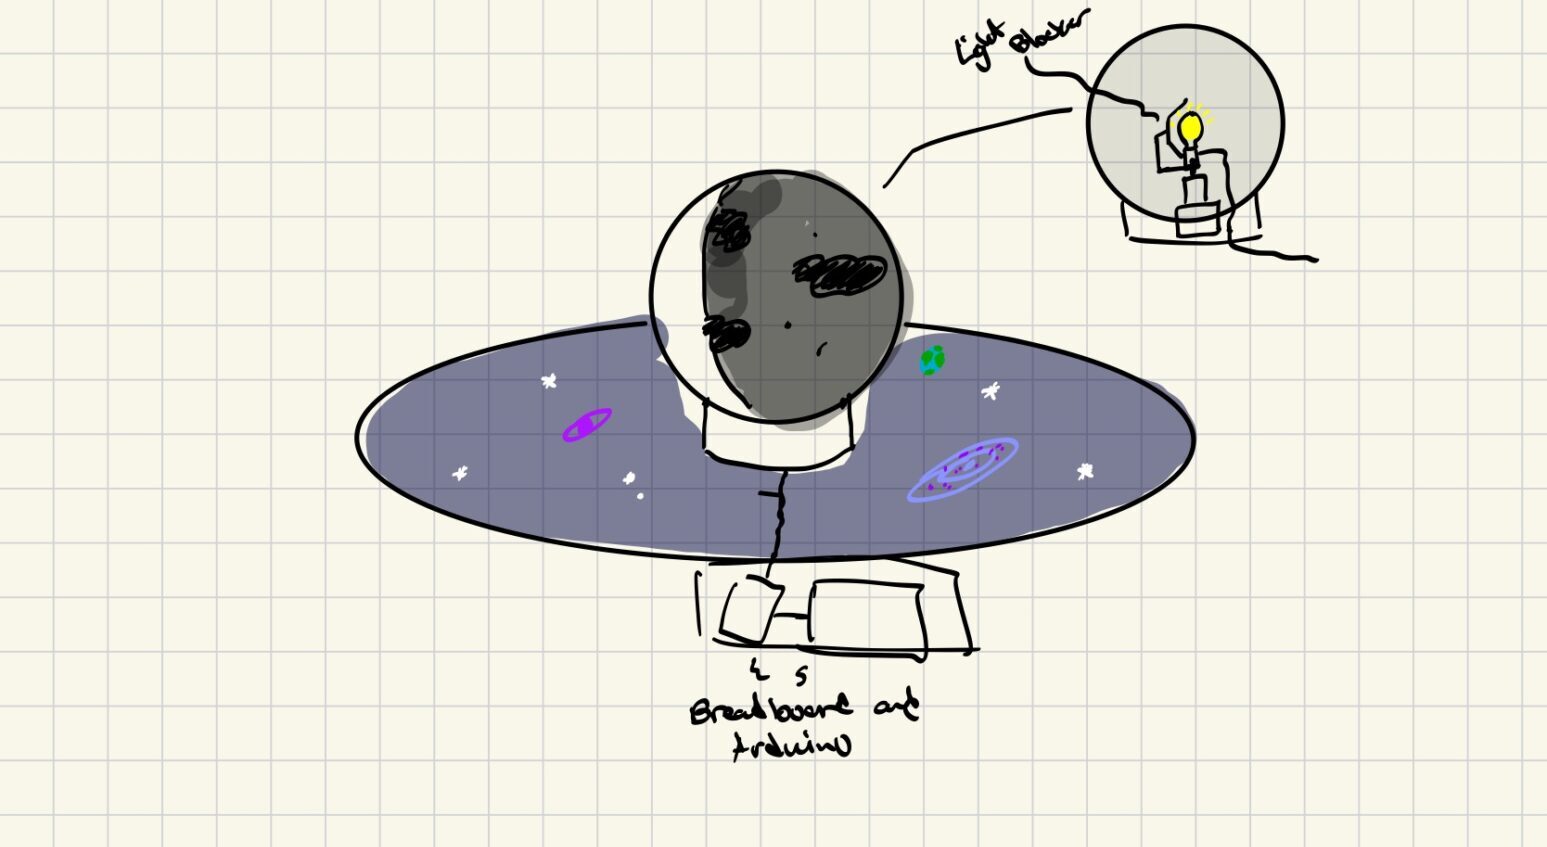
Overall Design:
The design will include three main pieces. The board, a creatively decorated wooden plate where the moon will sit, the Moon itself (will match the same patterns as the actual Moon), and the electronics kit. I may also create an electronics case so they can neatly sit next to the project, instead of just hanging out in the open. I have included a sketch of my design below:
 Board Design:
The board is going to play a very important role in helping create the Lunarpunk aesthetic of this project. I have found several options on Home Depot’s website that I can use for this board. They have flat wooden boards ranging from 16-24″. My plan for this board is to paint it purple, and draw several different star constellations, planets, and galaxies in the background for decorations. In the comments of one of my posts, someone recommended using glow in the dark paint to help my project fit the Lunarpunk aesthetic. I think this is a really interesting idea, and I am currently researching options for this.
I have also been brainstorming ideas on how to connect the moon to the wooden plate. The plastic globe I ordered has an opening at the bottom of it that extends outward slightly, my first idea was to cut through the wood and insert the exit of the globe into this cut out section, but I figured it may save me some fabrication time if I instead glued the exit to the top of the wooden plate. I may also 3D print an extension to put underneath the exit to elevate the moon, allowing more room for the motor. With this idea, I can also design an outlet for any wires going to the motor and lightbulb instead of cutting one out of the acrylic globe’s exit.
Moon Design:
As mentioned earlier, the Moon will be made out of an acrylic globe that I have already ordered. This globe has a 6″ diameter, and an outlet at the bottom. The Moon will most likely be the most complicated part of this project, as there are a lot of components that I will have to design. The first being the blight blocker, which will allow the moon phases to actually be seen. I have to ensure this component actually blocks the light in a way that allows the replicated Moon phase patterns to appear on the surface of the sphere. I have not yet started to consider how I will test this, but I do plan on making multiple prototypes until I get it right. I also need to put careful consideration into the light bulb fixture itself. The light blocker will be rotating inside of the sphere, and the wires from the bulb fixture can’t get in the way.
As for the artistic design of this moon. I was considering either painting it, or printing out the Moon’s patterns and gluing them to the sphere. Both of these options have their own pros and cons. Painting the moon will allow for a higher quality texture, but printing out the patterns would allow me to achieve a higher accuracy of the Moon’s actual surface patterns. I have included an image of the purchased acrylic globe below.

Electronics Integration:
Lastly, I will have to determine how I am going integrate all of the electronics, and run the stepper motor. I plan on just plugging the light bulb into a regular wall outlet, but I will have to get creative with how I am going to power the stepper motor. I have done some preliminary research, and I’ve found a circuit diagram that may work.
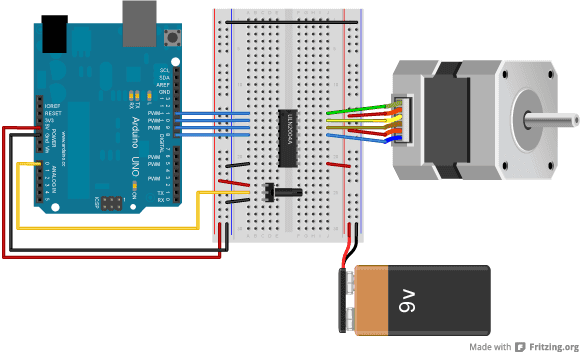
The image above is a lot to look at, but the required components can be broken down into the following:
- Arduino Board
- stepper motor
- SN754410ne H-Bridge
- power supply
- hook-up wires
- breadboard
I have reached out the the ITLL here at CU, to see if they have any of these components either for purchase. I am assuming they will not have the motor driver SN754410ne H-Bridge that I need, but as many components that I can avoid buying online, the better. Arduino’s website also has sample code for driving a stepper motor using an Arduino Uno, so the most complicated part of this project will most likely be making the circuit.
Moon Phase Calculations
The moon takes about 29.5 days to go through a complete cycle of phases. I will need my motor to rotate once (360 degrees) every 29.5 days. The image below from NASA.com illustrates the Moon’s different phases throughout this cycle, starting as a new Moon, and moving from waxing to waning.
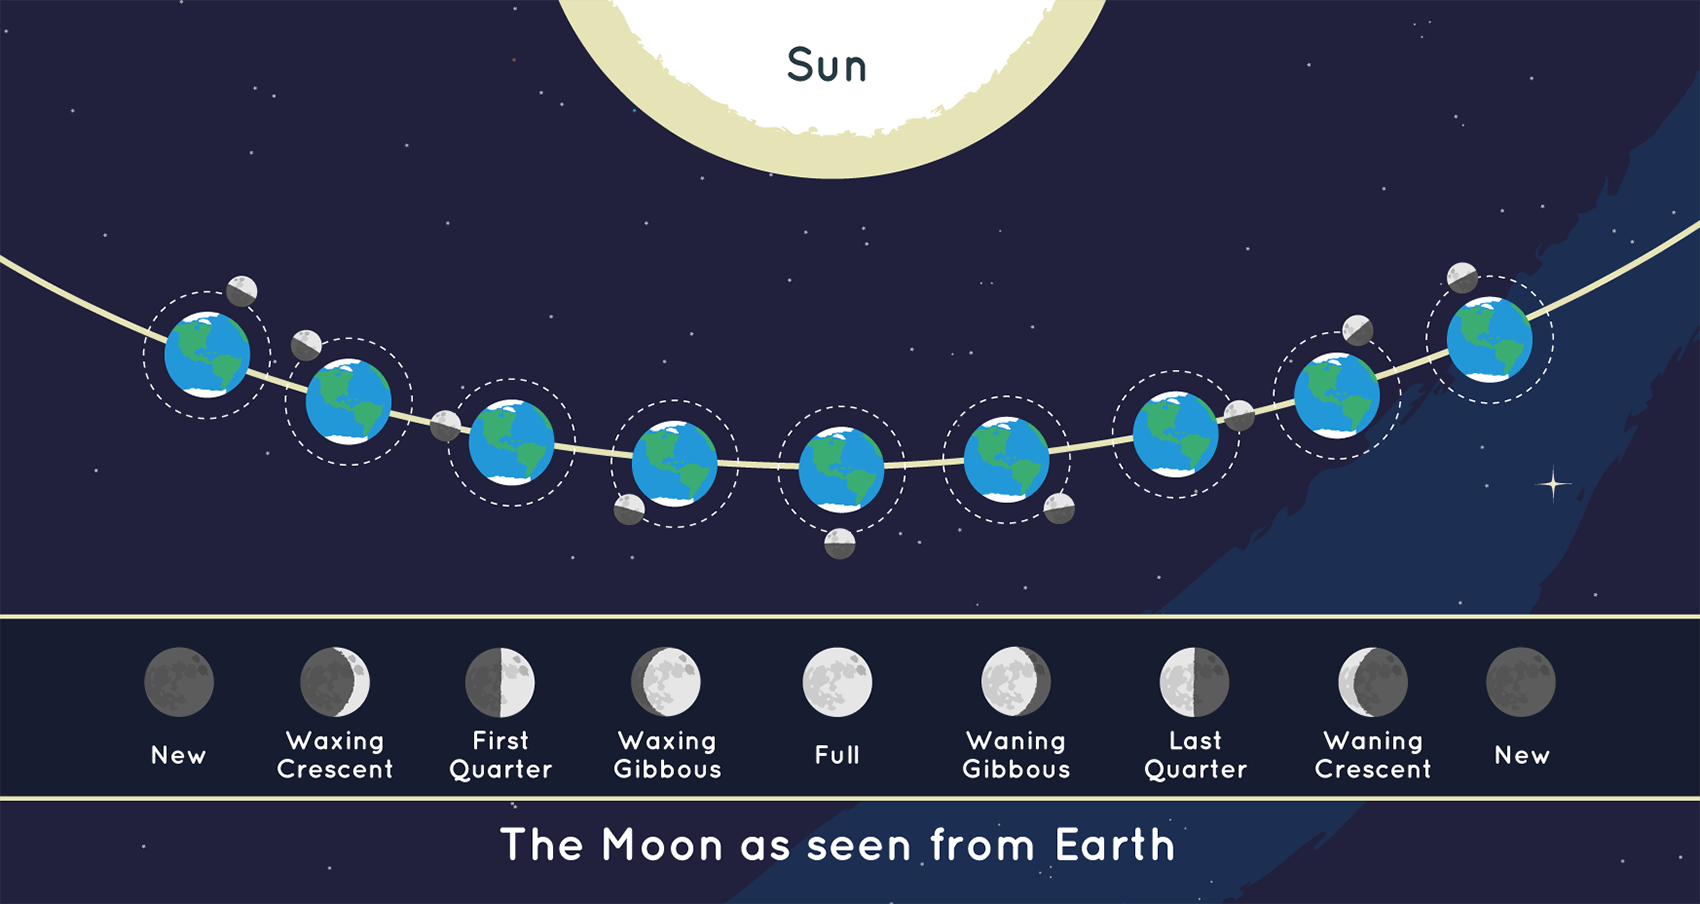
In order to replicate these phases on my project, I’m going to have to calculate how often I will need the stepper motor to rotate at it’s minimum step angle. Luckily, the time between steps is programmable, so I can tailer the delay to be whatever I want. To figure out the delay I will need to match the Moon phases, I will need to know the step angle of the motor I am buying. I have not yet purchased a motor for this project, but most stepper motors have a step angle of around 1.8 degrees.
(360 degrees per cycle)/(29.5 days per cycle) = 12.2 degrees per day
12.2 degrees per day / 1.8 degrees per step = 6.77 steps per day = one step every 3.5 hours
Looking at these calculations you may be wondering how I am going compensate for error propagation over time since there is no way I will be able to program the motor to match the exact timing of the Moon phases. To deal with this, I will need to integrate a button that speeds up the motor so that I can match it with the actual Moon phase manually. I will be able to do this in the code as well, but it’s better to have some kind of physical interface.
Timeline:
March 1st – March 14th: Order/buy all components
- This includes the wooden plate, painting kit, Arduino kit, stepper motor, driver, wires, acrylic globe, light bulb, and light bulb fixture.
March 14th – March 21st: Design light blocking fixture in CAD and submit to ITLL for 3D printing
- During this time range parts will most likely start arriving
March 21st – March 31st: Paint Wooden board and Assemble Circuit
- This will be a fun Spring Break activity that I hopefully won’t procrastinate
April 1st – April 14th: Testing and finishing touches
- Celebrate the close of the project and my birthday
Sources:
Amazon. “Amazon.” Amazon.com, https://www.amazon.com/. Accessed 11 Mar. 2025.
Arduino. “Stepper Motors.” Arduino Documentation, https://docs.arduino.cc/learn/electronics/stepper-motors/. Accessed 11 Mar. 2025.
NASA. “Moon Phases.” NASA Science, https://science.nasa.gov/moon/moon-phases/. Accessed 11 Mar. 2025.
Toshiba Semiconductor. “Step Angle of Stepping Motors.” Toshiba Electronic Devices & Storage Corporation, https://toshiba.semicon-storage.com/us/semiconductor/knowledge/e-learning/stepping-motor/chapter3/step-angle.html. Accessed 11 Mar. 2025.