
Project Overview
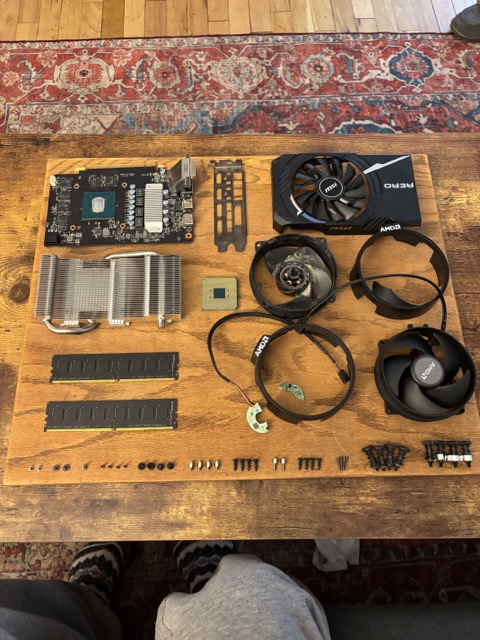
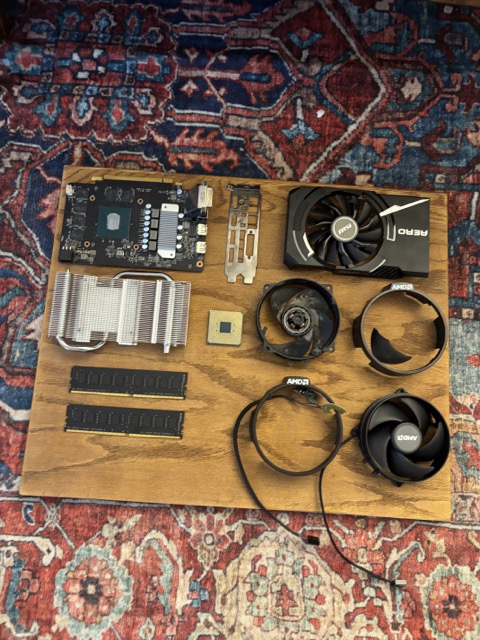
For my upcycle project, I created an exploded view display using old PC components that I recently replaced. Rather than discarding my outdated hardware, I turned it into an aesthetic and educational piece of wall art. This project gave a second life to my GTX 1060 graphics card, Ryzen 5 2600X processor, DDR4 RAM, and various cooling components by fully disassembling them and arranging them in a detailed, methodical composition.
The inspiration came from a conversation with a friend during my PC upgrade. They suggested an exploded display—a concept commonly used in technical sketching, 3D modeling, and industrial design. Having prior experience with CAD modeling and exploded views in an engineering course, I immediately connected with the idea. The deconstructed arrangement highlights both the complexity and precision of modern electronics, transforming these discarded parts into a piece of wall art.
This project contrasts two dominant design philosophies: exploded view aesthetics and seamless design. Exploded view emphasizes exposure and clarity, while seamless design values integration and invisibility. By fully dismantling each component and displaying even the smallest screws, my work leans completely toward the exploded aesthetic, sacrificing function for visual storytelling. I would argue however that the wooden board and they way the parts are attached to it is seamless design, some of the pieces appear to be floating with no seams in the connection.
Inspiration & Existing Designs
The exploded view aesthetic is widely used in engineering and product visualization, commonly seen in:
- Technical Manuals & Blueprints – Exploded diagrams illustrate internal mechanics.
- CAD Renderings – Industrial designers use this technique to analyze assembly structures.
- Art Installations – Artists have applied this concept to physical installations, deconstructing everyday objects.
A major inspiration for this piece was Todd McLellan’s “Things Come Apart” series, which disassembles objects like cameras, typewriters, phones, and powertools into meticulous exploded arrangements. His work showcases the hidden intricacies of everyday items. Another influence was PC build guides, where components are displayed in neat arrangements before assembly.
I wanted to take the logic of both inspirations—technical precision and aesthetic arrangement—and apply them to my old PC hardware that would otherwise have had no use.
Project Vision & Aesthetic
My goal was to create a clean, visually balanced exploded view display that:
- Showcases every component down to individual screws. (thank you classmate Arden Villanueva for the idea to line them up at the bottom)
- Follows a structured, technical arrangement rather than chaotic scattering. The cpu or “brain” of the computer is in the center with pieces around it to show their dependence.
- Enhances the presentation with a natural wooden backdrop (found in the scrap wood at BTU) that contrasts with the metallic and black hardware elements.
Rather than just scattering components randomly, I wanted each part to be placed with intentionality, both technically and aesthetically pleasing ensuring it looked like a precise engineering blueprint and an art assembly at the same time.
Fabrication Process
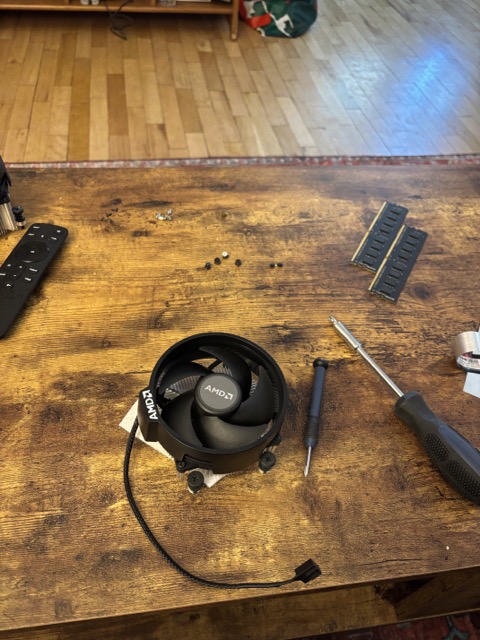
Step 1: Component Disassembly
The first step was taking apart each PC component as much as physically possible. This included:
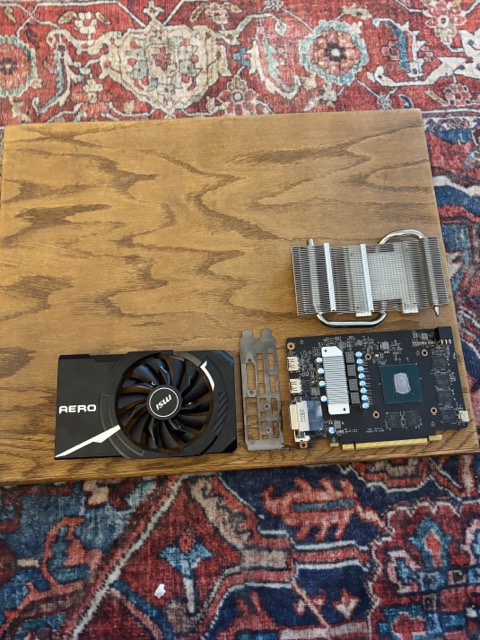
- Removing heatsinks, fans, and protective shrouds.
- Separating circuit boards from casings.
- Extracting thermal paste residue from the CPU and GPU.
- Organizing screws, clips, and brackets.
Tools used were:
- A screwdriver
- Exacto knife
- Hammer
- Physical force
- Clippers
- Pliers
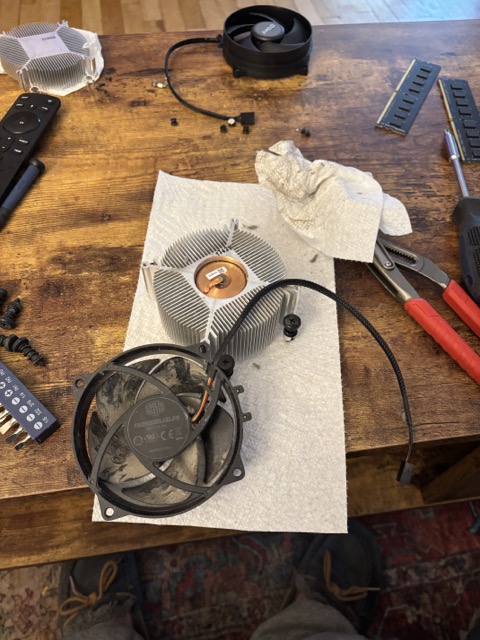
This stage required patience, as I had to carefully unscrew and detach fragile parts without breaking them unnecessarily. I also had to do some problem solving for parts where I couldnt find any screws. I enjoyed this process the most as it was super interesting to see the insides for the first time. This step surprised me as I thought it would take much longer than it did. My CPU coolers were particularly complex, with layers of plastic, a PCB that required breaking to get to, and tiny annoying fasteners.
Step 2: Planning the Layout
Before gluing, I experimented with multiple layouts. I wanted a structured arrangement that made sense both visually and mechanically. Considerations included:
- Keeping each part near its origin point
- Aligning elements to maintain aesthetic symmetry.
- Spacing components evenly to avoid a cluttered look.
I was pretty set on putting screws as close to where they came out until I tried and it looked cluttered and unaesthetic. Luckily, as mentioned above, a classmate had the wonderful idea of lining the screws at the bottom. I did this in order of size which came out great.
Step 3: Securing the Components
I used E6000 glue, chosen for its strong adhesion and ability to remain hidden once dry. I have used this for countless projects on a lot of materials and it can truly glue anything together. Components were glued strategically to minimize visible adhesive while ensuring durability. This step by far took the longest, or so it seemed like forever as I got light headed from breathing in the glue.
Final Artifact & Reflection
Final Display
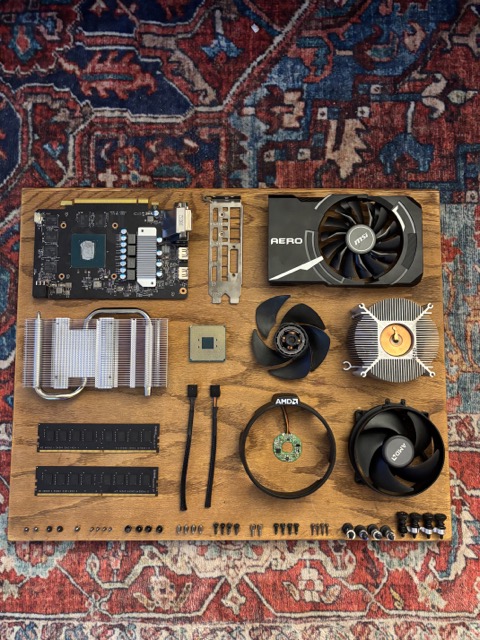
The finished piece is a visually compelling deconstruction of my old PC hardware, with every part meticulously arranged. The wooden background adds a natural contrast to the industrial tech elements, enhancing the aesthetic. The result is a blend of engineering and artistic display.
Comparison to Functional Goals
Due to time constraints, I didn’t get around to my objective of making the artifact wall mounted. But I don’t think this will be too much work when I find time.
Comparison to Artistic Goals
Aesthetically, I successfully captured the exploded view aesthetic, avoiding chaotic or scattered placement. The balanced composition maintains a technical, blueprint come to life appearance while also standing as an artistic piece for my apartment.
What’s Next?
- Number 1 priority for future development is getting this piece hung up on the wall! I would love to get this up so I can admire my hard work.
- I might explore future iterations with other devices, such as an old smartphone or console.
- I could experiment with adding labels or annotations, turning it into a more educational display.
- I am a creative technologist and this art could definitely be transferred into a digital realm for projects such as graphic design.
This project reinforced the value of upcycling through creative deconstruction. By turning discarded tech into art, I not only extended its life but also highlighted the hidden complexity of the devices we use daily.
Personal Reflection & Lessons Learned
Looking back on this project, I realized how much I enjoy the hands-on process of working with physical components. Having prior experience with CAD and digital exploded views, I initially assumed that laying out the physical pieces would be a straightforward translation. However, handling real materials introduced challenges I hadn’t expected. Funnily enough, the exploded view in CAD gave me more issues.
One major difference was the permanence of physical arrangements—unlike in CAD, where I could move parts infinitely without consequences, in reality, once something was glued down, there was no easy way to reposition it. This forced me to be more intentional in my planning. I also didn’t anticipate how much problem-solving would be involved in the disassembly. This extra planning is probably the reason for a smoother process in the physical exploded view opposed to previous CAD work I have done. Some components, like the CPU cooler, weren’t meant to be fully taken apart, so I had to figure out alternative methods (and occasionally use force).
The biggest surprise was how much I enjoyed breaking the parts down. Seeing the intricate layers inside the graphics card and CPU coolers gave me a newfound appreciation for hardware design. I also underestimated how long the gluing process would take—not because of technical difficulty, but because E6000 glue fumes are no joke! I had to take breaks to avoid getting too lightheaded.
Media Documentation
Below are images of the project, from disassembly to final display.
Final Design!
Sources
- Todd McLellan’s Things Come Apart Series: https://www.toddmclellan.com/thingscomeapart
This project successfully merged technical design, upcycling, and artistic composition, transforming discarded computer parts into a detailed, visually engaging exploded view display.
2 Comments. Leave new
Hi Joe! This was such a unique and interesting project to read about. I had never thought about an exploded aesthetic but now I can imagine many other projects you could apply this to. I liked your comparison to the time required to make an exploded view in CAD; I also would have initially assumed it would be easy on a physical object, but I can definitely tell how much time this project took you. I like the display method you chose, I also think you could elevate the look by adding a glass case on the front and making it a hanging piece, which I see you mentioned as a future goal. Super cool project, thanks for sharing!
Hi Joe, I really like your finished upcycle artifact! As a fellow creative technologist, it’s always fascinating to see the different components of a product, and you checked all of the boxes for exploded aesthetic in my opinion. You mentioned labeling the components as a potential future task, but I also wondered if you would explore different material backgrounds or wood colors/stains? This blend of art and technical design makes me think of XreArt too, who uses frames to show exploded components. Whatever you decide, this is super cool, great work!