
In class, we were tasked with researching an aesthetic and creating something of interest with said aesthetic, as well as incorporating recycled parts. This is how I approached the project. I love the steampunk aesthetic and decided that this project must represent the steampunk aesthetic. After that was decided, I wanted to find something to make. I wanted to create something that I would love to use or have and that the steampunk aesthetic would be a fun spin. Looking around my room and my house, I realized that there were not a ton of sources of light. This led me to create a steampunk lamp. After researching the aesthetic, I decided to find some upcycled materials to create my project. Before I get into my step-by-step process, here is some information on the steampunk aesthetic.
Steampunk Aesthetic:
This aesthetic took influence from 19th-century Scientific Romances such as The Steam Man of the Prairies by Edward S. Ellis and many other authors leading all the way into the 1960s – 1970s. There were many forms of literature and art that did not have a genre to be properly classified by in the 1970s – 1980s. This led to author K. W. Jeter coining the term “Steampunk” in 1987. Although Steampunk became more of a popular style in the latter half of the 20th century, the stories typically take place during the Victorian Era (1837 – 1901). This is due to Steampunk being seen as an alternate history for the Victorian Era. It takes aspects from the Industrial Revolution and the Victorian Era.
Steampunk takes ideas such as the practical, dull, raw, and geometric features/views of the Industrial Revolution and combines them with the ornate decoration, fancy/flashy, materialistic, and complexity of the Victorian Era. This makes it so the Steampunk has features such as:
- Gear/Cogs
- Leather
- Steam & Fire for Electricity/Power
- Piping
- Metalic Colors
- Dark/Dull Colors
- Fancy/Detail of the Victorian Era
- Practical/Functionality of the Industrial Revolution
This allows for popularity in books, film, comics, art, decoration, and DIY. These media outlets feature tons of steam-powered airships and cosplay that integrate Victorian clothing with features of gearing, goggles, and other complete mechanical systems. Also, artists have created house features like lamps, clocks, and other furniture that have exposed and complicated gears and piping.
Designing of the Lamp:
With my research complete and the reassurance that a steampunk lamp would look great, I went forward with this plan. Next, I created an initial sketch for my plan. I then moved on to see what resources and materials I had at my disposal. I looked for materials I could upcycle first and then identified what else I needed to integrate the upcycled parts to create the lamp. Below, I have listed the upcycle materials I wanted to use:
- Scrape Wood
- Wire/Clothe Hangers
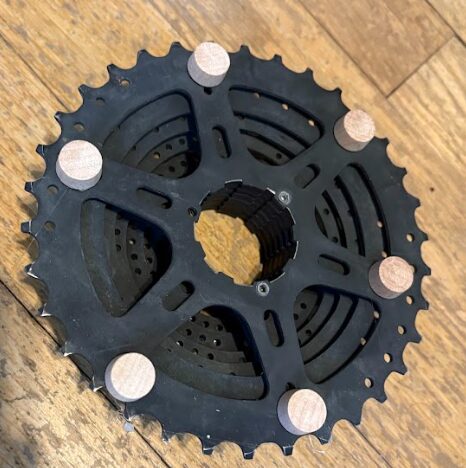
- Rear Wheel Bike Cassette
And to create the rest of the project, I scavenged in my art supply closet:
- Wooden Dowels
- Wooden Pegs
- Plastic Gears
- Paper
- Hot Glue
- Tape
After that, I identified the parts I needed to buy:
- Light Socket
- Lightbulb
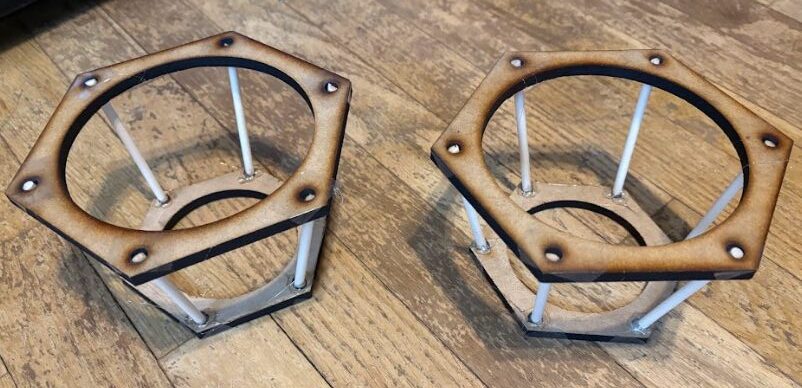
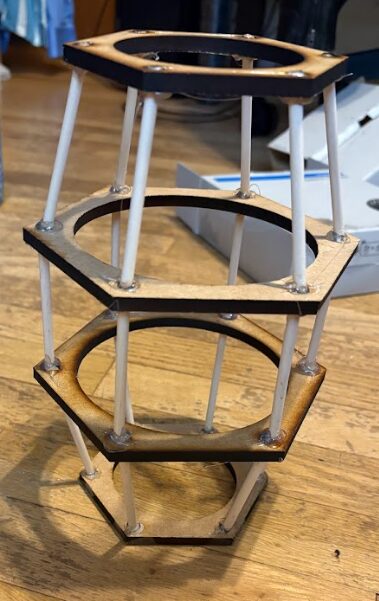
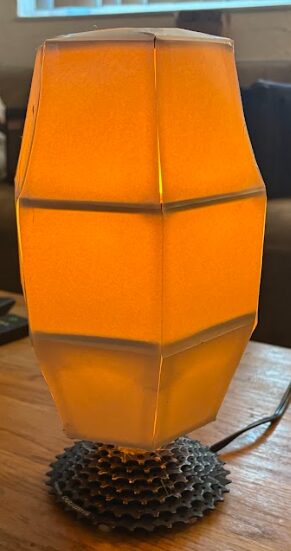
Once I had all the materials, I started with my assembly. I first created the general structure of the lampshade. I decided I wanted to give the lampshade the shape of an airship for the first connection to the Steampunk Aesthetic. I did this by having the shape of the skeleton be hexagonal as well as having the top and bottom of the shade be one size and the middle be some bigger hexagons. I did this by using wooden dowels, laser cutting the scrap wood, and gluing it all together with hot glue. I started by creating two hexagonal pyramids and then gluing the two together with some wooden dowels to finalize the shape of the blimp inspiration.
I initially planned to do this with the wire and clothes hangers instead of wooden dowels. I accidently created the small holes in the wood too large that there was too much changing in shape to integrate the wire. Also, the wire was a little too soft to hold the shape as sturdy as I wanted. This also made it so the bends were not as clean as I wanted either.
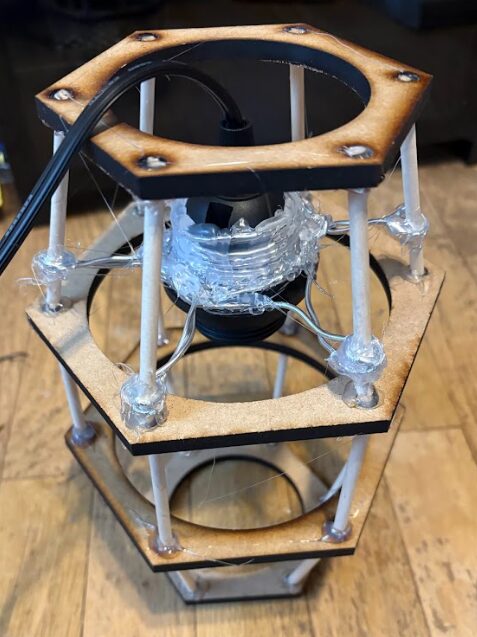
From there I moved onto integrating the light socket. I used the socket, wire, and hot glue for this. I wrapped wire around the socket and each of the dowels to lock in the height and then covered all the connections in hot glue. This wasw a bit of a struggle since I did not plan well enough adn just “went for it” with my loose design. It is a rough solution, but it works and is inside the lamp shade so it can not be seen easily.
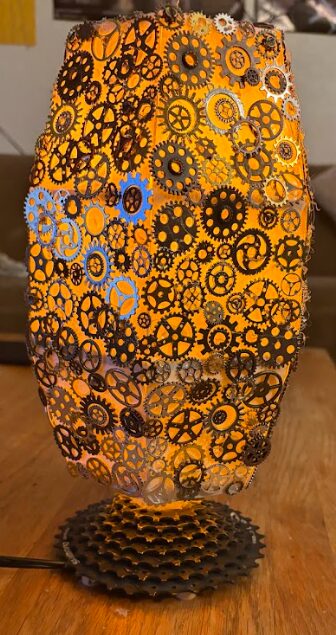
I then decided to work on the base of the lamp. I figured my old bike cassette would be a great base structure. It is heavy enough to prevent the lamp from timping with reasonable force. The base is also a collage of gears and that is a key feature of the Steampunk Aesthetic. I added wooden pegs on the bottom with hot glue so that the lamp has some gap on the bottom for looks as well as let the wire from the light socket easily leave the base.
I had to then connect the base and the current state of the lampshade. I did this by wrapping some of the socket wire with wooden dowels of structure and then with wire for aesthetic purposes. I then inserted this into the center hole of the bike cassette and filled the gaps with hot glue. this made it all sturdy enough to support the lamp shade. This was done a bit weirdly for the same reason as the light socket. I did not plan well how I was going to integrate thetwo structures and I winged it when I got to it.

Following that, I worked on the “shade” part of the lampshade. I created six panels that were trapazoidal ate the ends and a rectangle in the middle. from there I taped these together. With the rest of my plan for the lamp shade, teh tape would be hidden so the tape job did not need to be completly hidden.

I tested the paper lampshade with the lightbulb I bought to make sure it was matching my vision of the color of the light. I bought a flickering flame like LED to represent candle light. I figured this would fit the Steampunk Aesthetic well since they used fire/steam to create electricity/power. The paper and the LED light worked just how I wanted it to since it gave a orange glow that was difused and not too bright.
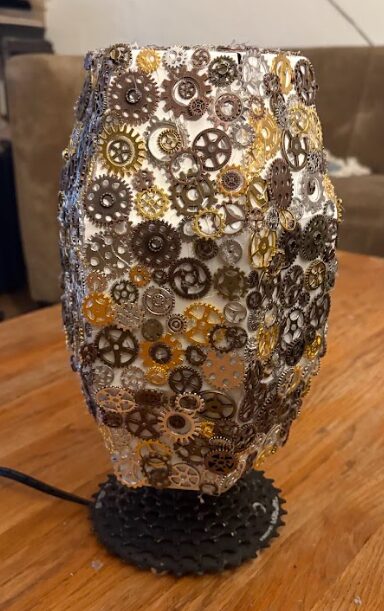
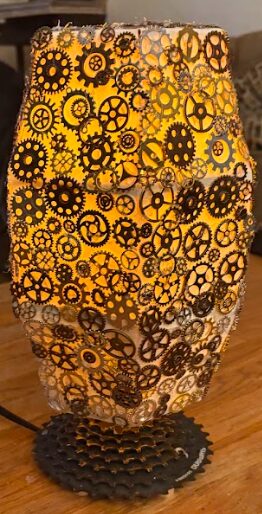
For the final part of the project, I decorated the lampshade by adding details. This was done by gluing down a much of mini gears I had. These were a mix of copper, gold, and silver plastic of various sizes, shapes, and styles. I randolmly pulled gears and glued them on in random positions to mix the color and shape to make the lamp shade look randomly balanced and as if it was functioning. I also layered some gears to meet this look aswell and to hide white space. Since the gears are plastic, I was not worried about the weight.
I think the lamp turned out how I wanted it to. I believe that this fits the Steampunk Aesthetic with encoperating key details. It is functioning just as I wanted it to. Also, the flickering light makes it even better!
There are some aspects that I would change if I was to redo this. These were mostly planning out the whole design first. This would improve and clean up how I set integrated the lightscoket aswell as combinging the base and the lampshade. If I moved the distence between the hexigons and planned better with my lasercutting of teh scrapewood, the light socket could have intrgrated nicley without any use of wire and hot glue. Also for the base I should have develoepd and adapterpiece to into the center of tge bike cassette. This would make the whole thing more stable and possibly look nicer. I would also consider using a different glue thank hot glue or use a different adhesive for assembly, especially with applying the gears. Since I used hot glue the whole project is “stringy” and I continue to clear off some hot glue strings. I still love my current design and do not currently plan on making any changes, but I have learned a lot from this project for future projects.
Sources:
Alex. (n.d.). Alex. Steampunk Avenue. https://steampunkavenue.com/en/blog/what-is-steampunk/
What is steampunk?. Wonderopolis. (n.d.). https://wonderopolis.org/wonder/what-is-steampunk
Wikimedia Foundation. (2025, January 21). Steampunk. Wikipedia. https://en.wikipedia.org/wiki/Steampunk
Wiki, C. to S. (n.d.). K. W. Jeter. Steampunk Wiki. https://steampunk.fandom.com/wiki/K._W._Jeter
Wiki, C. to A. (n.d.-a). Cyberpunk. Aesthetics Wiki. https://aesthetics.fandom.com/wiki/Cyberpunk
Massey, B. (2024, September 20). Victorian aesthetic. AC Silver. https://blog.acsilver.co.uk/2023/03/22/victorian-aesthetic/
What happened during the Victorian Era?. Royal Museums Greenwich. (n.d.). https://www.rmg.co.uk/stories/topics/what-happened-during-victorian-era
Wiki, C. to A. (n.d.). Victorian. Aesthetics Wiki. https://aesthetics.fandom.com/wiki/Victorian#:~:text=When%20it%20comes%20to%20archit
2 Comments. Leave new
[…] Final Project: https://www.aesdes.org/2025/02/19/upcycle-steampunk-lamp/ […]
Xander, your steampunk lamp is an impressive and creative piece that genuinely embodies the aesthetic you were aiming for! Using upcycled materials, especially the bike cassette as the base and the various gears on the lampshade, strengthens the steampunk theme. I also appreciate how you incorporated the flickering LED to mimic candlelight—it adds an atmospheric touch. Your detailed explanation of the historical background of steampunk gives your project additional depth and shows that you put thought into your design beyond just the visual aspects.
I was curious about your choice of hot glue for structural support. You mentioned that it caused some stringiness and that the integration of the light socket could have been cleaner. If you redo the project, would you consider using a different adhesive or a more mechanical fastening method to create a cleaner look? Also, I’d love to hear more about how durable the lamp feels. Does it seem sturdy enough for long-term use?
Overall, I like the way this turned out