

‘The Mhona’ Tote is dedicated to my mom, who influenced my love for bags. I’ve always enjoyed collecting bags, believing they are essential accessories that complement outfits while serving a practical purpose: carrying necessities. For my upcycle project, I decided to challenge myself by creating a bag. I chose to make a tote bag because it’s the one I carry every day and the most functional among my collection. I wanted to learn the process of making a bag and expand my creativity in an area I enjoy—fashion. Since I lean more toward minimalism in my fashion choices, so exploring how I can express my creativity as a maximalist presented an exciting challenge.
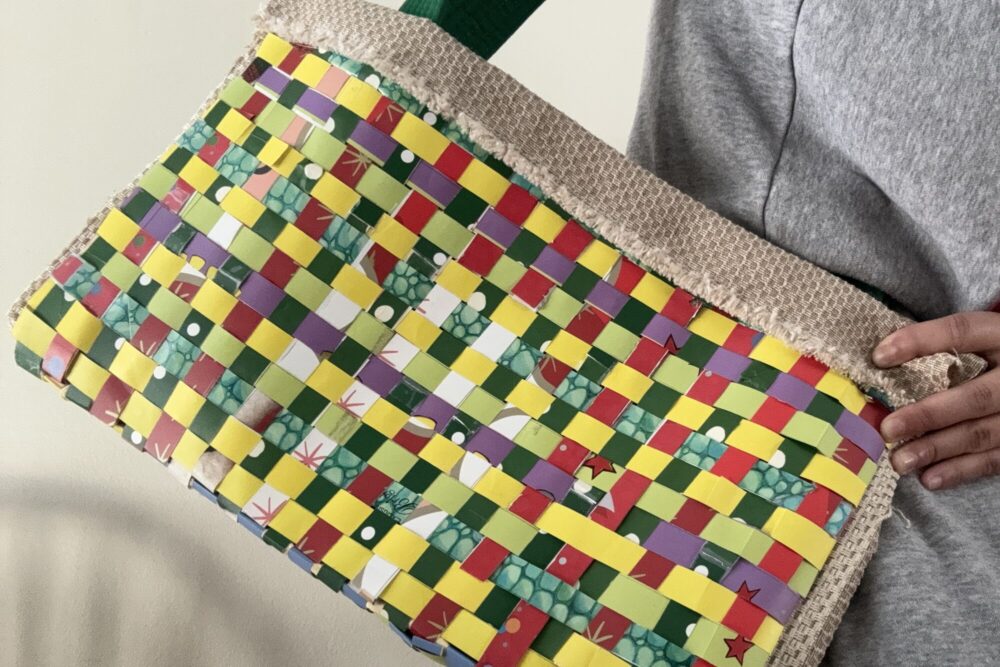
THE FINAL PRODUCT:
Several design changes occurred throughout the process. The initial plan was to use plastic book covers and coffee bags as the main materials and weave them to form the bag. However, I realized that these materials were difficult to obtain. Coffee shops rarely kept their used coffee bags, and book covers were more expensive than expected. To solve this, I used kraft paper gift bags. Kraft paper has a similar feel and structure to coffee bags, and my mom had plenty of gift bags at home. Additionally, kraft paper is sturdy, which made the weaving process smoother compared to using regular gift bags. The downside is that paper is prone to getting wet, so I added fabric underneath for protection.
THE GOAL:
My goal was to design and create a tote bag that fuses maximalism with contemporary art—a combination of textures, patterns, and colors that harmonize with each other. I intended to use a color scheme inspired by my favorite colors and various fabrics that complemented those shades, making the project feel more personal. Additionally, I wanted to experiment with the maximalism aesthetic and explore how I could blend fabrics, patterns, and colors to achieve that bold style.
THE INSPIRATION:
I’ve admired Bottega Veneta bags since I started collecting. What stood out about their designs was how they blended contemporary art with minimalism to create elegant, versatile bags that elevate any outfit. Their bags can transform a simple white shirt and jeans or complement a full blazer suit ensemble.
Bottega Veneta also uses their signature weaving technique, the ‘Intrecciato,’ which involves cutting lines in one fabric and weaving in small leather strips through the cuts.


Another inspiration is the rattan bag, popular in my home country, the Philippines. Many rattan bags are colorful, embodying the maximalist aesthetic. They are also highly functional and used for groceries, laundry, travel, and personal items.

ITS FUNCTIONALITY:
I wanted to create a bag that could fit all my essential devices (iPad and laptop), carry personal items, and add style to any outfit.

THE VISION:
Initially, I planned to use brown and beige with hints of black, white, and orange since these colors are common in coffee bags and book covers. However, due to the material change, I switched to a color scheme of yellow, green, blue, purple, red, and white. This scheme better reflected the maximalist aesthetic I was aiming for and blended harmoniously. These colors are also my favorites, making the design feel more personal.
For the details, I chose yellow and green as focal colors to create a striking balance between the fabric texture and the gift bags. The green shade blended well with the straps, and the yellow complemented the beige fabric.


THE FORM:
Weaving is a well-known form of contemporary art often seen in various items. The weaving patterns also conveyed maximalism well by blending colors without clashing.
I added fabric underneath the paper to secure the entire bag and protect it from moisture. The fabric I used had frayed, distressed edges, which added texture and personality to the bag. It also served a practical purpose by covering the ends of the woven pieces in a stylish way.
After finishing the bag, I realized the frayed look enhanced the maximalist aesthetic better than expected. Maximalism involves mixing multiple textures, colors, and patterns so that each element stands out. The fabric and woven paper pieces had distinct looks, but they complemented each other, creating harmony between different designs.

The weaving pattern also had a slightly rugged appearance, and combining two rugged elements helped achieve a unified aesthetic. Instead of clashing, the designs allowed each other to shine, aligning with the essence of maximalism.
For the straps, I used a thrifted karate belt because it was the sturdiest material I could find. In terms of functionality, the karate belt achieved my goal of creating comfortable straps for easy carrying. The belt’s texture blended well with the bag’s fabric, further enhancing the maximalist look.

THE PROCESS:
THE MATERIALS:
First, I took two paper bags from my mom and visited Art Parts to gather more. Most of my materials were thrifted from the same place, including the fabric, yarn, karate belt, and ruler.

THE WEAVING PROCESS:
I started by cutting strips of paper, which took five hours because I initially didn’t have a ruler and used an index card to trace lines. The sturdy bag material also made cutting more labor-intensive. Each strip was 2.5 inches thick, but they varied in width. To achieve a width of 14 inches, I compared the strips and taped them together as needed.

I experimented with the weaving process since keeping the long strips in place was challenging. Initially, I alternated between weaving long and short strips, but this method was time-consuming because the strips kept shifting. What worked best was laying down all the long strips first and weaving the short strips through them. This approach immediately secured the long strips and made the process faster and cleaner.
THE END:
Finally, I used a hot glue gun to attach the fabric to the woven paper and glued the belt on top. I also glued extra fabric to the sides of the bag for added security.

THE NEXT STEPS:
My next steps are to stitch all the fabric and the belt to strengthen the bag and cover the woven pieces with a clear plastic film. My pod mate, Mia Winstead, suggested slightly altering the resin ratio to create a flexible, clear film that can protect the bag without fully solidifying. Alternatively, I could use laminated film to cover the woven parts.
REFLECTION:
I had fun making this project. It was interesting to see how I approached the design phase, what worked and what didn’t, and how I thought through each step of the process. I didn’t expect to tap into so much creative energy, especially with all the engineering-heavy projects I’ve been working on. Plus, my mom liked the bag, which is a win-win!
2 Comments. Leave new
I really like your final product for this project. The end quality seems like something that you could buy online. Nice job. I am not sure if this is on my end, but I am having some trouble loading some of your photos, so you might want to double-check that. I like the idea of adding a clear plastic film, I think this could add a lot to the functionality of the product.
Francine this project is astonishingly good. The photos and look of the bag are so professional I love it. I see that you already considered making the bag more waterproof which is great because I would hate to see such a great item to be destroyed if something spilled on it. One thing I would like to know is if you had any other structural considerations while making the bag?