
Space Age Lamp
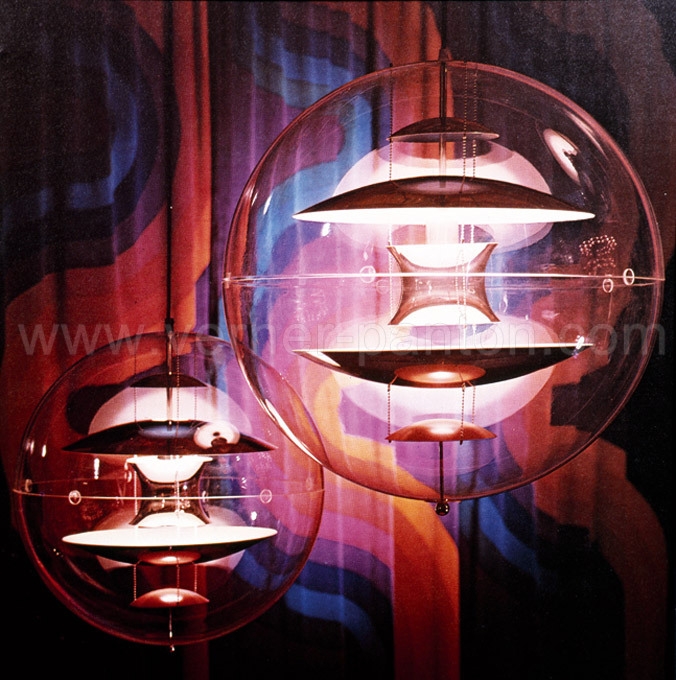
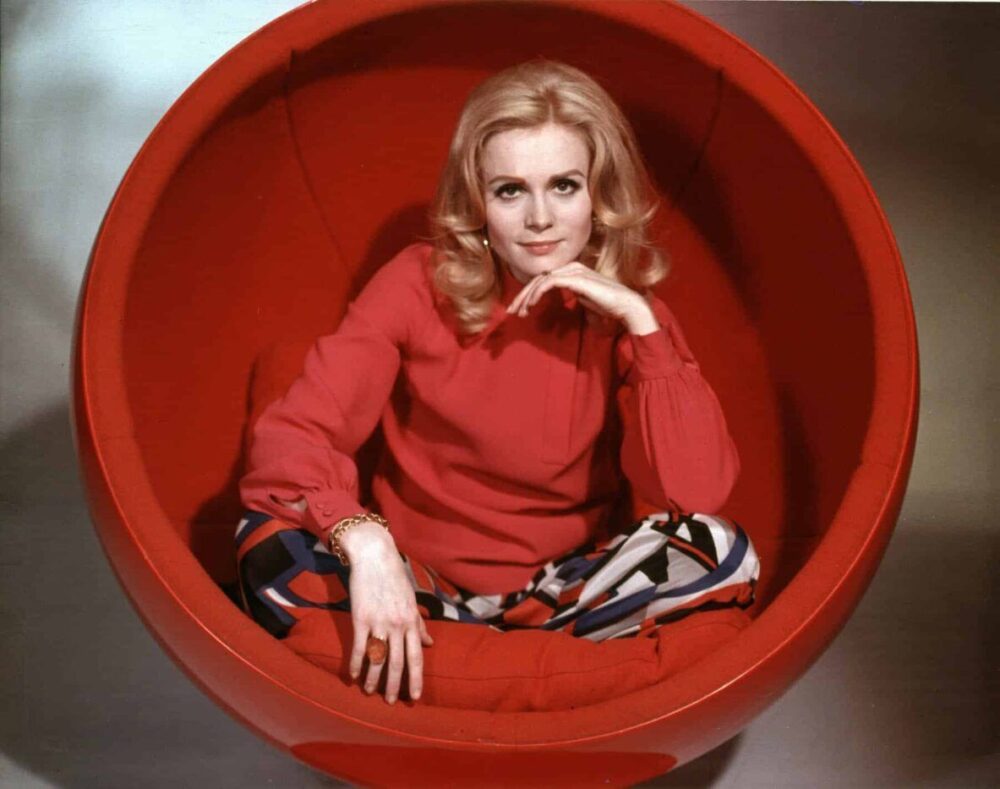
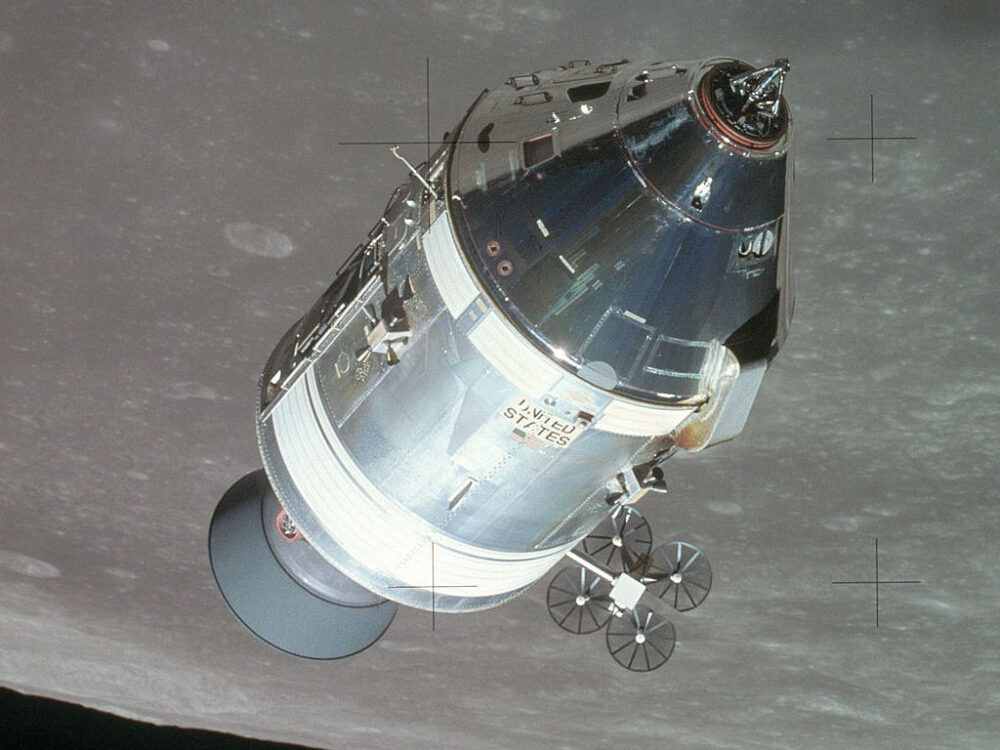
I have chosen to create a lamp in the space age aesthetic. Aesthetically, I am inspired by the furniture, lighting and clothing made by space age designers during the second half of the 20th century. Some notable pieces include the VP Globe pendant light by Verner Panton and the iconic Ball Chair designed by Eero Aarnio. I also drew inspiration from iconic American air and spacecraft, like the SR-71 Blackbird and Apollo Command and Service modules. I want to incorporate flowing lines and smooth, curved aerodynamic surfaces to reflect the space age aesthetic.

Upcycled Material
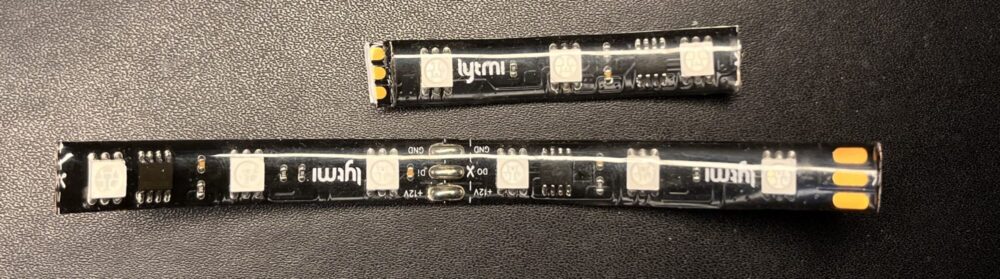
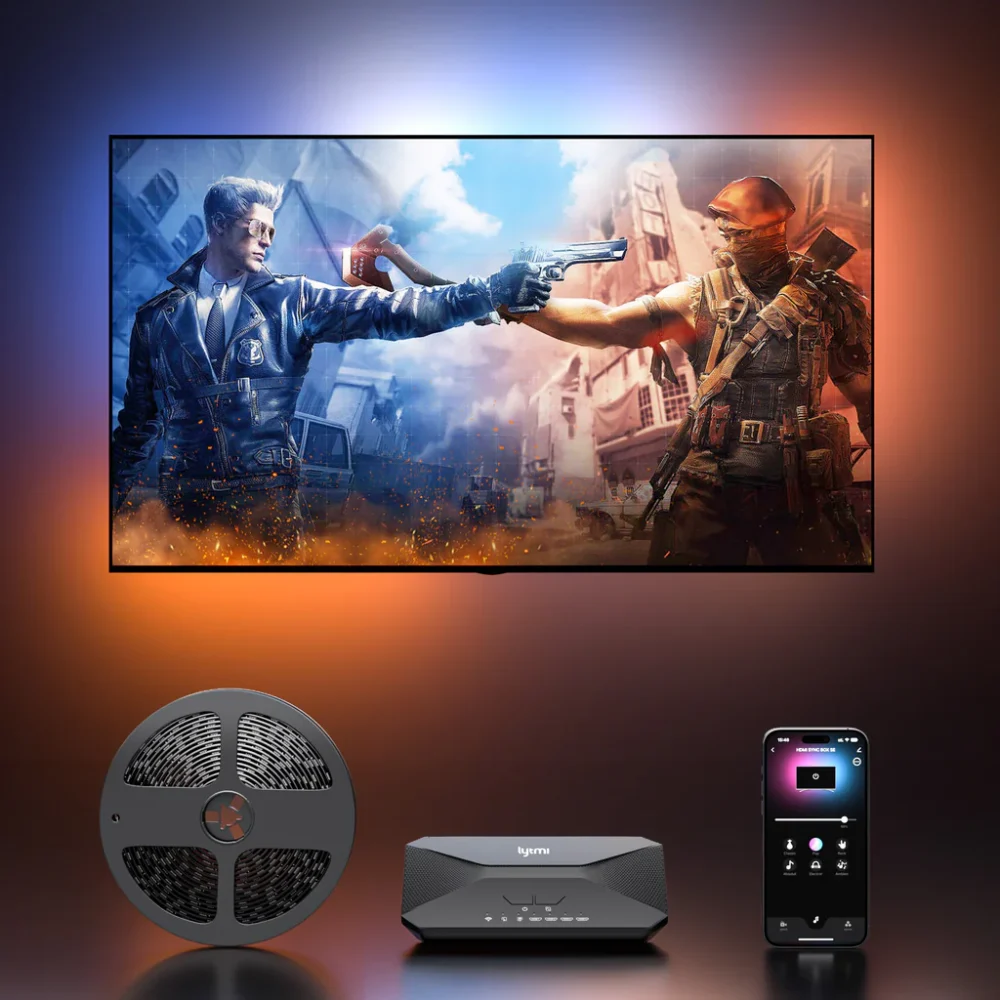
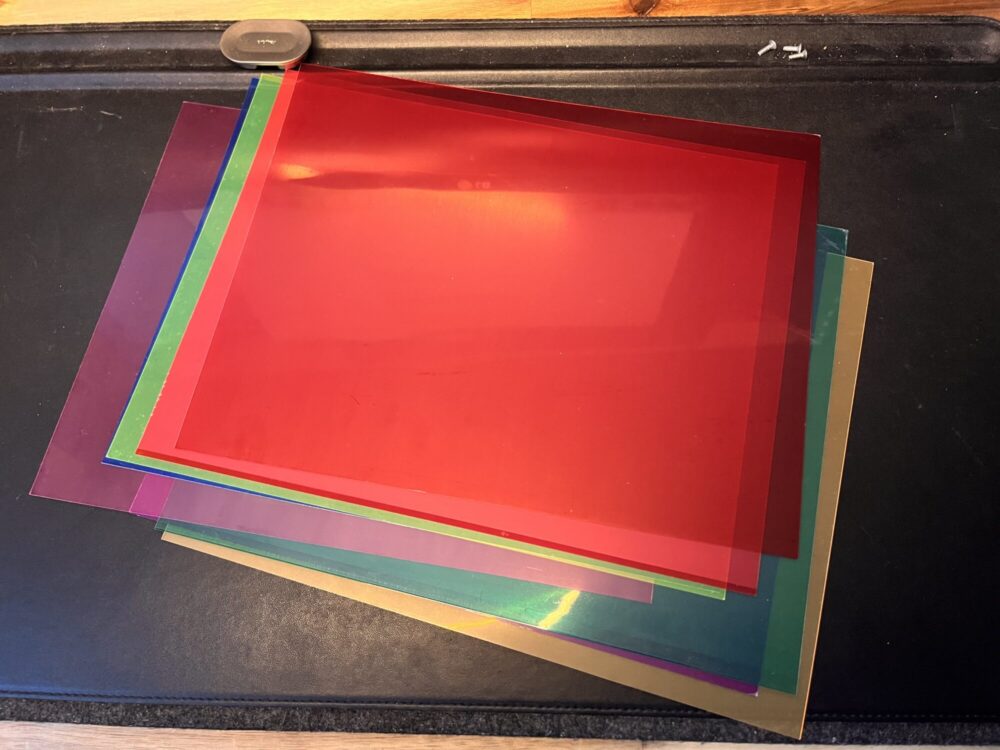
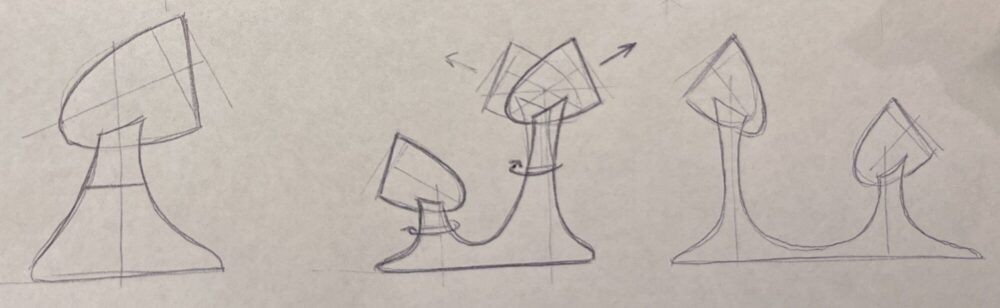
I have decided to use scrap LED strips leftover from a sync backlight as my main upcycled material. The process of installing the sync backlight involves cutting the provided addressable LED strip down to the measurements of the TV. The remaining scrap strip is useless without a basic program to control inputs, LED location on the strip, and lighting parameters. In addition, I will use translucent plastic sheets to filter the light, also upcycled. Below are my materials as well as a few loose sketches exploring the design of the lamp I intend to make.
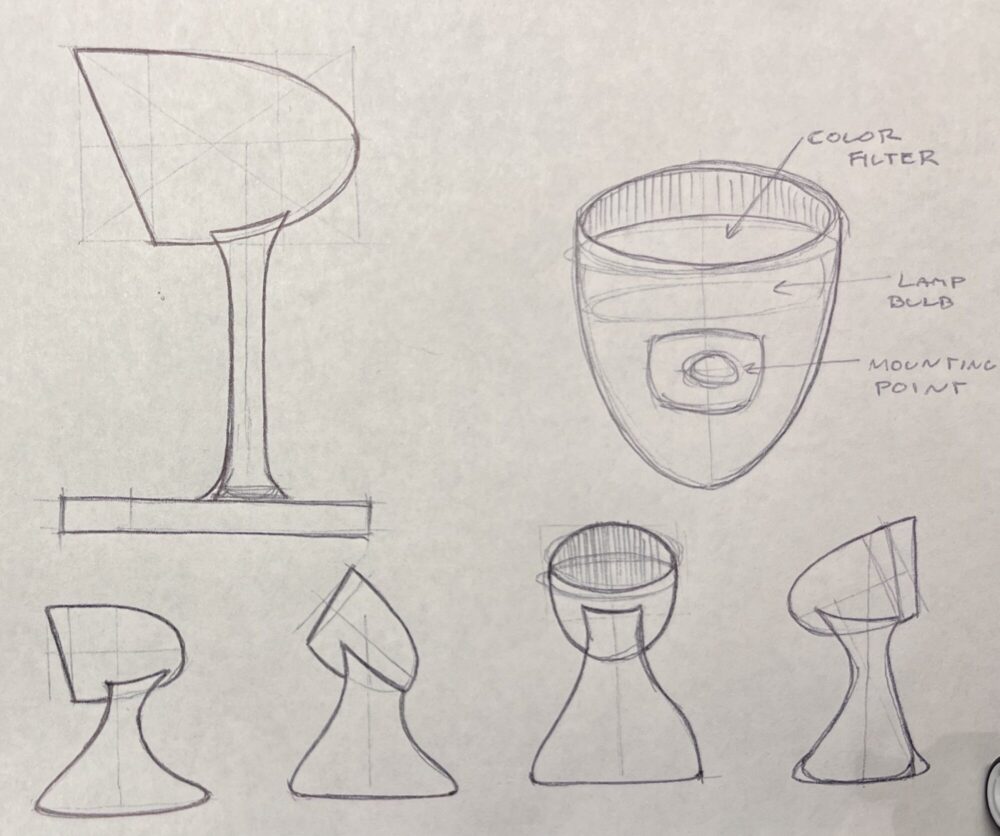
VERSION 1
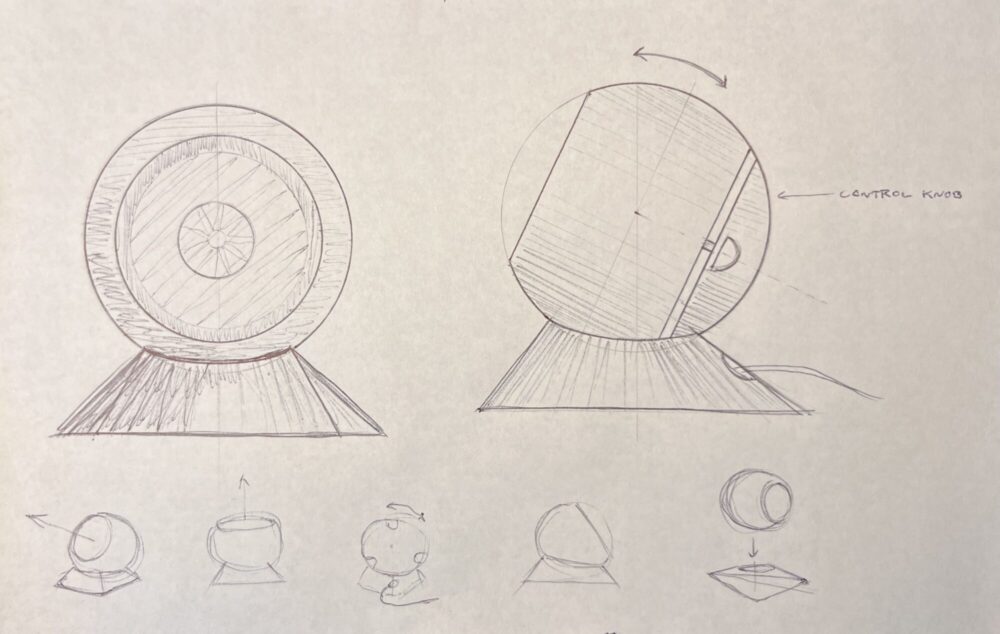
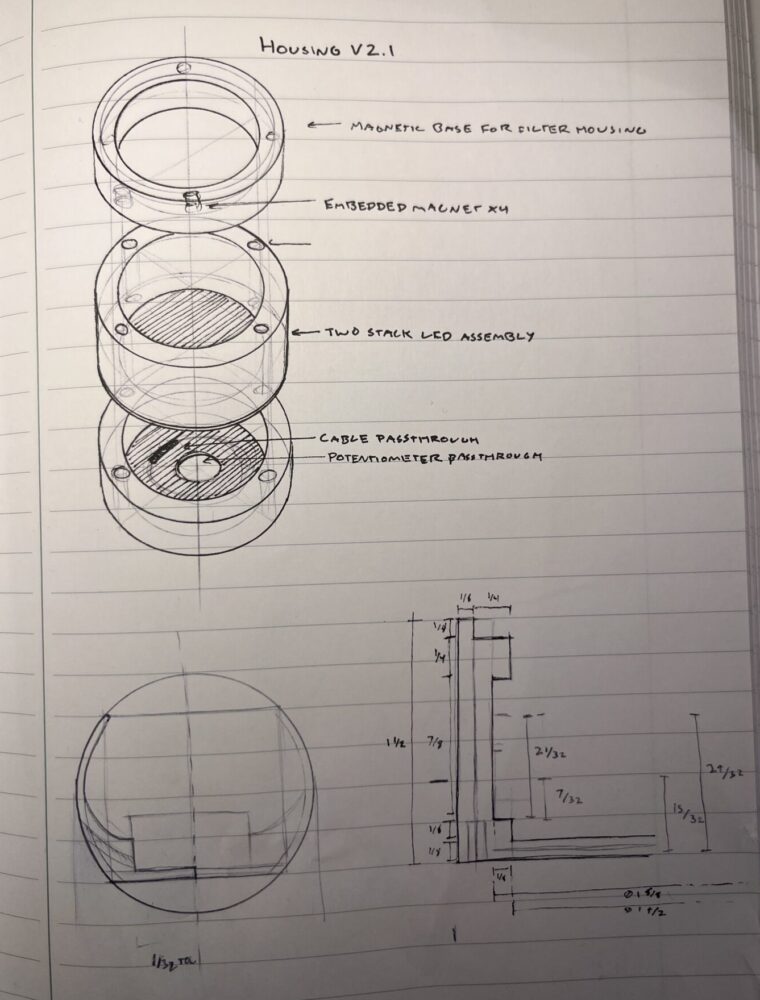
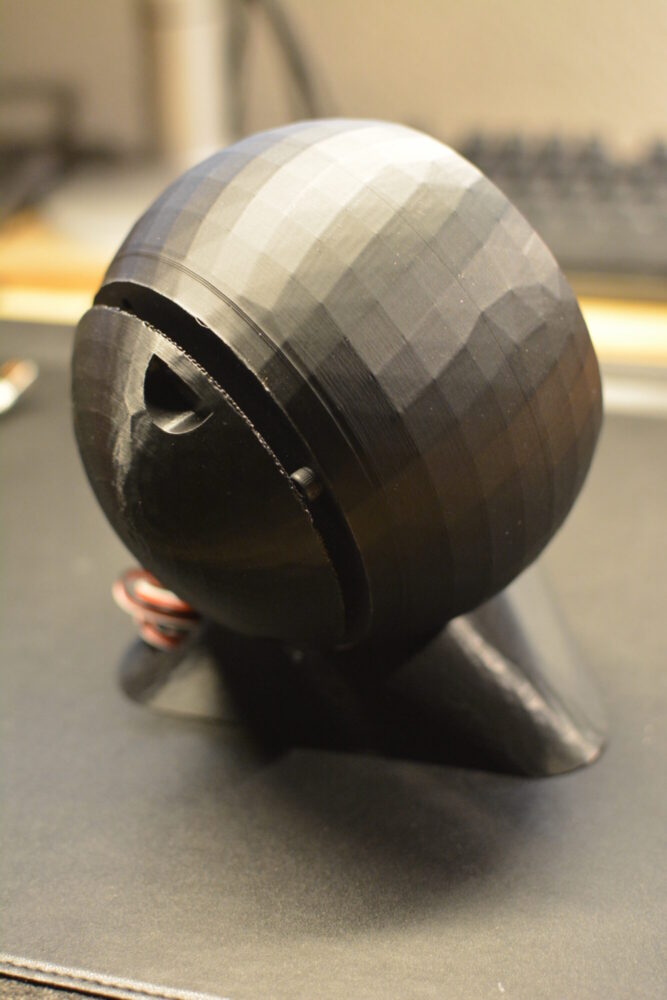
I settled on a spherical design, 5 inches in diameter. The lamp will sit on a pedestal, large enough to conceal the control board and power input. The light itself will be provided by the LED strip, arranged around the circumference of the interior cylinder. This modular cylinder will house all electronic components and insert into the outer portion of the lamp “shade”. In order to preserve the streamlined space age aesthetic, I will incorporate internal cavities in base of the interior cylinder for the control potentiometer and mode button to sit. The control knob will be hidden in the back of the main lamp sphere, and depressing this knob will cycle through modes allowing the single potentiometer to control three inputs: hue, saturation and brightness.
Coding
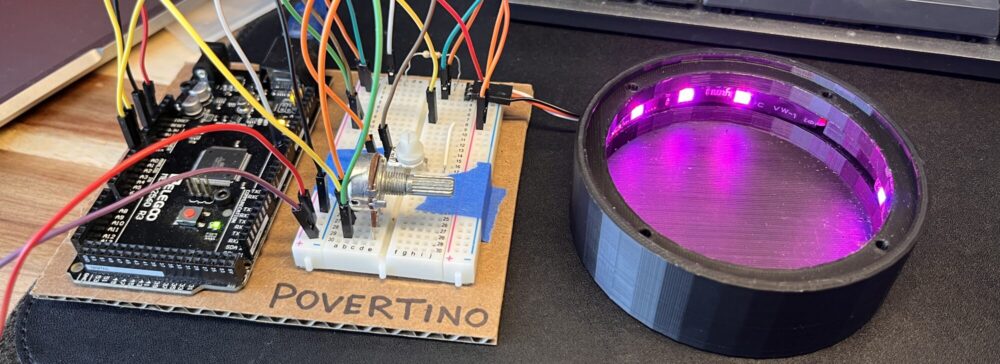
I began by connecting the led strip to the arduino to test out the concept. I used the FASTLED arduino library to get the led strip to work. After running some default commands, I modified the code to proportionally map rgb output to potentiometer input. To switch between modes, I added a button to the circuit. Each click of the button cycles the function of the main knob. I will embed this button in such a way that it will be triggered while depressing the back knob.
Backwards Development
Usually, I design and dimension a physical product around a general purpose, and find the best fitting components after the initial stage. For this design however, I chose to work backwards by letting the spacing and length of the scrap LED strip dictate the circumference of the interior cylinder. I wanted to arrange the 12 LEDs on the strip evenly around the cylinder to preserve symmetry and even light output. Below are some crude calculations (and even cruder approximations).
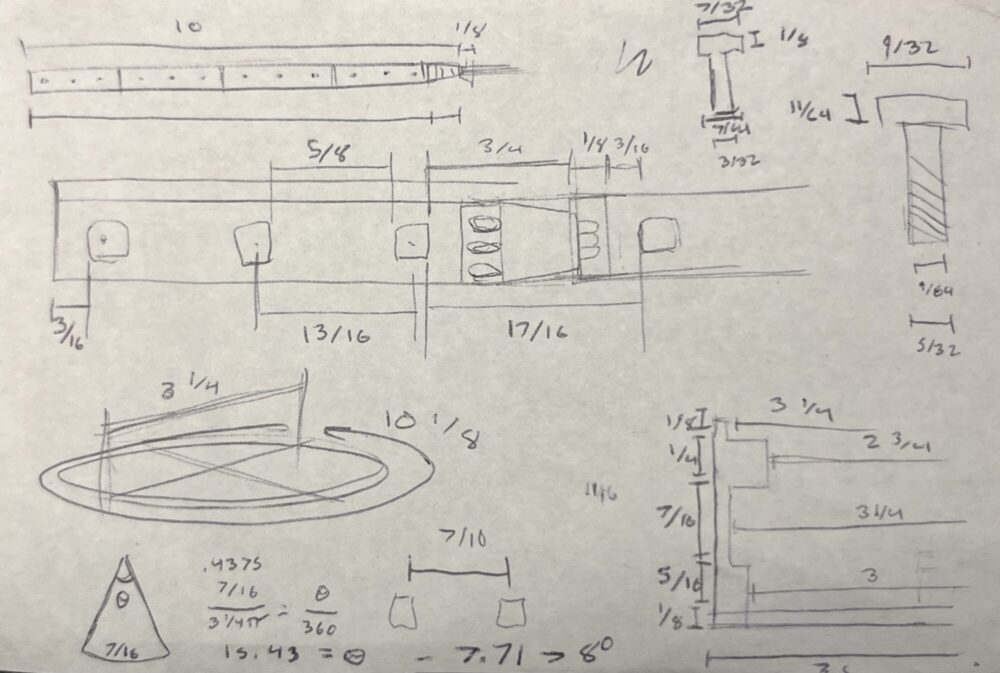
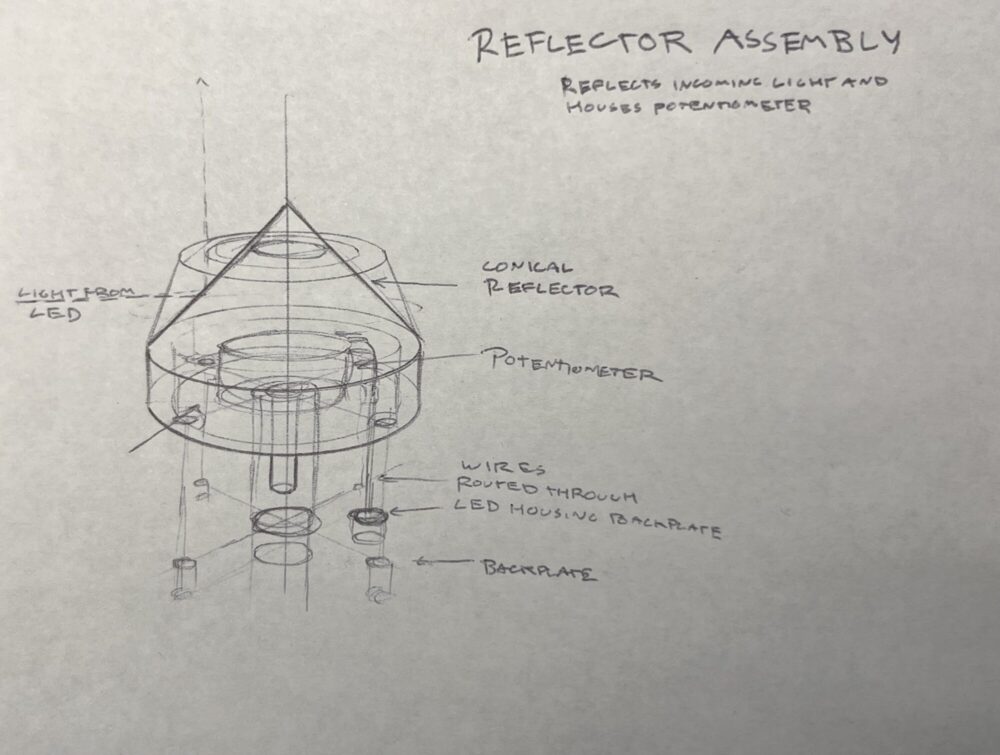
REFLECTOR
Due to the configuration of the LED strips, each LED unit outputs the majority of its light towards the center of the cylinder. I have designed a conical reflector to direct some of the light out of the front of the lamp. The reflector itself is hollow to conceal the potentiometer and button below it to preserve the aesthetic without adding thickness to the base of the housing.
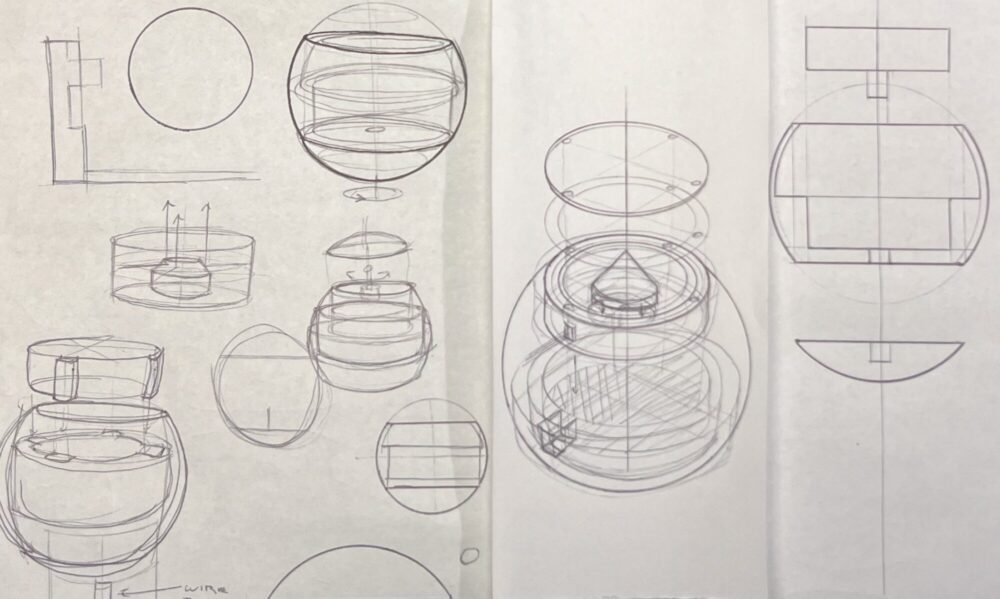
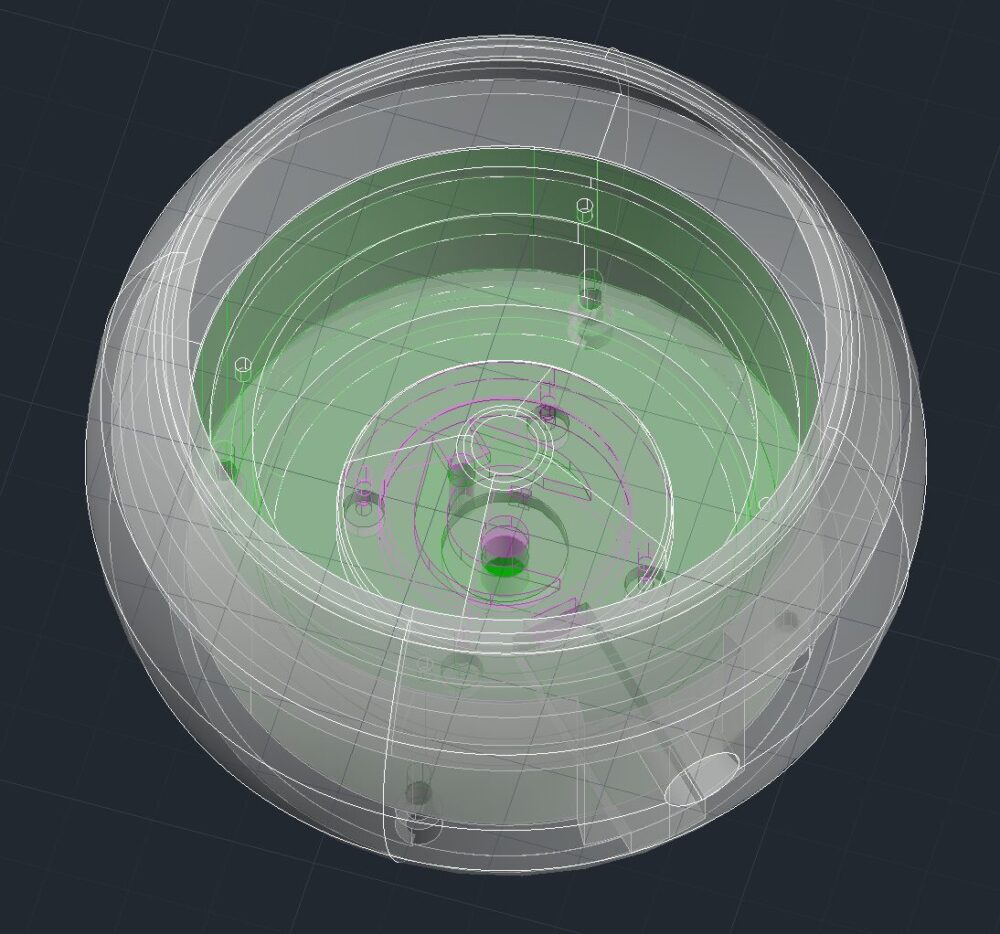
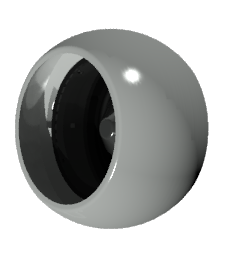
CAD Model/Render
Below are some images of the CAD model as well as a 3D render of the interior lamp assembly, interior reflector and the outer lamp “shade”.
VERSION 2
After constructing version 1, I was able to identify problem areas with the initial design. The second version addresses most of these issues.
Updates:
- The V2 LED puck is smaller, allowing for an even and seamless distribution of the 12 LEDs on the strip.
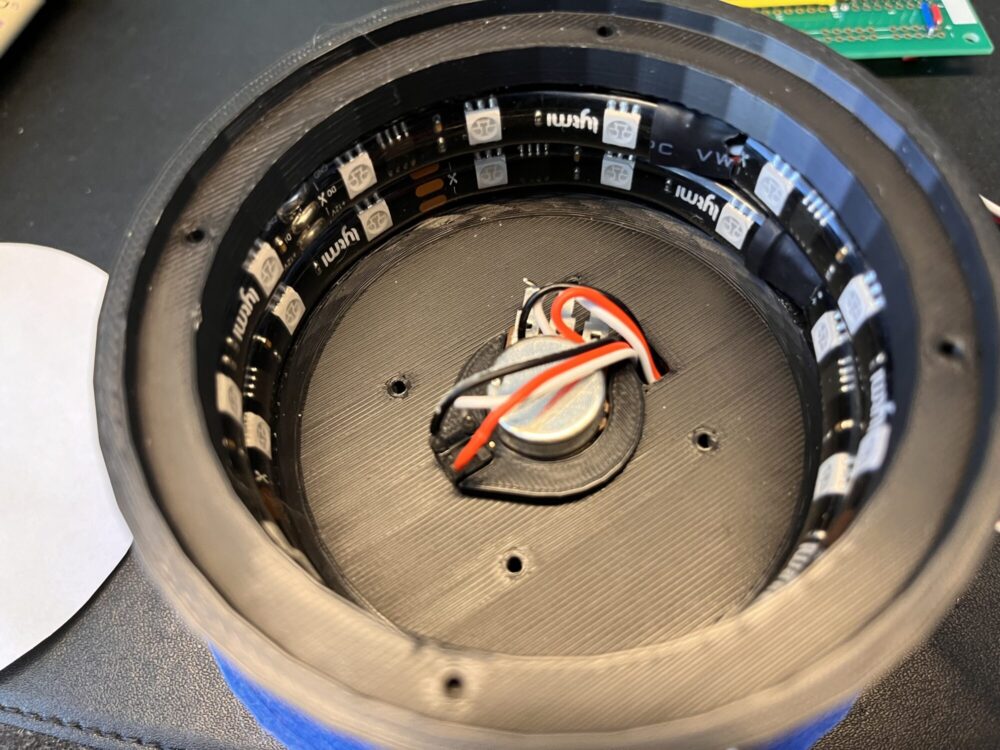
- The interior puck now accommodates two led strips for added intensity and visual appeal.
- Integrated potentiometer and button housing in the base of the interior puck
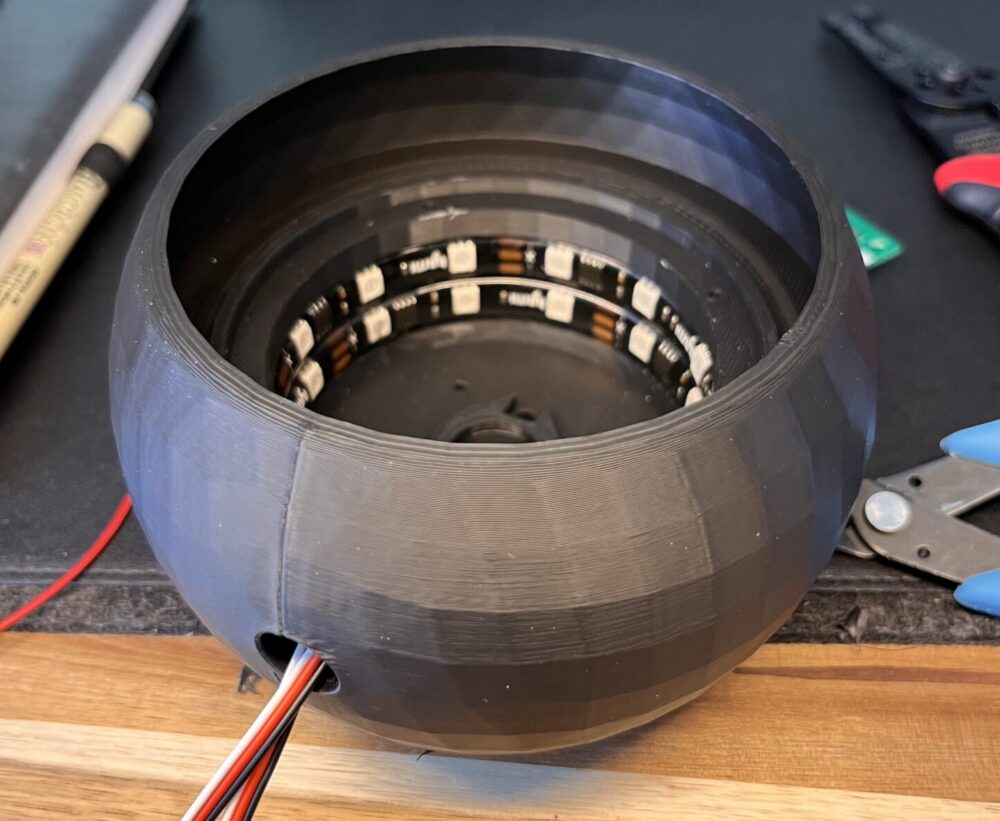
After printing out the updated components, I installed the button and potentiometer into the interior puck, and the puck into the main shade.
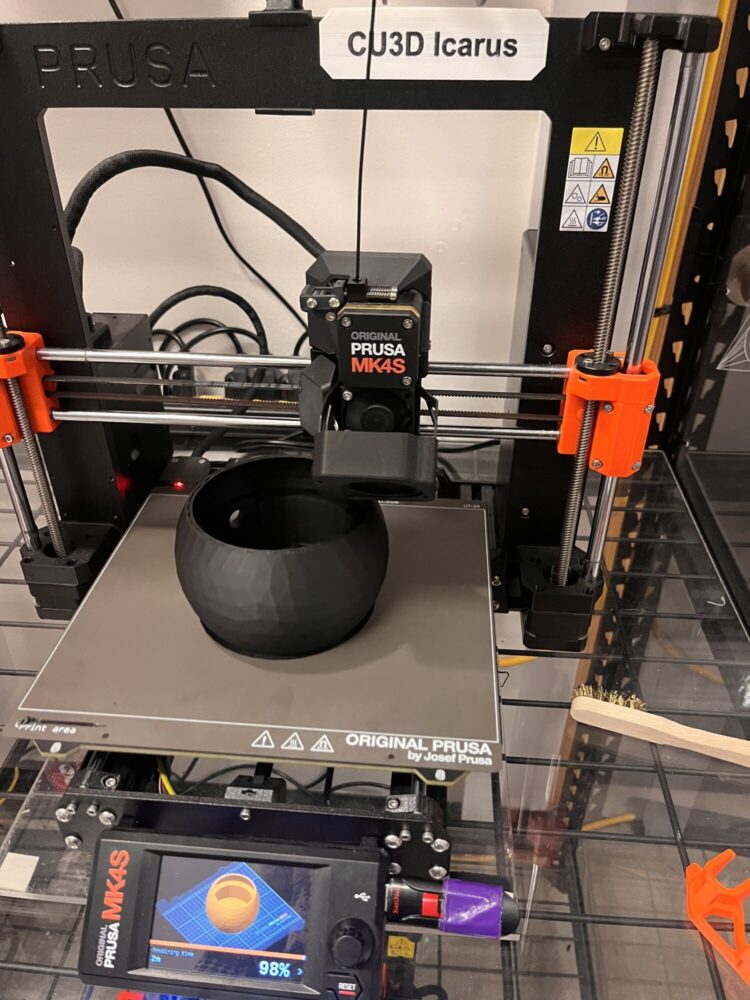
Unfortunately, my largest print (outer lamp housing) did not adhere properly to the build plate. Luckily, this defect only affected the base of the component so I was still able to check the fitment with the main LED interior puck. In addition, the V2 housing was not rigid enough to hold the button from being poked through. To fix this, I impatiently tried using super glue to get the button to stick. The super glue seeped past the intended joint and seized the button adding another setback.
In the meantime…
- I cut the translucent plastic sheets into circles that would sit on the top flange of the interior puck.
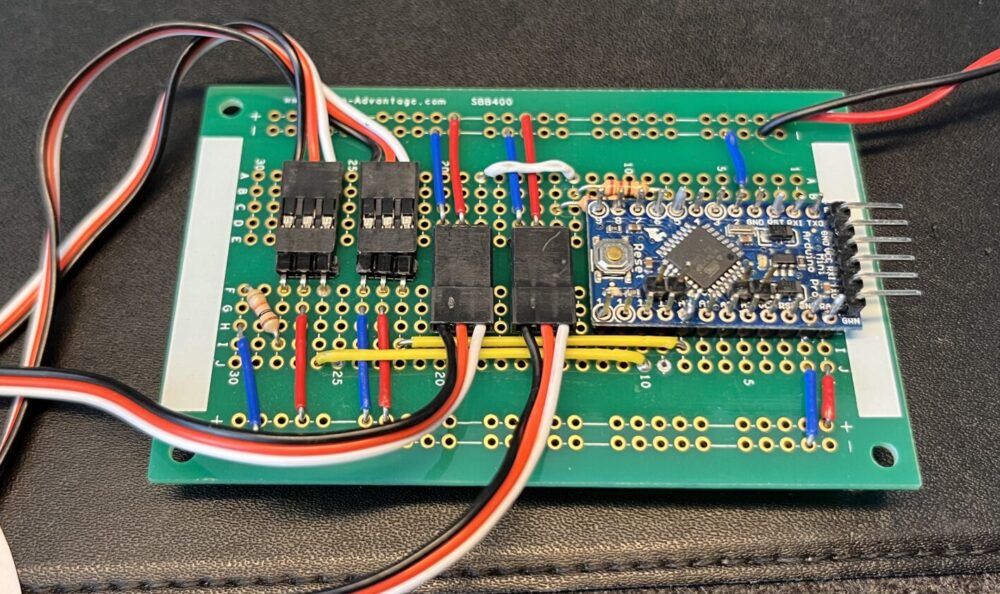
- Laid out and soldered a new control board, powered by an Arduino mini, in hopes to reduce the form factor and dimension of the base pedestal
- Designed a small 3d printed bracket to hold the button in place, preventing the need for super glue.
Shortly after, I was able to reprint the outer shade successfully, as well as the main control knob. Fortunately, all of the pieces fit together perfectly.
Pedestal
After many attempts, I was unable to create a base pedestal that could conceal the control board without detracting from the overall aesthetic of the lamp. A pedestal that was too wide made the lamp look like a snow globe. A pedestal that was too tall made the lamp look like a gumball machine.For the time being, I designed a low profile pedestal with a cable passthrough. This cable bundle will run to a remotely located control box for the initial demonstration. This problem will be easily solved in the near future with a custom PCB, allowing all internals to be contained within the pedestal. Below are some renders of the design I settled on, and the design in real life.
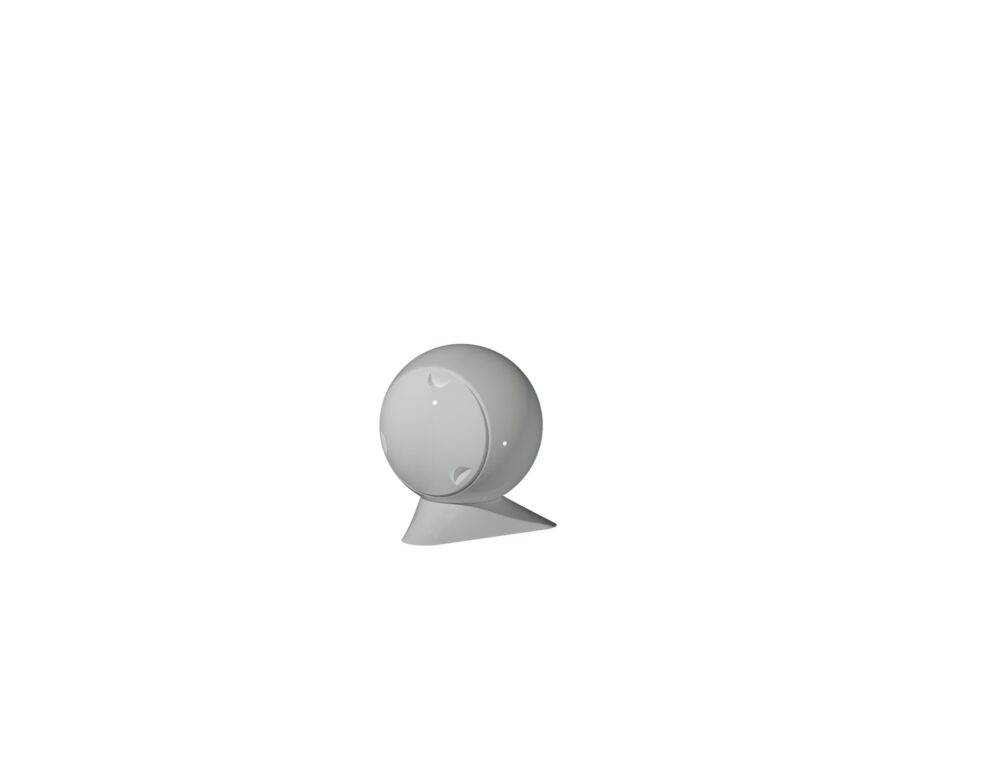

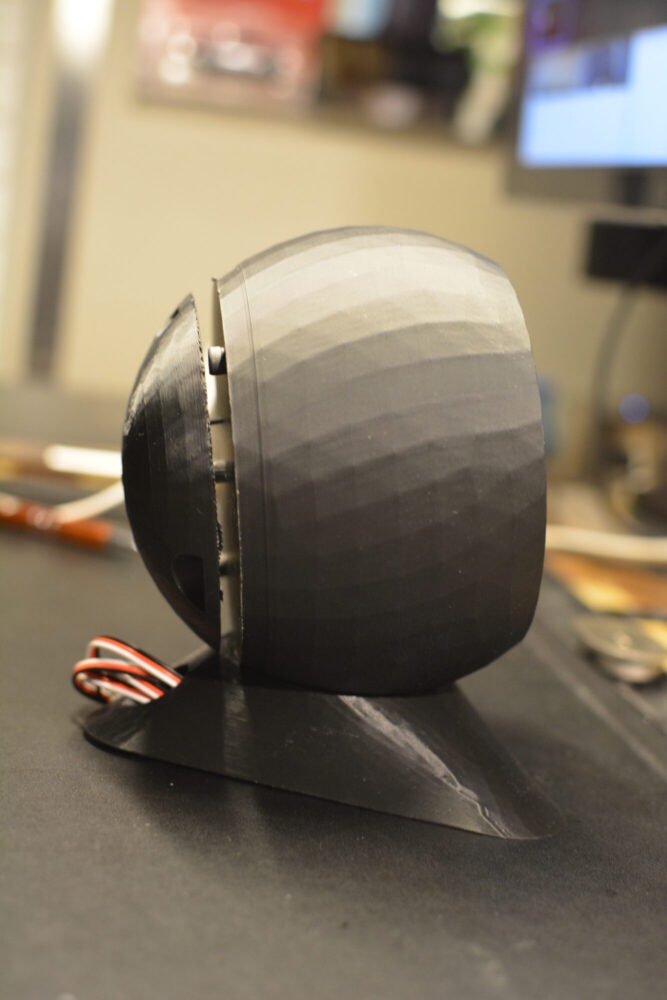
After settling on this design, I finished the remaining prints and got everything connected. Below are some images demonstrating the silhouette of the lamp.
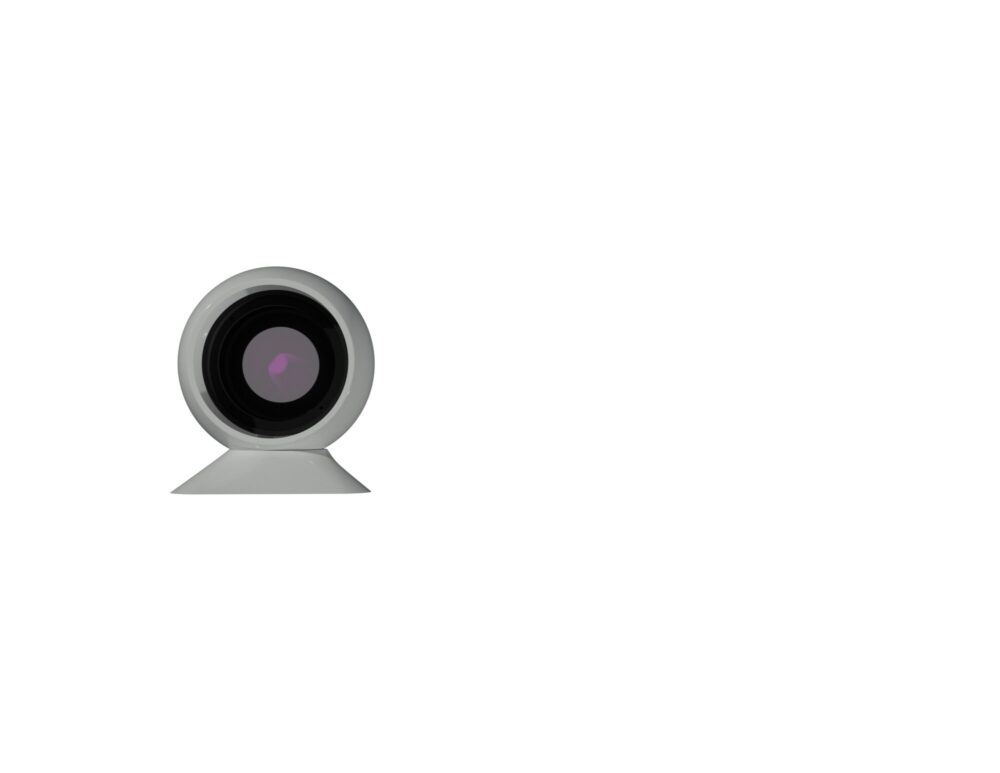
Final Product (For now)
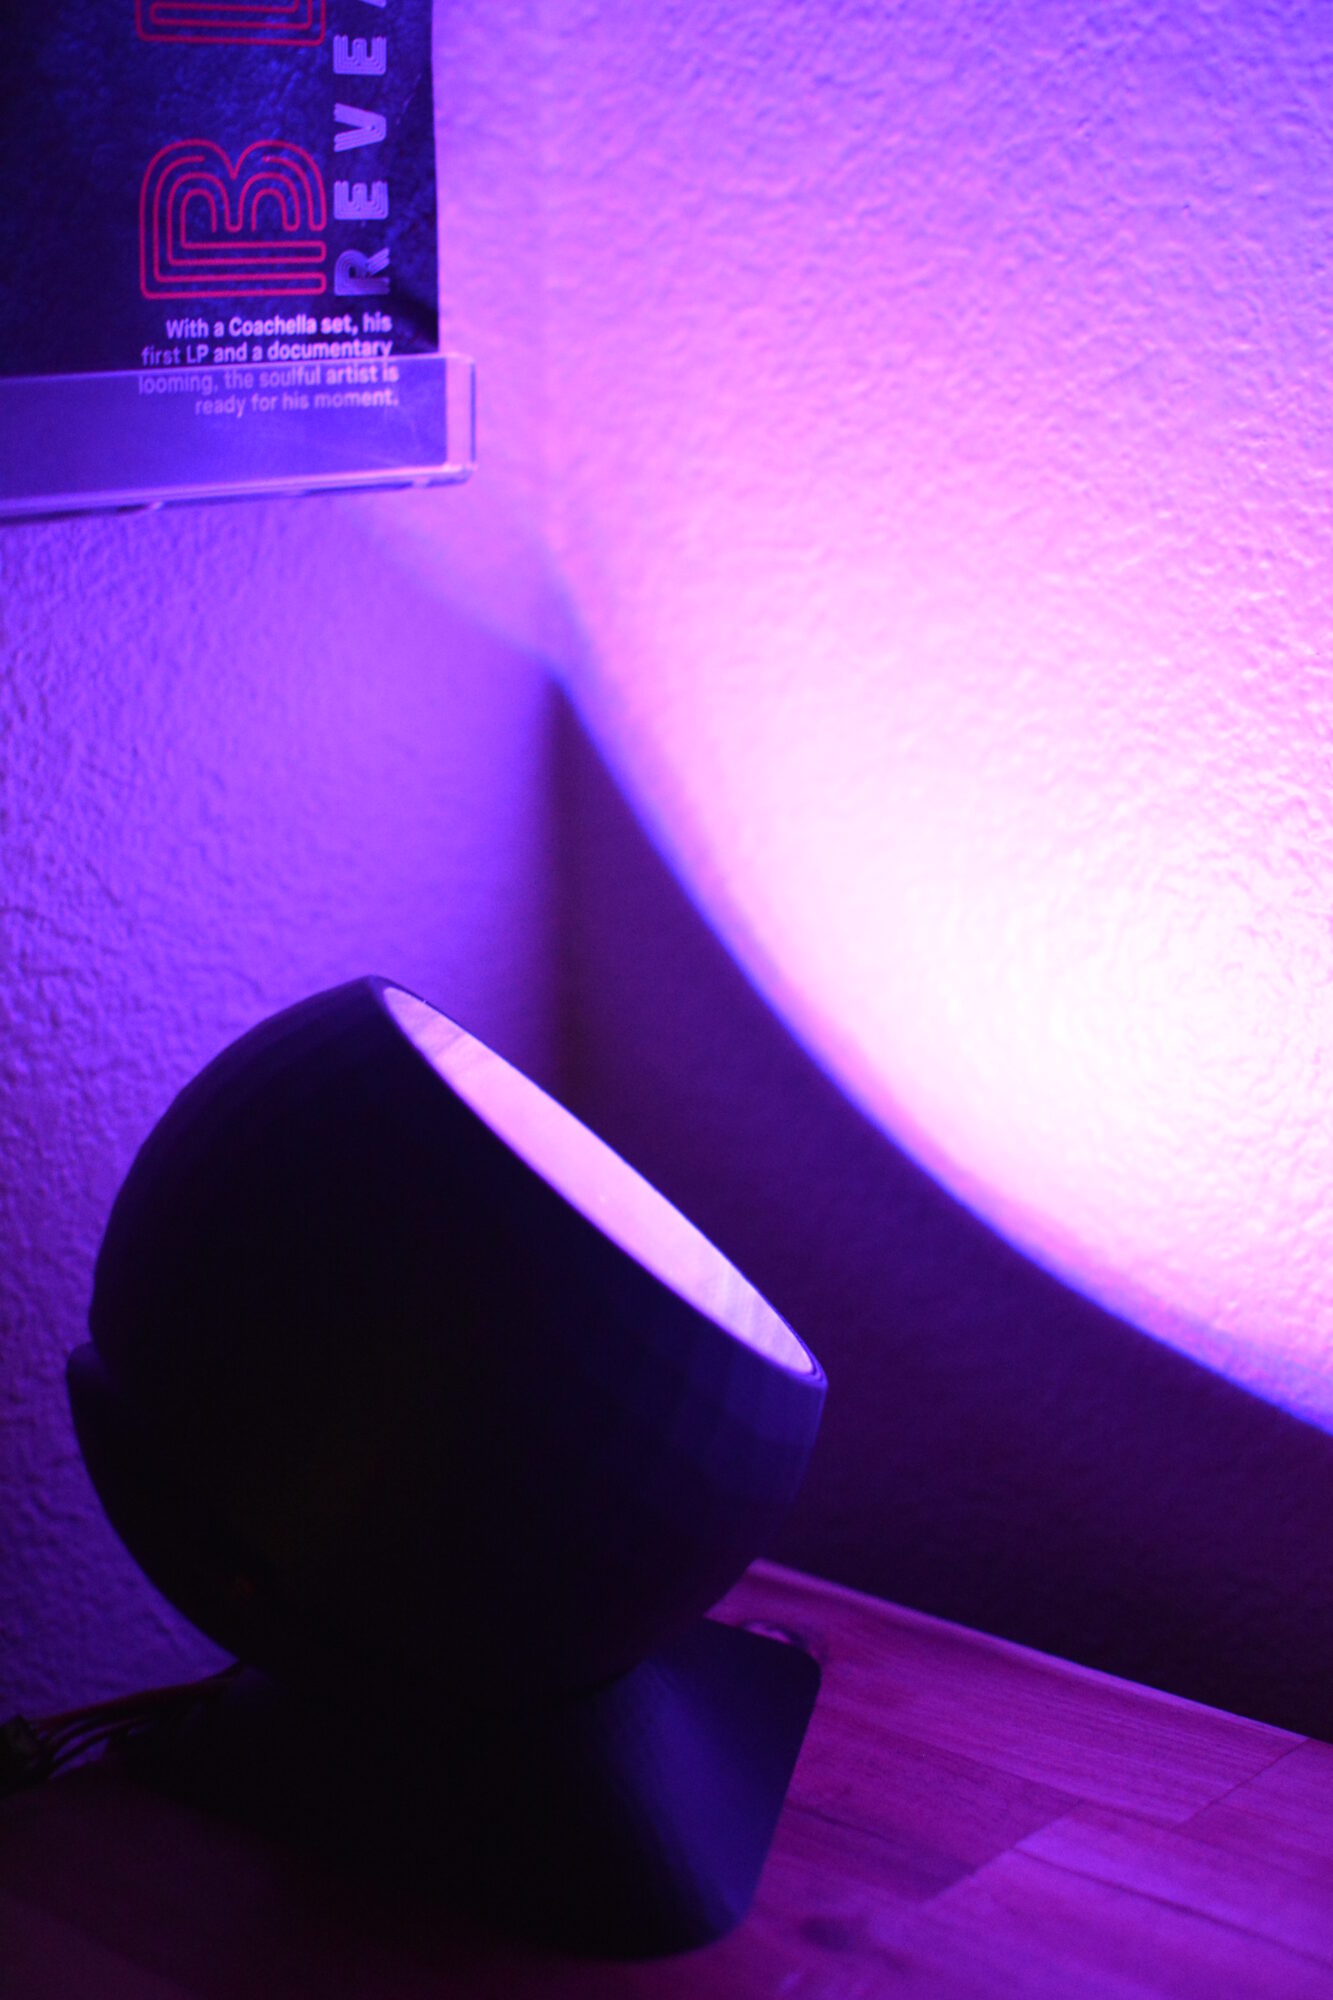
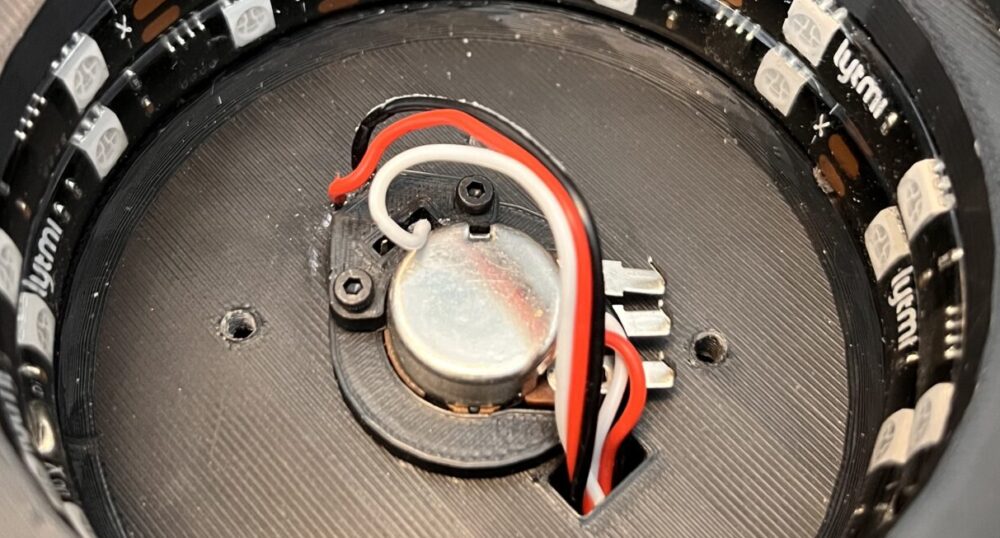
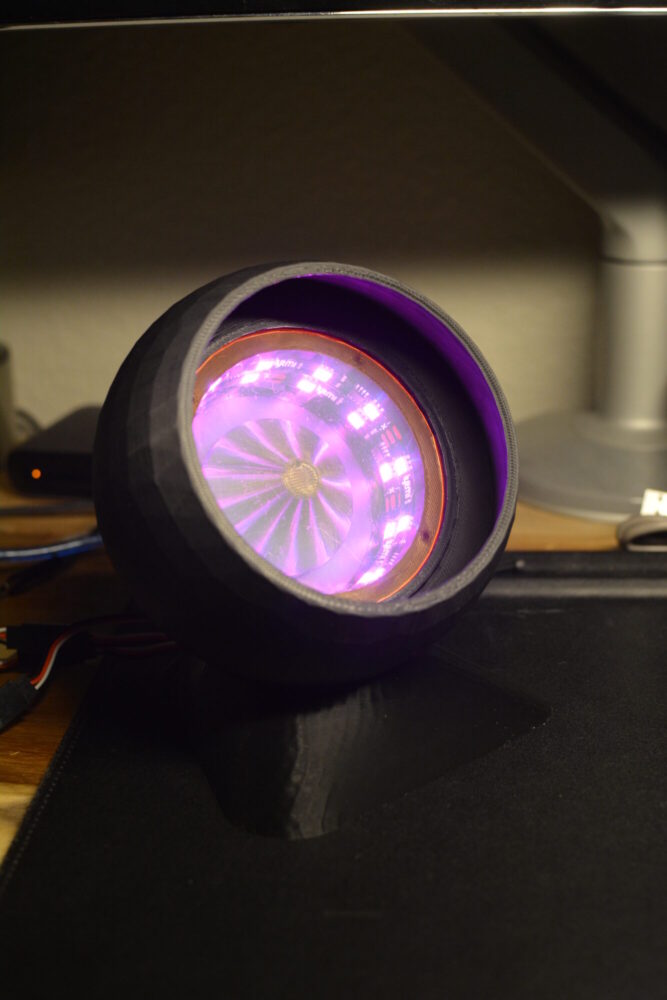
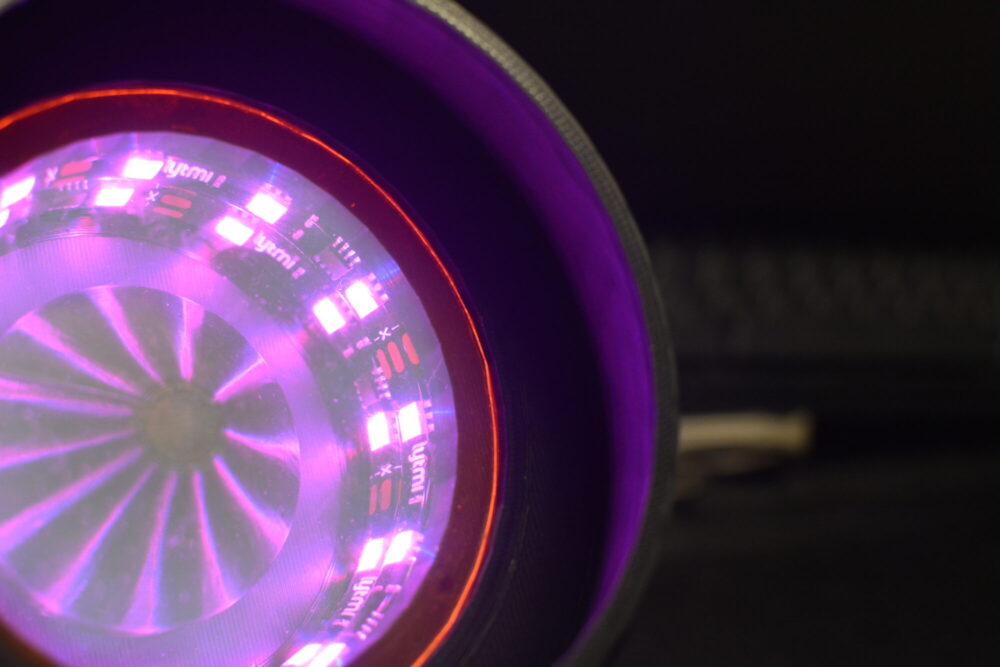
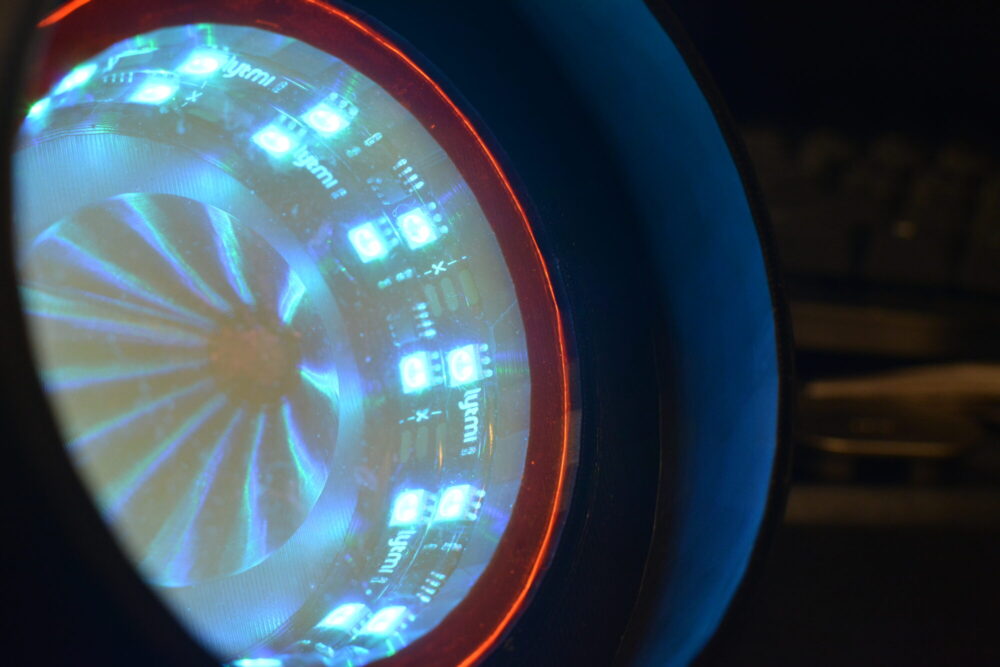
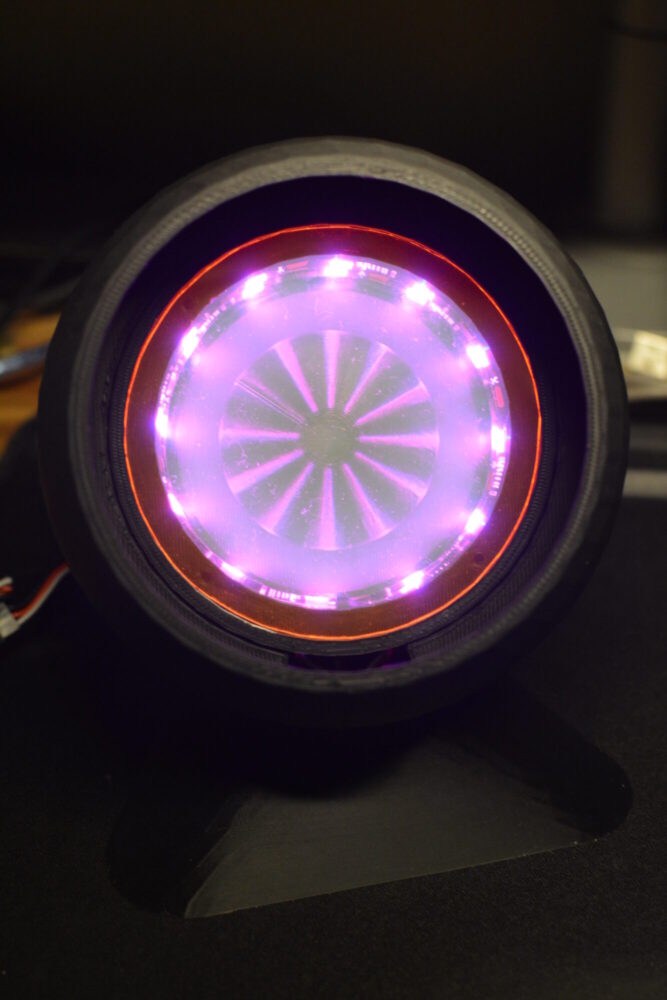
Below are some close up shots of the light element, conical reflector and diffusing plastic sheet.
Pictures of Lamp
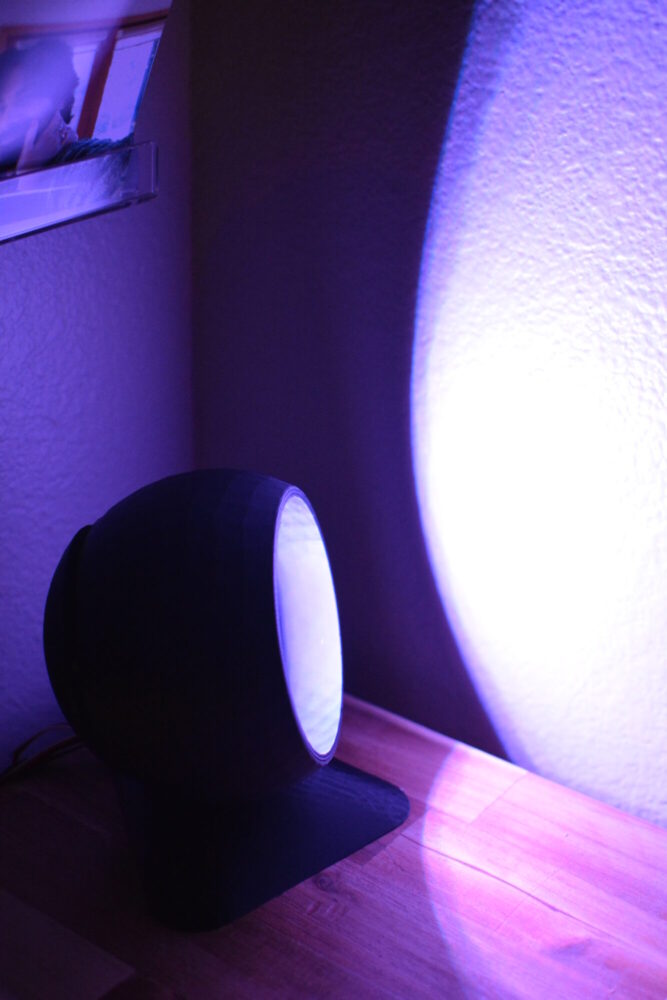
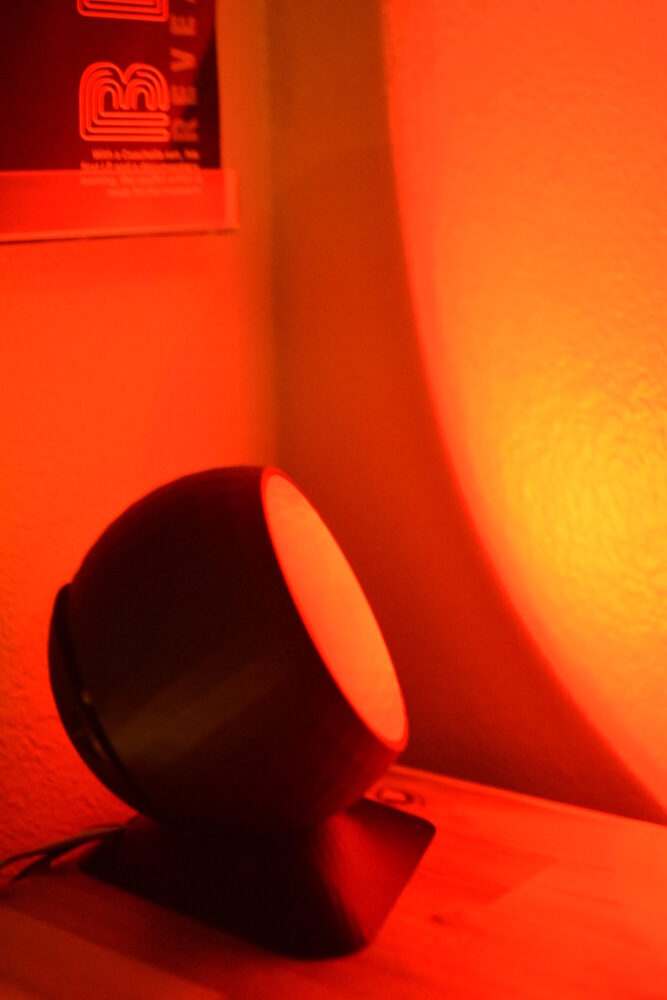
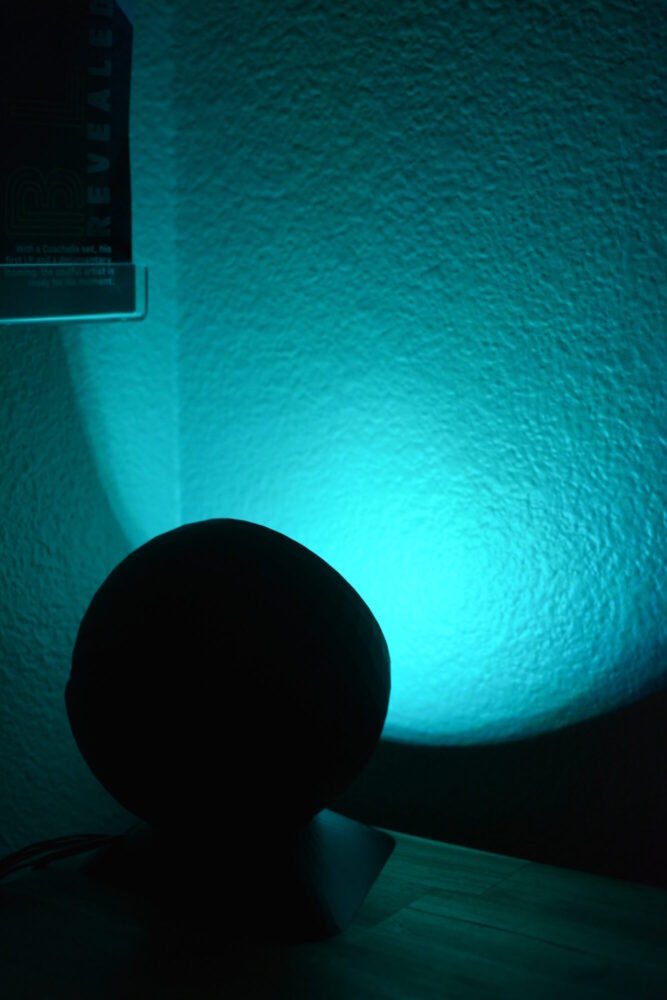
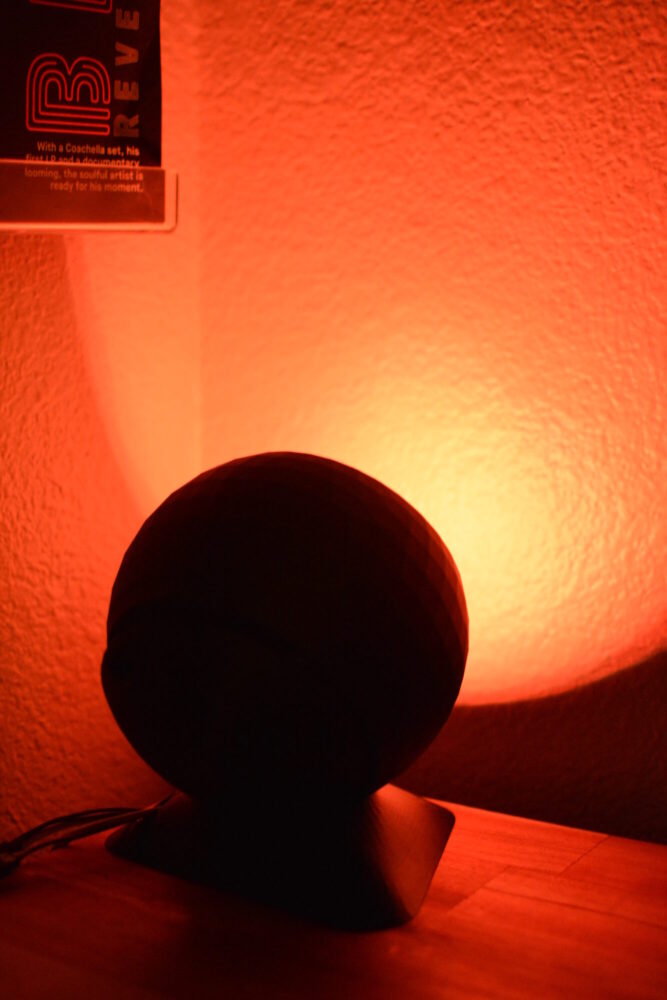
And finally, some pictures of the lamp in context.


Conclusion
Functionally, I am happy with the result of this project. The lamp is intuitive to use, and the operation of the knob and mode button is smooth. The light emitted from the lamp is bright, and casts an elliptical glow when faced toward a wall.
Aesthetically, I am content (for now) with the way that the lamp turned out. I believe that the final product is a good representation of the Space Age aesthetic due to its spherical shape and design details. The LED strips themselves are an interesting visual element, especially in a stacked arrangement. I originally had intended to paint the outside surface of the lamp and pedestal glossy white, but the failed main print delay and outside time constraints were unforgiving. Although it results in a slightly different overall aesthetic, I believe that the black color of the raw print still has aesthetic merit. I plan to sand and paint the next version of this lamp I create in white, and compare it to the original. I also hope to paint/cover the reflector cone and the base of the interior puck with a mirrored surface, to increase outward reflection and overall light output.
I had a lot of fun designing and creating this artifact. The Upcycle Project brief was a form of design I had only tried a few times in the past: designing a product around one component/element and working up from there. This “backwards” form of designing opened my eyes to new aspects of the design process and forced me to work through problems I had never faced before. I am excited to try this method again in the future for other projects, and I look forward to continuing this one in the near future.
Editors Note: I apologize for the horrible formatting. WordPress and I are not friends.
Image Sources:
Verner Panton Globe Pendant
https://www.verner-panton.com/en/werk/vp-globe-vp0477-00-b-d07/
Eero Aarnio Ball Chair
The Ball Chair, Eero Aarnio’s Space Age Masterpiece, Was Almost Never Made
SR71
Apollo
https://www.nastarcenter.com/season-of-apollo/part-five-apollo-command-service-modules.html
LYTMI TV Backlight
Lytmi Fantasy 3 TV Backlight Kit – HDMI 2.1
3 Comments. Leave new
[…] https://www.aesdes.org/2025/02/19/space-age-lamp-design-report/ […]
I’m really impressed with how much development you fit it the few weeks we had on this project! Seeing you take detailed sketches to prototype and second design iteration while handling geometry constraints, large 3D prints, and electronics is really inspiring. Also, your ideas to sand, paint, and reflectively coat the reflector is exactly where I would suggest to go next, and I would love to see how that turns out. Also, I think you did really well with creating shapes that fit the space age aesthetic; Is the space age aesthetic one that you wish to continue pursuing in either personal projects or acquired furniture and decorations? Has your opinion changed at all on the space age aesthetic over the course of this project? Or have you discovered any details, insights, or challenges related to it?
Hi Arjun,
This is SUCH a cool project and I am really impressed at the detail and level of craftsmanship that went into the lamp. I think you did a great job of designing the enclosure to look like it was from the space age era, and it fits the space age aesthetic well. I think having the enclosure be metallic or shiny in some capacity would add to the overall space age aesthetic well. I would have loved to see videos of the lamp with the colors changing via the knob. Overall amazing job!