
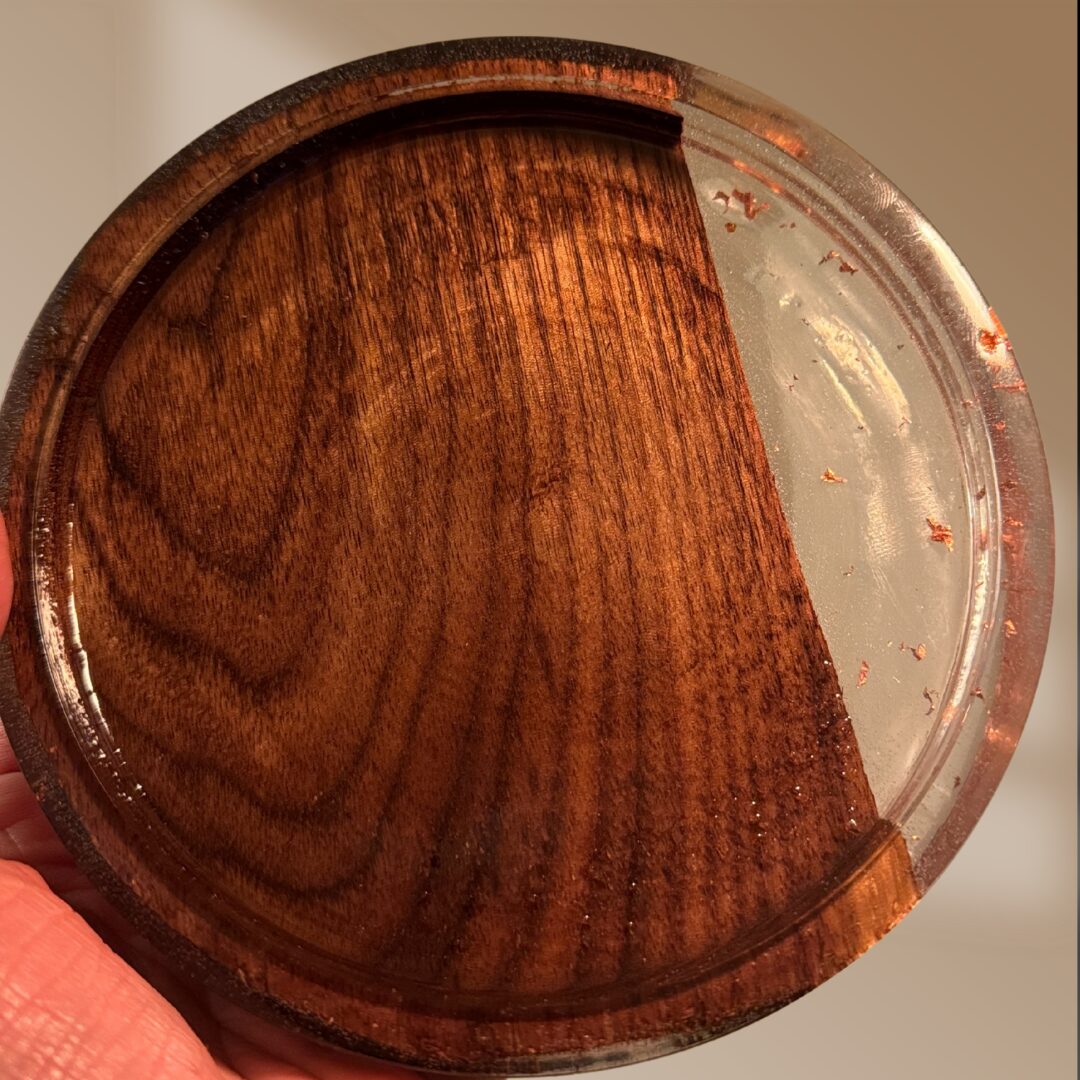
For my upcycle project, I made a set of small platters that embody an organic patchwork aesthetic. In the context of the woodworking world, this aesthetic is often defined by pieces that are slightly askew in character. By leaning into the power of asymmetry and negative space, the organic shapes and characteristics of the wood(s) emerge.
Project Inspirations
To ideate my project’s aesthetic, I drew inspiration from three key players in the woodworking world. First, the Woodworkers Institute, which has lots of resources for mastering the art of turning a natural edge bowl, leading me to keep the live wood edges intact. Second, I have always adored Mill and Mooch’s products, especially her mastery of the use of gold flakes in her bowls. Lastly, I really enjoy Alon Dodo’s patchwork wood furniture, which relies on simplistic forms to highlight the beauty of imbalanced design.
Project Specs
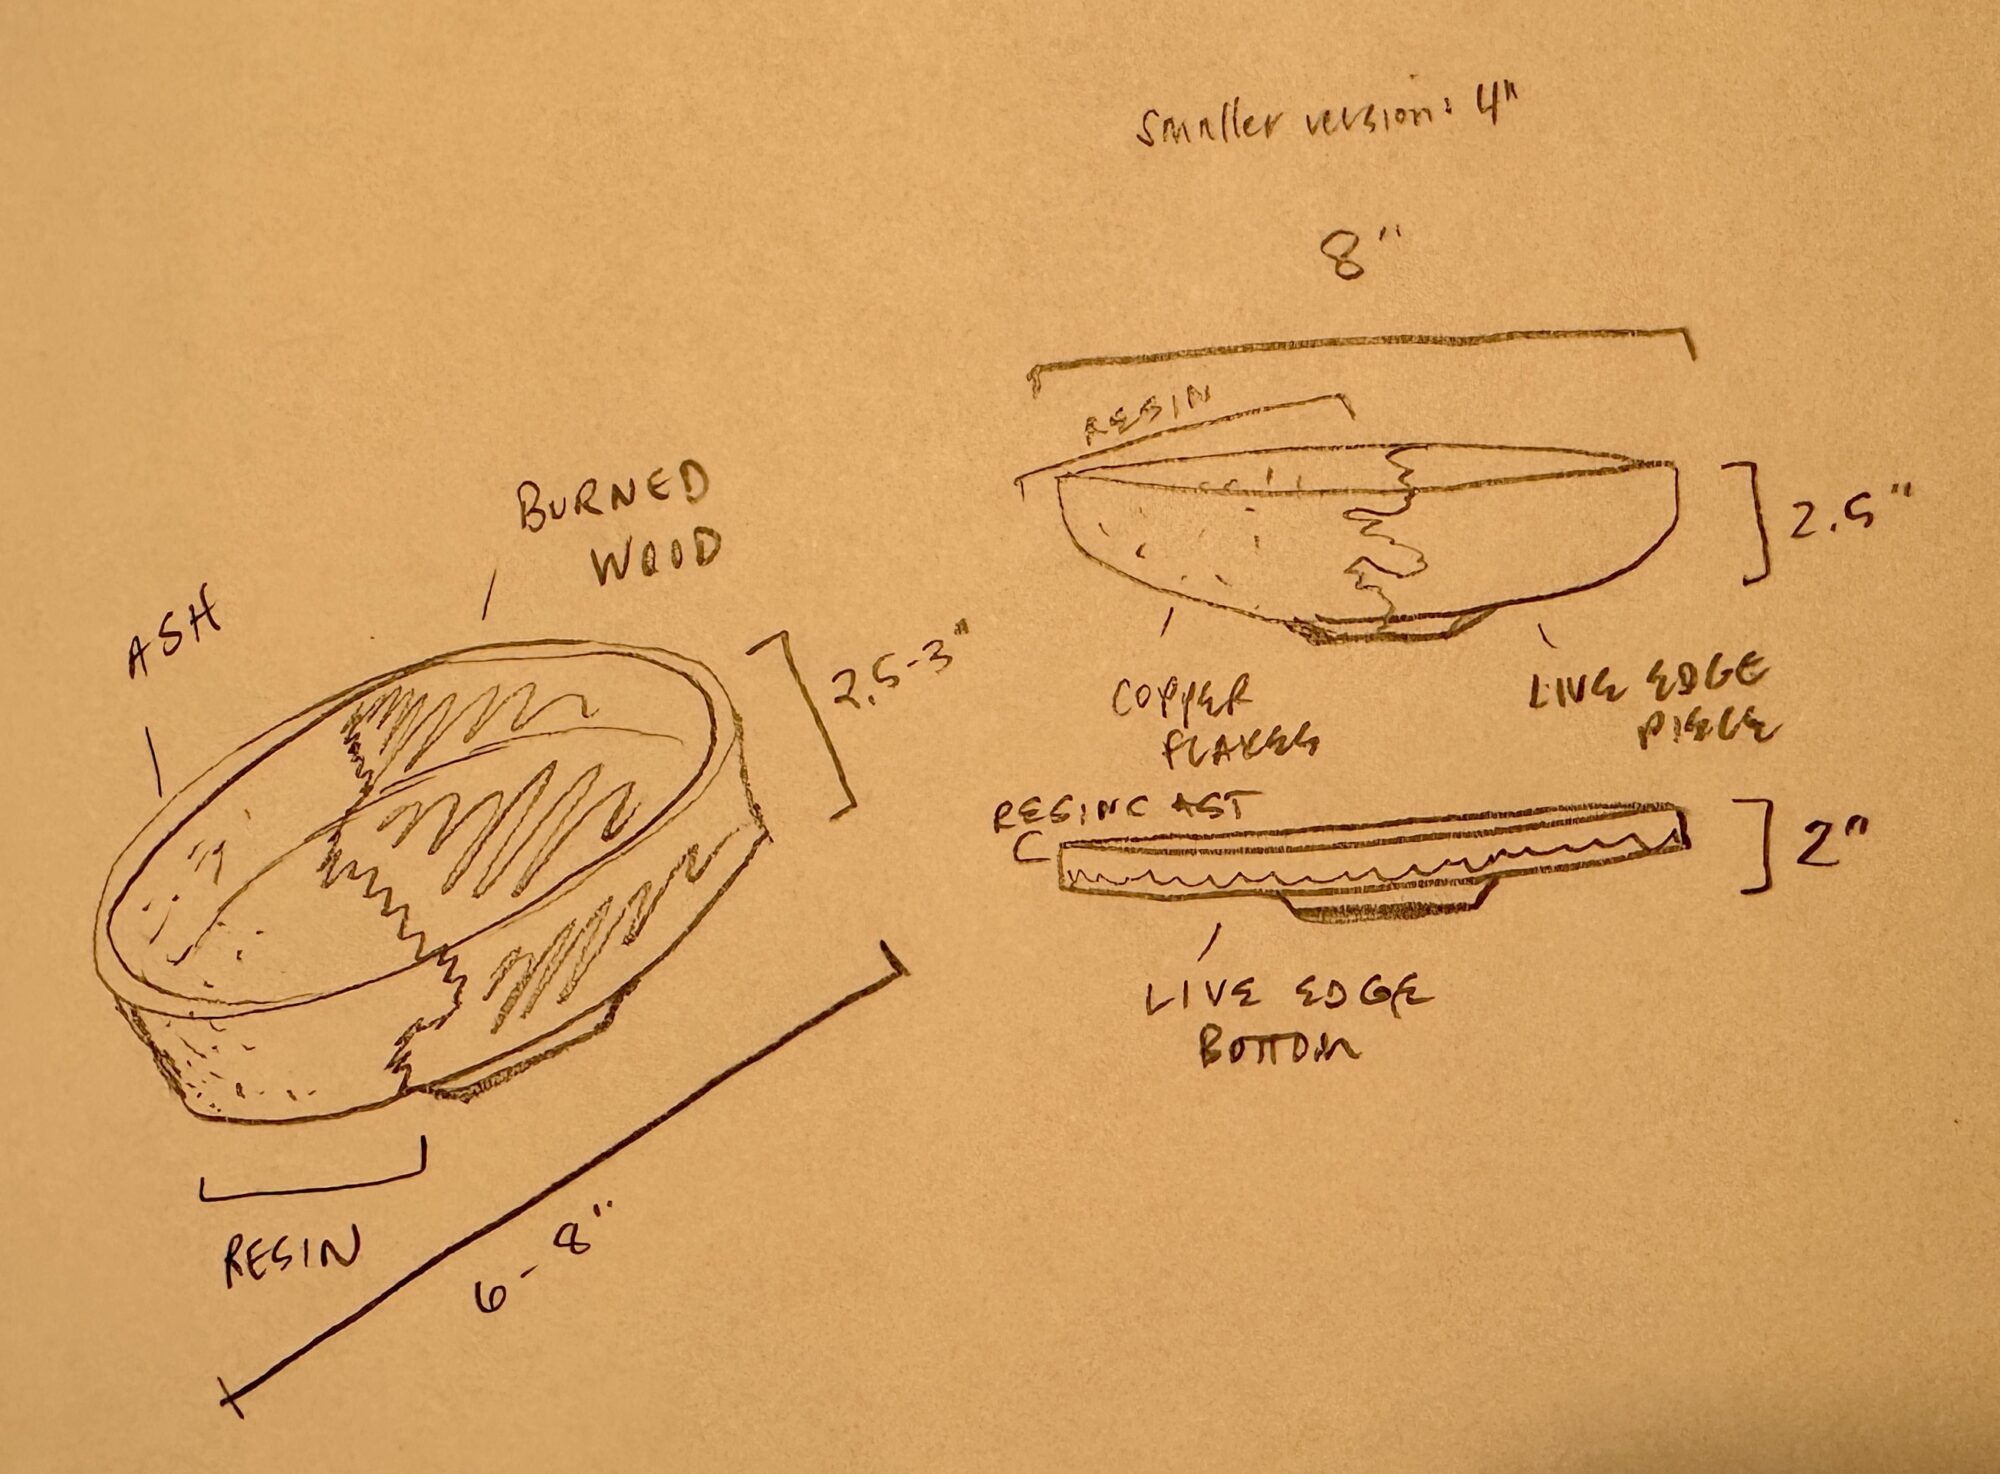
To develop the specifications for my artifacts and kick off my design process, I first did a quick look through my garage and the “Free” bins at the Denver Tool Library. In doing so, I was able to create a mental inventory of materials to be upcycled: several scrap pieces of wood and 32 ounces of unused epoxy resin. Moving into the ideation phase, I applied my aforementioned inspirations towards sketching out all of the things I could make from these leftover materials, including tableware, silverware, small side tables, a tabletop “window” art piece, and more. Having recently purchased a benchtop lathe, I decided to explore some sort of tableware (bowls, plates, etc.) so that I could practice turning with new-to-me, mixed materials. Going one step further, I was also excited to explore the intersection of form and function after our discussion in class about the Arts & Crafts era.
Form and Function
When it was time to focus on the form and function of my artifacts, I originally pursued the idea of a mixed material bowl for it’s wide range of functions and play on form. I wanted to show both curves and angles in my turning approach, such as a bowl with a flat bottom and curved edges that can hold any type of meal. Aesthetically, this combination of circular but asymmetrical would also fit exactly what I was going for.
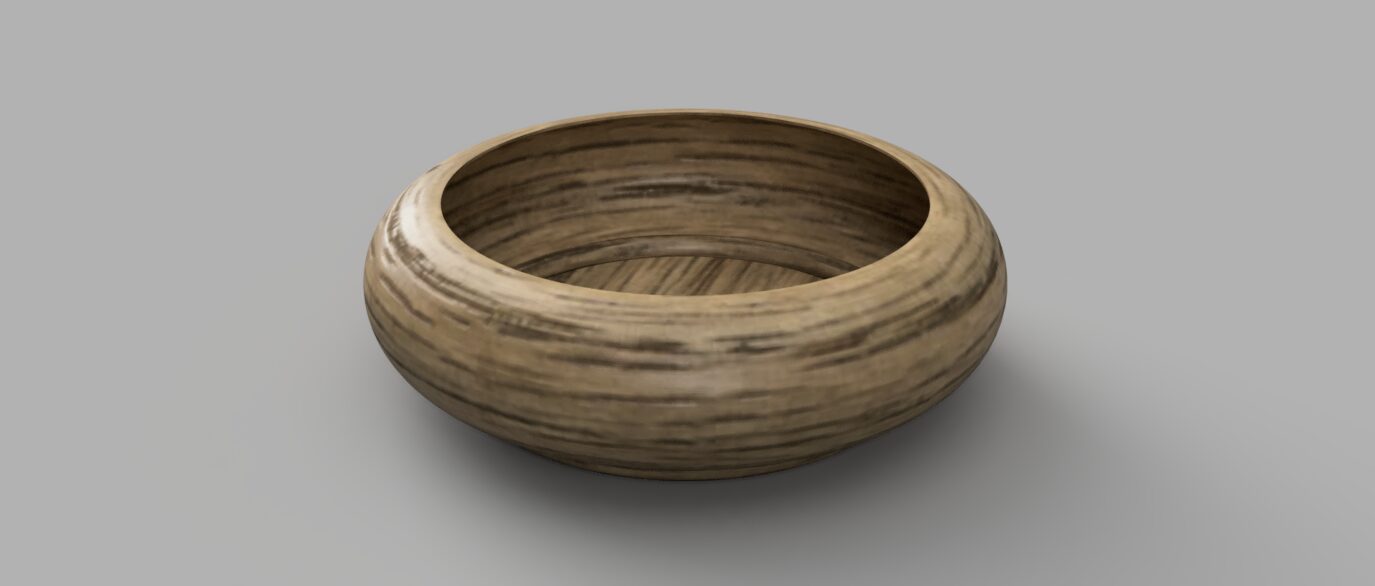
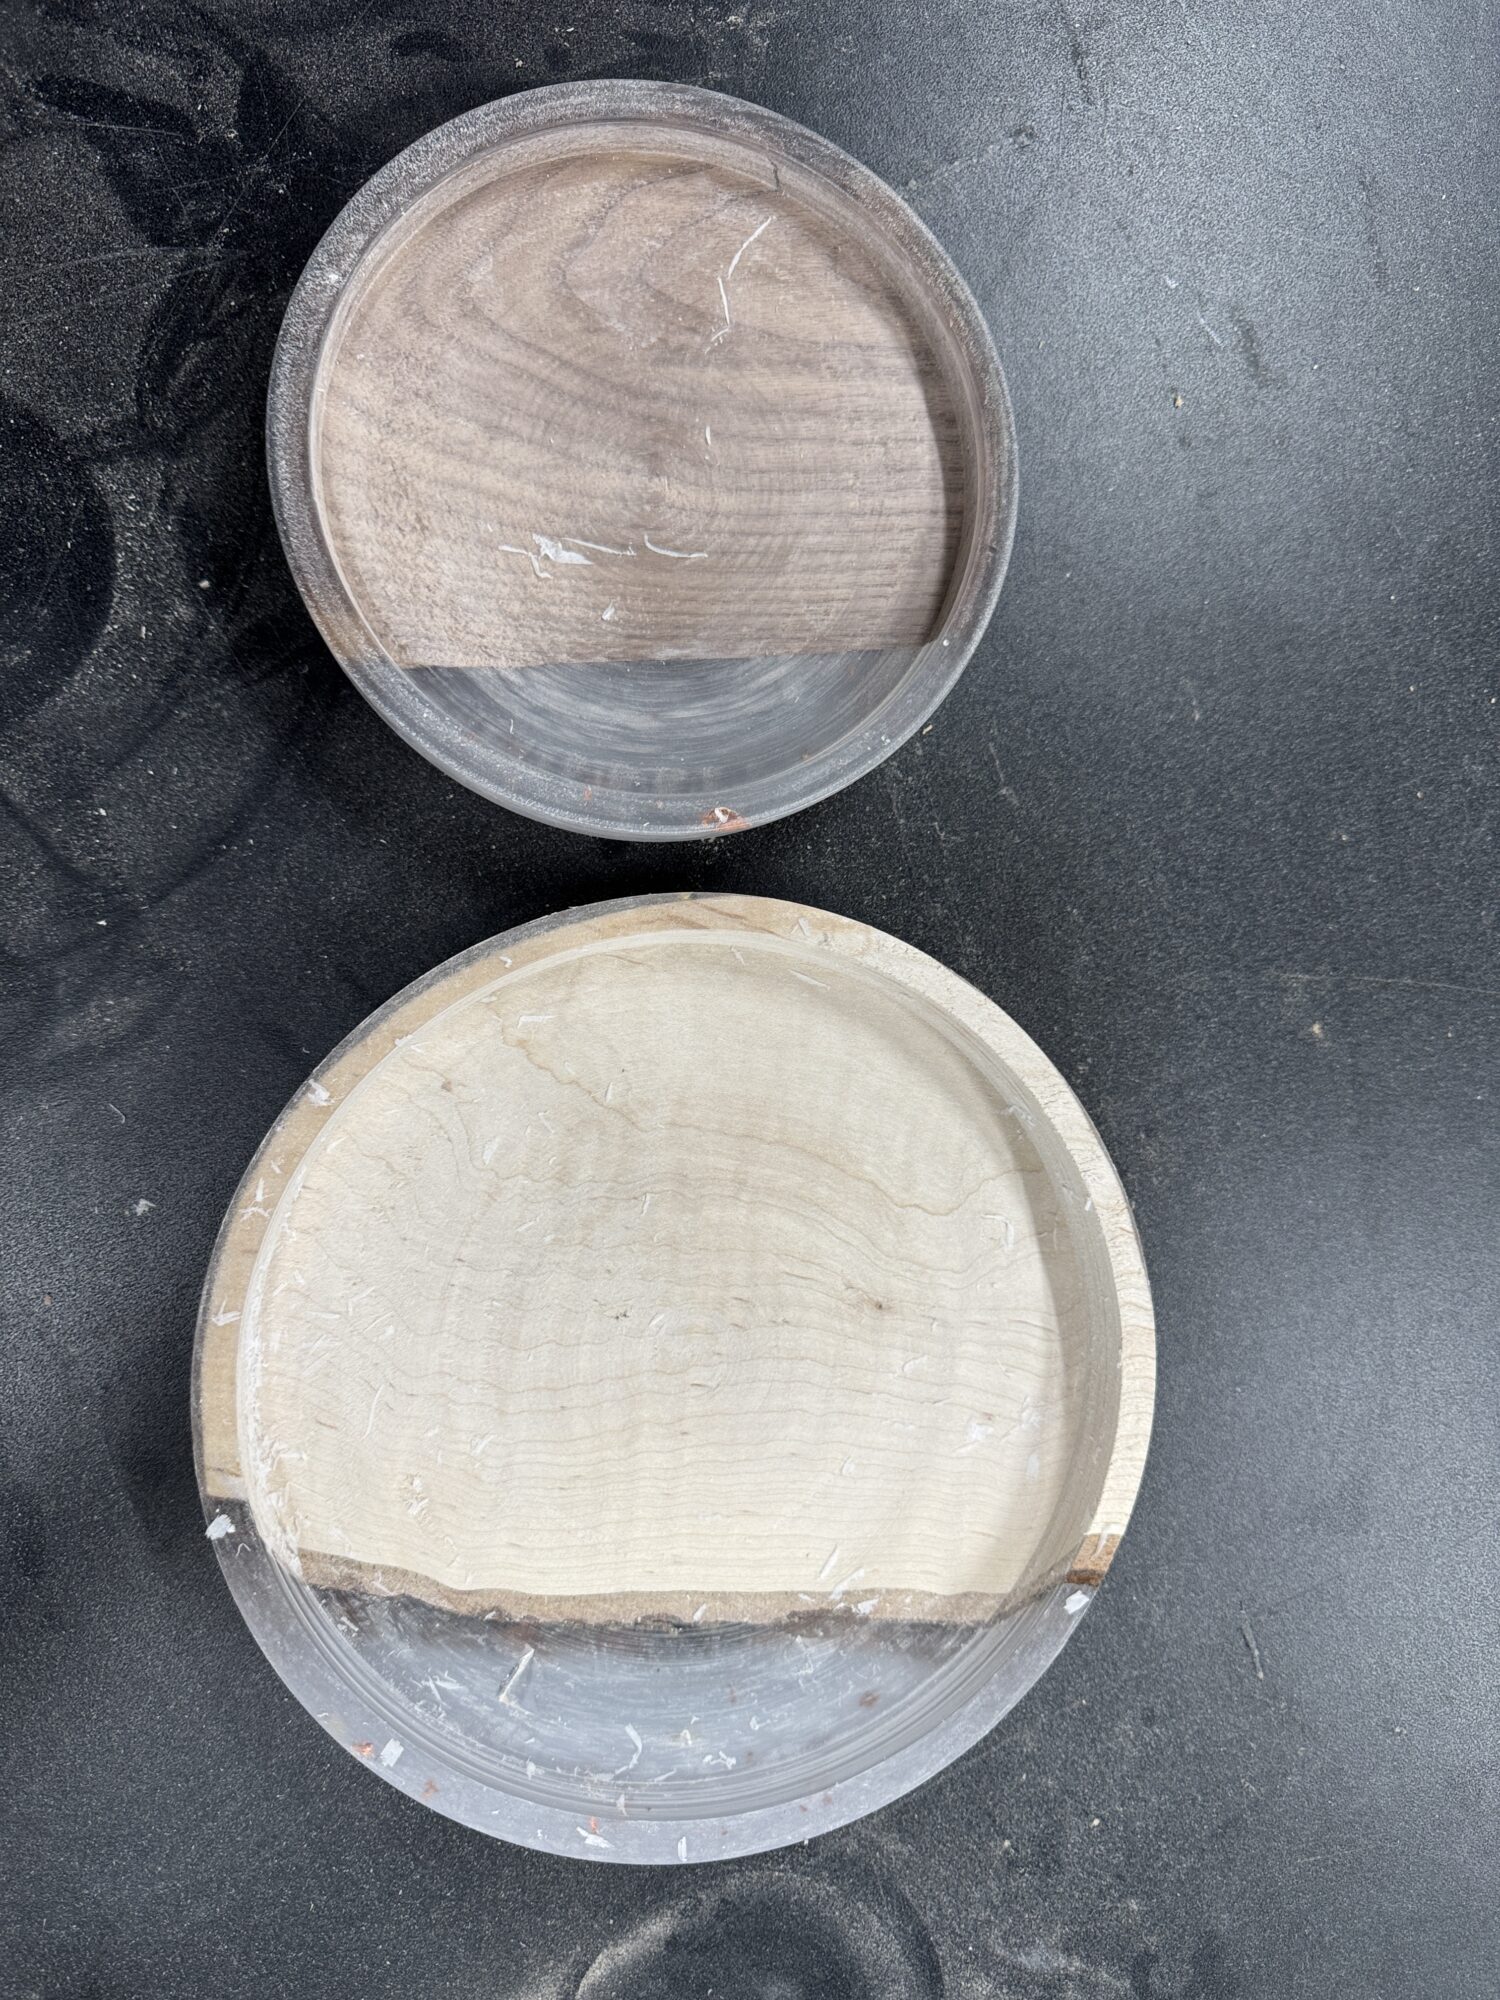
My goal posts quickly shifted when I realized at the start of the fabrication process that I did not have thick enough wood or enough resin to pursue the depth that a bowl requires. Thus, I pivoted to a platter shape that remained functionally sound but more minimalistic in form. In doing so, I was able to maintain the diameter that I was hoping for, allowing for my artifacts to fit together as a set rather than two separate, unrelated artifacts.
Fabrication Process
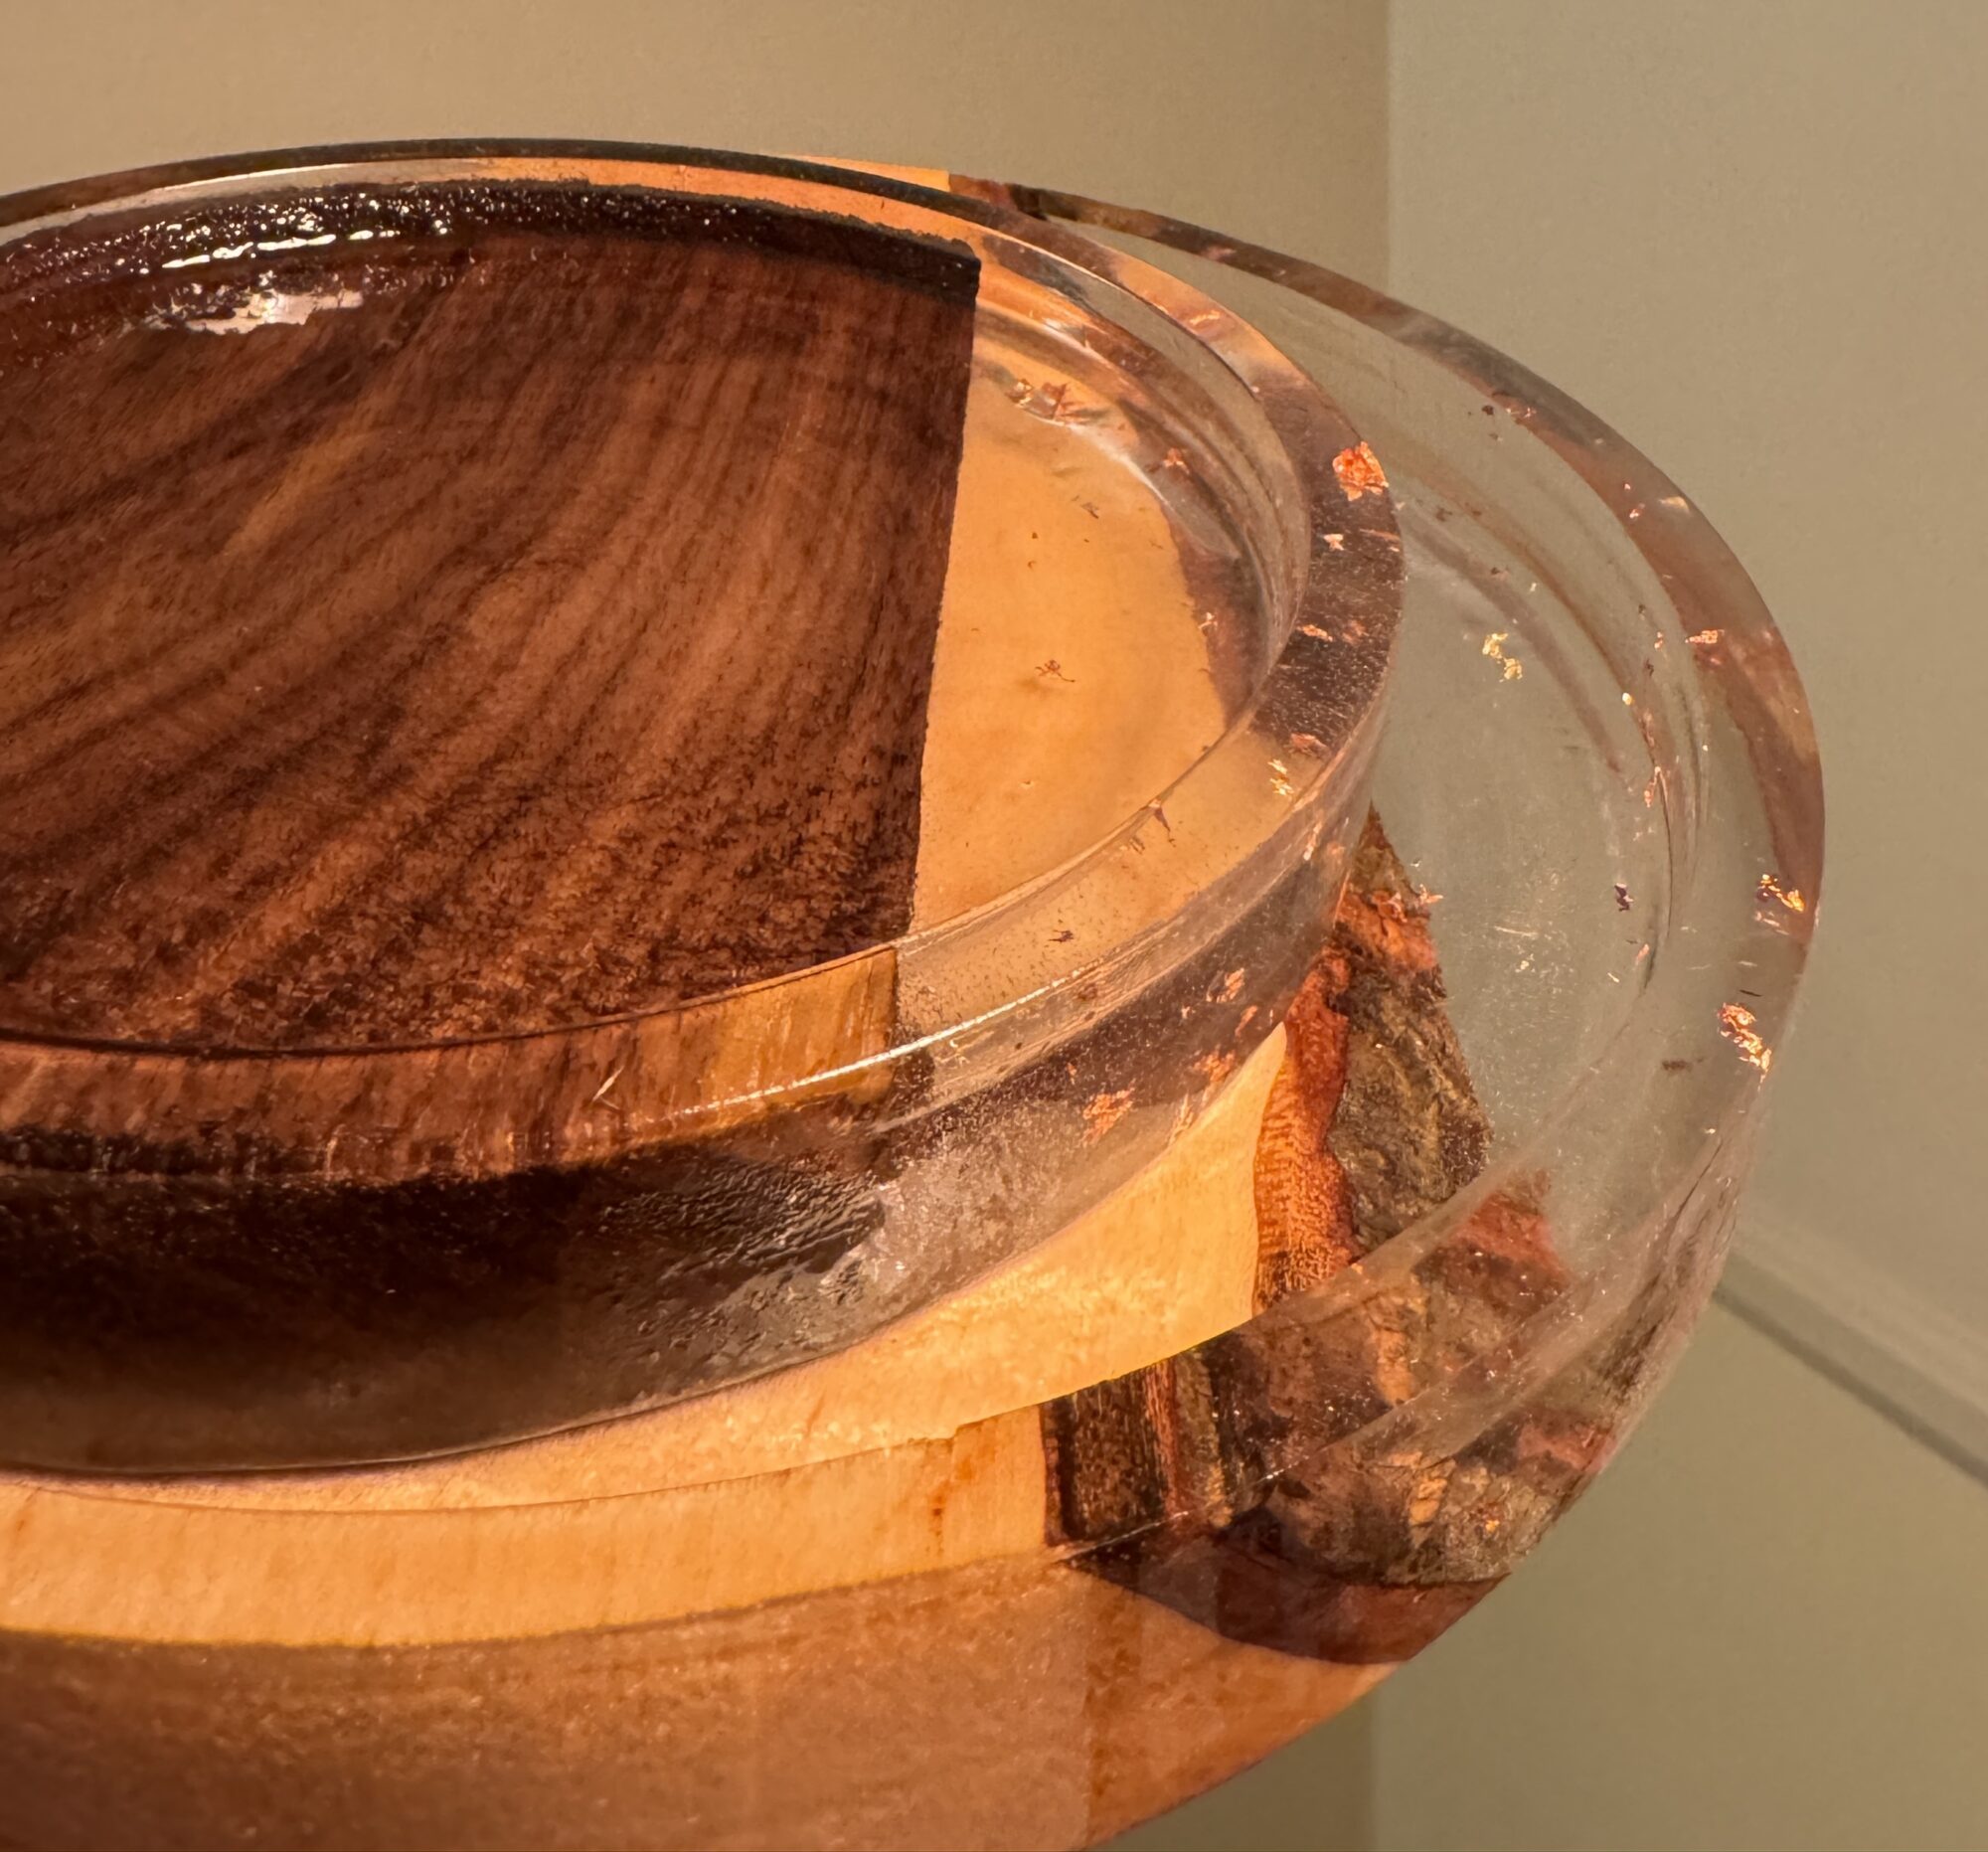
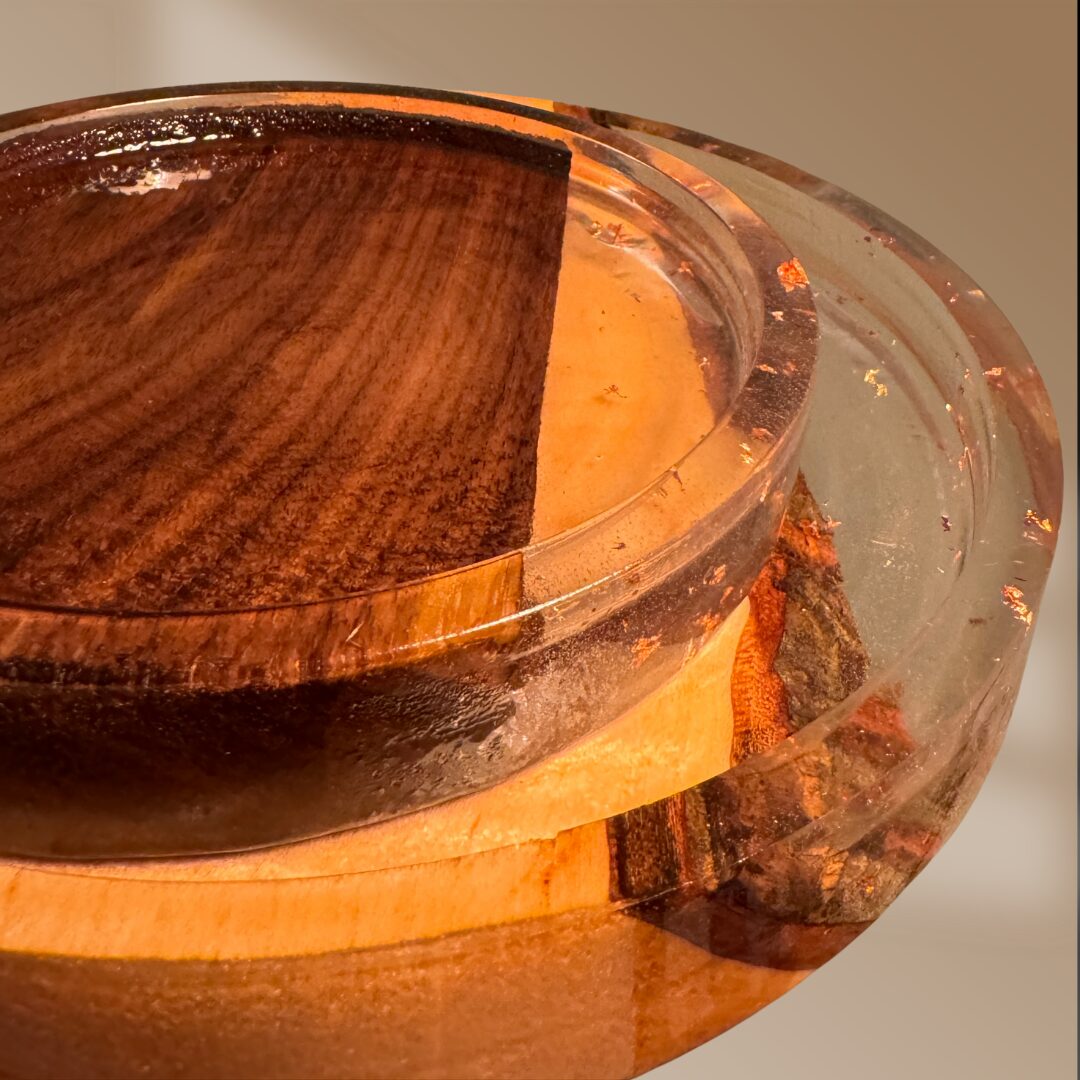
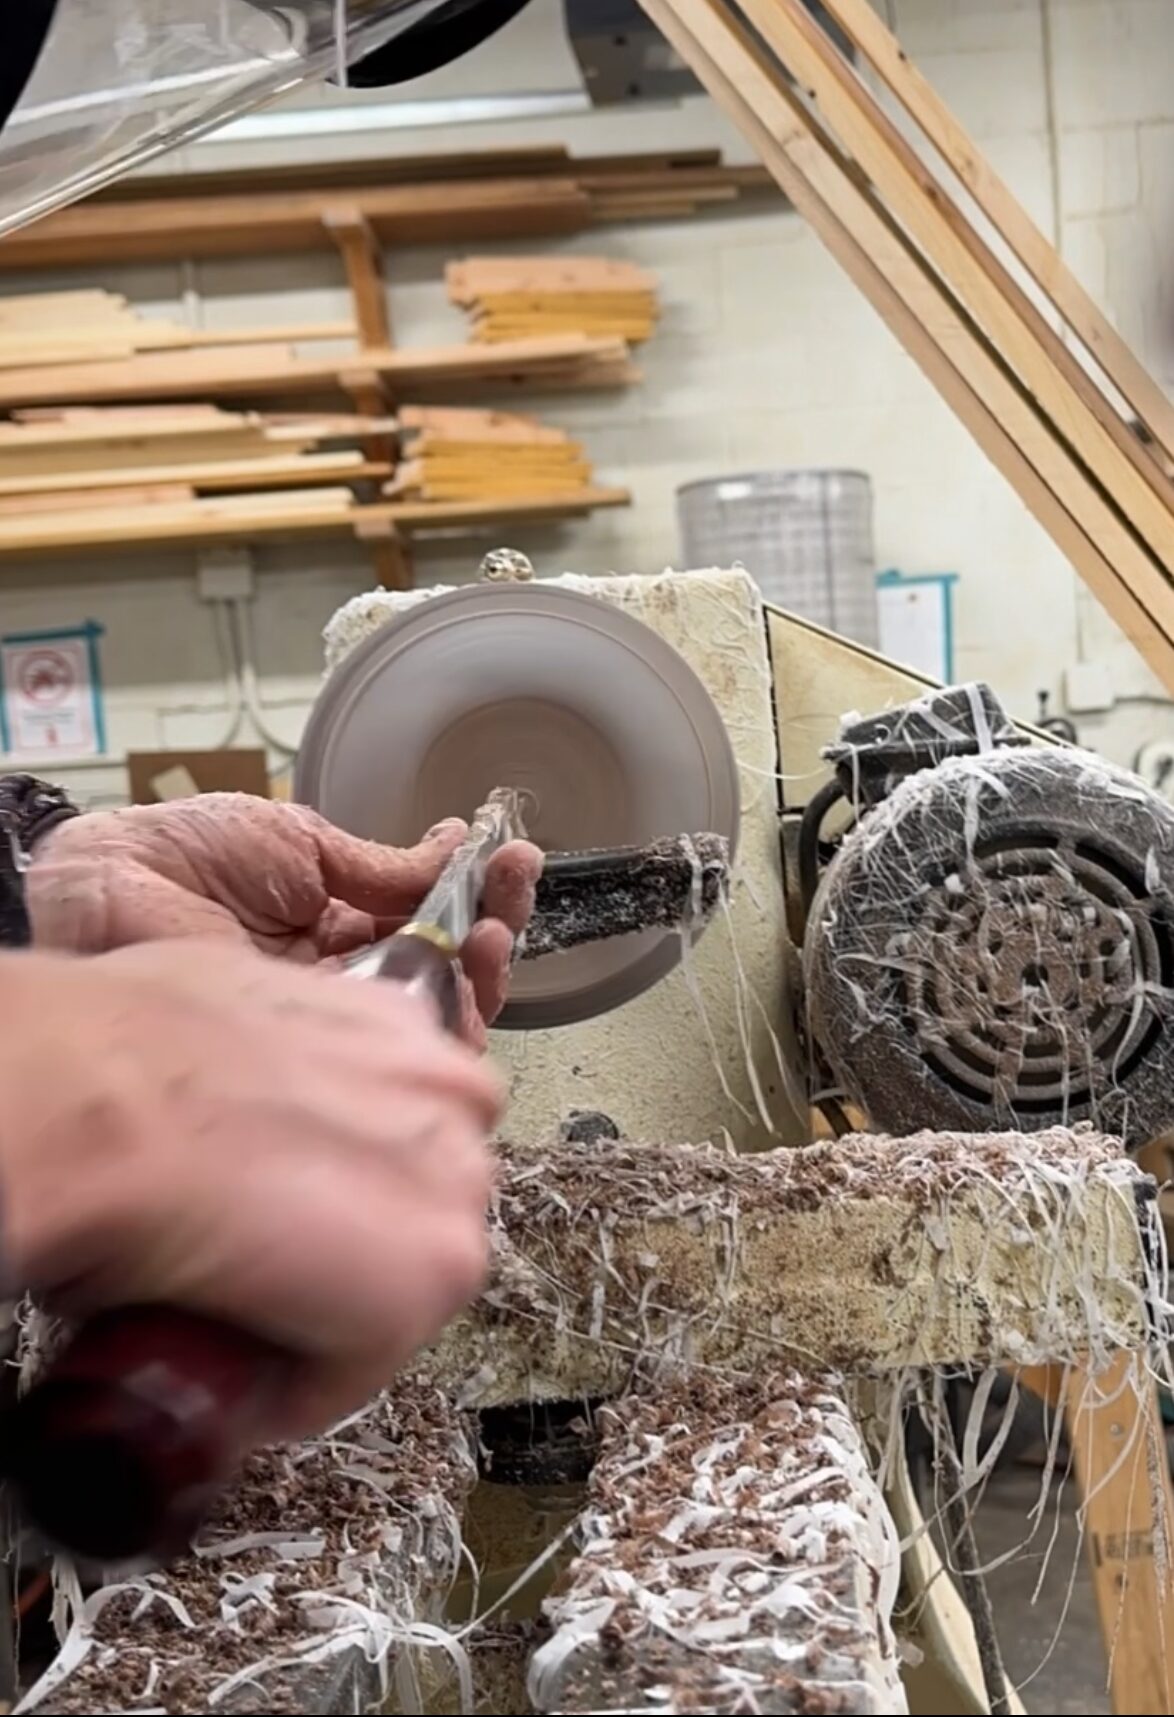
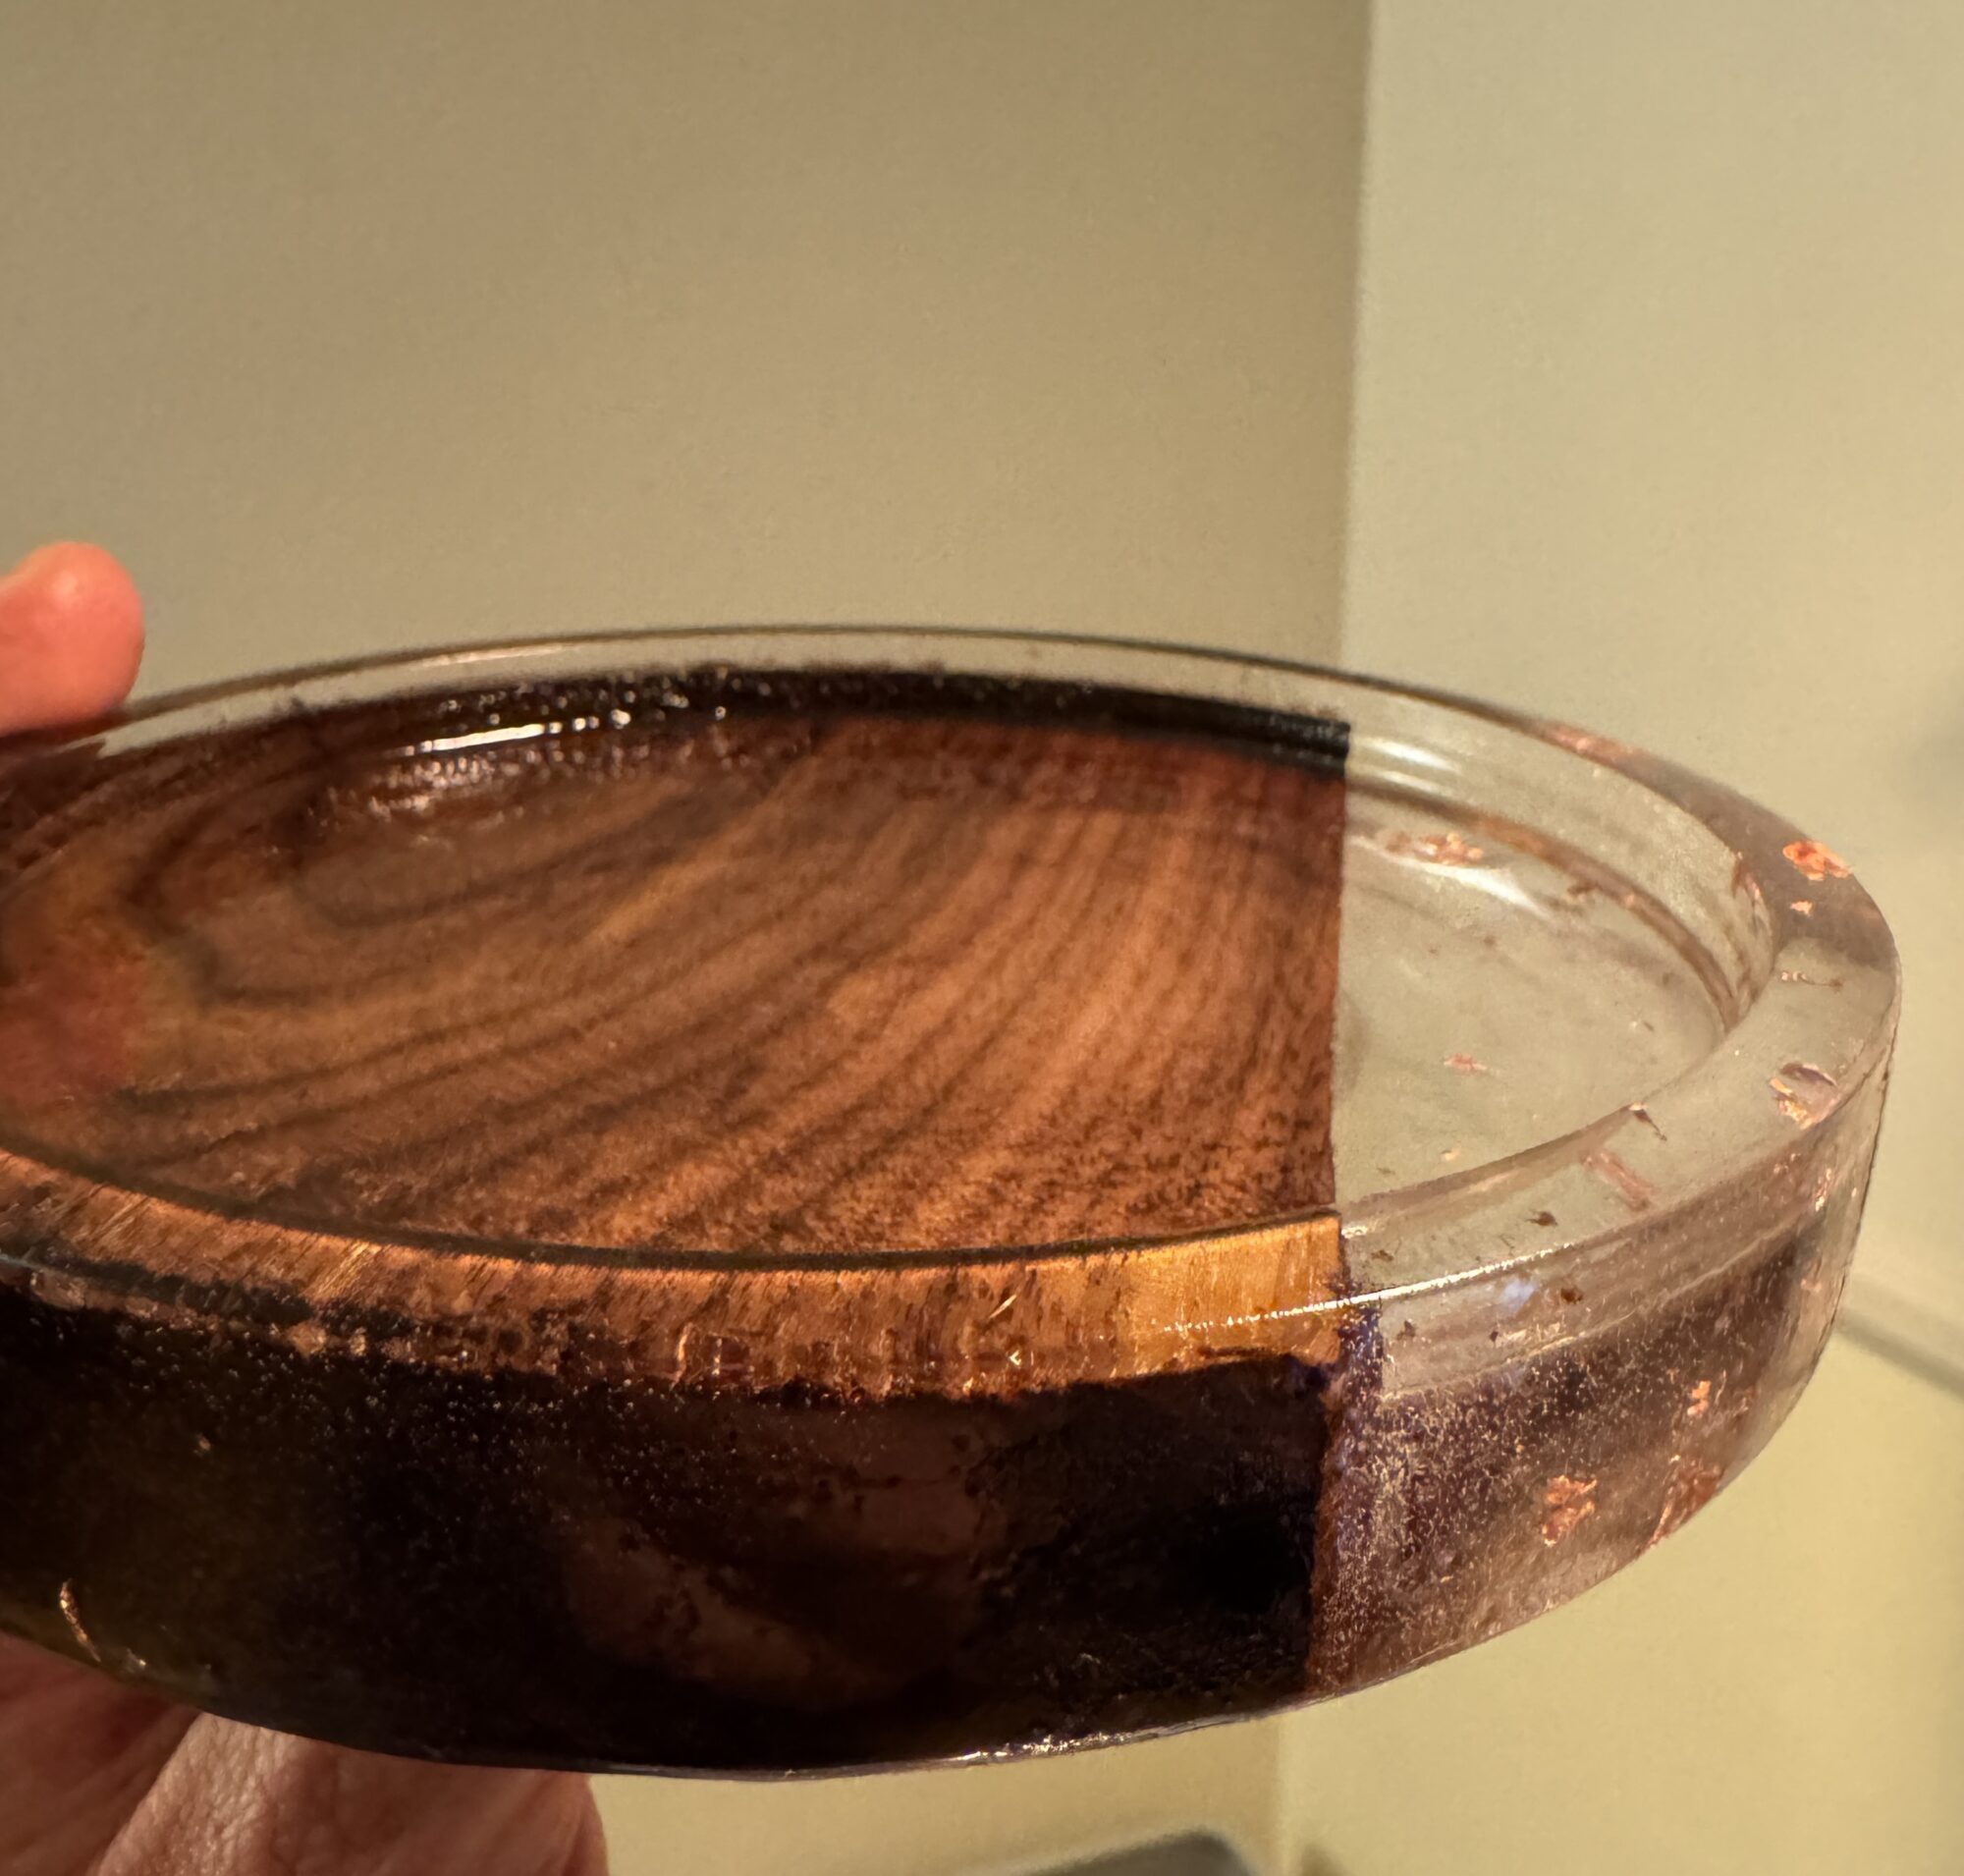
Speaking of the fabrication process, I utilized silicone molds to arrange my materials and cast the resin to create the initial dish shapes. After allowing 72 hours for the resin to shape and harden, I then turned my artifacts on two different lathes. First, on my personal lathe, I turned with a testing bowl made from the smallest mold, which was comprised of resin, ash, copper flakes, and a small cut of maple wood. Once I knew that my chuck was centered and that I could indeed turn resin, I moved on to my two ‘official’ project pieces.
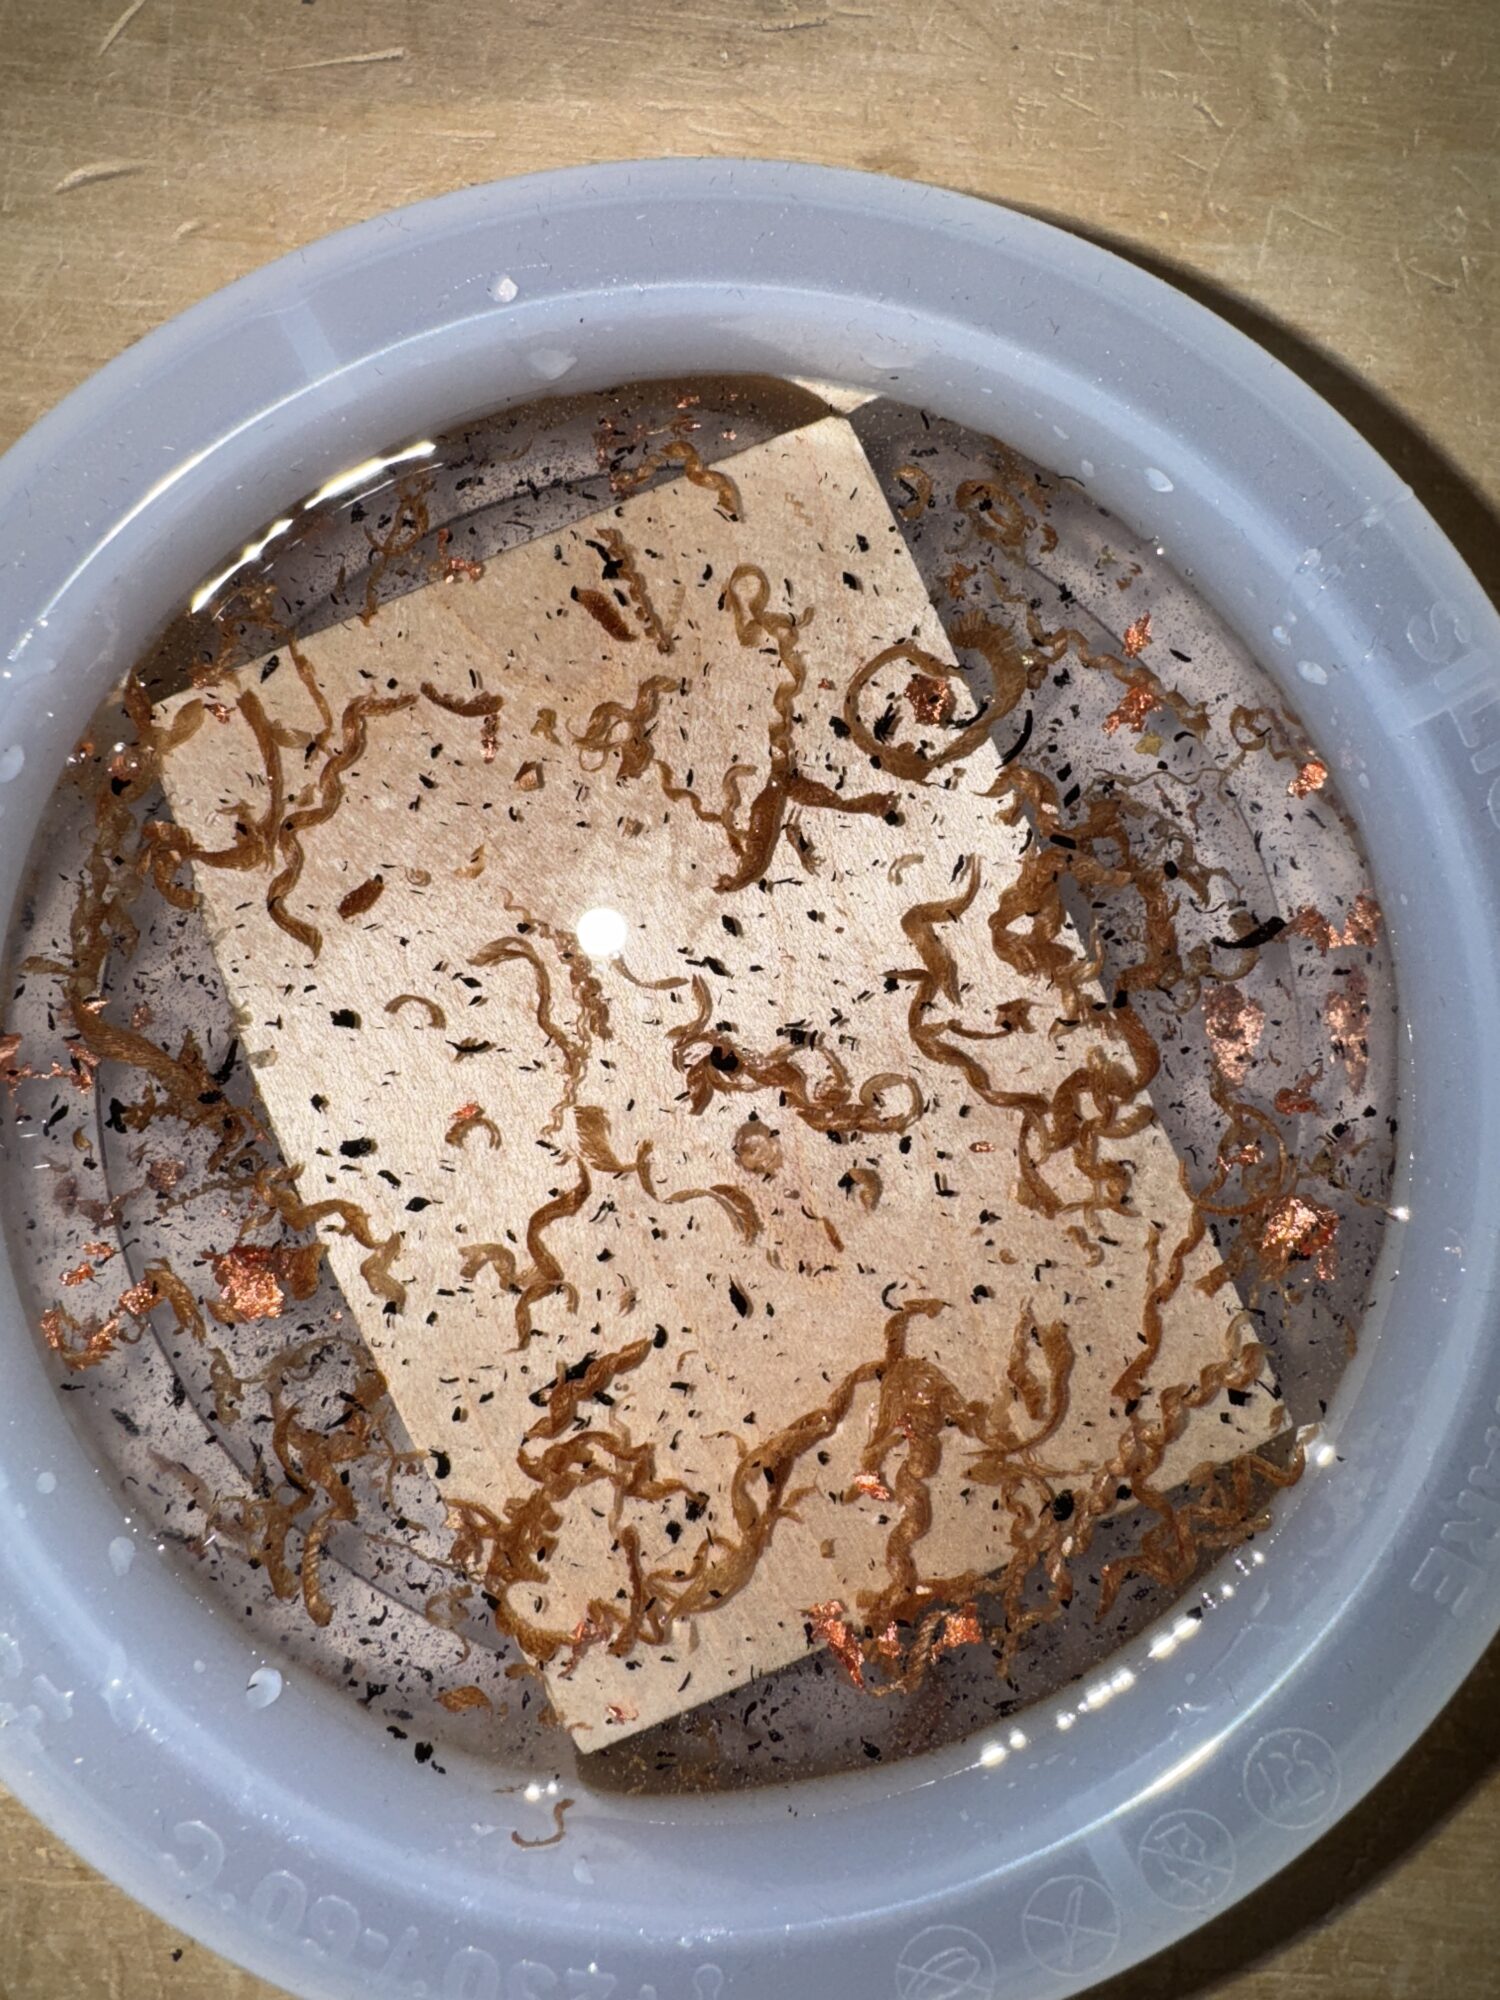
At this point, I hit a bit of a fabrication snag; my lathe was not a fan of the misbalanced weight of the resin and wood pieces. My benchtop began shaking so much that I couldn’t shape anything evenly as tools were falling from the sky, so I stopped and pivoted to the Denver Tool Library’s community shop. Here, I turned the two platters that would eventually become my finished artifacts. The turning of resin was a bit of a learning curve for me; the platters were more prone to ‘bites’ from the chisels and felt like a softwood species. Similarly, the resin was messy and I was covered in shreds of thin plastic that left me mummified by the end of the process.
A short video that captures my entire fabrication process (01:18 in length), plus an extra timelapse of My shaping process on the lathe:
Reflection
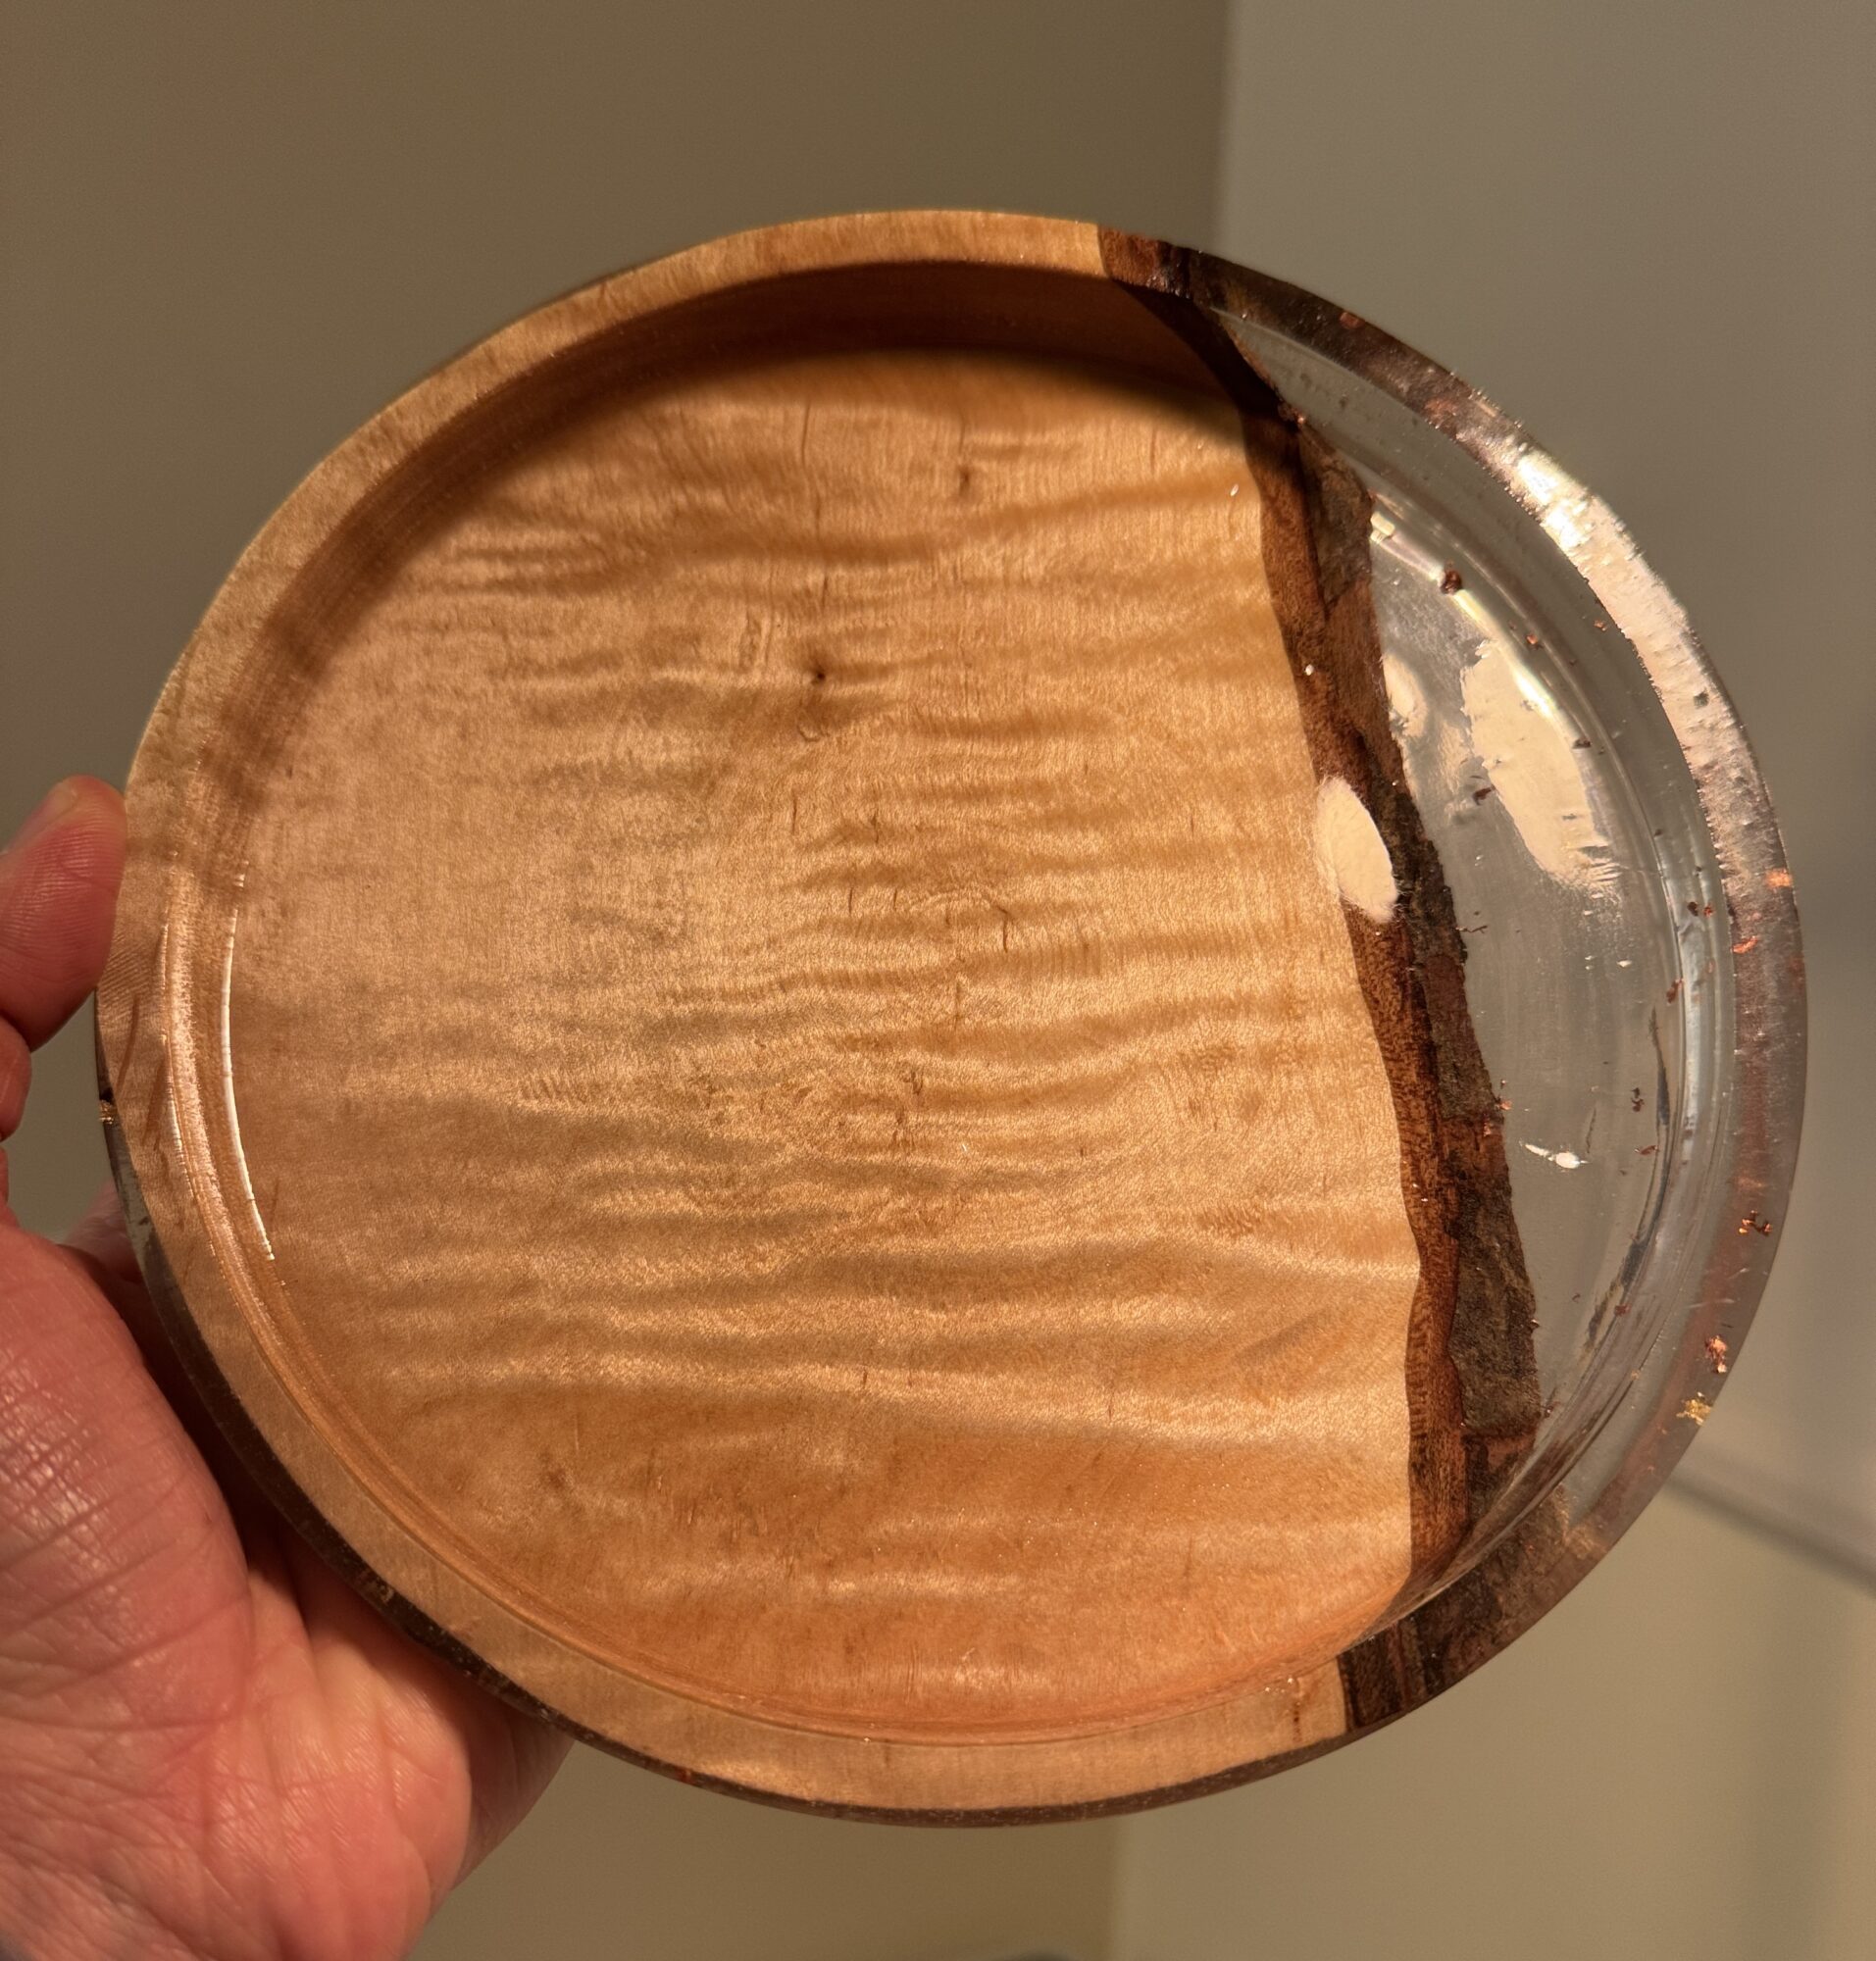
Compared to my artistic goals, I really enjoy the tone, asymmetry, and simplicity of my finished artifacts. The platters together are quite complementary, the wood has a warmth to it, and the flakes really spice up the negative space that would otherwise be plain. I am also proud of how the patchwork aesthetic ended up being more than upcycling; both platters are ultimately a craft that tell a story through their imperfections.

That being said, if you notice from my earlier sketches, I did consider throwing ash into the resin as a comment on rising wildfires and the life cycles of wood. I moved away from this idea after my testing bowl because the ash didn’t jive with my aesthetic quite right and chipped out of the resin. If I were to try this project again tomorrow, one way that I could expand my artistic vision is through more expressive wood arrangements within the resin, such as an image or pattern.
Compared to my functional goals, I ended up shifting my design considerably from bowl to platter based on available materials. Both platters are still entirely functional but have a more limited depth and holding capacity than a bowl shape. I would love to attempt the bowl shape in the future, either with resin or an all-wooden patchwork pattern like I mentioned before. In the meantime, I will try and see exactly what the platters end up being used for, even if that’s holding onto our keys by the front door.
Looking forward, I plan to refine the finish on each of my platters by resanding and polishing the external coating. While I like the glass-like clarity of the pieces now, I would like a more matte finish that doesn’t feel and sound like a plastic dish when used. Having seen the turning process first-hand, I am also concerned that the current resin finish would not hold up to much poking or cutting from silverware (without adding to the ongoing microplastics takeover). Once that process is complete, the platters will be extra food-safe and I can introduce them to our kitchen!
Overall, I really enjoyed this project’s focus on sustainability and artistic expression. While I likely won’t work with resin again unless I come across an upcycle-able supply, I feel as though I strengthened my design and fabrication skills throughout this process. I am eager to continue to grow my craft and apply the same process towards different aesthetics and materials in the future!
For more on my project, here is a link to my in-class Upcycle presentation using Google slides.
Sources:
- https://timberflow.uk/products/handmade-walnut-epoxy-bowl-cyan-design-by-timberflow
- https://soleilbois.myshopify.com/
- https://woodworkersinstitute.com/turning-a-natural-edge-bowl/
- https://millandmooch.com/shopcollection/p/ishor
- https://www.yankodesign.com/2015/03/04/a-perfect-blend-patchwork-wood/
5 Comments. Leave new
[…] Overall, this project was a wonderful start to the semester as I was able to experiment and push myself to try something new in woodturning, a category of current interest to me. Like many design processes, creating these platters was not without a few pivots and bumps, allowing me to learn while doing and become a better designer and fabricator overall. Learn more about my process, fabrication, and reflections here. […]
These platters turned out great! The resin work on both of them looks professional, how did you learn to work with resin like that? Also, how did the cutting of the resin on the lathe feel, did the material of the resin interfere with this process?
Hi Cort – thanks for saying that, I really risked it with the resin and hoped for a good turnout! The silicone molds were a gamechanger as far as the casting process, though I do want to get better at removing the tiny bubbles that make it in the resin from pouring (I think people use vaccuum chambers for removal). I have been woodturning with just wood for a few years, so that gave me the foundation to bring resin into the mix. Otherwise, I consulted YouTube for tips! Speaking of, the resin felt really different on the lathe than typical hardwoods – it was softer and more prone to ‘bites’ or chip-outs. I had to take very thin layers off at a time to make sure I didn’t ruin the entire dish, which just slowed the process down. Overall, I wish I had a little more resin to begin with in my upcycle stash so I could have had greater depth with my dishes, but still enjoyed trying it out!
Eli – these platters look fantastic! I really like how you incorporated a video showing your whole manufacturing process. It made it easy to follow along with your writing. I love how you made the platters mostly with wood, with the resins and flakes being more of an accent to the piece. It fits your aesthetic beautifully. Do you think you would make more of these to have a bigger set?
Hi Taylor – appreciate your thoughts and agree that the resin and flakes as an accent to the wood is more fun as a design consideration! I would love to make a bigger set of these dishes sometime in the future, like a full table setting or a special serving set. First, I want to figure out the finishing process by experimenting with more sanding, polishing, and some different finishing oils. Doing so would likely give a smoother, less plastic-y feel on the exterior of the dish, which might hold up to more ‘wear and tear’ of constant meals. Beyond the platter and bowl shapes, it would also be super fun to try a mug or vase later on!