Post 8: Design Preview Report
Brief History of Cheese making
Cheese is one of the most varied types of foods with many different types. It is enjoyed on its own, paired with meats/ fruits/ beverages, and cooked with. Some form of cheese has been part of human existence for around 5,000 years (McGee, 52). Although cheese types have gone through multiple transformations through this time period, some cheeses we know today have been around for a couple of hundred years.
Cheese making process
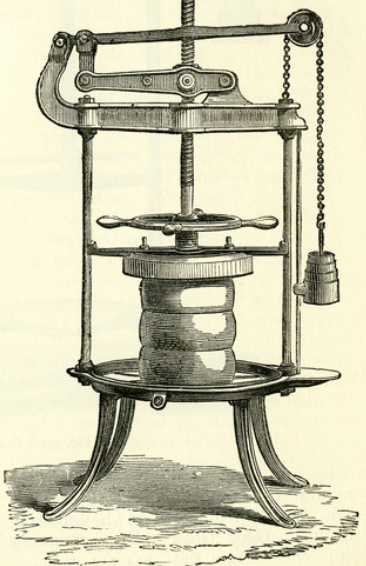
The cheeses we enjoy are all a product of different biochemical processes with the cheese maker manipulating a multitude of factors. My project for aesthetics in design deals with one of the final steps in which some cheeses are changed through a mechanical process by applying ranges of pressure. Although the final steps vary in cheese making, all cheeses start off by being made in the same way: increasing the temperature of the milk, adding bacteria, enzymes, and minerals in some cases. The bacteria converts lactose into lactic acid, while the enzyme causes the milk to clump together. This produces two different products, the curd and the whey. The whey contains a larger portion of the water that was originally in the milk. For most cheeses, the curd is desired, however there are exceptions, such as ricotta, which is made from whey. The curd is cut up to make it easier to drain the whey, and then put into a bowl. This is the point in which the device for my project comes in. For some cheeses, the curd is then pressed to drain out the remaining moisture. This is done using a cheese press. The cheese press allows for a range of pressures to drain out more moisture out of the curd over a range of time. Pictured below is a diagram that details the different steps in producing cheese and general types that can be made from these steps. Interestingly, cheeses that are pressed make up a small portion of these cheeses.
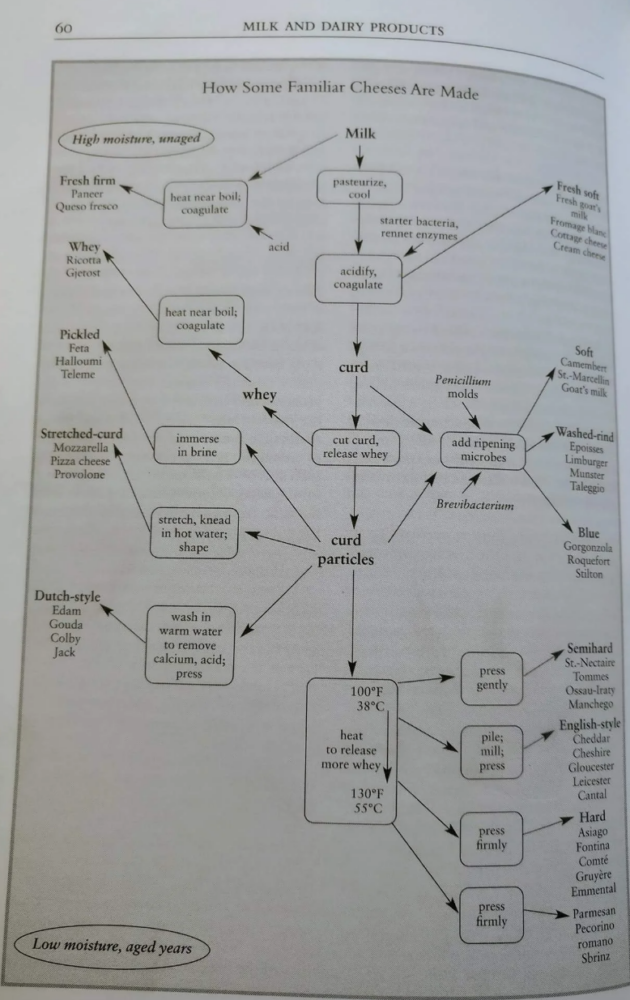
The cheese’s firmness, semi-hard to hard, is dependent on the amount of moisture drained. As you can imagine, a relatively small amount of moisture loss after pressing leads to a semi-hard cheese, while a relatively large amount of moisture loss after pressing produces a hard-cheese.
Project Inspiration
My inspiration from this project comes from the craftspeople who put in their time to make rare foods or cheeses and share their food and passion.
Vision for Project
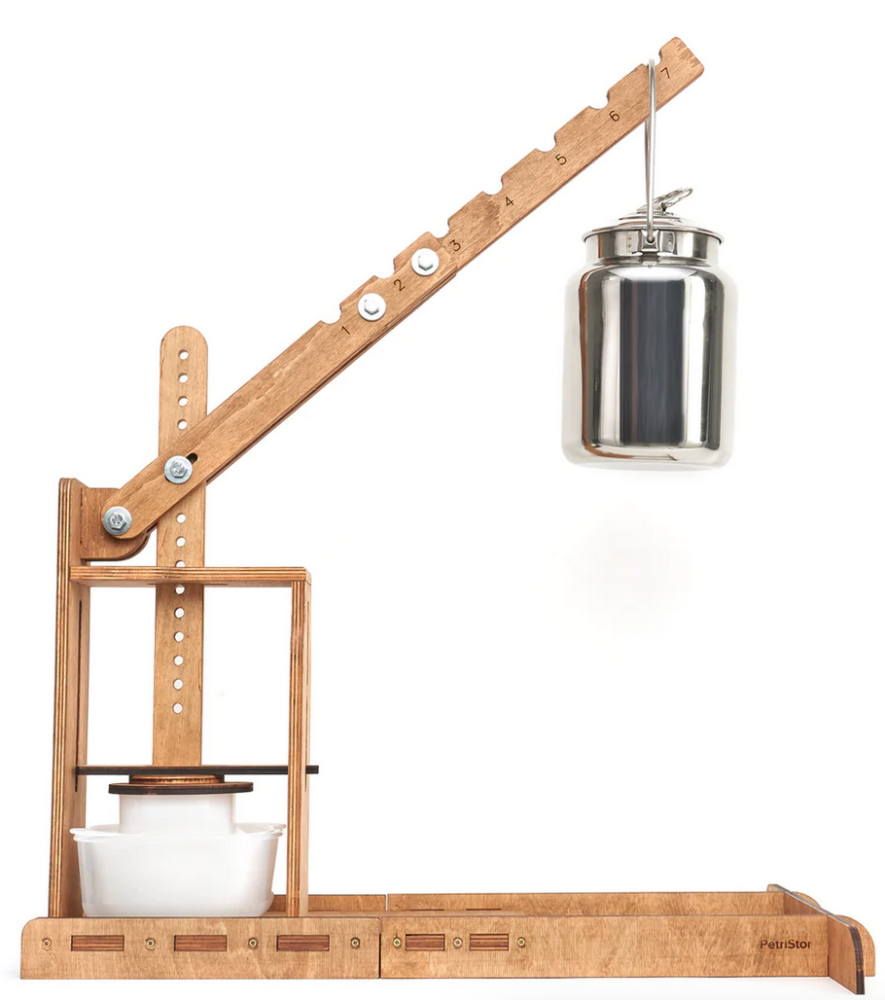
The aesthetic I am currently trying to achieve is a carpentry/woodworking look. To me this means that the press is made from thick beams of wood. I was inspired by a cheese press that I found online, in which I liked the functional nature, thought it would fit in a home kitchen, and it seemed to be sturdy enough to apply a large pressure. The website claimed that it could apply a pressure of up to 270 pounds.
Although I liked the basic construction of the cheese press, there were several factors that I wanted to change about it to make the woodworking aesthetic style more apparent. This includes both factors of form and ease of fabrication given my personal woodworking skills, which I would give myself about a generous 5/10 rating as a carpenter.
I decided to sketch what I wanted my personal project to look like instead and include dimensions in how my press would vary from the cheese press that I used as my inspiration.
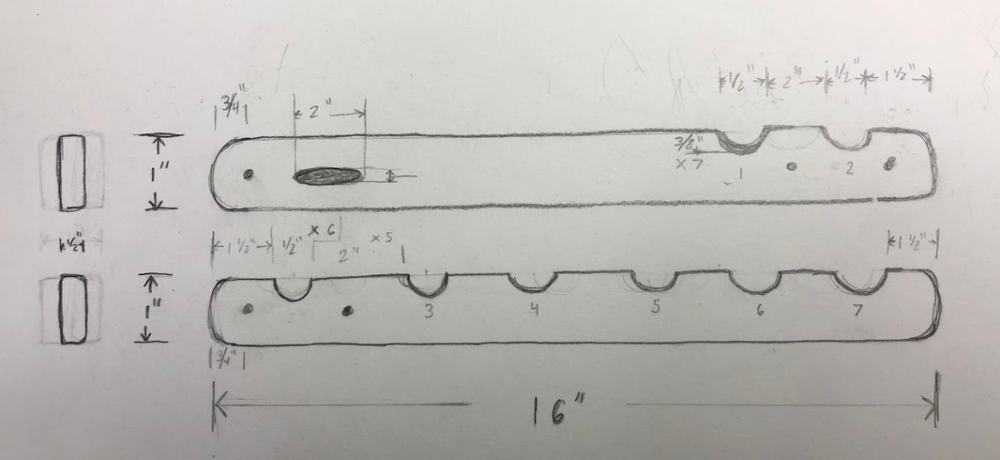
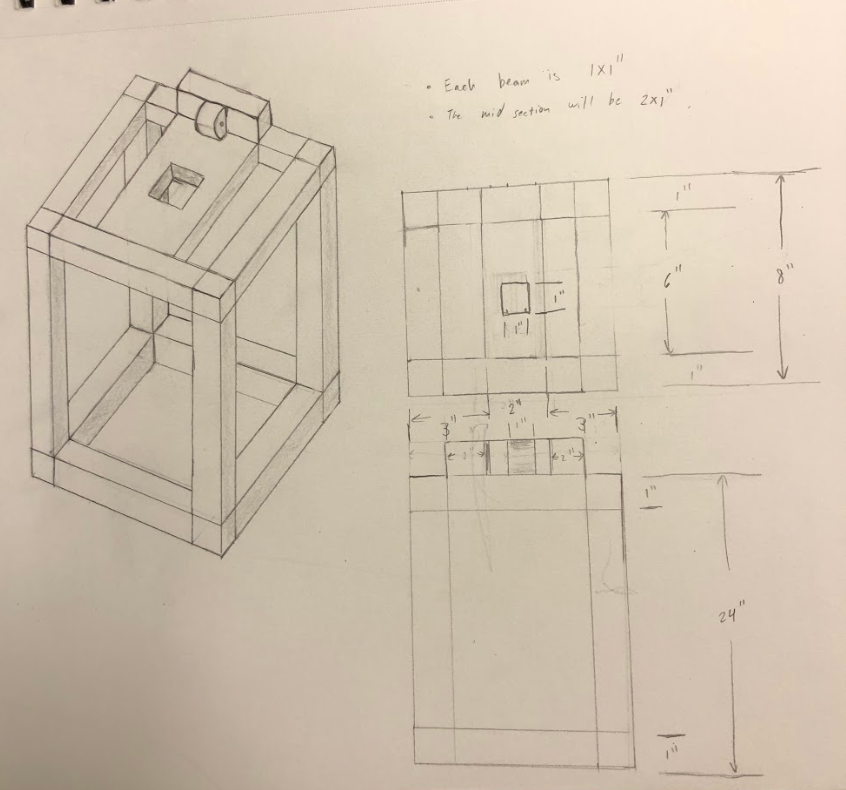
The differences to note are the shape and wood stock size used for the cheese press. In my own version, I designed it to be more box shaped, while the cheese press I originally referenced is rectangular and protrudes with its own drip tray. I thought my own press could be placed on a metal pan used as a drip tray, that way I would not have to worry about manufacturing my own or designing the press to include a drip tray. I thought I wanted to use 1”x1” stock size wooden pieces to construct the frame, instead of the thinner pieces used from the previously referenced press. This design also lent more to the sturdy woodworking appearance I am trying to achieve.
I realized that this design would not work well for one major reason. There is no counter force to the force generated by the moment arm that is used to apply different amounts of pressure. I decided to change my design by adding a section of wood that would apply the counter force and also be easier to make in the wood-shop. This led me back to the original idea of the shape of the press looking like the dutch style cheese press.
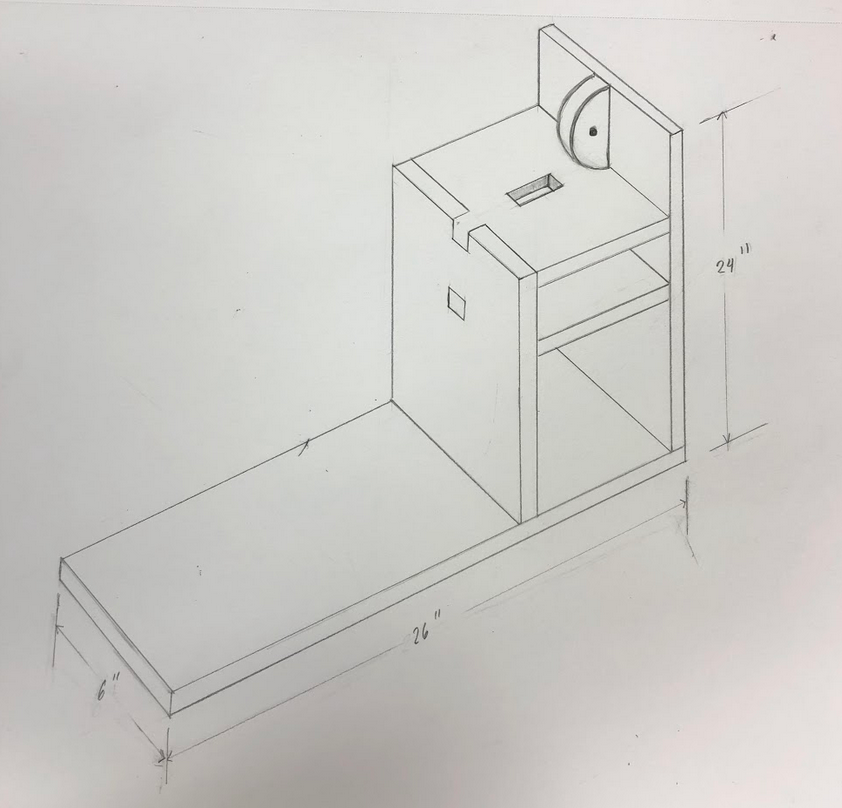
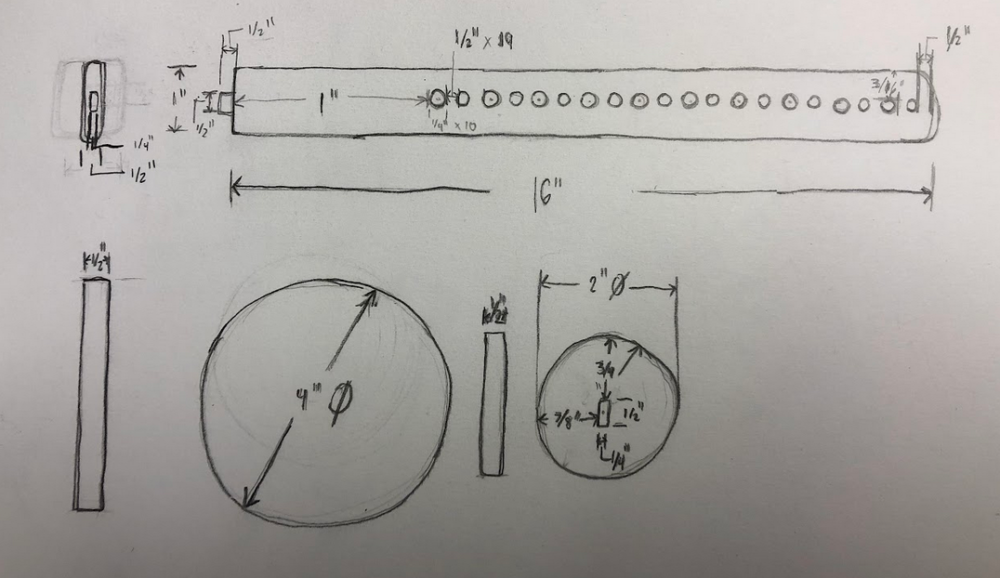
I plan on having the wooden pieces to be 1/2″ thick. Some of the pieces will have extrusions, while others have pockets to allow them to fit together and secure each other. I will also be drilling screws into the pieces so the press will hold together.
Additionally, I want my press to have some designs on the exterior wooden pieces that make it more unique and to be able to give it my own personal style. I am working on some patterns that I would like to add to the wooden pieces with a wood burning tool.
Alternative Visions for the project
I was also picturing having extruded detailed pictures of a cow, goat, and sheep head that would be done with a laser printer. This would be able to symbolize the importance of each creature, because without them. the cheese would not be possible to make. I decided I liked the idea of carving a design with a wood burning tool better.
Project Fabrication
The steps in how the project will be made are as follows:
-
- The wood will be collected.
- The wood will be cut to the appropriate sizes needed for the project.
- The appropriate holes for the bolts to travel through will be drilled in the wooden segments.
- The wooden pieces will be smoothed out to avoid a block-like appearance.
- A wood burning tool will be used to carve out the patterns that were previously mentioned and shown.
- An assembly and sanding stage will take place making sure all of the components fit together appropriately.
- A final wood treatment stage will be done to pretty-up the wood. This will be done with a food safe coating.
- Lastly, the final assembly of the press will occur.
- The wood will be collected.
Timeline
I will be getting the required material and checking out the shop space before spring break. After the first week break I will be cutting the pieces into the shapes I need. The second week after break I will drill the holes and assemble the press.
References
McGee, Harold “On Food and Cooking” Pgs. 51-64
https://www.thecheesemaker.com/dutch-style-cheese-press-heavy-duty-single-pro-series/?sku=&gad_source=1&gclid=CjwKCAjw17qvBhBrEiwA1rU9w2fz55mJNaVlAUgFs0pcKUSV8aEj-rRwt343Bzu8uwiREMS5OKKYdBoCuZAQAvD_BwE
www.reddit.com/r/Cheese/comments/6wf281/a_page_from_harold_mcgees_on_food_an_cooking/

4 Comments. Leave new
Ben, Its great that your project will end up being such a useful thing! I’m a huge fan of your isometric hand drawings, I think they turned out amazing. If you really want a food safe coating for this, especially considering polyurethane coatings could rub off with wear, I’d suggest a simple mineral oil coating. After a few initial coatings it would be protected and food safe, and when the coating dulls another coating of mineral oil can simply be added. I like the aesthetic you’ve chosen and am looking forward to how this turns out.
Hey Jadin, thank you for the compliment on the drawings. Also mineral oil is a good idea. I will use that when for several coats when I get to that stage. Thanks!
Hey Ben,
This was really interesting to read about! I didn’t know that cheese has been around for such a long time. It seems obvious now, but I didn’t know that cheese presses were a thing. It makes complete sense that different cheeses would need different amounts of pressure, but seeing those designs were really interesting, I’ve never seen them before. Do you know what kind of wood would be used for these kinds of presses? Does the wood shop have different kinds of wood for you to choose from?
Either way, looks really cool! I like the rustic woodworking aesthetic and the influence the Dutch cheese press has on your design.
Hi Josh, I’m glad you found the material interesting! Typically maple is used for this style of cheese press. I am not sure yet if they have maple, but I will but some to use at the shop if they do not have any. Thanks for the nice comment on this post!