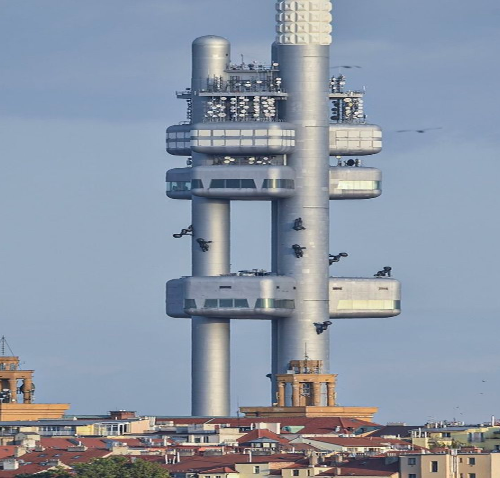
When exploring my aesthetic for the upcoming project I hit a few roadblocks. However, after exploring the idea of a mind map I was able to determine my desired aesthetic, Brutalism. This certain aesthetic was a major design movement stemming all over the world but especially in Eastern Europe and Russia after World War Two. Brutalism utilizes simple block shapes and exposed concrete to portray an intense feel when viewing the buildings. From personal experience I have seen lots of Brutalism in cities like Prague, Berlin, and New York City. I find it very interesting from a historical and visual perspective and want to explore it more for my final project. A certain brutalist building I saw myself was the TV tower in Prague, Czech Republic.
 After doing extensive research, I concluded that I would like to create a lamp influenced by the brutalist aesthetic. I did a lot of research, but through social media and the marketplace I was able to find my greatest inspiration for the project.
I was able to contact the person through Instagram so I could ask for any sort of guidance about the concrete laying strategies, weight, or light fixtures. To be honest, I really want to keep emphasizing the Brutalist aesthetic in a warmer light that can offer warmth in any room. More times than not, I think Brutalism gets a bad wrap because of its rather intense colors and shapes. However, it is my goal to try to create an artifact that may shed light on the potential warmth of this aesthetic. Below is a potential design I can build off for my own lamp.
 Like I stated above, my vision is to bring some warmth into the Brutalist aesthetic and try to convey that this rather dark aesthetic has the potential to bring light into any room. I hope to do this by installing a warm light in contrast to the concrete I will be using for the main structure of the lamp. I am visualizing this lamp being a standalone piece that may sit on top of a desk or a coffee table in a living room. Depending on weight and price, I plan to make the lamp 26” – 30” so its presence can be prominent in any room. In addition, I will have to keep in mind that the concrete is going to weight about 100 pounds so moving this light will be a huge mission. However, I think I will be able to utilize foam inserts to lighten up the overall weight of my lamp. Finally, a major specification will be the overall light being a certain style with a nice curved filament and warm light tone. A large influence for my design is shown below.

To begin, I will present a process flow diagram for the general flow of my project.
 To further explain my manufacturing process, I will go through each major component of my overall process. To begin, I will purchase all necessary materials as mentioned above in order to successfully make my product. First, I will use wood screws and caulk to create a wooden frame for my project that will represent the overall dimensions of my lamp. Next, I will create a rectangular rebar structure that will represent the “decaying” portion surrounding the lamp. I will connect these rebar components with copper electrical wiring and tighten it down so we can ensure a solid form. Then, I will place it within the wooden mold and pack sand all around the area I want to be exposed. Now I will route the PVC piping for the electrical wires for the light fixture through the sand. After the sand is packed and wet, I will pour the concrete all within the sealed box. After allowing maximum drying time, I will test the light and ensure it works. At this point, I will have a full rectangle of concrete and I will need to vacuum out all the sand to show the exposed section.
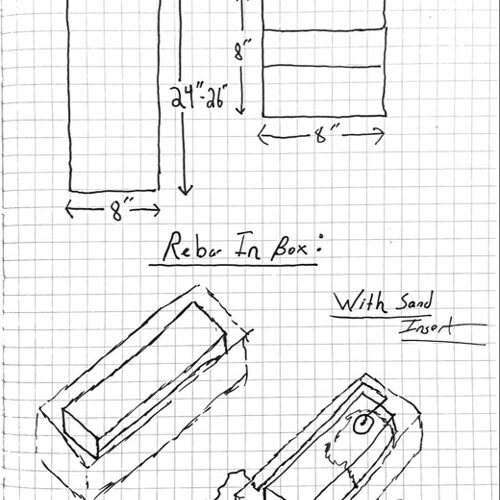
 As this process deals with pouring, curing, and mixing concrete I will need to take some special precautions. To begin, I will need to add glass fibers to the concrete mix to allow for minimal crack propagation throughout the lamp. I will also need to buy special interior concrete that is used for interior design and appliances. Below you can see some rough dimensions and sketches of the rebar profile within my wooden form which the concrete will be poured into.
 Here you can see how I will route my electrical throughout the lamp and I hope it allows the reader for a better understanding of exactly what I will do to lay the concrete. The larger wooden form does not have a top face allowing the rebar to become exposed and allowing me to fill the entire cavity. After the concrete sets, I will wedge the wood off and vacuum out the sand, leaving me with the open inlet for the light. After the concrete has fully set I will add some finishing appliances to the concrete ensuring the longevity of my final product. I will experiment with different concrete to water ratios and how I can add conservatives to my mixture to make the lamp truly an “inside” piece. After doing some rough calculations, I was able to find that with the density of concrete and the volume of my mold I will have a product that will weight around 155 pounds! With this comes the necessity for having friends help move my piece in addition to needing a vehicle to get it from my home to campus for expo.
I have not been able to do any physical prototyping up until this point. However, I am confident with my dimensions, material selection, and concrete techniques so I am ready to move forward. This week, I will create the shell for the concrete mold and ensure I have all my proper dimensions. In the next weeks I will get my rebar framed created and have the concrete poured.
Bibliography:
https://www.google.com/search?sca_esv=3691a2ff7c8514a2&rlz=1C5CHFA_enUS864US864&q=home+depot+rental+concrete+mixer&uds=AMwkrPuiS0aUR9P9Ahe3Sw6DBcXby7VOne6ArDuRXDd_QW7mRlomYF47iIbYkhPVKJwgcnUfOUOxLqxbNscayjCcodjTtUMrN-ngc8uBlLu5rZrTjuyvycPO5mXy9aBDlc-dhWiXw2tbKW5t7Wmzj7tRKgszthwpxhghZ0EwJo8tz68bOrUPWtpGAPE0BWg45Z-fhMF1uvRXw40LelwY3LP174A0ur9XiNZ7mTP6cVs3YuR4Wtehic0To9kN0r9CSnY_zxnMg0trPKxxuxkMEx_8Oahs5KxPEFQEe7cP3uM0R1b39_6wowMeDRQnJyXrnguBJ6EekwqpXXbuTfjLnum7qCV9K6ZUG7mORZSb1p7T-9XGHgAGD78&udm=2&prmd=sihvmnbtz&sa=X&ved=2ahUKEwjzrradsvCEAxW5JDQIHc95CbwQtKgLegQIERAB&biw=1170&bih=656&dpr=2.2#vhid=GCN39AkqD9JoLM&vssid=mosaic
https://www.google.com/search?sca_esv=3691a2ff7c8514a2&rlz=1C5CHFA_enUS864US864&q=wet+sand+for+molding&uds=AMwkrPslraGj5iPA8fe46vri0ubJet8FV1bGkLxmzd0iVbSxsgi2IwdqLGHfJaSWBbnB9XPTN-vGQVz8d41BCUIWurmSjeuZZIFD-pPEMMaWn0pigCXKRk8qne1DMM3c7lDZ8ZCr3u3DhCoRRROOWoWQXwdus8qoyrcWTu_bcG0RVzim1fTxEYDGFk_5miRsAUpgQlqNj-ahHSUBnK-jGqAzeOnfUP7xdHC5jBT5TG_2ObqsRS6jPv6T9pTJzKj3YlFZTt-cKqE_fRhC4JSIi44GrwVSJgJDqCxgT8mJcYsVstBT8W3P4MJUuqEuXYNl1bJ1P_-gEJRbz8FwNTmFqIKVo8xUi_mmZLBfPrh9re_-LSpZM9npl8s&udm=2&prmd=sivhnmbtz&sa=X&ved=2ahUKEwiYnbahsfCEAxWMxuYEHRgFAdcQtKgLegQIDxAB&biw=1170&bih=656&dpr=2.2#vhid=TteMEpCh0m-BCM&vssid=mosaic
https://www.google.com/search?sca_esv=3691a2ff7c8514a2&rlz=1C5CHFA_enUS864US864&q=prague+tv+tower&uds=AMwkrPvY4j0QWX7Jb2FvTLujNGPXjWuhV44xsAxspRBSEEH6NBKE2UTtpKX3PXMvQ1SF_RYz_7O72wdy2juleQIfa7_R0llmxx6Y7OgIsThXlgZFj-aevSub3N2w0UTFx2nE1v-rcFs5MzVPzR86z_X28LKKnOHpCnf0i20iFkyR4w10J2EV9sWBkt1sEAh4ZJ69kZpSxwzGOcYW_vjB1kbrDo3WYiNiVXqdM45tbujePnhfaD26NRPGxTgVLnif4x9su48owv7hmcxbvxJeCbA04UNeyD2_Dld0Ac7xiaJAT_FLnoJgw8Hm5Vczs-l3Lgb6GfaMEBmJz3yEubc9GZjjKOtBwfeaM8EFIhvLVTSGdeoZ5q_05qc&udm=2&prmd=imhvnsbtz&sa=X&sqi=2&ved=2ahUKEwjsltLQt_CEAxUg78kDHdB9AcQQtKgLegQICxAB&biw=1170&bih=656&dpr=2.2#vhid=aGhnQN5nK4r7xM&vssid=mosaic


4 Comments. Leave new
Alex – this project looks very promising. I like the aspect of adding some light/character to the stark brutalist aesthetic. During the concrete pouring process I think that even if air bubbles form or there are some defects, it will still complement the aesthetic.
Thank you Arjun, I was very nervous about the defects but I think it will just add to the aesthetic !
Hi Alex. I really like the choice of brutalist aesthetic for your project. I think that your plan for materials and assembly will mesh together perfectly with the brutalist style. Do you think that this might be too heavy for smaller shelves to hold up due to all of the concrete? Or is your plan for this to mainly be set on something very stable?
Hi jason,
After some back of the napkin calcs I was able to find that the weight would break a standard wall mounted shelf. Therefore, this piece will be best used on a table or free standing.