Abstract Tech
My main project will be of the Abstract Tech aesthetic. Abstract Tech includes digital holograms, lights, geometric patterns, and conceptual “technology” to paint a futuristic picture. This aesthetic draws on the technology movement of the 20th century. There is often digital circuitry involved in this aesthetic, and an overall futuristic feel. Below is an example of Abstract Tech.

Artist: Olena Lishchyshyna
My personal interest in this aesthetic is rooted in my interest in technology as an engineer. I really like the digital/ circuit patterning aspect of Abstract Tech. It will open the door for many different elements of modern aesthetics that involve technology in my main project.
Inspiration
I am planning on attempting to nail this aesthetic by creating an infinity mirror, preferably in a geometric shape such as a hexagon. This will have LED lights around the outside, that reflect to the inside, to hit the Abstract Tech aesthetic. My inspiration for this design is from a YouTube video I recently watched. I have included a screenshot of my inspiration below.
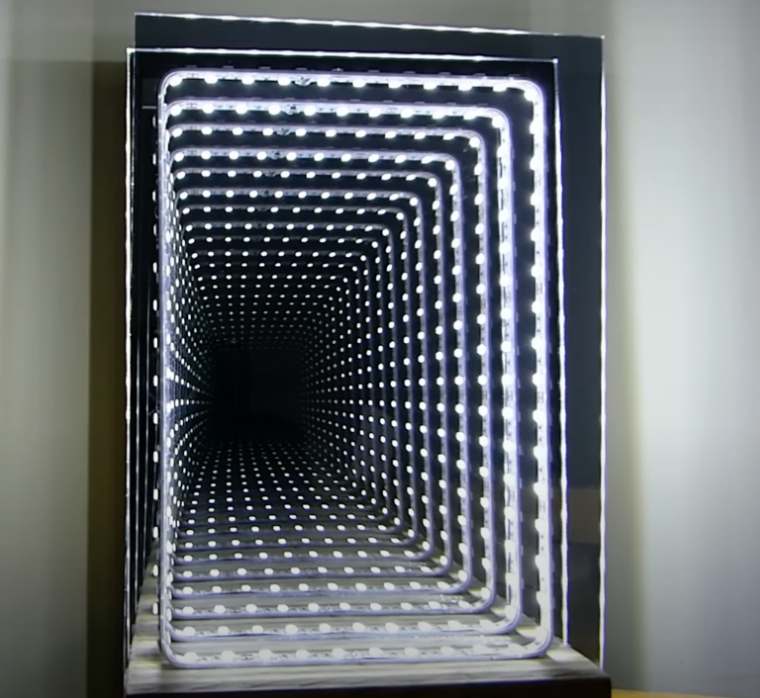
Artist: techydiy YouTube channel
https://www.youtube.com/watch?v=sAPGw0SD1DE
See how the lights create that infinite geometric pattern on the inside? I believe that this will drive the Abstract Tech aesthetic for my project. The infinity mirror is composed of an approximately 30% transparent mirror set up a certain distance away from a 100% reflective mirror behind. My current plan is to 3D print a frame for the mirrors to sit on, and attach LED lights similar to the ones above along a rim in between the mirrors. This should result in the intended repeating pattern of the LEDs. I’ll have some electronic issues to deal with in creating a nice, clean frame that is easy to plug and unplug from a wall, or possibly even powered by a battery pack.
For the dynamic portion of the project, I am open to and would appreciate any suggestions. My current plan is to create a newton’s cradle in between the mirrors, on the same frame that holds the LED lights. The main goal/problem would be hiding the strings that attach to the balls. I think that the balls would not only provide an interesting, dynamic scientific portion to the project, but also reflect light in a way that plays further into the Abstract Tech aesthetic.
My Design
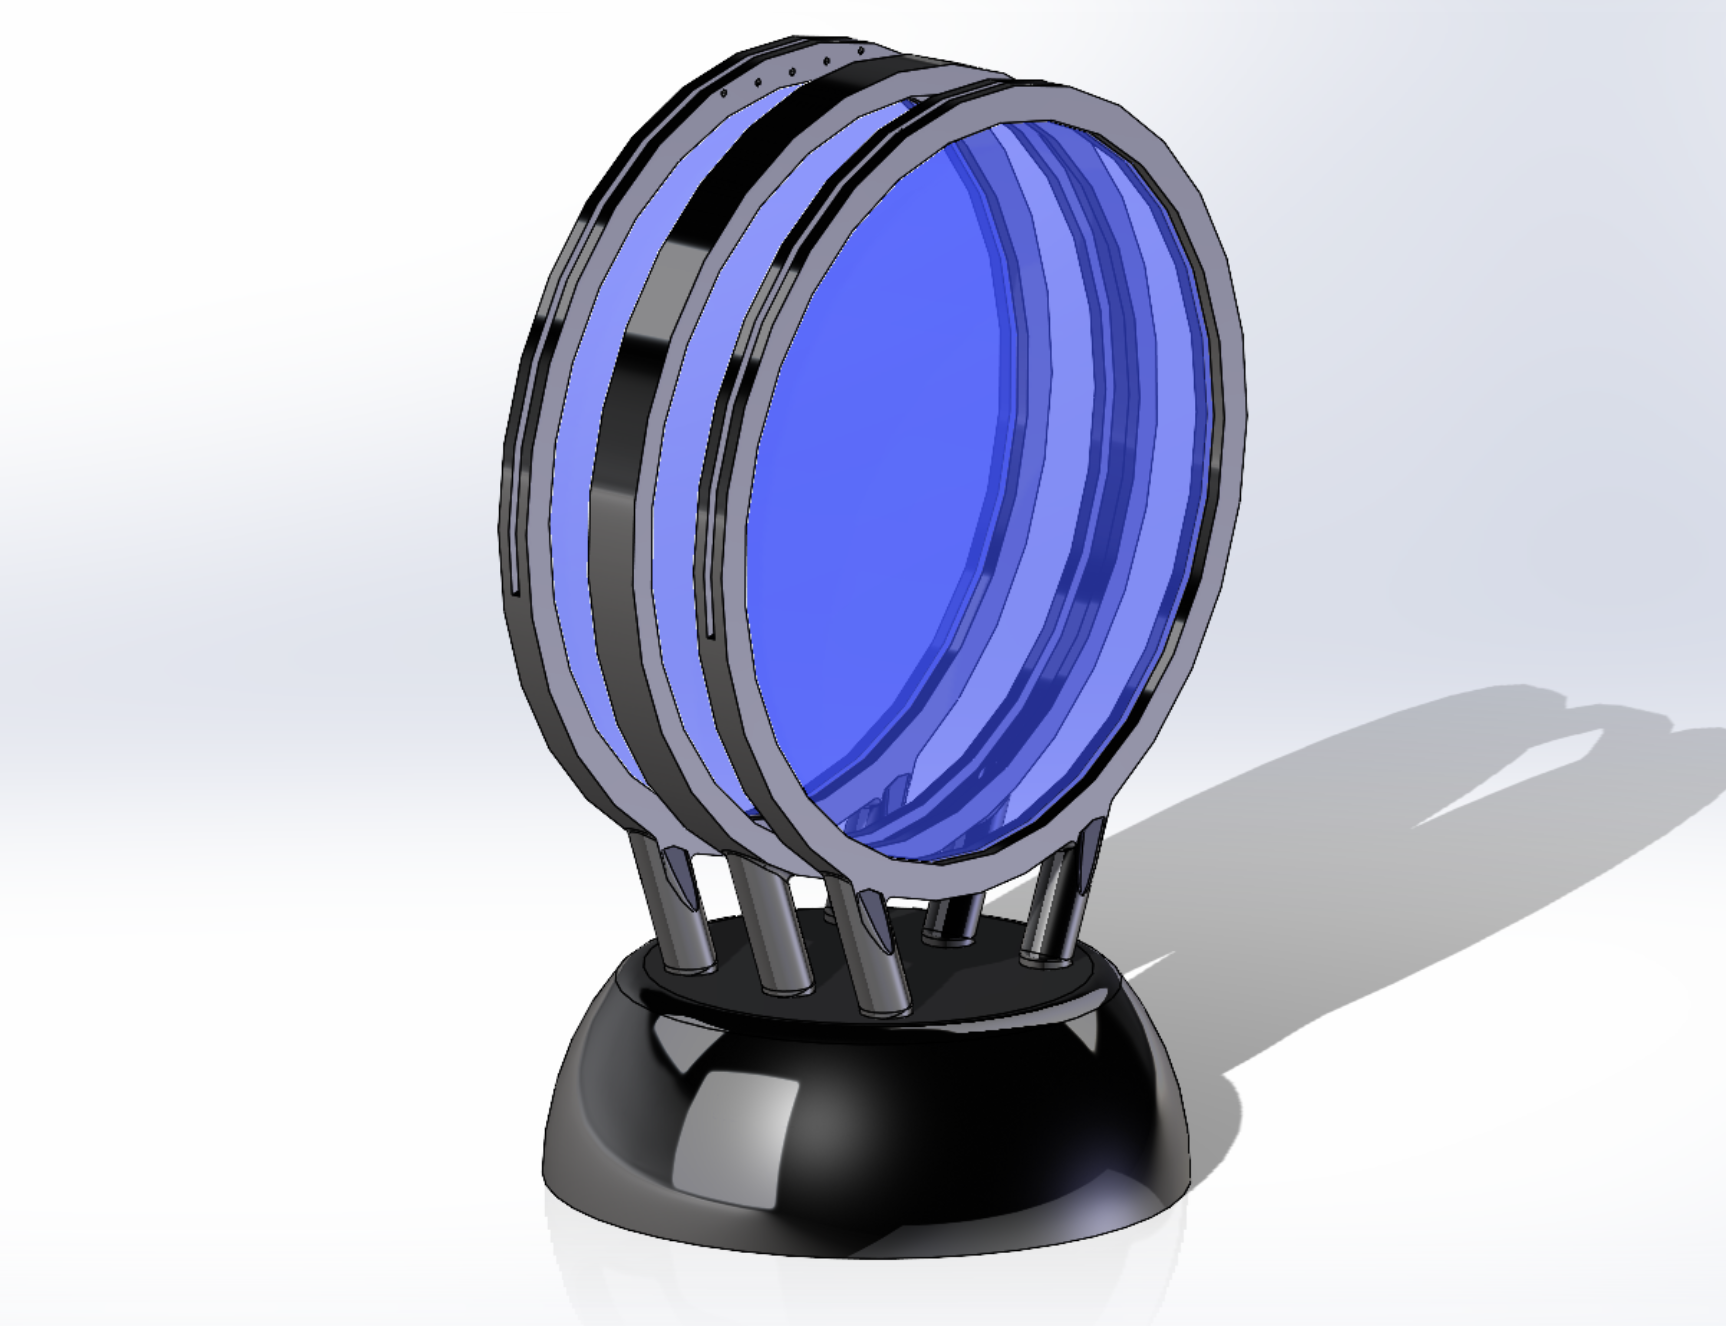
The first step in creating my design was to make an accurately dimensioned CAD model. I have completed this and am satisfied with the results. My current CAD design is included below.
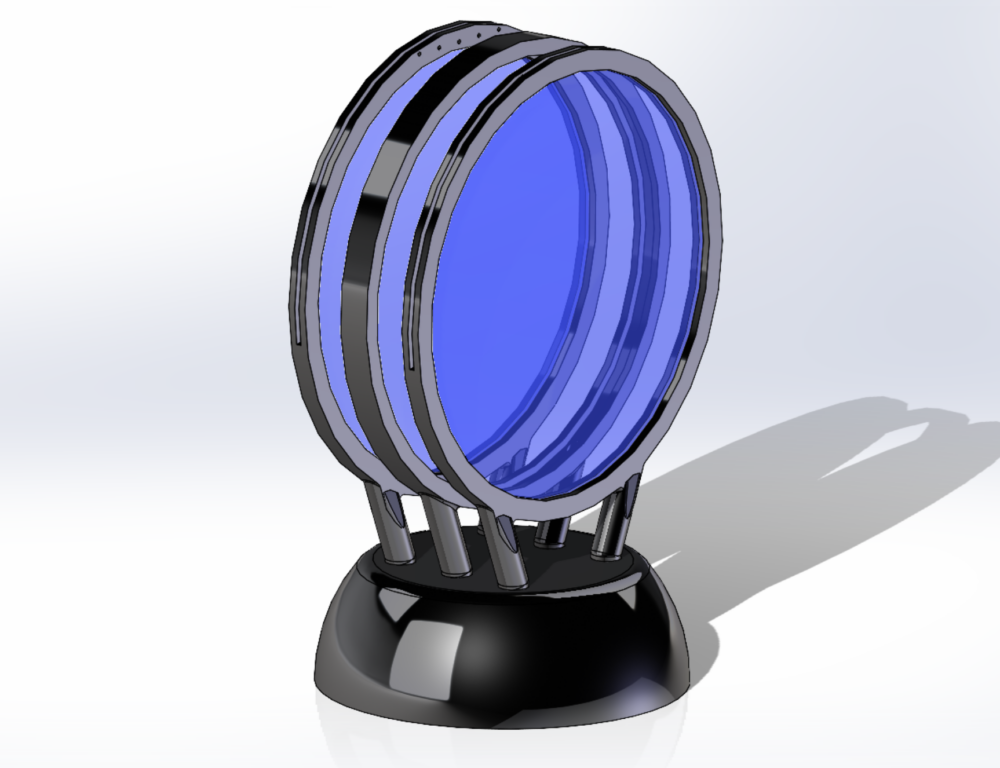
Each of the three rings on top of the base serves its own purpose. The front ring will have an 80% reflective, 20% transparent mirror placed inside, and the back mirror will be 100% reflective. This will create that “infinity” look that I am looking for. The center ring will hold the LED strip and there are holes on the outer rings to hold Newton’s cradle in the center. Each outer ring has slots cut for the mirrors, and the center ring has a large indent for the LED strip. There is also a hole from the center ring to the base, which will be used to hide the electronics from the LED strip. Below is a side angle to show the approximate spacing and slots.
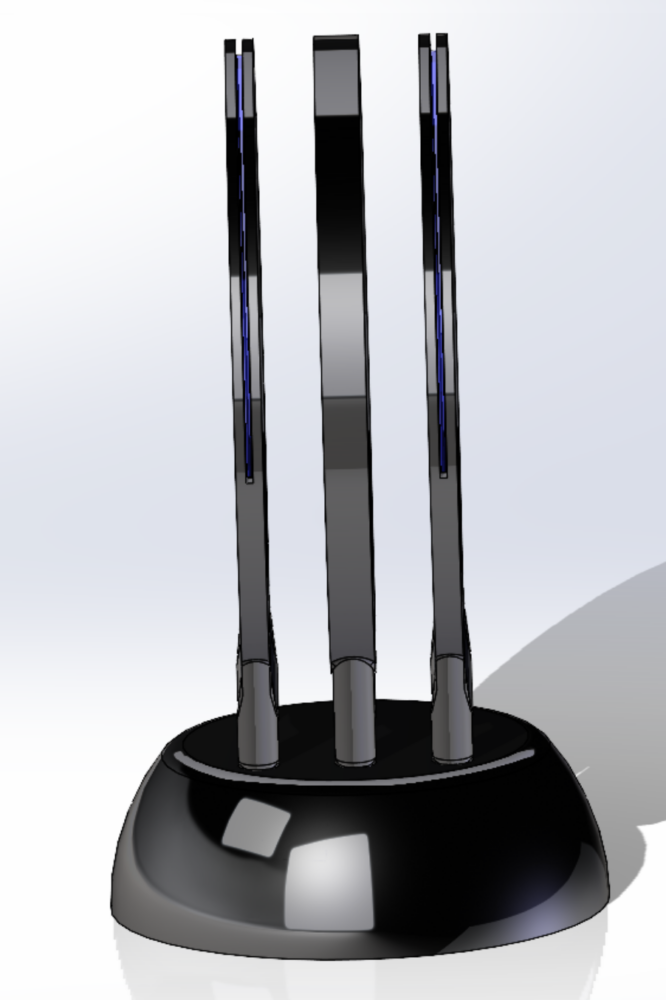
Each ring will be 3D printed separately, and are connected to the pegs they stand on. These pegs will be placed into holes that are in the base, also 3D printed. I designed hooks on the bottom of each peg for a rod to hold the legs into the base tightly if needed. Below is a photo of the bottom of the base, if you look closely you can see the hole for the wires and each small hook.
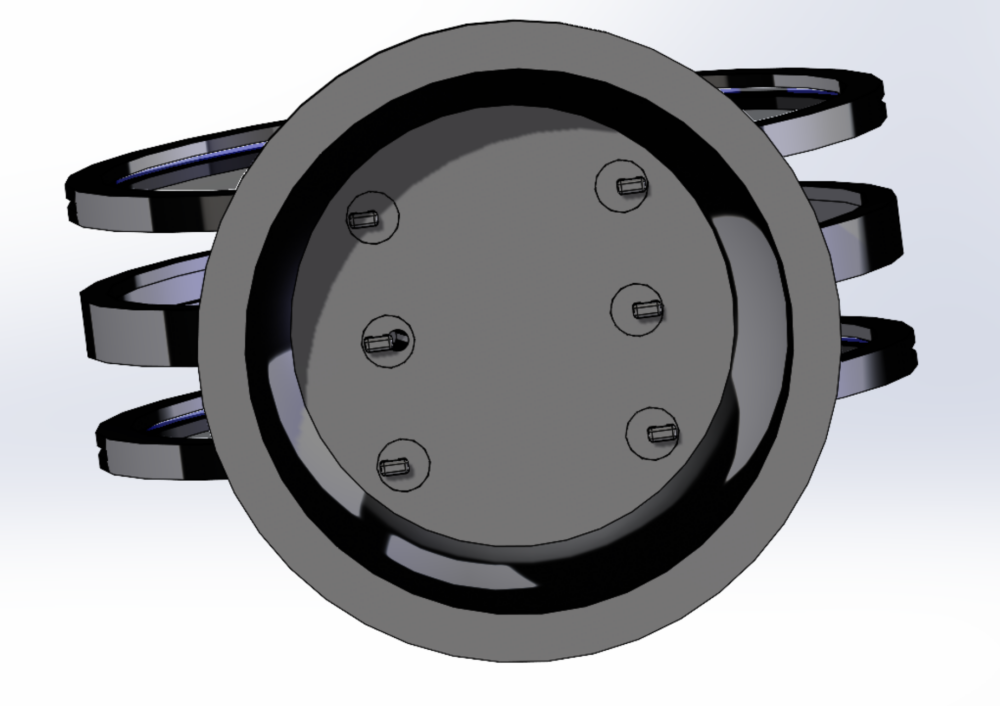
The design stands about 16” tall, and each mirror will be cut to an 11” diameter. Everything is toleranced to approximately +\-.01”. This should create smooth connections and give wiggle room in necessary areas. The base is a 9” diameter, which should be enough to structurally support and balance the weight above, as well as hide all of the electronics.
Fabrication
The first step in fabrication will consist of 3D printing each ring along with the base. I then intend on piecing the frame together, and making sure everything fits as planned, and the piece is balanced properly. If the pegs are not fitting as snugly into the base as I hope, I’ll have to redesign and reprint. I’ll also check out my slots and hooks to make sure that everything can fit as intended.
The next step will be to laser cut the mirrors into 11” diameter circles. This will be a new skill I’ll have to learn for the project, as I’ve never used a laser cutter before. I plan on doing this (along with the 3D printing) in the ITLL. I find that the people in the ITLL are more willing to help beginners and more friendly than the Idea Forge.
Those are my two main fabrication challenges. After that, the majority of my project will be focused on assembly and execution. The assembly will start with placing the rings together, and sliding the mirrors into each individual slot. After that, I will cut the LED strip to length and feed the wires through the base hole. The wires will then be soldered to a 12V battery pack. I have soldered before but I will need to refresh myself on how to do it. After the battery pack is soldered, I will need to find a way to attach the battery pack tightly underneath the base. When that is done, I will place dowels through the hooks on the bottom of the pegs, and my project will be nearly complete. The final step will be to assemble Newton’s Cradle in the center. There are holes on the outermost rings which will hold each of the strings. The challenge here will be to make each string the correct length and equal to each other. I am still playing with different ideas on how that will be done. Once this is assembled, the project will be complete besides for any needed adjustments/touch ups.
Timeline
Below is a timeline I created using MATLAB to show my intended steps and target dates. We are currently near the middle of the process, around March 10.
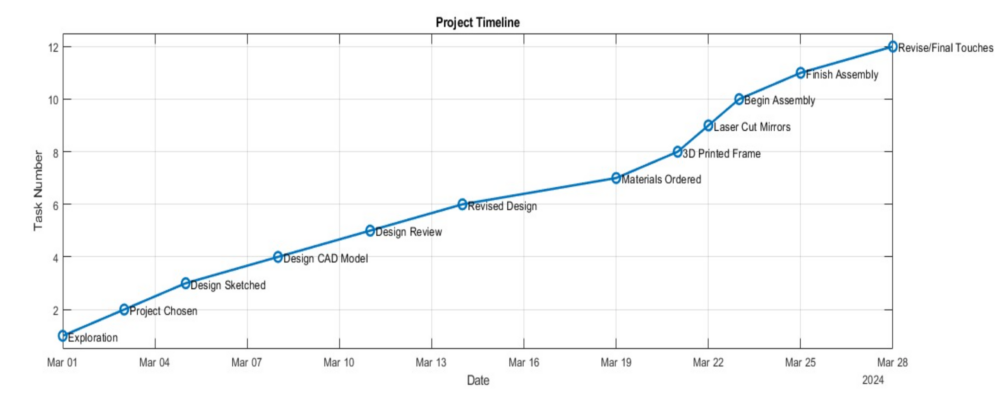
Some of our completed items are: Exploration, Chosen Project, Design Sketched, and CAD Designed. Our main upcoming tasks will be the design review this week, and then any design adjustments based on that. After this week, I plan on ordering materials.
Most of my materials will be coming from Amazon. I have already found an 80% reflective mirror for cheap on Amazon, and I am able to use any 100% reflective mirror I choose for cheap as well. The LED strip will be ordered from Amazon as well, assuming that I can not find my existing one in my room. This LED strip will have places where one is able to cut to length using scissors. It will also have adhesive on the back side, which I am hoping will be strong enough to stick to the 3D printed frame. If not, I’ll have to use hot glue or something. A 12V battery pack will also be ordered from Amazon. I’m planning on getting one that takes AA batteries. Having a wall/plug in attachment is another idea if the battery pack does not work out for some reason. The Newton’s Cradle balls and strings are the only thing left to order. I will first check local vendors like Walmart for these, but if I can not find what I am looking for, I will have to order them from Amazon and then adjust the holes in my frame based on their sizing when I receive them.
I am currently on track with my timeline plan. I hope to have the final product completed by March 28 in order to have more bandwidth to support my other classes and projects. The only thing that may throw this timeline off is Spring Break. This might mean that I have to push back soldering the wires until after break, but that will not be too much of a change of plans.
One task that is not listed, but will be completed prior to 3D printing and laser cutting is talking to the ITLL staff and asking if the laser cutter is capable of cutting mirrors. I will also show them my current design and ask for any suggestions/improvements when it comes to actually 3D printing. I have never 3D printed a part by myself, so this will be an interesting process to learn.
Overall, I am excited to execute my project. This will be the first and last individual design project I have done in college. I must say, it has been nice working individually. I have thoroughly enjoyed designing and planning a project completely on my own, and I’m hoping for the best possible results.

2 Comments. Leave new
Your concept of incorporating the Abstract Tech aesthetic into your project is fascinating. I admire how you’ve drawn inspiration from your background in engineering and your interest in technology to create a piece that embodies futuristic elements like digital holograms and geometric patterns. However, I’m curious about how you plan to ensure that the infinity mirror truly captures the essence of Abstract Tech, particularly with the LED lights reflecting to create a dynamic and futuristic ambiance. Additionally, your intention to incorporate Newton’s Cradle as a dynamic component adds an intriguing scientific dimension to the project. Have you considered potential challenges in hiding the strings and ensuring the balls’ movements align with the overall aesthetic? Your detailed CAD design and fabrication plan demonstrate a thorough approach to the project. Still, I wonder if you’ve accounted for any unforeseen obstacles or adjustments that may arise during the fabrication process. Overall, I’m impressed by your ambitious vision and look forward to seeing the final result.
Hi Jason, I really enjoyed your post! Your design preview for the “Infinity Portal” project is impressive! The fusion of Abstract Tech aesthetics with engineering ingenuity is evident in your planning and execution. The concept of incorporating LED lights and an infinity mirror to create a dynamic and futuristic geometric pattern is very cool. I also like the idea of including a Newton’s cradle. Given the complexity of integrating various components such as the LED lights, mirrors, and Newton’s cradle, what strategies do you plan to employ to ensure seamless assembly and execution of your design? Additionally, how do you intend to address any unforeseen challenges that may arise during the fabrication process?