My goals for this project are to create a neon sign with my Gamertag to put up as a decoration. I would like to be able to control the lighting with an Arduino to manipulate which neon light is turned on. The aesthetic I aim for is glow wave as my sign will have a dark background and pink and light blue neon lighting. However, the biggest challenge I face is with the Arduino.
I have looked at many tutorials online on how to connect the Arduino to LED strips, to Neon LED strips, and much more. I began by refreshing myself with the Arduino IDE and circuit building. I first created a small circuit with two LED’s which is similar to what I will be making for my final project. Below is a picture of the simple circuit I created.

I started to mess around with the blinking and flashing to see what effects I could possibly implement into my neon sign. This has proved to be a challenge with the Arduino, converting code into an aesthetic/effect I want to create. Additionally, the Arduino only has a 5V output where as the lights I have chosen require a 12V power supply. This means I have to incorporate more into my circuit than just hooking the lights to the Arduino.
This has been my main constraint and challenge for this project, my plan is to have a relay between the Arduino and the lights so that I can power the lights with the Arduino acting as the power source.
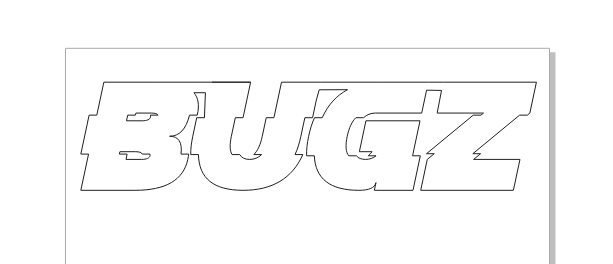
My initial design that I was going to recreate is shown below, however the acrylic I would have to laser cut would not be efficient at creating the effect and it poses another constraint. I had to simplify my design to make it manufacturable

Instead I recreated the image and went with this design instead which is easily manufacturable in the laser cutter.

Although my original plan was to buy black acrylic and cut that, the acrylic proved to be more expensive that way so I decided to change gears and use the clear acrylic from the ITLL that costs $4.00 to make and then buy spray paint for around $10.00. This way the total I would spend is less than buying the black acrylic.
To recap:
Top 5 Constraints:
- Circuit building for the Arduino to control the lighting
- Programming an effect, how to code the effect I want
- Sizing – due to laser cutting and stock sizes my part is limited to 24″x12″
- Spray paint finish – leveled spraying and nice surface finish
- Font change to ease manufacturing in laser cutter (connected letters)
Top 5 Specs:
- Glow wave / Neon aesthetic is what I am aiming for with the dark black and bright neon
- Glitch effect from lighting which needs to be coded into the Arduino
- Lightweight as the acrylic is 1/8″ thick
- Inexpensive, this project can be done for under $100 depending on the lights chosen
- Glitched font to blend two aesthetics together
Throughout my brainstorming my idea has changed a bit as the neon lights are more of a backlight now than they are the actual sign but it still conforms to the aesthetic I want to achieve which is a glow wave aesthetic.

1 Comment. Leave new
Hi Alex, I think this is a really cool idea for a project, and I can see this being a nice addition to a gaming setup. The simplified outline does a great job at recreating the image that you provided while making it manufacturable. The neon look is also one that I’ve appreciated in the past, so I hope it turns out well for you!