My project utilizes many electronic components that I have not had a lot of working experience with.
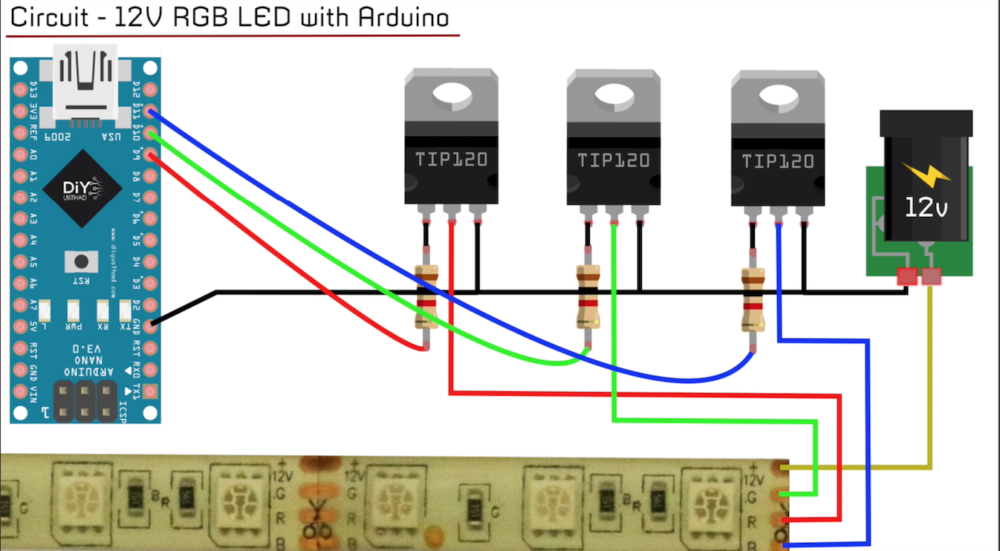
- My first constraint is in the LED lights that I am using. They require a 12 volt supply and this will require more circuitry than just an Arduino. This also means that I will need to some form of battery, which also means I need to design around the fact that this part of my project may be a little bulky. The following shows the type of circuit I would need to build.

2 .This leads to another constraint, which is my glow in the dark aesthetic, I want it to look modern and sleek. The LED’s I have chosen work well for this as they have a small volume, but the case I will need to make to house the Arduino and battery could be challenging.
3. Additionally, I am constrained to space, the snowboard has a certain perimeter and LED’s can only be cut in certain increments. This might take some finesse. Additionally, the wiring needs to be in a certain position so that the accelerometer is accurately tracking the motion of the board.
4. I am also constrained in the actual sensor itself, the accelerometer I plan to use is not very accurate, as it will not be used to actually acquire data I will be trading accuracy for cost. It only needs to be able to detect a range of speed/motion. Because of this, I may only be able to utilize a small handful of volt output ranges which will limit the colors available in the LED’s , most likely Red, Green, Blue, and Purple.
5. My last constraint is usability of the product. I need to be able to create this design while keeping everything waterproof and able to handle chaotic speeds and motions. I want this system to be stable even in a crash. This means I will need to secure all the parts of this design really well. This will constrain the way in which the housing is made and the way in which the lights are mounted.
Sources:
Featured Image: https://bgr.com/2020/01/30/led-strip-light-amazon-with-wifi-smart-plug/
Arduino Circuit: https://create.arduino.cc/projecthub/najad/12v-rgb-led-with-arduino-fb6c46


3 Comments. Leave new
Hey Austin,
I think that you have thought through this pretty well so far. I would say that your number 5 is very challenging. Keeping everything water proof will be a challenge but in the end I think that it will work out well!
On the topic of batter power, this project seems perfect for lithium ion battery cells! I have some 18650 cells, the battery packs, and the changing regulators sitting around my house if you want to do any work with those. Those cells only run at 3.7 volts but can kick out some decent current and wire in series in their battery packs. Let me know if you want any of these supplies for prototyping!
This is such a cool idea! My main concern would totally be making it waterproof and safe to use so I’m glad you included that as a constraint. What else do you need in addition to the Arduino and a battery? Perhaps whatever else you solder can be fitted into a sleek container that works with the design.
If I could recommend anything right now, I would say is to focus on getting the neopixels working as you want them with your electronics nicely tucked in a box that you can attach to your board. Once you have that it will be much easier to modify layout of the wires and sleekness of it all. All the waterproof and crashproof logistics will come more easily then too.
Best of luck!