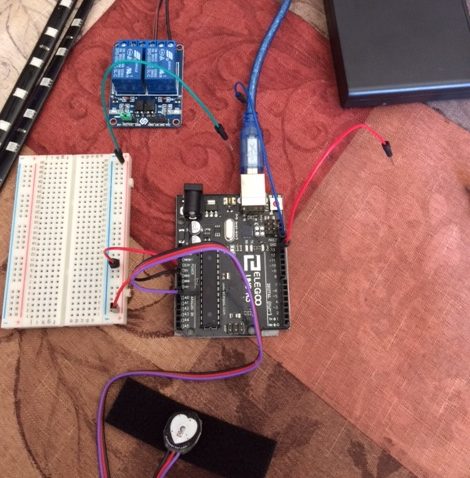
At this point, I have received all of the parts in the mail, and have started putting everything together.

- The step was to do quality control. I started by hooking up the Arduino UNO R3 and make sure I had proper connectivity. After properly configuring the simulated com port, I struggled to get a connection. Eventually, I figured out I just needed to unplug it, then plug it back in for the new connection setting to take effect.

- The 9V battery holder was not working, so I used a multimeter to inspect each connection. It looked like one of the battery holders was bent and had a loose connection.

- I’ve assembled the relays, heartrate monitor, and the arduino board together, and found a source code for the heart rate monitor from the manufacturer’s website.

- The following video shows the relay clicking and a status light flicking at the rate of my heartrate:
https://www.dropbox.com/s/gn0mf4k5v8ceoo6/Video%20Apr%2011%2C%2010%2048%2052%20PM.mov?dl=0 - I’ve cut a piece of plexiglass, which will encase things together.
- The next step is to hook up the LEDs and physically mount everything together. I anticipate this work will take half a day.


2 Comments. Leave new
I’ve found battery holders to be pretty cheap, and often have some loose connection somewhere. Electronics can be so temperamental! How will you fasten the pieces of plexiglass together?
Hey Shohei! Wow, this is awesome. I honestly would have never thought about constructing my own heart rate monitor. I’m curious about how you determined all of the materials you would need for this — did you just do some research on homemade heart rate monitors? Did you need extensive circuits knowledge to complete this? Plexiglass is what you have chosen to encase your components, but are you interested in trying to conceal any of them or would you rather all of the components be on display? I think it would be interesting, if not now then in the future, to enclose the majority of the device with something and expose only the LEDs. Your post is fairly descriptive of your assembly process and your disturbances (particularly with the battery holder). I feel like it would be useful to have an image or drawing of what you expect your final product to look like because I am a little unsure of what you are going for aesthetically at the moment. Great work!