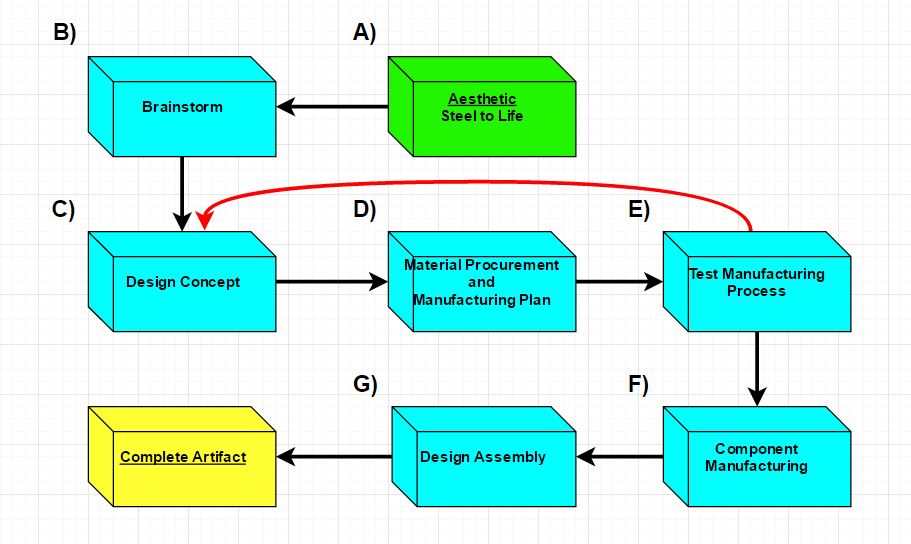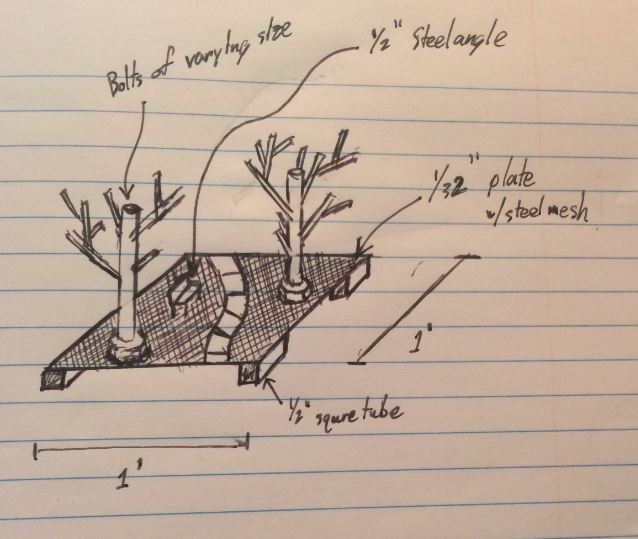
The beginning of my design loop for the Upcycle Project was the selection/creation of an aesthetic that I wanted to achieve, “Bringing Steel to Life” (Step A). I wanted to utilize this aesthetic by creating representations of living, organic things out of remnant steel, and so began to brainstorm possible representations that I could possibly manufacture (Step B). I decided on creating a tree out of shoulder bolts and carpentry nails (Step C). I had many loose bolts and nails at my house and planned to use a MAPP gas torch and braze the pieces to one another (Step D). I began grinding down carpentry nails to varying lengths using a table grinder and attempted to braze the pieces together. I held one piece with a pair of long pliers while the other was constrained in vice as I held the torch in my other hand. The brazing process proved to be to inefficient (not to mention uncomfortable) and so I determined that using my MIG welder would be the most effective method, but the scale of my artifact was too small for MIG welding to look clean/concise (Step E). If it came out looking like trash, it would have been the size of the piece, not my skill, to blame of course. I then decided to adjust my design to fit my process and so decided to make a much bigger artifact with bigger components and ultimately came up with the idea to do a park scene (Step C-2). I had remnant 1/32″ steel plate, 1/2″ angle, and 1/2″ steel tubing left over from component design last year that I determined would make a fitting base for my scene. I then went to ReSource and obtained bolts of various sizes (all large) for my new trees, some 1″ X 2″ X 1/32″ steel blanks for a sidewalk, and a steel mesh window screen to possibly create a differing texture that may be (probably not be) reminiscent of a grass-type appearance (Step D-2). I have started tacking some of the bolts together that make up the tree limbs, but have not gotten any further as far as manufacturing and assembly goes. The idea looks phenomenal in my mind, but boy is my confidence low as far as recreating it to look 1/10th as good. Here’s to hoping I surprise myself! The newly realized park scene can be scene in the image below.


3 Comments. Leave new
I think you have done a great job laying out your project, and you have really put a lot of thought into all aspects of the project. The design loop is well developed with iterations and a full proof plan. Great work!
I too like how articulated your design process is. It follows a very linear path, but does have room for looping back and changing the design. It great to see that during assembly of some of the components is where you made the changes in the manufacturing process. Cant wait to see what you final product is like!
It sounds like you have a very defined vision of what you would like your final product to be. I especially like your clearly articulated design process. I like how step E iterates back to step C. Why did you choose this point to iterate back? Would it be more reasonable to have other places where you are able to iterate and return back to a different stage if needed? What if you were not able to procure the correct materials from step D, you would then have to return to a previous step.
I am excited to see the final product!