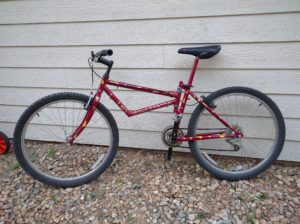
When I started this project, I knew immediately that I wanted to make a swing bike because I had admired them for the past 8 years when I first saw one. Since you can’t buy them, this project seemed like a good excuse to stop being lazy and actually make it! If you didn’t read the previous part of my report, a swing bike is a bike that swings. It has an extra pivot added to the seat tube so the back end pivots independently of the middle of the bike and the front. It really has no purpose but to add fun to the experience of riding a bike by allowing you to swerve, make super tight turns, etc.
The bike turned out pretty close to how I intended it, but not exactly. What happened is that I intended to improve the concept of a swing bike by adding stuff to it, but I ended up not adding them… because the concept was already good as is. For example, most swing bikes are single speed. I wanted to add gears to it, but due to the pivot in the back the cable routing would’ve had to be needlessly complicated. It adds friction to the system so it doesn’t shift as well, and since the stock cable guides on the frames I used are useless the extra housing and zip ties to secure them would’ve made the bike ugly. Additionally, the bike takes a lot more effort to ride than a normal bike, so it isn’t practical as a mode of transportation or for sport, the only scenario in which gears are needed.
I had also intended to make a locking mechanism for the seat pivot so you could lock it out when you don’t feel like swinging. I decided against that because why? Just ride another bike if you don’t feel like swinging around. The mechanism would also have ruined the bike’s aesthetics.
Public reaction turned out very well. Even though my painjob isn’t very high quality, people have commented on how it looks like it took a lot of CAD, machining, and manufacturing to get it done. It draws a lot of attention when I ride it around campus, with many people telling me it’s cool. By far the most common question I got was how does it ride and how long does it take to learn it. It’s more difficult to ride than a normal bike for sure, but it isn’t as hard as you might think. However, not many people want to actually try it out, which surprised me. It makes sense though since it’s harder to ride than a normal bike and people could perceive it as dangerous.
I learned from this project that nothing is what it seems. Every step took more time than I anticipated, and the ones that took the most time were the ones I expected to go the fastest. For example, machining and welding was relatively quick, probably because you have all of the machinery doing the work for you. Finishing the bike took by far the most time. I had to go over every inch of the bike with a wire wheel to strip the paint, and I screwed up my paintjob halfway through and had to paint over it and start again.
From the class, I learned that aesthetics are very deep and it’s more than just throwing a random color on something. There are so many different artistic movements, motives behind them, and even human tendencies that inspire them. Without the material I learned, I wouldn’t have ended up with the cool idea for a paintjob for my swing bike that I did.
There are a few things that I wish I did differently with my bike, although they all can be done after the semester is over. Since I’m going with a single speed design, I wish I had bought a specific kit to convert it to one without resorting to using the original triple chainring crank and gear cluster. It’d clean up the aesthetic even more. I intended my paintjob to be inspired by an aesthetic movement called Rayonism. It involves lots of triangles and streaky lines, which ended up being too difficult for my newbie spray painting skills, so I settled for a bunch of smaller triangles on a red background. Given more time and skill, I would implement the Rayonism theme next time.
I don’t know what I intend to do with my swing bike now. I am an avid cyclist, but have four other bikes vying for my attention that are way more functional if a bit less novel. For now, I plan to keep it and see how much I can ride it, since not many people want anything to have to do with a bike that’s harder to ride than it needs to be. It’s been a good project and good experience, so I intend to have as much fun as I can with it!
I’ll edit the post with a video of me riding it when I’m able to record one!

1 Comment. Leave new
I actually really like the subtle Rayonism aesthetic you’ve got going now, the red and gold/yellowish colors you chose complement the design without overwhelming it. I’m glad you got to take a welding class as well, you did a very clean and professional job with the assembly on your final product. I enjoyed hearing about your design process, and the practice you did on other bike pieces. I wish I was brave enough to try riding the bike, I’m sure you will have fun with it in your collection. It was great getting to work with you this semester, good luck for the future!