For my final project, I wanted to make a piece that could transform into something unexpected. I wanted to create something that people would never know what it actually was or what it could do until they saw the transformation and interacted with it. After looking online for some project ideas, I came across the infinity mirror. People have made many variations of the infinity mirror to include a beer pong table, a coffee table, a mirror with pieces in the middle that also produced the infinity effect, and just the regular infinity mirror in a standard frame. I loved all the creative ideas I found and also loved how the mirrors were still emerging and not overproduced. Before I could start I wanted to come up with a new infinity mirror design that had not been done before or that I could improve upon. This is when my team mate Sreyas recommended the clock approach. He liked the idea how the two concepts played together with how time is infinite and so was the mirror in this case. While it is a bit cheesy I still loved that theme and really liked how creative it was and the huge range of possibilities that came with it. After that, I explored the internet for some more ideas and walked around various stores like Michaels and McGuckin’s Hardware for things that I could incorporate in my design. After a few sporadic purchases I was able to decide on a preliminary design.
When it comes to a project that has a more artistic approach than engineering, I like to avoid over-planning and over-designing. I love having flexibility in my design and being able just play with the actual pieces rather than only conceptualize it through CAD before assembling. Fortunately, the majority of my project allowed me this creative freedom and flexibility in the design process which helped me make the best design decisions in the moment based on the desired aesthetic and the feasibility of creating that desired aesthetic. I was able to bounce ideas off my friends and roommates by showing them what each option looked like in person rather than how it looked in a CAD model. This process worked really well for me and allowed me to tinker with the design much like people like to do with their cars. I was able to maintain focus and flexibility in design using this approach.
Using this design approach, I was able to start my design. From the digging I did on the internet, I found a clock I wanted to purchase that I could rip apart and start designing from there. The clock I went with was a $25 clock from target with a glass front that I could use for the second mirror. After carefully disassembling the frame of the clock, I examined the clock face and figured out what my options and limitations were with this clock. Fortunately, I was able to remove the numbers on the clock without breaking them or the clock face which allowed me the ability to reuse them. The next step was figuring out if I could remove the clock hands without destroying the mechanical system. With some help from another Mechanical Engineering friend, Vincent Staverosky, I was able to remove the clock hands from the face while keeping the mechanical system intact and still be able to put humpty dumpty back together again. With all the key components removed I began stripping the patterned cardstock from the clock face to give me a clean face to work with. Once everything was gone and the face was cleaned, I was able to see exactly what my options were and start figuring out the design more in depth. The biggest challenge I saw was getting a mirror onto this round clock face that had to have at least one hole in the middle for the clock hands. Another factor I had to consider was how I was going to feed the wires from the LED strip through the other side, which meant drilling another hole in the face but also being able to hide that hole. After much consideration I decided the best option that would meet the necessary design requirements was to use mylar film for both mirror faces. This way I could get the perfect size with the necessary holes and make a small slit in the film to feed the wires through. After applying the film to the face, I found that while the film was not as reflective as an actual mirror, it would still work and produce the desired aesthetic while working around the limitations of the clock face.
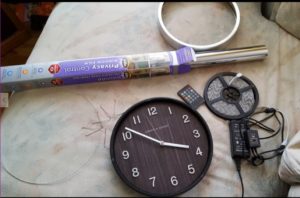
After applying the film to the clock face and the glass face, I started playing with how I wanted to arrange the numbers and incorporating other mirrors into the clock face. That was where the opinions and ideas of my friends and roommates came in clutch. They helped me decide on the final design I decided to incorporate.
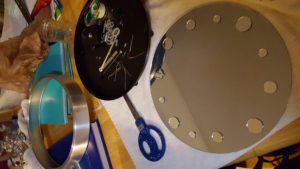
After adhering the little round mirrors to the clock I wanted to also place the numbers back on the face on top of the mirrors. I had the numbers all lined up and ready to start gluing when I realized I couldn’t find the number 4. I searched my entire house and could not find the number 4 anywhere. So I ended up just laying out the 12, 3, 6, and 9 and loved how that looked much more than having all the numbers or having no numbers. With that, I attached the numbers to the face in the appropriate locations.
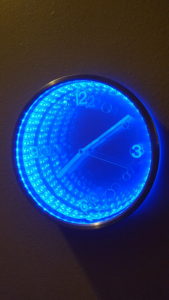
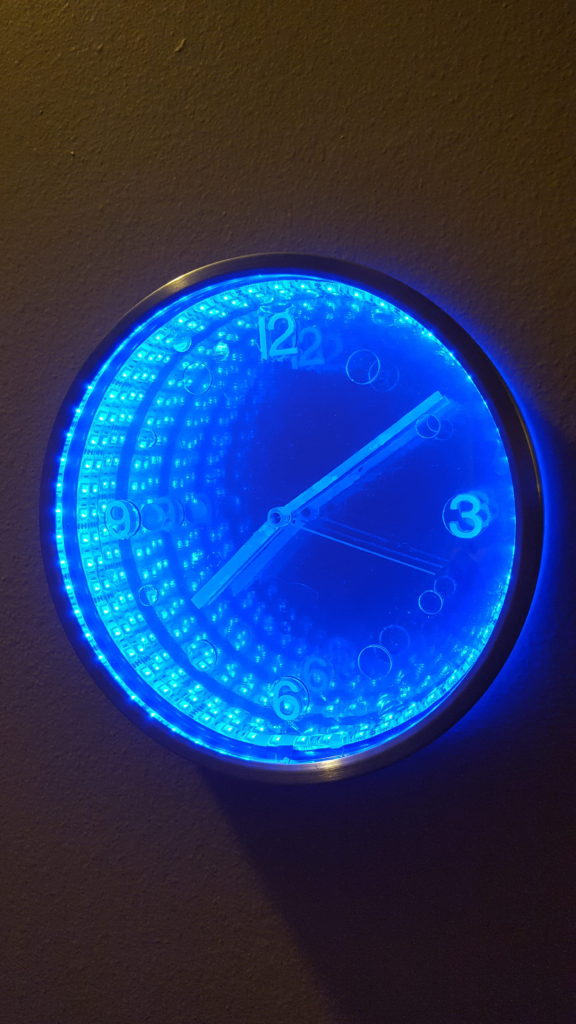
Next was figuring out the layout of the LED strip. The only limitation with this strip is that you can only cut them after every 3 LEDs. Of course I would run into that problem so I had to decide if I wanted to cut the strip short, or have access. Both would cause an imperfection in the infinity effect but I figured a hole in the infinity strip would be much worse than a slight bump. After adhering the single strip around the inner frame of the clock face I decided I wanted to use the rest of the lights in the roll and layer them if possible. With that, I added padding to the inside of the clock frame and adhered another layer of lights that stuck out far enough to interact with the infinity effect. From all my preliminary research I found that additional layers of LED lights helps create the illusion of a deeper infinity mirror, the only setback is that if you add too many layers, the frame has to be deeper which defeats the purpose of the infinity mirror, which is to be a thin as possible but add this impossible depth. So I decided adding a second layer would still work with the design and after adding it I tested it out to confirm my decision. The second layer definitely helped add more depth to the infinity effect and since my clock frame was already that deep, it didn’t add any unnecessary physical thickness to the design. After these two layers I still had enough of the LED strip left to do something with. So I decided to create a ring around the back in order to produce back lighting that would reflect off the wall in a way that really highlights the physical depth of the clock in comparison of the perceived depth created by the lights. Using a 3 in 1 adaptor I was able to connect all three separate LED strips to run off the same power source and run in unison.
To provide a bit more background on the LED strip, it was a roll of multicolored lights that are remotely controlled. The best part of the lights I purchased is that they have a music sensor and you can set the lights to react to music. All this came for $31 off Amazon for a 16.4ft strip including the music sensor, remote controller, and the power adaptor.
Once all the lights were in place I reassembled the clock face back into the main frame to see what I had so far. The lights responded wonderfully to the music when I had it at that setting and everything was working wonderfully. I took some videos of the clock and sent them to friends to see what they thought. One of my friends mentioned how it would be so much more amazing if I could get it to run completely on battery power hidden behind the clock rather than have all the wiring and cords hanging out from the bottom. I definitely agreed and started planning for how I was going to accomplish this.
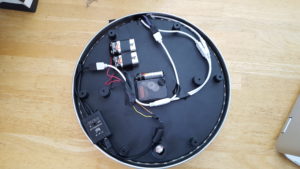
Conveniently enough in class the next week, we had a guest speaker talk to us about some designs and design sites out there and one of the examples was a student who made a video game inspired sword that was lit up by the same LED strip I used. This student also wanted his to run on battery power and found that two 9V batteries worked well enough to power his sword. With that, I began working on the electrical system and assembled the clock to work on two 9V batteries. The only issue with running solely on battery power is that as the batteries die, the lights become fainter and less colors can be produced (white especially because it requires all the LEDs to be lit up as bright as possible). Even without having the LED strip on the batteries were draining fast. After discovering this, I purchased another pack of 9V batteries and created a hard switch that prevents them from draining when the LEDs are off.
INSERT PICTURE OF BACK OF CLOCK
Now that the clock functions in the desired way, the biggest obstacle is now being able to see that it is a clock when the LEDs are not illuminating the clock. When the lights are off it was really hard to tell that it was even a clock at all. It just looked like a small round mirror that had something going on behind the glass but it was really difficult to tell what that was. So after further internet browsing and adventures at craft stores, I decided on purchasing a glow powder that I could adhere to the clock hands and numbers using epoxy. The glow powder I purchased was $8 for ¼ ounce and can glow for up to 12+ hours after prolonged exposure to light. After applying this powder to the hands and numbers and leaving in light, the powder works perfectly to show that it is indeed a clock. A few setbacks occur when the clock is not exposed in bright light to activate the powder or if it is exposed to too much light such that it cannot be seen as well since it is not in a dark enough environment.
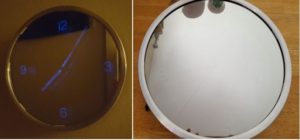
This final component still has room for improvement but when it works, it is beautiful and works amazingly well. Overall, the intended environment this clock would be in would be at parties or at night when the infinity effect would really stand out from the environment.
As far as budget goes vs. the actual cost, I was looking at spending roughly $100 on this project. Unfortunately that was not quite the case. Below is the expense breakdown:
Clock – $25.00
Mylar film – $32.16
LED strips – $52.98
LED adaptor – $6.49
Small round mirrors – $3.99
9V Batteries – $13.49
Glow Powder – $7.98
Epoxy – $3.99
Electric tape – $2.99
White tape – $2.99
9V Battery leads – $2.79
Wires – Free!
Hard Switch – Free!
Total: $151.86
I anticipated a possible additional $10-$15 on top of the $100 but not another $50. Unfortunately I did not anticipate the many smaller expenses necessary to operate the mirror and have it run on battery power. Even though I never would have spent $152 on a light up clock mirror from a store, I love what I was able to create! At this point it’s more of a piece of art than it is a functional clock or mirror. Just like if you paint something it’s going to cost you $50+ depending on the paint you chose to buy, the canvas, the brushes, and all the other additional costs plus the hours of labor creating it, but if you bought the exact same thing you painted for $10 it obviously wouldn’t be the same. There is no story, nothing to get excited about, nothing that adds meaning to the piece. For my infinity mirror clock, I can tell everyone who sees it exactly how it works, why it works, and how to make one. If I just bought it people would be more amazed with how much I spent on it rather than be more amazed with how it works and the effect it creates.
Overall, I am very very happy with how this turned out. While it is not 100% perfect, it is something I plan on having for the rest of my life and hanging anywhere in my house. I love how it transforms into an impossible depth and how I can make it even more interactive just by playing music. I definitely plan on making more infinity mirror projects and using the knowledge and experience from this project to help me create something even more exciting!

3 Comments. Leave new
This project turned out really well and I think it is cool how your design process worked and how much you got out of the blog posts. It is really interesting how it is so unassuming when it is turned off, but how neat an effect it has when it is turned on and hooked up with the music. Great work!
As Thomas pointed out, I think you made an excellent discovery about DIY projects. Unlike in product design, it’s rarely about the bottom line ($$), it’s about the process and the journey. I hope you never lose that spirit because I think that the journey and lessons learned along the way are what excite me most about being an engineer!
As for the actual clock, it turned out awesome! The glow powder definitely did the trick. The next obvious step would be to find a way to use a single power source for all the electronics, but that was out of scope for this semester anyways. Great job Rachel! Let’s definitely keep in touch about our DIY projects in the future!
I agree with your observation about price and value of a DIY project. In addition to having the object that you created your self, the process itself is enjoyable because you of everything that you learn along the way. In the future it would be really cool to create an infinity mirror piece using an addressable LED strip, so each LED could be a different color. If you were feeling adventurous, you could add a micro controller so that you could program any patterns that you want (like Apple-style pulsing, color spirals, fading). Since LEDs pull a significant amount of current, I imagine that replacing the batteries so often will get expensive and annoying. You could look into purchasing a LiPo battery. They are rechargeable, and have a significantly larger capacity https://www.sparkfun.com/products/8483. You could also get a battery that you could recharge from your computer or phone charger like https://www.sparkfun.com/products/11358 .