I have finally completed my wind turbine! After multiple iterations, much troubleshooting, and plenty of trips to McGuckins, it came together quite well. As with any design process, I ran into a multitude of issues that set me back a bit, but each one taught me valuable lessons about the turbine. The process of creating the turbine was actually very entertaining and satisfying, and I wouldn’t have thought that I could create such a useful machine with such basic materials. Just like with my Upcycle project, I have gone with the theme of using very basic materials and manufacturing methods. I did this for two reasons. First, this project costs a pretty good amount using basic materials, and if I were to try to create something more sleek and refined, it would have run my budget too high. Second, I like being able to share this fun design with other people, so they can run to a hardware store and create one themselves. Below is a picture of the turbine as it currently stands.
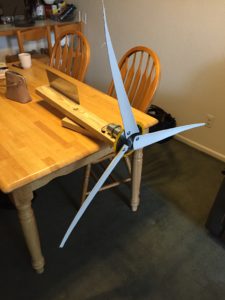
Wind Turbine on Kitchen Table
Although this turbine functions properly and fulfills its practical purpose, there are plenty of changes I would like to make to the design if I had more time. But before going into the future iterations I would like to make, I will take you through my design process.
I started off with pretty basic materials. These included 4″ thin walled PVC piping, a saw blade, U-bolt, 4′ 2×4, sand paper, aluminum plate, handsaw, low rpm motor, plenty of fasteners, epoxy, two sided female threaded shaft, and a Lazy Susan ball bearing.
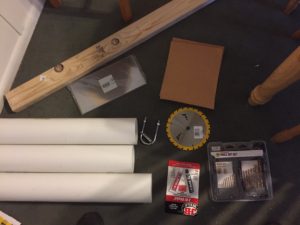
Initial Materials
The first step I took in creating this turbine was drawing out lines on the PVC piping to outline the blades. I did this by marking the top, bottom, and both sides of the pipe, and then drawing lines down the length of the pipe all the way to the other end. Once I had these lines drawn accurately, I connected the end of each line with the end of the line below it to create the wing shape (see image below). This simple method actually creates a very robust blade design for a DIY turbine. The lines seem a little bit squiggly which is due to the fact that I used a string to create the curved line and trace it out.
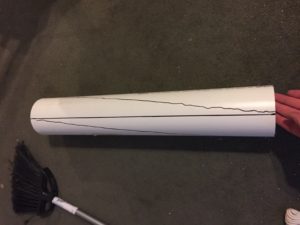
Creating Blade Lines to Cut Out Later
Once I had the PVC pipes mapped out like above, I moved on to the U-bolt. I needed something to hold the motor to the 2×4 and the U-bolt seemed like a perfect fit, given the curved shape of the top of the motor. I drilled two holes through my 2×4 and mounted the motor onto the edge of the wood. The U-bolt holds the motor perfectly in place and allows for easy removal of the motor if need be.

Motor Mounted Using U-bolt
Next, I installed the wind vane onto the 2×4. This vane allows the turbine to rotate towards the wind in order to take advantage of wind from any direction. Wind vanes come in many different shapes and sizes, but a flat rectangular plate does the job just fine. McGuckins had plenty of these and their staff pointed me towards one that works for my size turbine. In order to install the wind vane on the 2×4, I simply drilled 4 holes through the plate and then screwed it into the thin side of the 2×4. At first I tried to center it perfectly on the back of the 2×4, but then I realized that it will be just as effective if it is mounted to the side of the wood, which makes it much easier to install
.
Wind Vane Mounted on Side of 2×4
Up next, I decided to mount the Lazy Susan ball bearing to the bottom of the 2×4, so the turbine will be able to rotate towards the wind on whatever surface it is mounted. The bearing I found is very easy to install, with 4 holes already drilled through the corners. This bearing is also incredibly smooth and will not impede the structure from turning into various directions. I screwed the Lazy Susan into another 2×4 for presentation purposes.
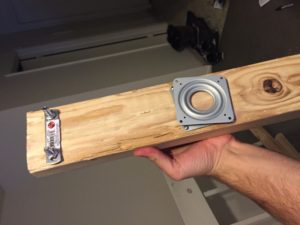
Lazy Susan Mounted onto 2×4

Side Angle of Ball Bearing in Lazy Susan
Next, I needed to cut out the blades from the PVC pipe I had previously labeled. I first tried using a hack saw that I bough from McGuckins, which only led to me creating a massive mess in my apartment and making no progress on the blade. I then ran back to McGuckins to purchase a smaller saw that hopefully would prove more useful (according to the McGuckins staff). This was also a failure, as the saw blade bent sideways after about two minutes of use. I decided to head to the ITLL to use the resources available to me. It turns out that the hand saws in the pretotyping room work perfectly well for cutting PVC, and I cut all three blades out in about an hour (also creating a massive mess). Since I was using basic tools to cut the PVC, the blades don’t look incredibly aerodynamic or smooth, but they do function just fine.
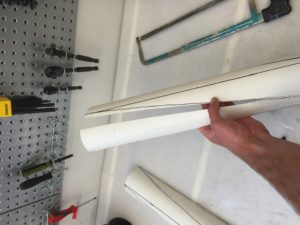
Cutting Blades in the Pretotying Room
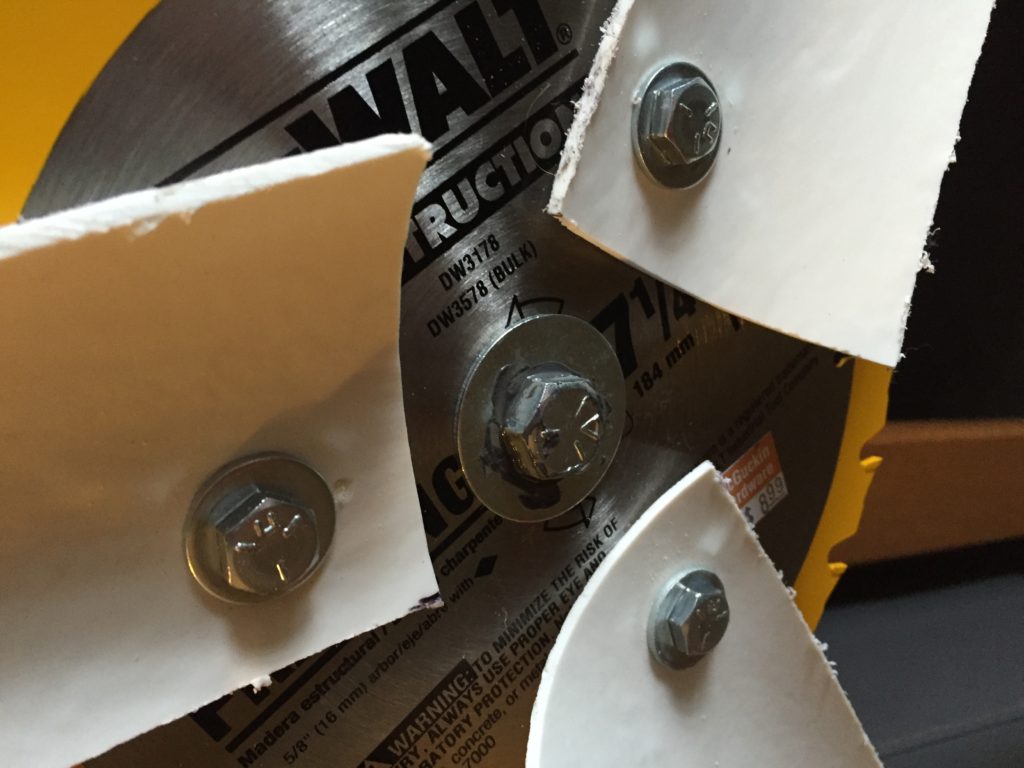
The last step in building the turbine is figuring out how to mount the blades to the saw blade, and the saw blade to the motor shaft. I was initially considering some complex designs that ended up being too costly, so I decided to head to McGuckins to see what I could fine. The motor I purchased doesn’t have a keyed shaft or any threads, so I had to get pretty creative with how I approached this portion. Luckily, I found a double sided female shaft that was pretty close to the 8mm diameter of the motor shaft. It also press fit perfectly through the saw blade center hole, so it appeared that I found my solution. Since I don’t plan on taking this turbine apart anytime soon, I decided on applying epoxy to the motor shaft and front nut in order to avoid buying more parts or machining anything on my own. I also got lucky with the saw blade that I purchased. I originally thought I was going to have to use a drill press to drill holes for the blades to fasten to, but the saw blade that I found already had three perfectly sized holes 120 degrees apart from each other, which saved me plenty of time.
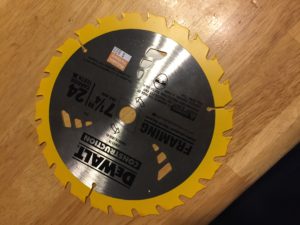
Saw Blade With Pre-Drilled Holes
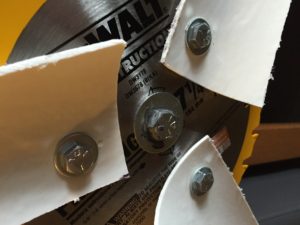
Final Product with Epoxy in the Center
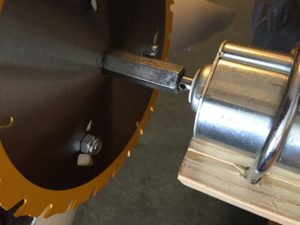
Shaft Set Up Before Applying Epoxy
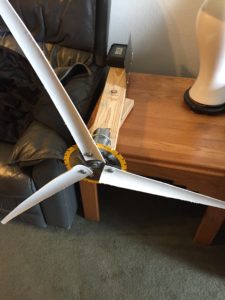
Wind Turbine as it Currently Stands
My original budget for this project during the design review was $120-150. I ended up spending about $170 on the final project. The reason it was so high is because I needed to purchase a new hand drill for personal use anyway. I ended up spending about $60 on the hand drill, so the project really only cost me about $110. Below is a general cost breakdown of the major components or tools that I purchased.
Mini Hacksaw (ended up being useless) – $8
Swivel Bearing – $3.50
8′ 2×4 Wood – $8
Drill Bit Set – $15
Hand Drill – $60
Another Hacksaw (also useless)- $7
Saw Blade – $9
Steel Sheet – $6
Sandpaper $2
Cobalt Drill Bit – $6
PVC Piping – $18
Fasteners and Other Small Things ~ $30
$174 total
While this is more than I hoped I would end up spending on this project, I have learned a good amount about wind turbines and I found the overall experience very beneficial. There are many aesthetic changes I would like to make to this design, and if I had more time and money I would definitely follow through with these changes. I will touch more on those in next week’s blog. I hope you enjoyed reading about my fabrication process and stop by the expo to check out the turbine!

1 Comment. Leave new
Chris, I was impressed with how well you were able to close out your project, especially from a functional standpoint. I can only imagine that getting all of the pieces cut out, put togther and working for a wind turbine can be hard enough, let alone adding an aesthetic to it. You should definitely follow through on getting a housing on there and cleaning up the edges of the blades to give the turbine a more sleek look. I think it would be cool to paint it black or metallic to give it a more futuristic and sleek look than most modern wind turbines.