My levitation audio visualizer is off to a good start. I have created a detailed BOM for the build, and I have ordered/received the parts required to prototype and functionally development one column. The remaining items to be purchased are only the ones that will be needed during the assembly of the final unit. As things are still in flux, I don’t want to order anything that isn’t yet needed in case anything changes between now and then.
After receiving most of the key parts from Amazon and Sparkfun on Friday, I spend this weekending getting them hooked up. A wild goose chase around Boulder later, I also managed to find some cheap clear tubes at McGuckins. I thought that the tubes that I had in mind were used for shipping, but after explaining it to a helpful employee, I found out that they are actually used to protect florescent bulbs. After figuring out what they were called and buying a 4ft tube for prototyping, I found that Home Depot sells 8ft versions for $5 a piece. Now that I know this is an option, I am considering making my visualizer 8ft tall (I was initially envisioning that this thing would only be around 2ft tall).
Below are some videos that I took during prototyping:
Testing Ball Raising/Lowering Speed
PID Closed Loop Control With IR Sensor
During prototyping, I learned that it is not possible to “levitate” a ball inside of a tube by just turning on a fan. If the fan is too low, the ball will not raise. However, if the fan is tuned up, the ball will rise to the top. In order to have the ball suspended in the tube, you must have a bigger or perforated tube that allows the pressure to drop proportional to height up the tube. To overcome this, I implemented a PID control loop to dynamically adjust the fan speed. I then found that IR sensors do not output a linear distance relationship, and are really only good at measuring up to 30in. I have since ordered some ultrasonic range finders, and I hope that they will be better suited to measure the location of the ball inside the tube. Since I need to be able to read so many sensors at once, and there are not enough available pins on the Arduino Pro Mini, I am planning on using an analog multiplexer. I have ordered a package of 74HC4051 on ebay, and I will test to see if this is feasible after I receive them. I also need to get some buck converters in order to test the high power RGB LEDs.
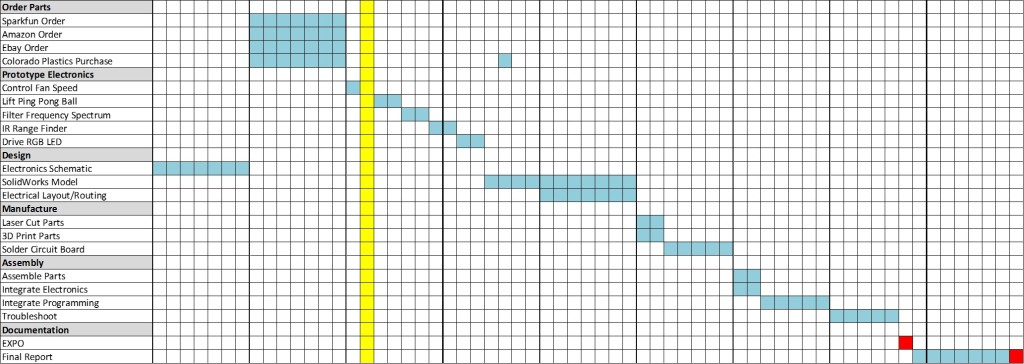
Below is a graphic version of my schedule, which details the sub tasks of each project stage. The yellow column tracks the current day, while the red squares represent deliverable dates.


5 Comments. Leave new
Good to see your initial planning and fabrication. It seems you have an effective approach to troubleshooting the electronics. As your project is technically complex, I do not have much in the way of advice but would encourage you to keep working through your difficulties so that you achieve a great aesthetic. I wonder what effect the length of tubes and size of balls will have on the final aesthetic with respect to your audio visualization inspiration…
I am impressed with your design idea and the detail of your planning. It seems like a challenging undertaking, though you have been able to trouble shoot most of the issues that seem most likely, This will be visually stunning when you pull it off. Best of luck.
From the videos, it looks like this is turning out great! The floating ball effect is really fun to watch – I can start to imagine several orchestrated together. I suppose this would work with any kind of music, but I keep imagining it with classical. Go big! Now that you found 8 foot tubes, I would love to see this thing be huge. Going big can only help create a fun user experience. (That is of course if the 8 ft tubes work as well as the 4 footers). It’s great to see the level of complexity you are going through to achieve a seemingly simple effect like hovering the ball. Awesome work!
Your project sounds sweet, but I’m probably just as impressed by the level of detail in your schedule. I wish I could think more like that.
It sounds like this is slightly more complicated than you anticipated (it’s more complicated than I thought at least). Good job troubleshooting and sticking with it to get the ball to hover, it looks like you’ve overcome that hurdle actually…I think the ultrasonic range finder will work too, although when you put a bunch of them next to each other I worry about interference…you may need some kind of dividers or something. I’m also curious how the final product will turn out in terms of response time. The balls respond to relatively weak forces (blower or gravity), and so they accelerate kind of slowly. In contrast, visualizers can “spike” so to speak really quickly in response to the music input. Will this just look like a slower version of that, or are you planning to program it a little differently?